

First Ride: Pirelli Scorpion Enduro Tyres
Pirelli is a company with massive involvement in just about every competition that involves tyres. The Italian brand makes the only tyre used in F1 and Superbike, and supplies teams competing in WRC rallies, MotoCross, and over 350 other competitions world-wide.
With a pedigree that also includes a history as the top quality maker of racing tyres for roadies, Pirelli re-entered the cycle sport world in 2017. Starting with road race tyres, the company now has a big range of mountain bike tyres, with XC and Trail already in the bag, Enduro ready to go, and Downhill coming in 2021.
A factor that sets Pirelli apart, is their method of product development. Over 2000 people are employed in R&D, and the way they are organised is interesting. The departments working in the different facets of tyre development, work on that aspect of the entire Pirelli range - for example, the chemistry of the rubber on a tyre designed for mountain biking draws on the knowledge of a team who share data from the chemistry used in every application the company works on. In developing their bike tyres, the designers were not constrained by cost, because compared to a car tyre the materials used makes up a smaller part of the overall cost of the product. The design teams could go all out in perfecting their products, and the way the mountain bike tyres are designed is a testament to that approach.
The challenges in creating a mountain bike tyre are generally met with compromise. Light weight is set against durability, and so is the grip factor of the rubber used. Knobs must be tall enough to do their job for the category they are aimed at, and strong enough to resist tearing off or wearing down too fast.
Some companies build a tyre using a hard, strong rubber, coated with a layer of softer compound for maximum adhesion. That results in a tyre that will perform well when new, but once that soft compound is gone the tyre is less than ideal. Other companies push that compromise onto the consumer (that is us). They offer a variety of compounds and leave us to decide whether we want grip or durability. Pirelli use the deep knowledge they have of chemistry to produce rubber compounds which are structurally strong, have optimal surface grip, and will retain the grip performance as the tyre wears.
Pirelli mountain bike tyres are organised in the same way across the entire range - with a letter and colour code to describe their intended application, following the logic used in Motocross:
H in Red means hardpack - small low knobs, designed for speed in the dry.
M in Yellow means mixed terrain - a bit more open, and some more depth to the tread pattern.
S in Blue is designed for soft conditions - a loose surface, or wet conditions, tyre.
R in Green is a rear specific tyre.
There are XC, Trail, Enduro and e-Bike ranges in the usual variety of sizes.
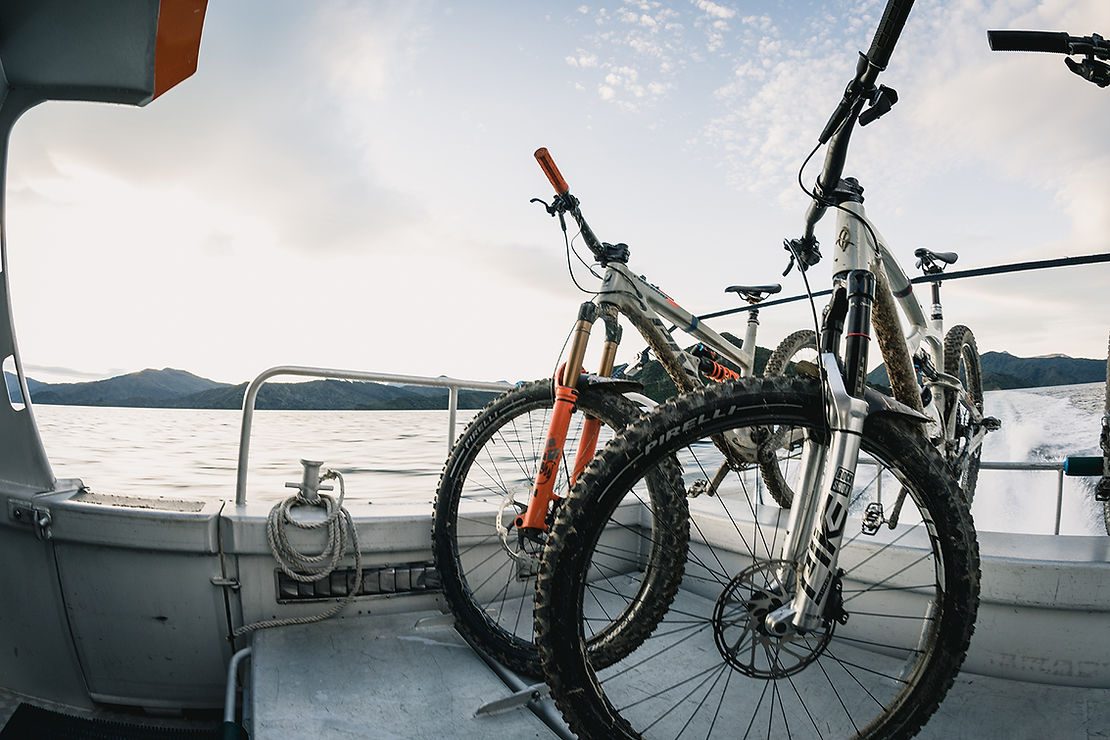
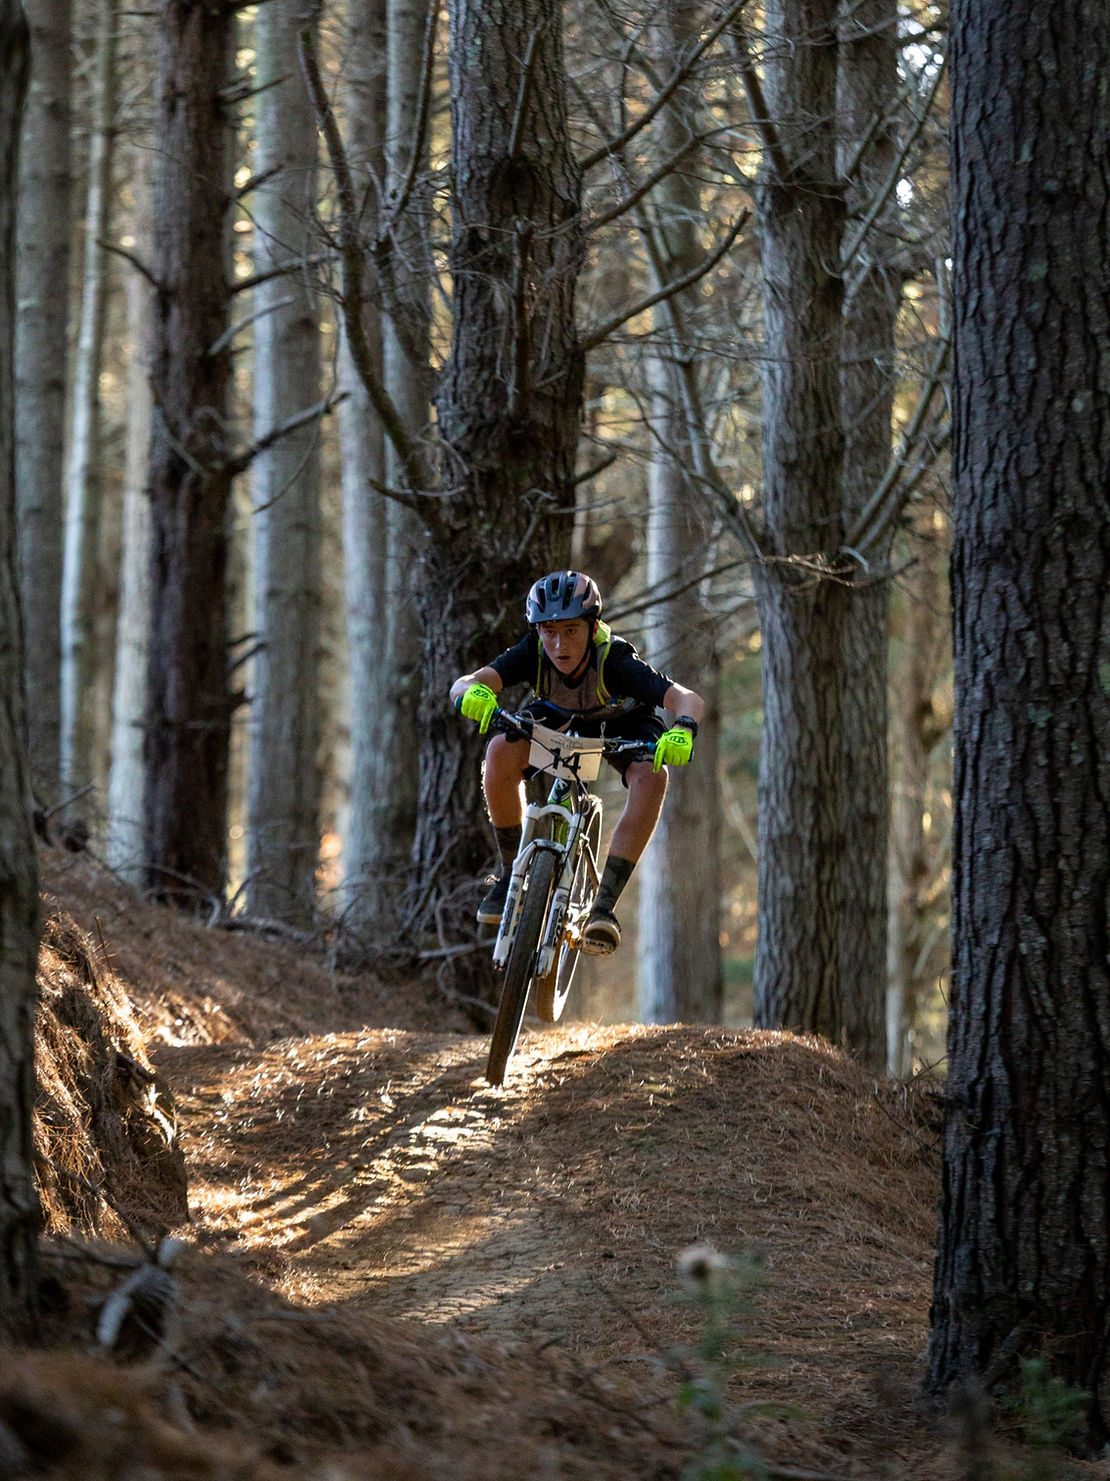
The first pair I got to sample were from the upcoming Enduro range, mounted on my Trek Fuel EX, a 29er. At 2.6” width, with very solid sidewalls, they are not lightweights, with a heft of 1140g per tyre. The front tyre was the S model, designed for loose conditions, with a very open tread pattern. The rear tyre (with a Green R!) has a mostly rectangular block tread pattern, with alternating wide and narrower blocks down the centre and two rows of very widely spaced knobs on the edges. The knobs on the outside edge are sculpted with several levels and notches, as well as small grooves across the face of all the knobs. Tubeless setup was fairly easy, they were a snug fit but once mounted they beaded quickly.
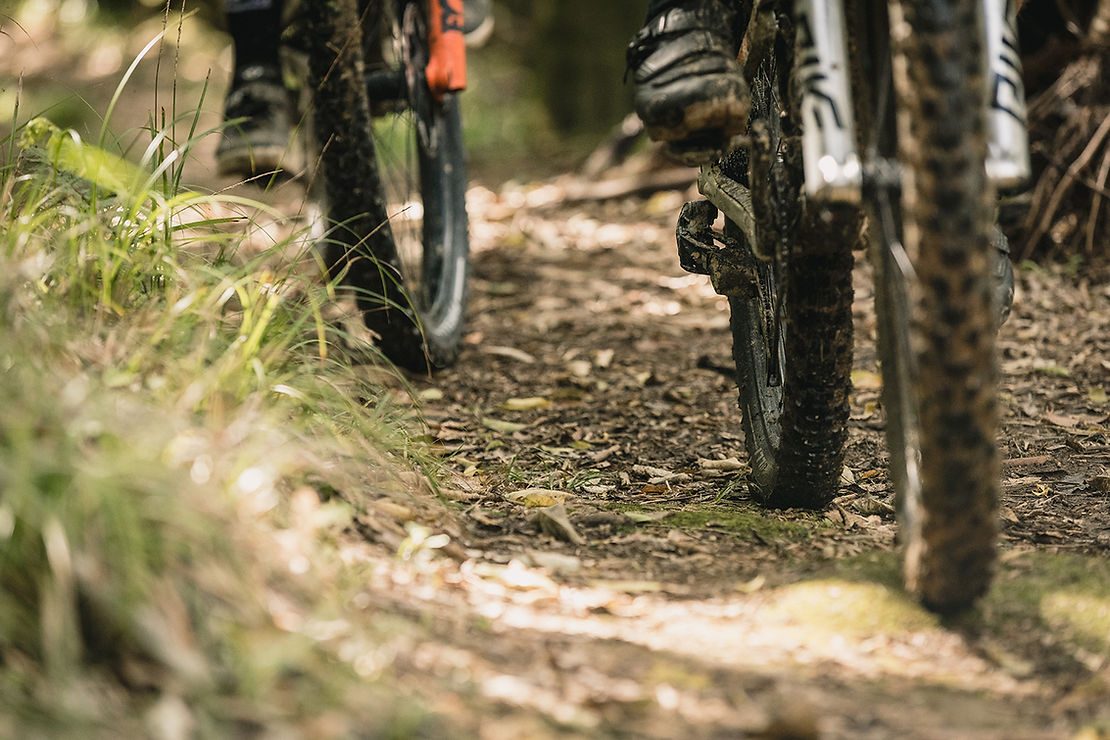
My first ride was on the day after a spell of rain, so I went looking for slippery roots and wet dirt. Initial impressions were based on the view over the bars: the Pirellis have a very round shouldered profile. They rolled better than I expected, and they didn’t seem to take any more effort than what I was used to on our way to the jungle at the top of the forest. The tyres had 23psi when we rolled out of Ride Central, and on the squeeze test they felt way too hard. I didn’t adjust them until we got to the top of the climb, where I dropped them to about 20psi – but they still felt over-inflated to the thumb. We took a lap down Tihi-O-Tawa in the native forest - a fairly natural trail of just over a kilometre, which drops 140 metres over that distance. It feels like half the trail is off-camber roots, and the best way to tackle them is to stay high. When the roots are wet and your rubber is carrying some mud, that isn’t always easy. I was happily surprised by the way the Pirellis handled things. The front end didn’t flinch, the bike heading straight where I pointed it. Any deviation was my fault. By halfway down I was feeling pretty confident, and the biggest root tangle was successfully navigated, delivering me to the small shelf I was hoping to get to, avoiding a slither into the quagmire that is the low-line on the trail. I ducked out of the trail and headed back up the hill, to take a run through the glorious Tuhoto Ariki, three kilometres or so of similar country, with a decent climb in the middle. The climb has a few sections that require your rubber to provide a firm grasp of the planet. Once again, no worries at all. I couldn’t get the rear tyre to let go.
Read Part 2 here.
Pirelli Store Locater is here
Words: Gary Sullivan
Images: Cameron Mackenzie
Trail Builder: Power of One
What started as a one-woman initiative six years ago has gained a life of its own in the form of recent Trail Fund recipient, Raglan Mountain Biking Club – a 60-strong crew that’s since developed its own local network.
“I’m not saying it was easy,” says club treasurer Dirk De Ruysscher, who has been involved since the beginning. “It was definitely a long process, but we’ve gotten to the point where we have some local options and we plan to continue growing.”
While the club was in discussions with Waikato District Council about acquiring some land to build on, the crew made up for the lack of local tracks with trips to Taupo, Rotorua and Te Miro, near Hamilton.
Dirk says it was a great way to start building a mountain bike community in Raglan, and to avoid losing momentum while the consent process was underway.
“After four years, we came to an agreement with the council for the club to lease a section of Wainui Reserve, a 140-hectare farm park giving access to Ngarunui Beach,” says Dirk. “As soon as the papers were signed, we were fundraising non-stop. Within a year, we’d commissioned Empire of Dirt to build a 6km loop network, spread over eight different trails.”
While 80% of the trails are Grade 3, there is one shorter and easier kids’ loop, as well a few grade 4, and a narrow but steep Grade 5 option.
Building Appetite
What might seem short and sweet to some is the perfect fuel for the mountain biking fire in Raglan, which faces the challenges of a fairly transient population and limited available terrain.
“Basically, what this small network has done is given us trails to call our own, and that in itself has helped pique interest in mountain biking and given people a solid reason to join the club – which supports our goal of building a larger trail network,” says Dirk.
In exchange for the lease, the club is committed to maintaining the network. It hosts maintenance working bees a few times a year, and in between Dirk enjoys tidying up the trails.
“We have enough people to volunteer, but we didn’t have the right tools, so we applied to Trail Fund for funding to purchase two wheelbarrows and a weedeater to help with maintenance. It’s the first time we’ve applied to Trail Fund and we were thrilled to be successful in our application.”
With the new equipment, Dirk and a crew of volunteers were able to extend Grade 4 trail Tin Man Goes Down, and undertake maintenance on the entrance trail, which requires a lot of maintenance as it leads to a number of trails and is co-shared by horse riders.
To help drive more interest in the park, and generate more membership revenue for tools going forward, the club held an inaugural mountain bike race – The Twilight Challenge – in the park, earlier this year.
“We had a great turnout and everyone really enjoyed the trails, so we’re planning to make it an annual event,” says Dirk.
Nothing Happens Overnight
For others who feel stuck in a consenting process with their local government bodies, Dirk recommends persistence and patience.
“There were times when it felt like we were getting nowhere, which can be very frustrating, especially as a volunteer, but it was worth it in the end,” says Dirk. “It also helps to have a cycling-minded council person on your side, so make sure your members realise the influence local elections can have.”
Words: Meagan Robertson
Images: Ken Hansen
News: The all-new Stumpjumper
Short-travel trail bikes have long cornered the market on lightweight and snappy climbing, but also often fall short when it comes to suspension performance and big terrain capability. The new Stumpjumper tears up that old script — we’ve never made an all-round trail bike this light, efficient, AND capable. The new Stumpy brings a telepathic, magic carpet quality to your ride. It’s planted and weightless at the same time. Stable, yet nimble.
To make the Stumpy the ultimate singletrack flow finder, we combined the lightweight, efficient DNA from our Epic EVO with the benchmark handling and capability of the Stumpjumper EVO. The result is a well-balanced performer that climbs and accelerates like it has a motor, descends with conviction, and flat out tears through every conceivable trail condition.
Enjoy.
THE BACKBONE OF THE RIDE
The frame is the backbone of the bike. It’s the origin of control and efficiency and is the centerpiece of any serious weight saving effort. Ready to build with all the fixin’s*, an S-4 Stumpjumper chassis is 2,240 grams; that’s damn light! Over 100 grams lighter than the previous Stumpjumper chassis.
To get to this weight — while improving handling characteristics, pedalling efficiency, and toughness — required the development team to pull out all the stops. The process started with frame shape, proceeded to composite selection, and finished with hundreds of iterations to optimize the layup.
*Including paint, shock, all assembly hardware, link, carbon extension, molded downtube and chainstay protectors, axle, and seat clamp.
HEY LAZY CARBON, BEAT IT!
The shape of a composite frame determines the vast majority of that frame’s weight, stiffness, and durability. After crunching countless Finite Element Analysis calculations, our engineers optimized the dimensions and radii of the Stumpy’s frame tubes and their intersections, eliminating “lazy” material that would otherwise hide in unoptimized corners. This ensures that every fibre is delivering the most strength and stiffness it can.
Small adjustments in shape make big differences in how the material performs. A great example of this is the shock mount at the top tube. By keeping the top tube “intact” (rather than piercing and bending it to shroud the shock, like the previous Stumpjumper), it’s more structurally sound and therefore more effective at bearing a load. The flat sections of the shock mount likewise carries those loads more effectively than the curved shock mounts of the previous Stumpy. Together, this top tube/shock mount section is lighter AND stiffer than its predecessor, without sacrificing durability.
Another example of how shape optimizes material use is the Sidearm design. The asymmetric Sidearm strut supports the shock link pivot, boosting stiffness by connecting rear end with front for a direct and integrated feel. The Sidearm also prevents torsional loads from entering the top tube, which helps the bike track and handle with precision.
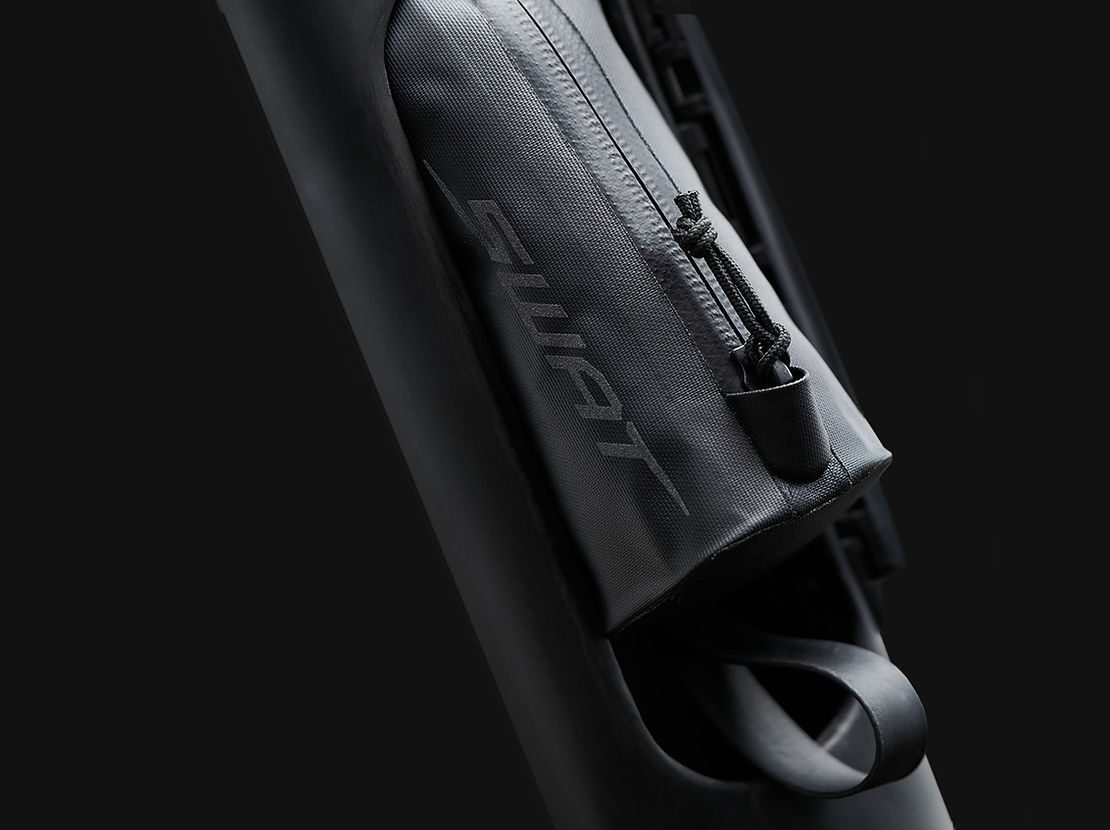
SWAT
Shit happens out on the trail. Flats, unplanned dismounts, rainstorms. Just ask Murphy, he wrote the law. Luckily the Stumpjumper’s SWAT compartment will faithfully carry all the stuff you need to get out of most trailside tight spots. And even with that high volume cavity in the downtube, our engineers figured out how to distribute all the loads around the opening. The Stumpy still delivers the stiffness required for telepathic handling on the trail, while also providing heavy-duty strength at an unprecedented light weight.
THE MISSING LINK
The pivotless seatstay/chainstay of the Stumpjumper leverages everything we’ve learned about building lightweight, full suspension trail bikes (something we’ve been doing since ‘93). A closer look at the rear dropout area revealed that there was no mechanical pivot. By applying our expertise in composites, we were able to ditch 55-grams of hardware, enhance lateral chassis stiffness, reduce maintenance, and precisely match suspension kinematics and chassis stiffness. In short, it’s the lightest, most efficient, control enhancing suspension solution for a mid-travel trail bike we’ve ever made. The elegance of this solution is fully realized and appreciated on the trail.
FLEXSTAY
Through precise shaping of the seatstays and chainstays, along with utilization of appropriate composites, we created a flex zone along the seatstay, above the brake mount, that serves up 130mm of travel without any rear end pivot hardware or redundant material required for bonding pivot parts in the carbon.
GOODBYE PIVOT, HELLO EFFICIENCY
The one-piece design improves torsional and lateral stiffness, which in turn enhances responsiveness and pedalling efficiency. These lateral and torsional stiffness gains are achieved by eliminating the flex intrinsic in mechanical pivots.
SUSPENSION
RxTUNE
Our trail obsessed team of engineers stay awake at night thinking of how to make suspension work better. For the Stumpjumper, they tailored every aspect that contributes to final suspension characteristics — kinematics, leverage curves, damping, and spring rates — to work together in harmony to deliver a highly controlled, responsive, and precise ride that handles bump forces like a bike with far more travel.
LEVERAGE RATE
The Stumpjumper has a very progressive leverage rate with a steep slope. This helps achieve a lively, snappy ride with generous utilization of travel and a good platform to pedal against through the mid-stroke, as well as great bottoming resistance at the end of the stroke. These are exactly the characteristics you want for a mid-travel trail bike designed to see full-size trail duty.
The combination of the progressive leverage ratio and mildly progressive spring rate results in precisely the ride we dreamed of for our mid-travel trail ripper. What you feel on the trail is a lively, snappy ride for the first two-thirds of travel, then — thanks to the increasing spring rate — excellent bump force management and resistance to bottoming in big events.
To ensure sufficient rebound with fast, deep hits, the progressive rebound damping catches big impacts. But, because rebound damping is lighter through the mid-stroke, it comes back quick so it’s ready to handle the next impact.
CAPABILITY AND STABILITY
The new Stumpjumper geometry contributes to a level of control and efficiency never before found from a mid-travel trail bike. How? The generous cockpit gives you the room you need — centering you on the bike and improving traction and corner control. The low bottom bracket, slack headtube angle and reduced fork offset keep things stable in the rough. A steep seat tube optimizes power output and puts your weight over the front while climbing. And short chainstays keep things flickable and nimble.
POWER TO THE PEOPLE
Creating the ultimate trail bike out of costly materials and utilizing processes typically reserved for space exploration was pretty hard. Bringing that unprecedented performance to as many riders as possible was even tougher. But we did exactly that with our new alloy Stumpjumpers, delivering the same great geo, Rx-Tuned suspension, ride quality, and S-sizing as their carbon siblings, but at much more attainable price points.

News: The all-new Stumpjumper Evo
We’re lucky to be riding during the Golden Age of mountain biking. We have access to more trails than ever, built with more diversity than ever, riders are progressing and nailing what was previously impossible, and now the new Stumpjumper EVO is evolved to meet the demands of modern riders. Delivering unprecedented control, capability and adjustability, along with unexpected climbability, it tames any terrain from chundery jank to progressive high speed flow and modern big hits. It’s your seat in the eye of the hurricane. And that’s good, ‘cause when shit starts flying on the trail, you’ll be zen in the middle of the mayhem.
Available in six style-specific sizes, the Stumpjumper EVO sets the benchmark for progressive trail geometry, delivering DH capability never before found from a 150mm bike alongside lively climbing manners. How? The generous cockpit gives you the room you need; centering you on the bike, optimizing traction and corner control. The low bottom bracket, slack headtube angle and reduced fork offset keep things stable in the rough, while giving you the freedom to destroy the turns, float through them, or nail the inside lines. A steeper seat tube optimizes power output and puts your weight over the front while climbing. And short chainstays keep things flickable and nimble.
Mullets are a thing these days. Not the hairstyle, though. Those are best still treated with wary respect and plenty of distance. No. We are talking about a 27.5” rear wheel and a 29” front. The big hoop up front provides traction and stability everywhere, while opting to run a smaller rear wheel can liven up responsiveness and also give more physical riders a skosh more room to get rad without hooking their shorts on the rear wheel. We utilize a different, aftermarket shock link to achieve Mulletdom with the EVO, in order to retain the handling, geometry and suspension characteristics that enable the rest of the package to shred so assertively.
The EVO’s 160mm front travel and 150mm rear feels bottomless on big drops, supple on small bumps, devours square-edged hits, yet still pedals responsively and climbs like a lightweight. The key ingredient here is Rx Tune – your prescription for fast. Riders all, our team of engineers and technicians toiled to develop every aspect of the EVO’s suspension into an optimally performing singularity. Chassis design, telemetry, wheel rates, spring curves, custom shimstacks, oil viscosity; front and rear suspension obsessed over, prototyped and tuned to deliver optimized and balanced performance, allowing the bike to disappear beneath you, leaving you confidently in control.
The SWAT door on the Stumpjumper EVO is a masterpiece of carbon fiber construction and spatial optimization. A simple pull and twist of the water bottle cage opens into a cavernous downtube storage compartment. There’s 15% more room than before; enough room to store 22oz of life giving water in an included, specifically designed bladder. Or some tubes and a rain jacket. Or folded up slices of pizza. Or multiple bananas (careful with that last one). Because we can tailor the layup of our carbon fiber, putting material where it is needed most, we can also design in this easy access storage compartment with zero compromise of the chassis strength or stiffness.
There’s a generous amount of anti-squat early in the EVO’s travel. When it comes to climbing responsiveness and pedalling snap, anti-squat is your friend. It helps you put the power to the ground without unwanted pedal-induced bob, and it transforms wattage into forward and upward momentum. As the suspension moves through its travel, the anti-squat characteristics drop below zero, and the suspension focuses on sucking up everything from chunder to dead sailoring blind hucks-to-flat.
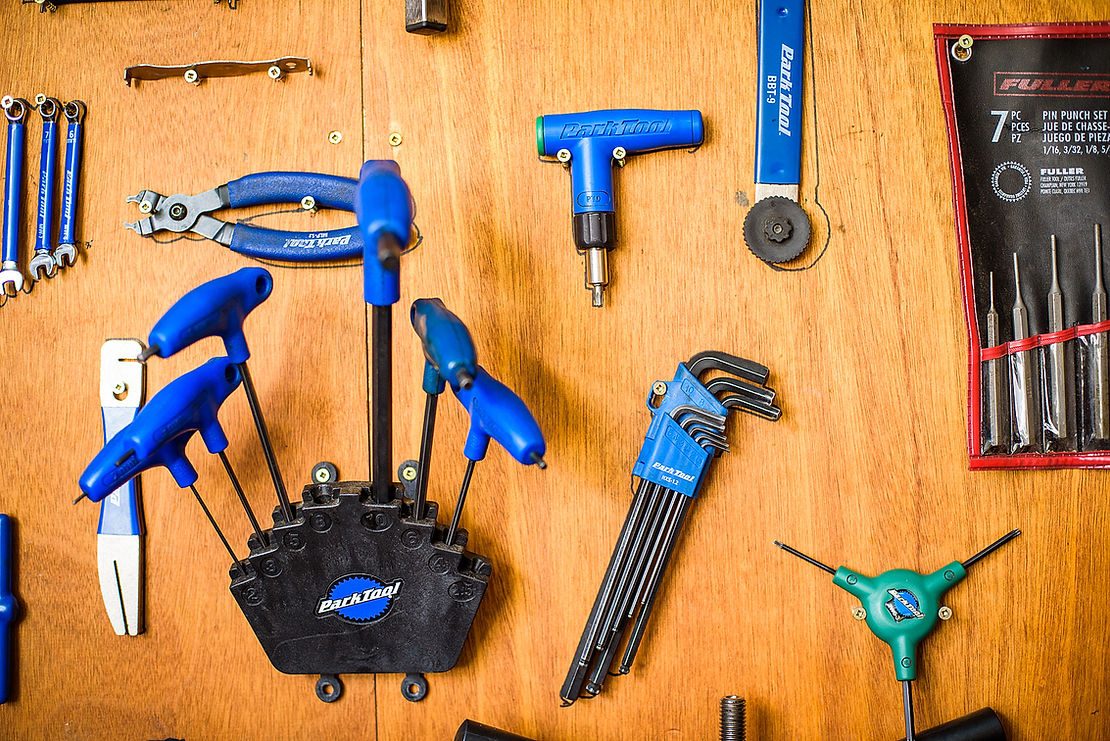
Story: Setting up a Workshop That Works for you
While it’s not every mountain biker’s favourite pastime, doing some at-home bike maintenance is part and parcel with the sport itself for a number of you. However, not having the right set up can really compromise the enjoyment you get from working on your bike, so this month we’ve put together a few tips on setting up a home workshop. On their own, these tips might not seem that important, but combined they can make a big difference.
Step 1 – Identifying Your Space
Ideally your workshop would be located in a garage or shed, but not everyone has that luxury. If an indoor space is your only option, look for a tiled one if possible, as it’s hard to avoid getting anything on the floor. Ideally, the space should be big enough to be able to turn your bike around, so at least 2m x 2m.
Lighting is key to good workmanship and preserving your eyes. Natural light from a nearby window is optimal; however, it’s best to avoid direct sunlight if possible, or to be able to close the blinds when necessary.
If natural lighting isn’t possible, or when you’re working at night, you want to use fluorescent tubes or coil fluorescent energy lightbulbs. Try to avoid using sharp light because it casts heaps of shadows. Or, barring that, hang a good work/inspection light from the roof, as you want to be able to keep your hands free.
Ventilation is also important as a lot of the best cleaning products – even the ethical ones – are often quite smelly. Even if it doesn’t bother you, remember to consider others in your household – muddy mountain bikers often already have a bad rep in their households and there’s no need to encourage the perception!
You’ll need somewhere to store hazardous substances (such as kerosene/diesel for cleaning a chain). Most people use a container that they need to dump out. One concept that works well is to use an old freestanding laundry tub that can be used to clean parts in, with a catch bucket collecting the waste to be disposed of appropriately.
The bike also needs to have some mechanism to hold it upright. Using a bike stand is optimal if you decide to invest. If not, you need to find a way to hang your bike. One option is to strap your unused bike rack to the wall. See more details in set up section.
Step 2 – Stocking your Workshop
Once you’ve selected your spot, you need to start equipping the area with a number of essential tools and items. Here is a list of what we consider essential:
- A good stash of rags – old cotton or flannel clothes are best as they’re not linty anymore.
- Bike stand or bike holding mechanism. If you don’t have a bike stand, it helps if you have a wall that you can mount stuff against.
Essential Tools:
● Good floor/ track pump.
● Small torch to be used as an inspection light.
● Tyre levers.
● Multi tool with all the hex and torx keys your bike needs, plus chain breaker and screwdrivers. (most decent bike specific multi tools will have all these things)
● Bike-specific cable cutting pliers.
● Side cutting and long nose pliers.
● Cassette lock-ring tool.
● Chain whip.
● Mechanic’s pick (a sharpened spoke will work)
● Soft-faced hammer or mallet.
● Phillips and flat screwdrivers.
● Shock pump.
● Utility Knife.
● Spoke nipple wrenches.
● Bike hanging jig: Chains from ceiling/ towbar bike rack mounted to the wall.... there are many make do options.
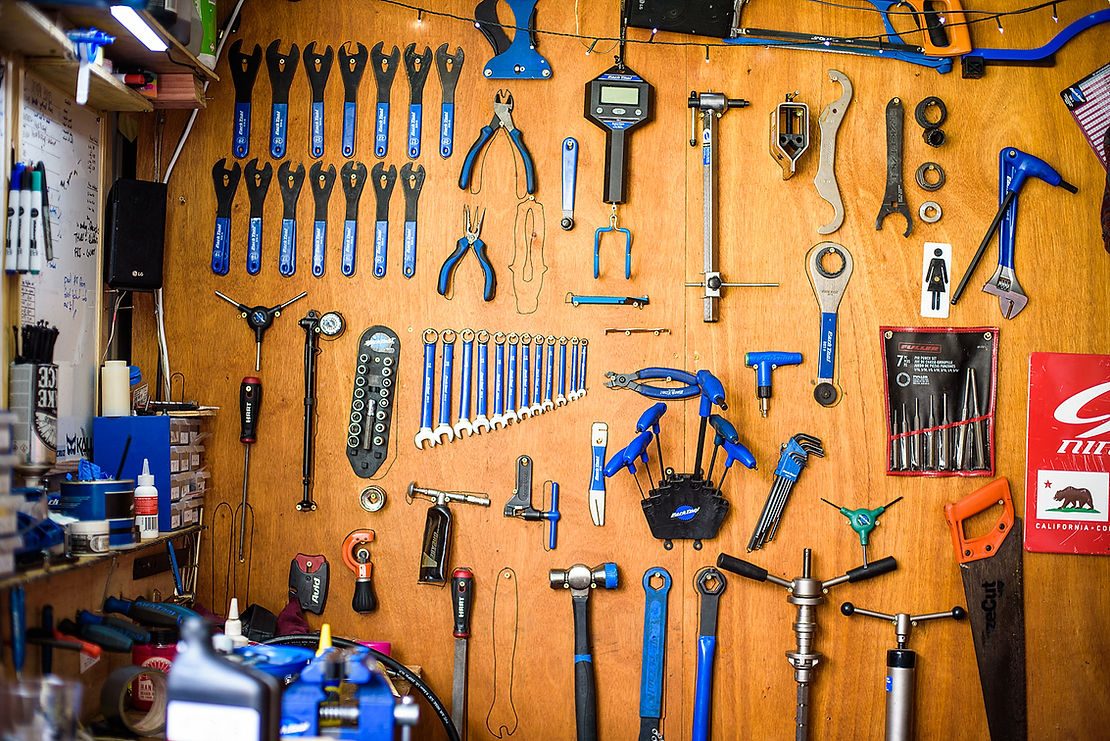
Great to have if you want to get really well setup:
● Good quality foldaway bike work stand.
● Solid work bench with engineer’s vice mounted to it.
● Air compressor.
● Good fluorescent tube lighting over work area.
● Chain joining link pliers.
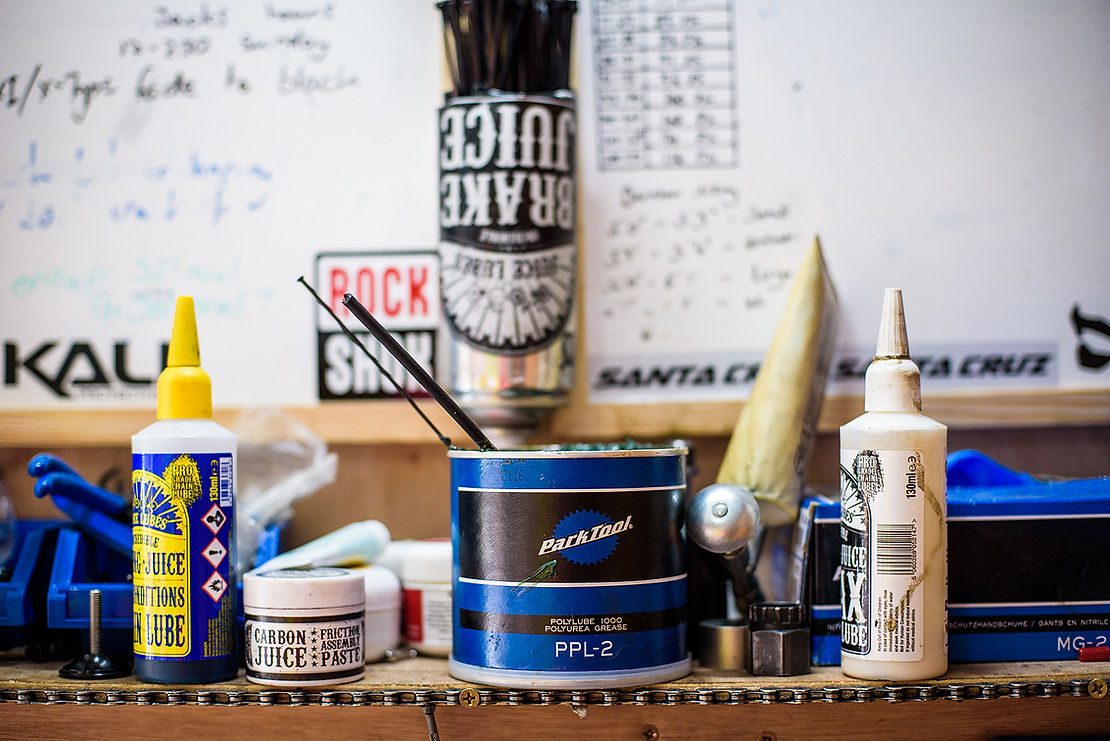
Useful products and supplies:
● Zip ties.
● Electrical tape.
● General purpose bicycle grease.
● Wet and dry chain lubes.
● Spare chain joining links.
● Silicone spray.
● Residue-free brake cleaner spray.
● Water-soluble degreaser.
● Blue Loctite thread locker.
● Carbon grease if you have carbon bike parts.
● Workshop apron.
● Nitrile work gloves.
● Bucket and selection of bike specific cleaning brushes.
Step 3 – Setting it up
It’s worth stressing the importance of having your bike at work height, ideally somewhere steady that doesn’t swing. This can usually be achieved by using a work stand, which is a luxury, or a wall mounted bracket.
To enjoy the optimal bike set up, all your essential pieces of equipment should be within easy reach and have their own place. You should also have a piece of scrap carpet under the bike and where you’re standing – it’s less slippery and absorbs extra mess.
The most frequently used stuff should be in the easiest to reach positions, so you’ll need some sort of work bench top close to the bike to put things on while working. Use old cabinets if possible to keep stuff put away and use as a bench – an old kitchen cabinet with a bench top is optimal for this.
Words: James Duncan
Images: Digby Shaw

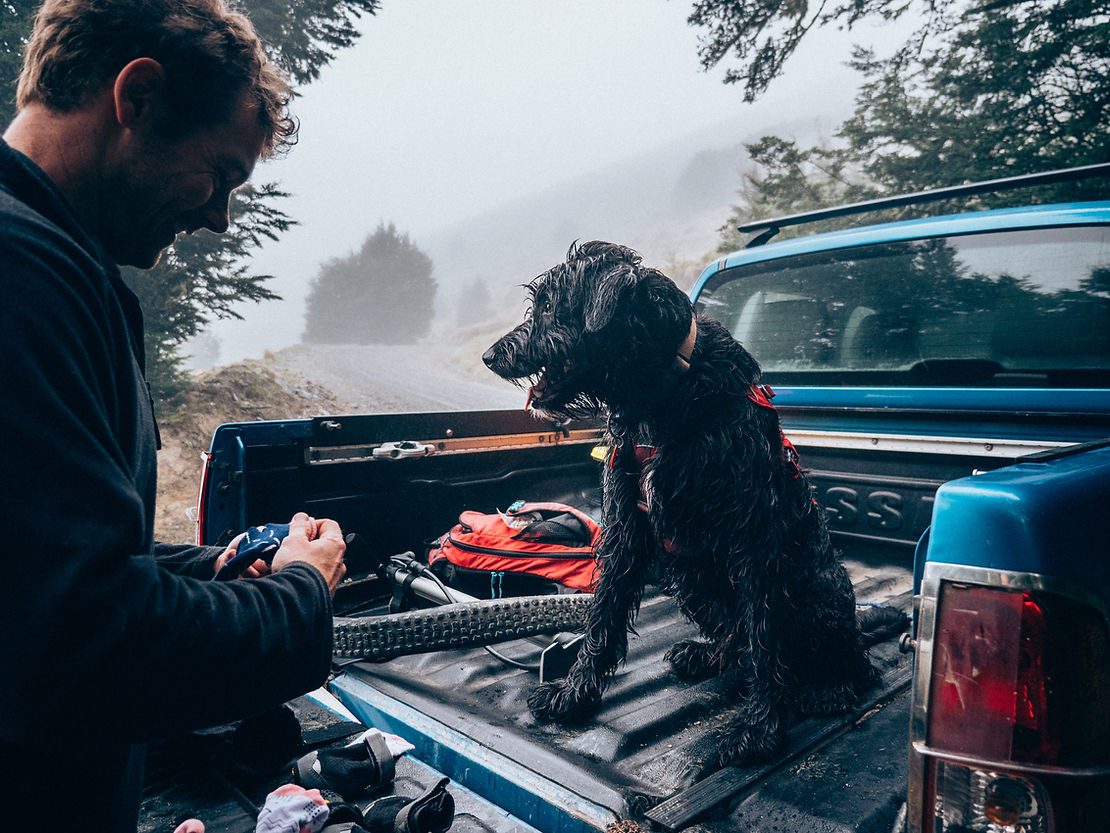
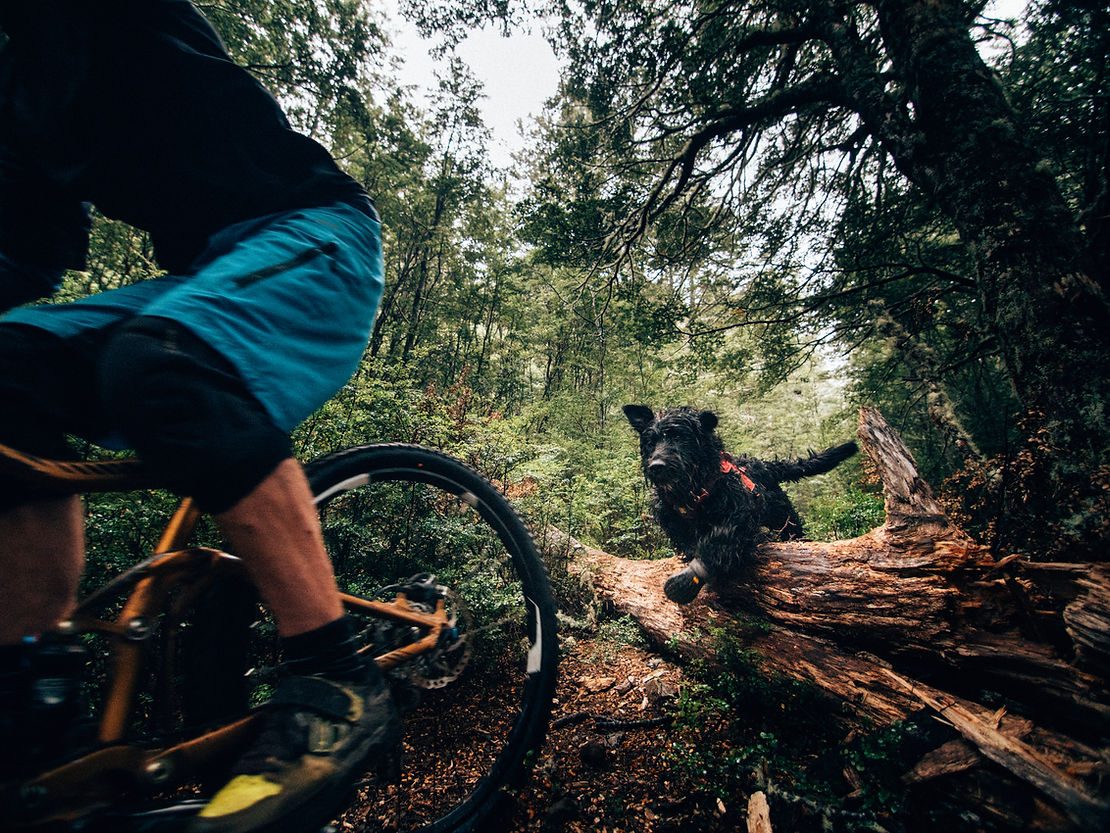
Story: Release the Hounds
With hands shielding the sun from our eyes, we scan the brown, barren emptiness of Hakatere Conservation Park. Several mountain ranges encircle us like we're in the centre of a gigantic crater. A light breeze carries the sound of barking, but the undulating landscape hides the culprit from view.
“Does he usually come back?” Adam asks, between sips from his water bottle.
"Usually," I sigh. We've not even left the car yet, and I've already managed to lose him. I clamber onto the roof and shout his name. In the distance, I can see a black blur chase several birds that soar high above. “Don’t worry, I can see him.”
Adam squints as if he's on safari trying to spot a wild animal across the savanna-like wilderness. “Is he coming back?”
My arms fall to my side. “…doesn’t look like it.”
Up until three years ago, I’d never owned or spent much time around dogs. I didn't grow up with one in the family and was generally indifferent to the four-legged, tail wagging species. So when my partner suggested we get a puppy, I was finally swayed by the possibility of having a trail dog. I’d seen plenty of riders out on the tracks with well-mannered, obedient canines at their side, and it seemed an ideal way to combine the chore of dog walking with the joy of mountain biking. Training can’t be that difficult? Sit, stay, sick balls – easy. As I watched my not-so-faithful companion disappear over the Hakatere horizon, it appeared there was still a bit of work to do.
A Bikers Best Friend?
On paper, a trail dog should be your favourite riding partner. They won't cancel when it looks like rain; they'll never struggle through a hangover during a weekend jaunt, and their infectious energy can power you up the worst of climbs. However, something I had failed to consider when observing other trail dogs out on the local tracks was that I was witnessing the finished product. It can take months – even years – of training to get a canine to a point where they are trustworthy and capable enough to be taken out for a few laps.
Before we’d even got our dog Oshy near a bike, we had noticed a few of his quirky traits. Some of which lent themselves to the possibility of trail dog material, others… not so much. His breed is a cross between Border Collie and Huntaway. Which I appreciate doesn’t mean a great deal to non-dog people. Put simply, both varieties are energetic and bred to herd livestock, with Collies being the brains, i.e. able to follow commands, and Huntaways being the muscle, i.e. barks a lot.
Understanding the breed and body type of your potential trail dog is important as it can dictate how they will cope when joining you for a ride.
“Generally speaking, larger dogs with long legs and long snouts are ideal,” explains Lisa Sturm, a trainer at Sit Happens, Dog Training Christchurch. “But that doesn’t include Greyhounds, as although they may appear light and quick on their paws, they have been bred for short, high-intensity exercise.”
Before we had consulted with Lisa, we’d helplessly watched Oshy chase seagulls for over an hour at the beach, so we knew his stamina was up to it. She recommended working on his control around chasing things first, before taking him out with the bike. Once that was sorted, Lisa suggested starting small and somewhere quiet for the inaugural ride, which is how we came to be in Hakatere Conservation Park.
Take One
Hakatere lies within the depths of Canterbury, and although not famous for mountain biking, it is remote. I’d plotted a course to the tantalisingly named Mystery Lake. The route followed an uneventful 4WD track in and returned via a surprisingly fun section of the famed Te Araroa walking trail.
Before we released the hound, we laid a short trail of dog biscuits for him to seek out and enjoy, helping to focus him before the ride. We made the mistake of leaving him to it while we sorted the bikes out, and once the biscuits were done, he unfortunately moved his attention back to the birds again.
Eventually we regrouped and set off, and it was only a matter of time before another mistake became evident. What I hadn’t fully taken into consideration was the distance. It was upwards of 30 kilometres, and we were out for far longer than planned. Before we'd even made it back to the car, Oshy was starting to stiffen up. He spent the following few days on his bed, staring at me with accusatory eyes.
Once the guilt had subsided, I began pouring over Topo-maps and DOC information, searching for suitable places for a second attempt. Then the obvious occurred to me - Craigieburn. Those that have ridden there will be familiar with the selection of soft, loamy trails and spectacular views it offers. With it being relatively quiet and full of shorter 10 km loops, it was an ideal location.
I was also keen to try some new commands we’d been working on, such as ‘Behind,’ ‘Wait,’ and ‘Let’s Go.' I'd practised them while riding around the front garden, tossing out treats like confetti at a wedding when Oshy got it right.
Take Two
On a crisp, bluebird day we slogged our way up the meandering Craigieburn access road to the base of the ski field. Sat at the start of a trail called The Edge, we both took a moment to enjoy the fresh alpine air and scenic views, before embarking – excuse the pun – on the track. This time the distance was right, and the commands worked suspiciously well, with Oshy waiting for the order to start, and staying behind the bike when instructed.
The Craigieburn trails are mostly through native forest, which provides welcoming shade, and we stopped at the many streams that trickle down the mountainsides so Oshy could keep hydrated. An important aspect to be aware of as you're freewheeling down your favourite trail is that dogs can't cruise, and can, therefore, be susceptible to over-heating.
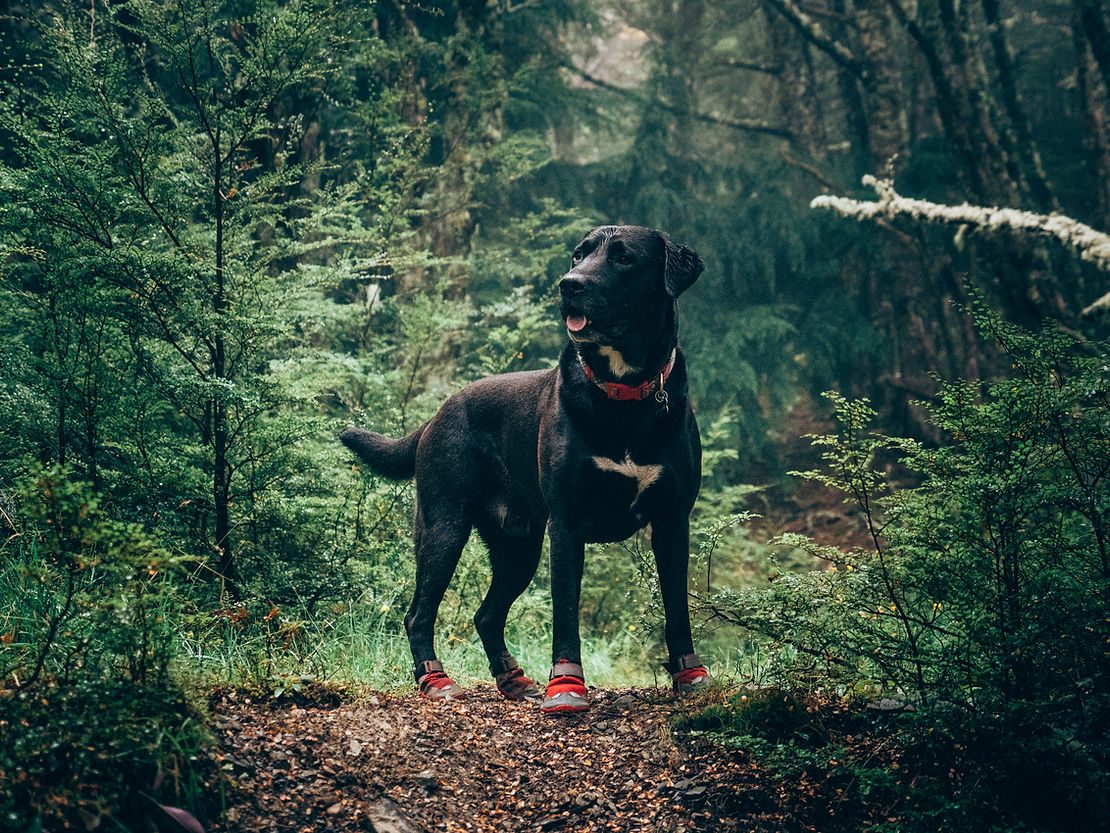
Unfortunately, what I hadn’t taken into consideration was the trail surface. It's called The Edge for a good reason - sections of it traverse over steep scree slopes. As well as being a bit sketchy in places, it didn’t do any favours for Oshy’s paws while he dashed over the jagged shingle. During the drive home I heard a constant licking noise, and on closer inspection, it appeared that he had torn his pad. Another wave of guilt washed over me. There was only one thing for it; it was time to go shopping.
Retail Therapy
“First and foremost, I’d recommended a set of booties,” Rocky suggested, holding up a pair of adorable dog shoes. Oshy and I were in FurtherFaster, an outdoor store in Christchurch, which has a whole section dedicated to arming your canine for adventure. There are collapsible water bowls, dog-specific first aid kits and all-weather dog coats.
As we measured up Oshy for some new boots, Rocky told me about Badger, their three-year-old Labradoodle. The large, shaggy dog bears an uncanny resemblance to Oshy, except instead of barking there is a continuous desire to chase toys.
“These days he’s more of a trail running dog,” Rocky says as we measure up Oshy’s paws, “due to the requirement for dogs to be on leashes when up on the Port Hills.”
It’s a bad idea to have your dog tethered to your bike as it can lead to all kinds of accidents. If you’re worried about your dog running off, or want to train them to run next to the bike, there are devices available. An example is the ‘Walky Dog Plus’ which safely attaches the dog's leash to the seat post, but bear in mind that it’s only suitable for wider trails.
With the boots fitted, my attention shifted to the selection of dog bags that can turn your pooch into something resembling a pack horse. The contents of my bike rucksack were evolving, and I was now hauling around biodegradable poo bags, a whistle, a leash and about a kilos worth of dog biscuits. Seeing as dogs can carry about 10% of their body weight, the thought of delegating some provisions to Oshy seemed an attractive one – especially as he never chips in for petrol.
At the counter, I asked if Rocky had any final advice. “Start small and somewhere quiet, and take plenty of water.” He then added with a grin, "and make sure you enjoy yourselves.”
Take Three
For the next attempt, I decided to bring some moral support. For anyone who has biked around Victoria Park in Christchurch, or been along to the dig days, they may be familiar with Frank (the Tank). A well-mannered, five-year-old Labrador-Border Collie cross. he can often be spotted taking sneaky hotlines and shortcuts as he races his trail buddies, Todd and Agata, through the steep and twisty downhill trails of the park.
I had hoped that the calm and collected presence of Frank, who has several years of trail running experience under his collar, would have rubbed off on Oshy, but alas. During a drizzly Saturday morning at Craigieburn, the sound of barking could be heard echoing through the mountains.
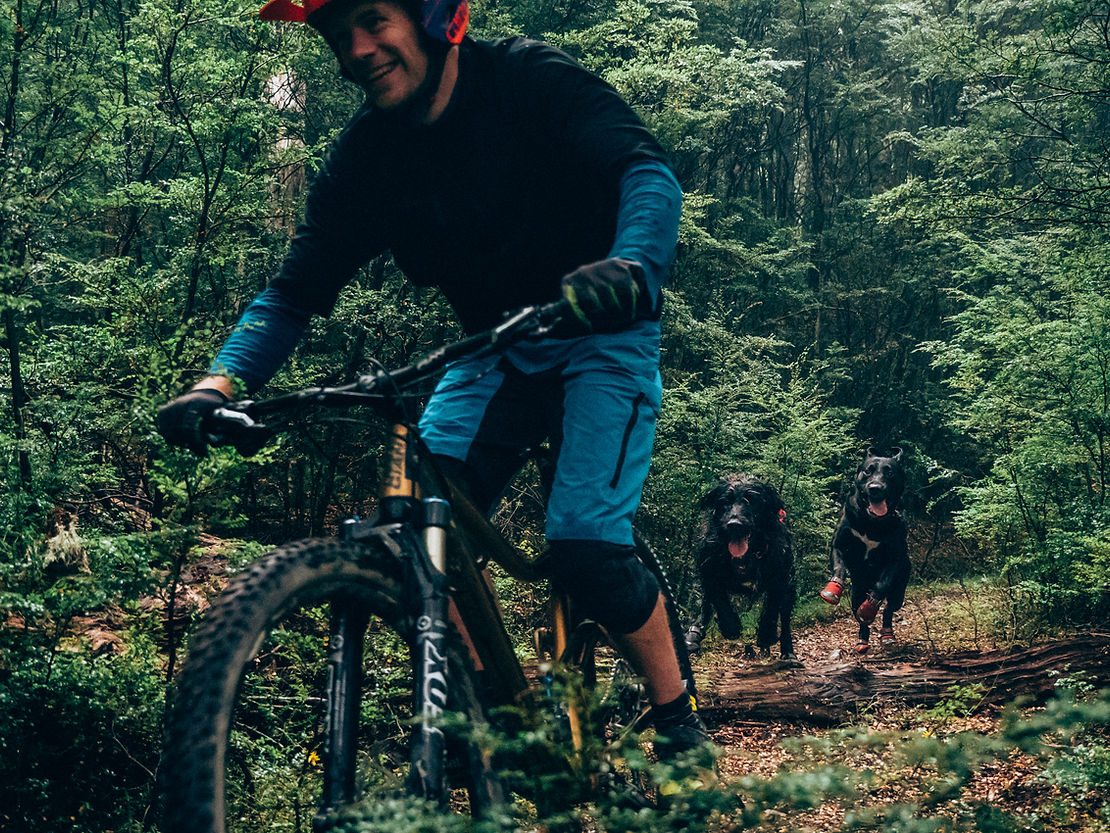
What I hadn’t taken into consideration this time was Oshy’s excitement at another trail dog and new riders. Sadly, he expressed this emotion the only way he knows how – barking. No amount of biscuits, polite requests to cease and desist or ‘time outs' in the car seemed to have an effect. After just two runs we had to call it a day. Something I’ve come to realise with Oshy is that if it's not working then don't force it. Similar to those rides where you have endless mechanicals or repeated crashes, it's best to just draw a line under it.
Through a rain covered windscreen I watched Todd and Agata set off for another lap, with Frank bounding happily – and silently – after them. I rolled my eyes and wondered why I bother. I turned to face Oshy and was greeted with a large pink tongue trying to clean my mud covered face. He then sat back with a huge grin across his chops, giving me the only reason I needed.
Words: Ian Middleton
Images: The Perfect Line