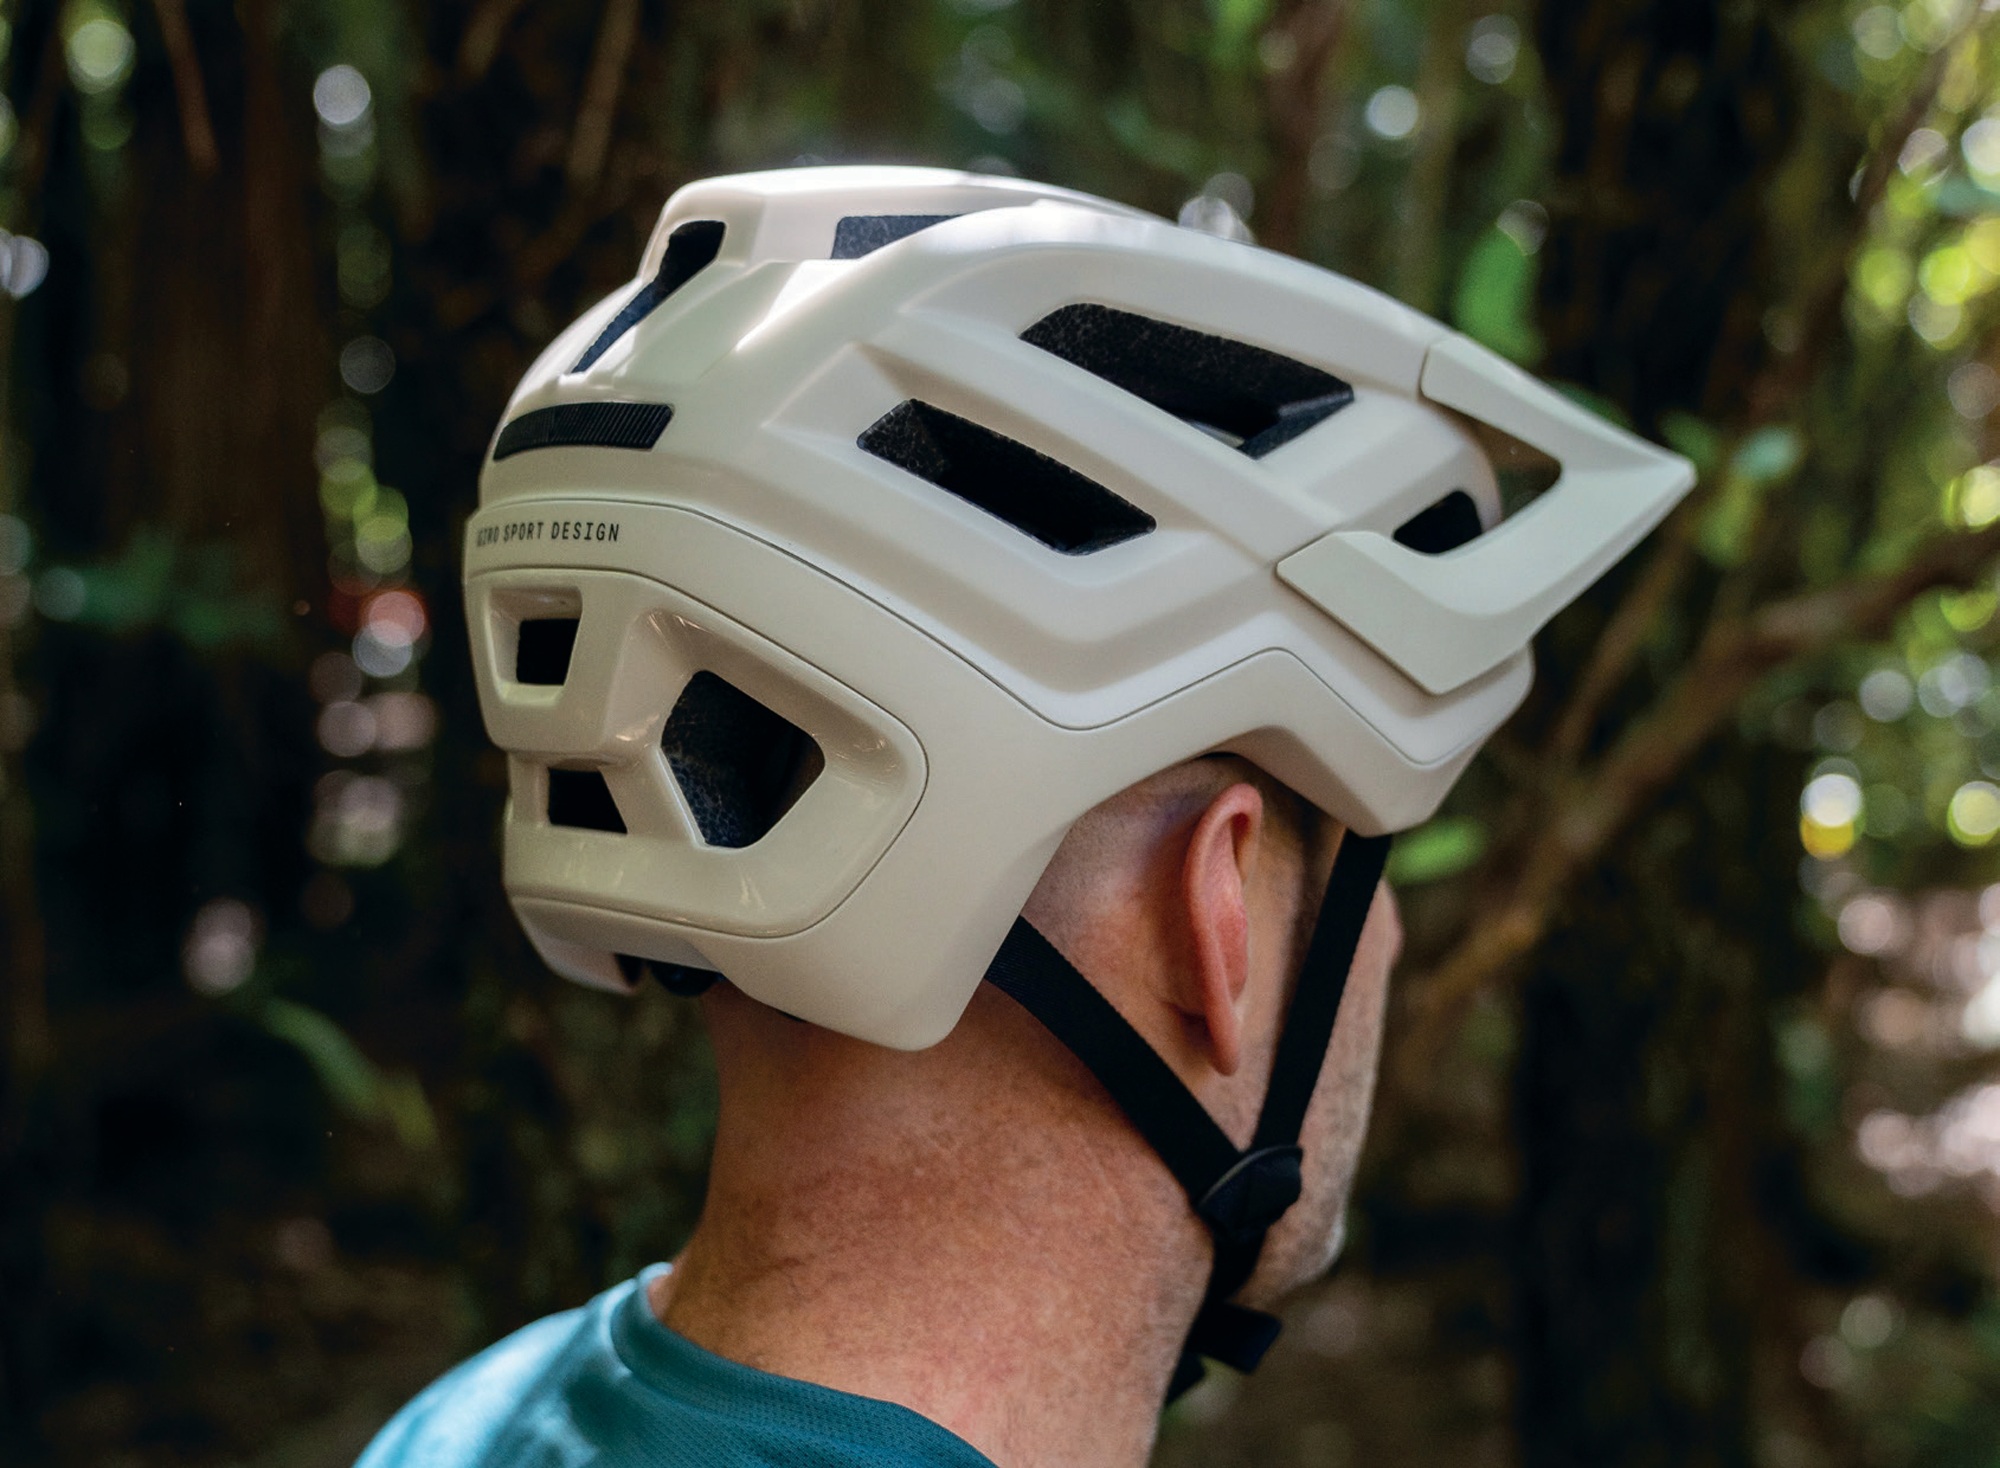
Giro Montaro III Mips
Words Lester Perry
Images Thomas Falconer
RRP $299
Distributor Worralls
I was excited to get my head into this new Giro Montaro III Mips helmet. Before receiving it, I’d seen some pics online and thought it looked pretty decent and ticked the necessary boxes for me to select a helmet.
The trail-focused Montaro III is almost a complete revision of the hugely popular, but ageing, previous edition, uniquely named the Montaro II. This new version certainly draws inspiration from other helmets in the Giro range and, dare I say it, from other brands. Although I poke fun, the result is a unique overall silhouette. I’m sure it won’t be for everyone, but when it comes to helmets, one seldom suits all.
There’s plenty of coverage on offer, and the helmet feels like your head goes some ways into it, meaning it comes relatively low towards the ears and back of the head. Internally, there’s a Mips Evolve Core, which is a refreshed version of the Mips slip plane liner. During an angled impact, the sliding action between the Mips layer and the impact-absorbing outer shell helps dampen rotational forces and, therefore, reduce neck and brain injuries (at least according to Mips). In the case of the Montaro III, the Mips shell doesn’t significantly affect breathability or airflow through the vents, unlike the earlier Mips liner system.
Giro’s Roc Loc tensioning system gives users a micro-adjustable fit via its dial tensioner and vertically adjustable tensioning cradle. The visor is vertically adjustable through two fixed positions. When in the highest position, there’s plenty of room for a pair of glasses to be holstered in the front vents. Most glasses will slide comfortably into the rear vents, too, so whichever place you prefer to stow them, you’ll find a solution on the Montaro. The helmet plays nicely with goggles, too. A rubberised section on the rear helps keep a goggle strap in place, and there’s ample room below the front of the helmet so goggles don’t get squeezed downwards on most faces. However, I do wonder if this may happen on smaller faces with large goggles – something to consider if you’re an open-face helmet goggle wearer.
Keeping the lid in place is a FIDLOCK V-BUCKLE, something I miss on helmets without it now. This magnetic wonder is a single-hand quick release and even securing it can be done with one hand with the proper technique and some practice.
On the trail
I find the fit of the Montaro is pretty good on my head – not the best I’ve worn, but one of the better. It seems the low-profile, sparse padding means it doesn’t feel as snug on the head as some, though the upside is it has minimal contact points on my head, which helps with cooling.
All the features of this helmet mean it tips the scales towards being one of the weightier trail helmets I’ve used. No doubt it offers plenty of protection thanks to its features, but theoretically, other lighter-weight helmets offer equivalent protection. There’s roughly a 75-gram difference between the Montaro and another recent review helmet with very similar features, including a rotational impact damper and FIDLOCK closure, so it’s not insignificant.
Weight aside, everything else with the Montaro is excellent; there’s a ton of airflow thanks to ample venting and substantial internal channelling. Even at slow speeds, the helmet didn’t feel stifling.
The outer hard shell wraps right around the bottom edge of the helmet, keeping that all-important inner foam safe from harm. Even while the helmet rolls around in a car boot between rides, it should still look pretty fresh, though results may vary!
It took me some fiddling to get the Roc Loc tensioner adjusted to the optimal position, but I got there in the end. At times, I still find the curvature of the tensioner on either side of the dial doesn’t quite suit my head perfectly, and occasionally, it’s caused me some annoyance. However, this could be a ‘me’ problem exacerbated by having no hair to give a little more padding.
With a $299 RRP, the Montaro III sits at the lower end of the price spectrum for a helmet with these features and coverage. All in all, it’s a solid helmet that offers a lot of protection for the dollars. Sure, there’s a bit of a weight penalty, but I’d wager that this extra weight comes in the form of more protection over some lighter-weight options in the market, so that’s got to be a positive.

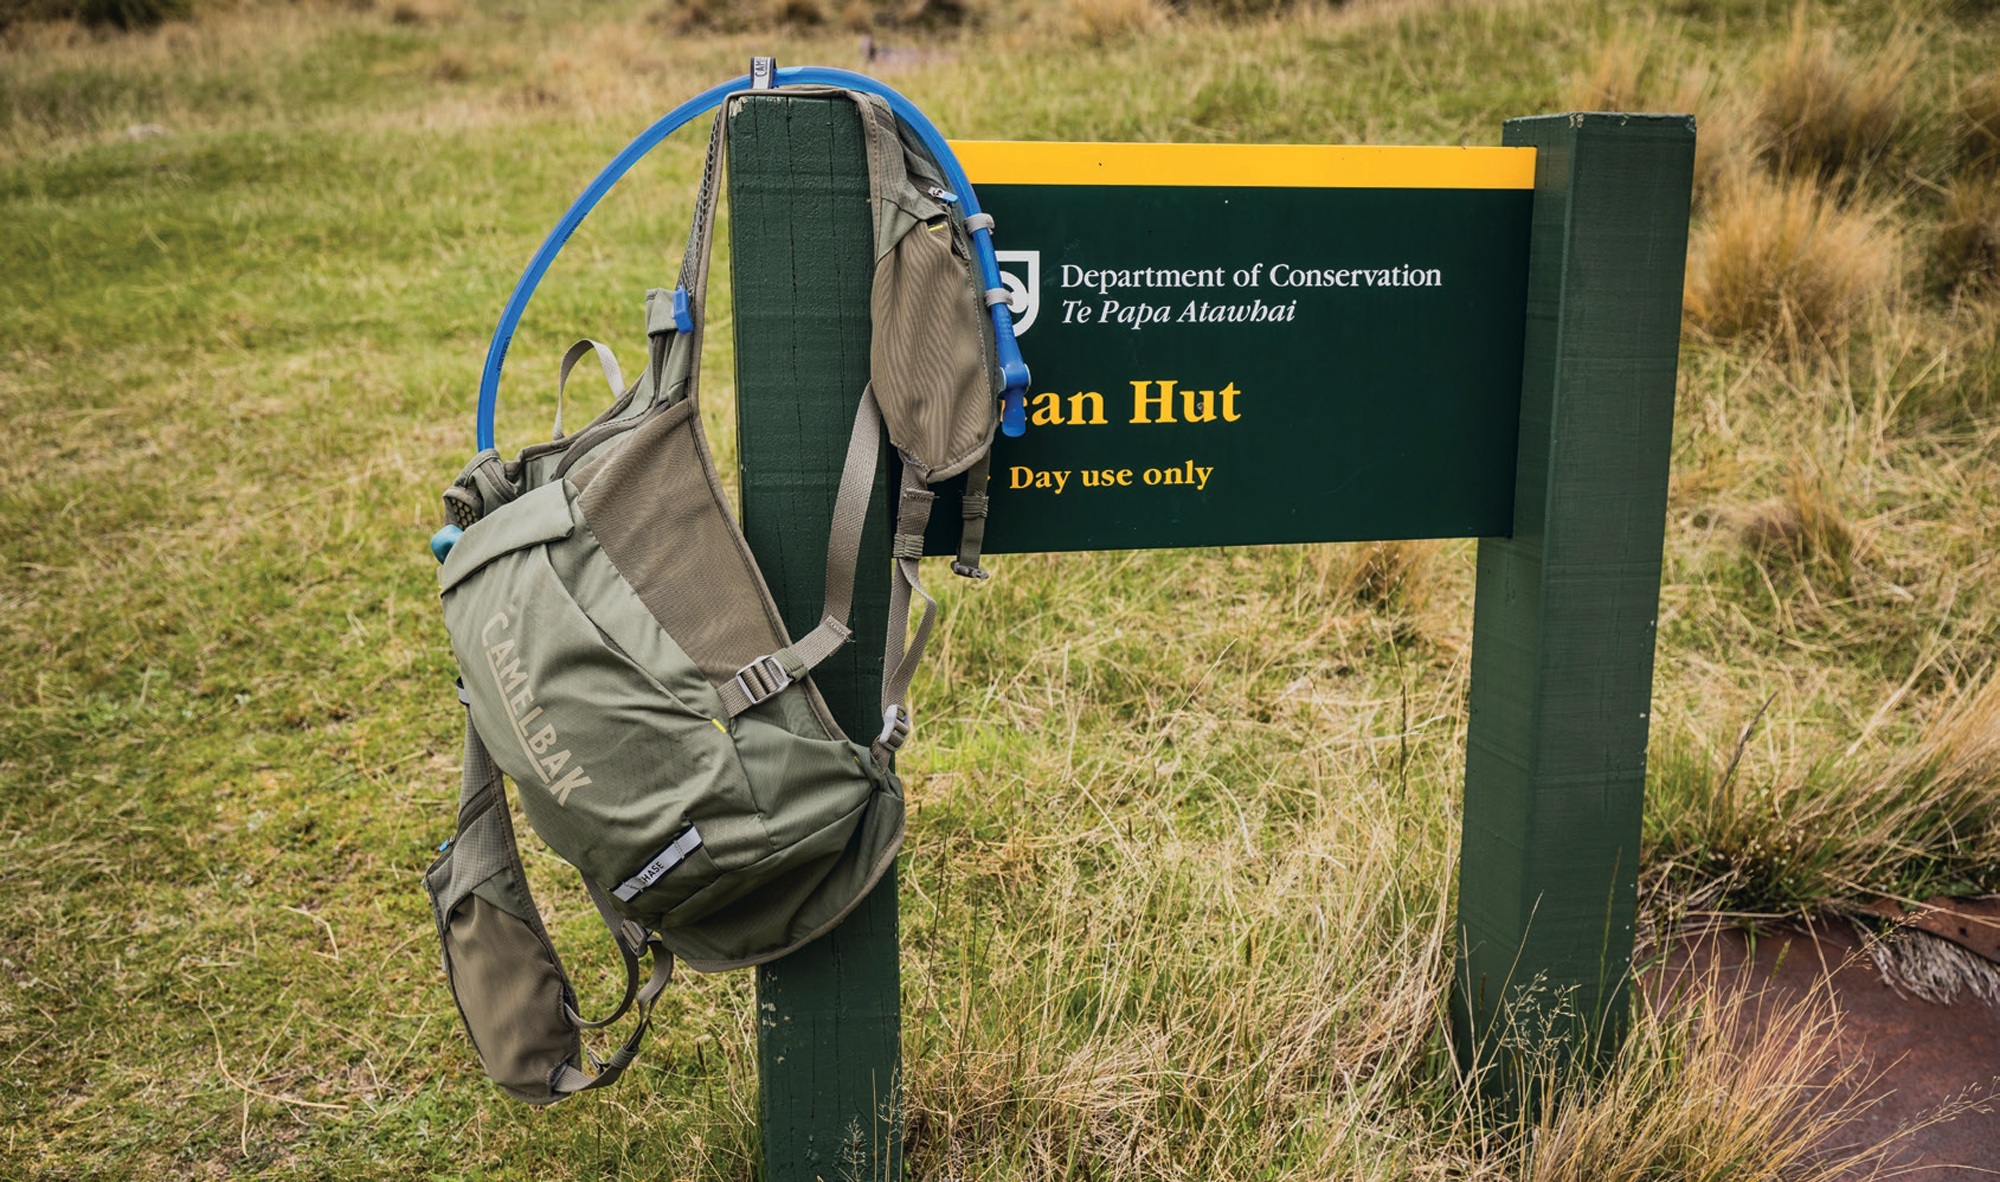
CamelBak Chase Adventure 8 Vest
Words Liam Friary
Images Caleb Smith
RRP $250
Distributor Southern Approach
There’s a particular style of riding where you need to carry more than your water bottle and whatever you have strapped to your bike or keep in frame storage (if you have one). But sometimes a full-blown backpack feels like overkill. On these days, you’re committed to being out for hours, tackling technical terrain, and need quick access to everything without fumbling around trying to get access to your gear.
When I first strapped on the Chase Adventure 8 Vest, I’ll admit I was sceptical – in the past, I’ve found vests either too snug or restrictive to wear. The Chase Adventure 8 Vest is designed for those big mountain all-day rides where preparation is everything. Eight litres total capacity, supplied with a two-litre Crux bladder, and enough clever organisation to make my tidy, slightly OCD self happy. The vest format means it sits above your jersey and/or bib pockets. This helps a lot as you’re not fighting for space but rather adding, and you can easily access any snacks or gear that’s not stashed in the vest.
The standout feature here is what CamelBak calls the “Command Center Harness”. It’s essentially a chest-mounted organisation system that puts your essentials right where you can see and grab them without contorting like a gymnast or stopping to dig through pockets. There’s integrated tool organisation built into the harness itself, which means your multi-tool, tyre plugs, and other critical bits are right there on your chest, easily within reach if something goes awry.
The main storage sits in the back panel with six litres of dedicated gear space. I managed to pack bike tools, some trail snacks, and a small first aid kit, and still had room for extras. The stretch overflow pocket on the outside is perfect for items you need quick access to – I stuffed my jacket in there. You can just grab the jacket on the descents or when the weather gets inclement without having to faff with zips and the like.
CamelBak has fitted this vest with their 3D Grid Mesh Harness, which does an admirable job of keeping airflow happening between you and the pack. But don’t get it confused – you’ll still be wearing something on your torso, so things will heat up. However, the airflow is pretty good when compared with other packs. The lightweight 420D recycled nylon construction helps here – it’s tough enough to handle branches and rocks but doesn’t add unnecessary bulk or weight.
The fit is secured with dual adjustable sternum straps. Being able to fine-tune the upper and lower chest fit means you can get it properly snug without feeling like you’re in a straitjacket. It did take some adjusting throughout the ride to get the sweet spot. The vest stays put remarkably well, even when you’re getting rowdy on technical descents or grinding up steep climbs. There’s minimal bounce or side-to-side movement, which is crucial when you’re trying to move around the bike.
I did find the fit good overall, though it could have been a bit better around the shoulders for me. However, this could be due to the winter months spent in the gym. Getting the right fit is crucial with a vest-style pack, more so than a traditional backpack, so definitely try before you buy if possible.
The two-litre Crux bladder is the same quality you’ll find across CamelBak’s range. The bite valve remains easy to drink from, positive shut-off when you’re done, and the magnetic tube trap keeps the hose secure against the shoulder strap when you’re not using it. It stays put on rough descents and didn’t bother me at all. The vest also features reflective elements for visibility, which is handy if your all-day ride stretches into dusk. There’s even provision for adding impact protection if you want back protection on gnarlier rides.
The capacity sits in an interesting, sweet spot. It’s not trying to be an overnighter like the H.A.W.G – this is for big single-day missions or rides where you need more than minimal kit but don’t want to feel like a pack mule.
I found myself reaching for this pack on more occasions with the warmer months, longer rides and changeable weather. I have been riding hip packs but lately, I’ve swayed back to the vest option due to its fit-and-forget nature and it sitting higher on the back. And, at 400 grams, it’s quite light for the capacity and build quality. When you cinch everything down for a shorter ride with minimal gear, it compresses nicely and doesn’t feel like you’re hauling around a half-empty sack. Equally, when you load it up properly, the harness system distributes the weight well enough that it doesn’t feel like it’s all pulling backwards off your shoulders.
The vest format really shines in situations where you’re frequently on and off the bike – technical trails with hike-a-bike sections, or rides where you’re stopping regularly to snack, session features or take photos. There’s no wrestling with shoulder straps or waist belts. And when riding, the vest just stays put and moves with you naturally.
The Chase Adventure 8 Vest is a well-executed piece of kit and it does what it says on the tin. It’s probably not for all riders, but it’s handy for those longer, more committing days in the mountains where preparation matters and quick access to your gear is invaluable.
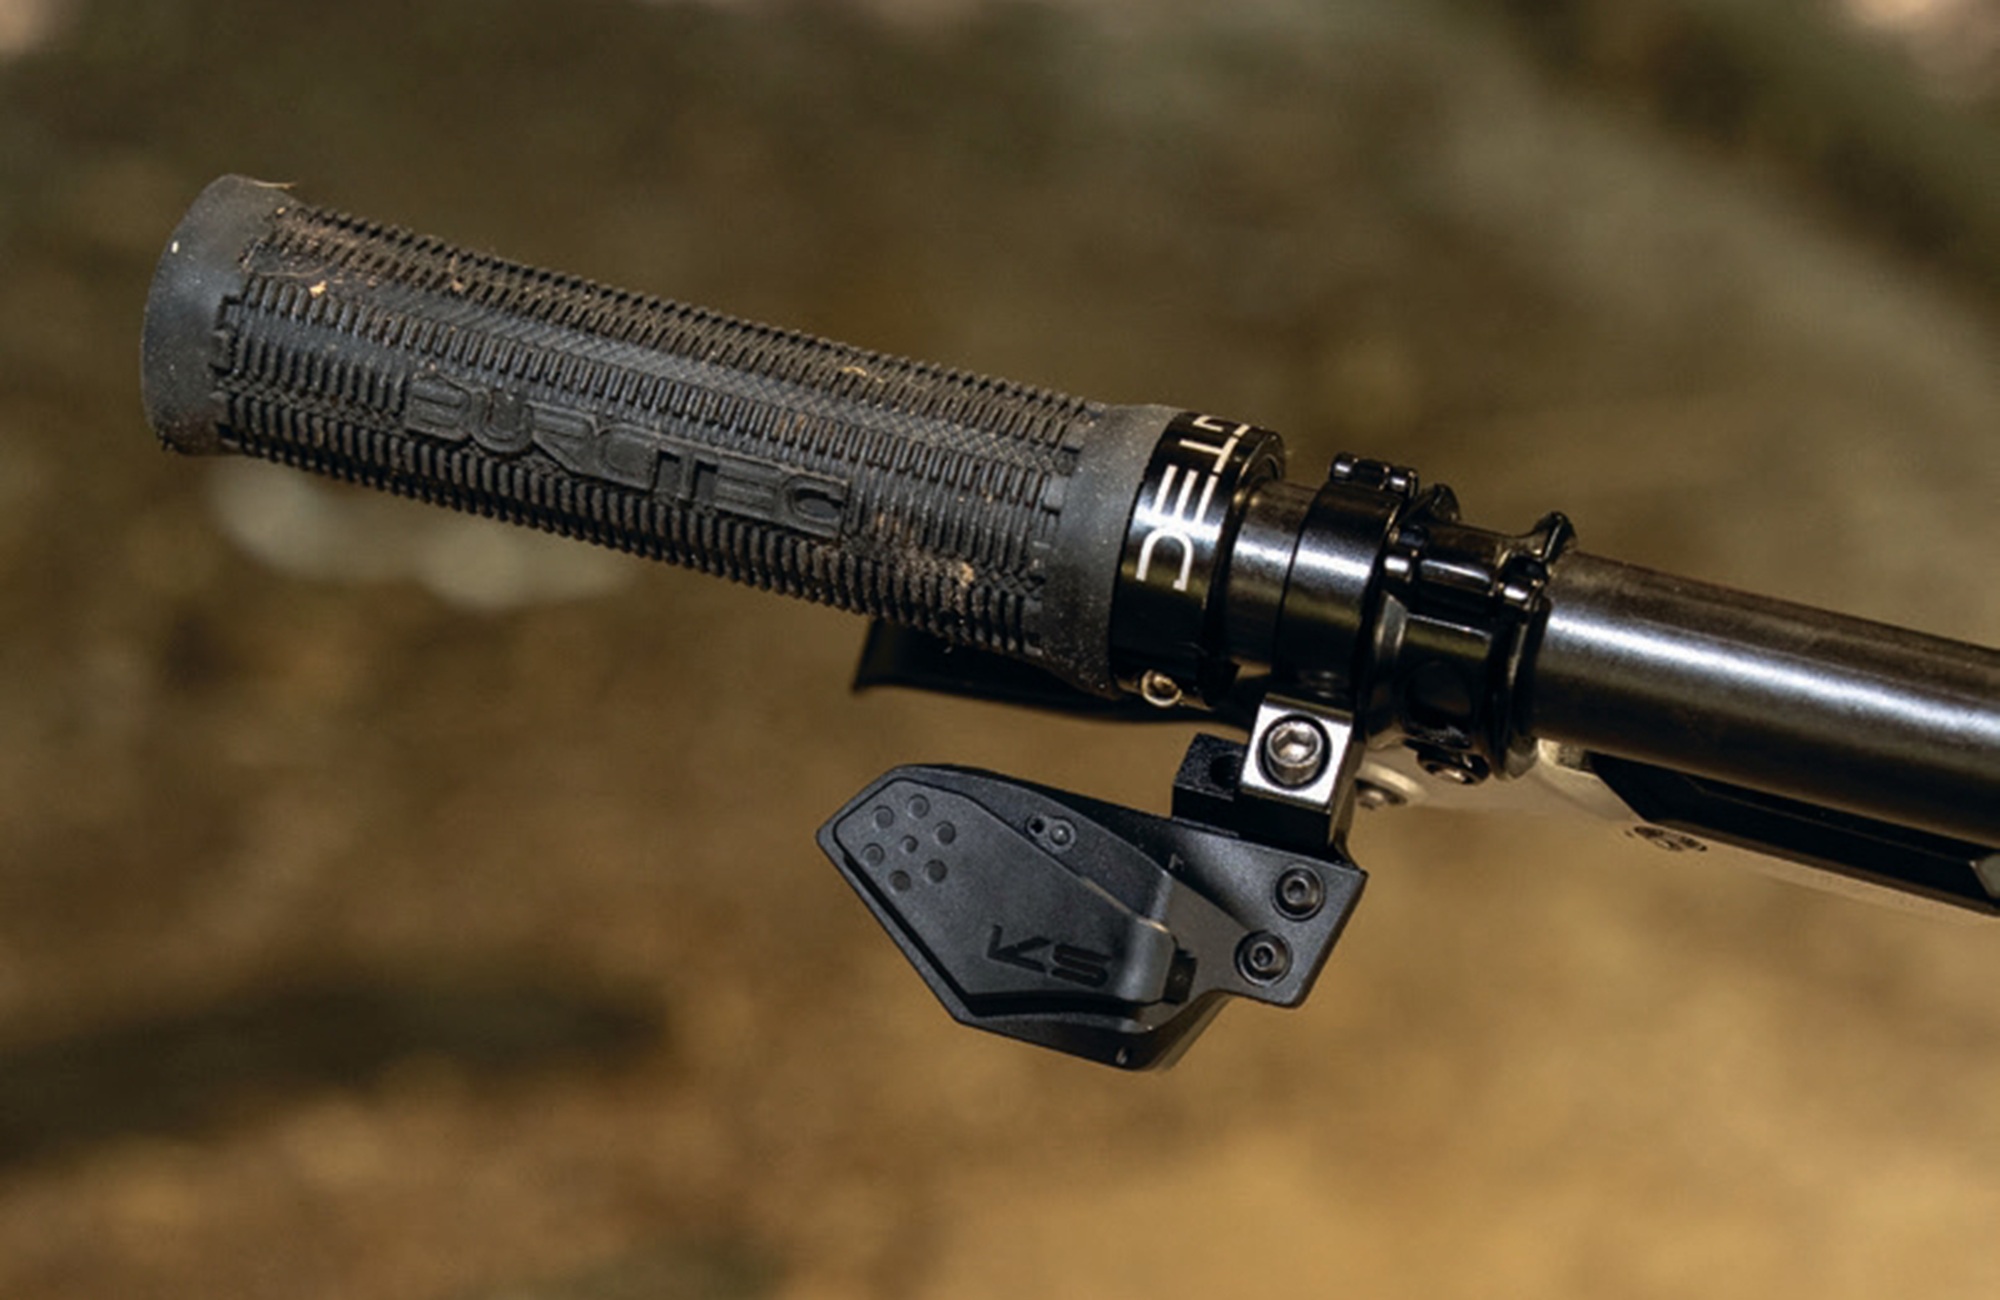
KS LEV Circuit Wireless Dropper Post
Words Liam Friary
Images Ralph Cabansag
RRP $799
Distributor Everoutdoor
Wireless droppers are in vogue lately. KS has thrown its hat firmly into the ring with the LEV Circuit. Let’s start with what makes this thing tick. The LEV Circuit is KS’s answer to the wireless dropper question, building on the proven internals from their well- regarded LEV series, but cutting the cord entirely.
No cables, no housing, no internal routing headaches. Just a Bluetooth connection between the remote and the post. Simple as.
Installation is a breath of fresh air. Drop the post in, clamp it down, pair the remote via Bluetooth, and you’re sorted. It literally took less than five minutes. It was a real pleasure when compared to wrestling internal cables through modern frames. The whole setup took me maybe twenty minutes, and most of that was just getting the saddle height dialled in. The remote runs on a standard CR2032 battery, while the post itself has a rechargeable battery that slots in neatly. Everything you need comes in the box: remote, battery, charger. Job done.
The post itself is available in 31.6 and 30.9mm versions of the Circuit, with travel set at 125, 150, 175, maxing out at a very respectable 200mm. KS has clearly thought about modern geometry here, with total post lengths that should fit most frames without too much drama. The adjustable air pressure at the base of the post lets you dial in the return speed to your preference, which is a nice touch. Mechanically, it’s nearly identical to the standard LEV, just flipped around. The air valve for adjusting return speed sits at the bottom of the post, while a small motor up top opens the hydraulic valve when you hit the remote.
The rechargeable 450 mAh battery slides in behind the seat clamp, keeping things tidy. KS reckons it’ll run for up to eight weeks on a charge under normal use, and it takes about 4.5 hours to top up with the included charger. The remote uses a CR2032 coin cell that should last around eight months, with an LED that flips from green to red when it’s time for a swap. You can grab one from any petrol station or supermarket if needed. I’ve had that happen on a few occasions, so it’s worth having a spare and double-checking battery life before rolling out.
Now, let’s talk about how this post performs on the trail. The actuation is noticeably smooth and light. There’s something almost effortless about how it drops when you press that remote button while weighted on the saddle. It doesn’t fight you at all. I have been running wireless dropper posts for more than a few years and rate them highly. I did revert back to a cable-actuated dropper with a recent test bike and actually forgot about how much more I use the electronic version when compared to the mechanical. Put simply – you press the button, the post drops. It’s that straightforward, and after a few rides, you stop thinking about it entirely. The remote lever itself is large and easy to reach, with a response time that’s very quick. The amount of force required is fairly light, and the post slides smoothly out of the way without much effort. It’s on par with the RockShox Reverb AXS for how little effort it takes to get the seat out of the way.
The post is built tough, too. An IP67 rating means it’s dust-tight and properly water- resistant. Precision keyways keep everything stable with virtually no play. This is something I’ve been checking for religiously, and so far, there’s been nothing to report. No slop, no wiggle, just solid performance.
But, there are some downsides. The return speed sits somewhere in the middle of the pack. It’s not sluggish by any means, but it’s not lightning-quick either. You can tune it a bit with air pressure, and I found adding a few extra psi helped. When it’s time to raise the seat for a climb, you hold down the remote and it returns to full extension, but this is where the Reverb AXS has the edge. That post extends much more quickly than the Circuit. I inflated the Circuit to 180 psi, the max recommended, and even then, I’d call the return speed adequate, but not amazing.
On rides with more rolling terrain, where the seat is constantly being adjusted, the difference between the Circuit and the Reverb AXS is noticeable. The Circuit is a little less eager to fully extend. Of course, not everyone wants a super speedy post, and I wouldn’t call the Circuit slow, at all – it’s just not the fastest out there.If you’re coming from a post that rockets back to full extension, you might notice the difference. It gets the job done, just not with any particular flair.
The remote lets the package down a bit. For a post at this price point, the remote feels cheaper than it should. Don’t get me wrong, it’s functional and does what it’s meant to do, but the construction feels a touch flimsy. It’s not that it’s going to fall apart on you, but for the price, you’d expect the remote to feel a bit more premium. The button action is fine, and the ergonomics are decent, but the overall build quality just doesn’t quite match the post itself.
The price of the post is up there but not nearly as expensive as the new RockShox Reverb AXS. Wireless convenience does come at a cost, however. If you’re building up a new bike or already running wireless shifting, the LEV Circuit makes more sense. But if you’re thinking about replacing a perfectly good mechanical dropper, you’ll need to really value that cable-free experience.
One thing worth mentioning is the serviceability. KS has a decent reputation for support, and the post uses their proven hydraulic valve design that sits at the top of the unit. Time will tell how this holds up long term, but the company has a solid track record with their LEV series, so I would back them.
After several months of riding, the LEV Circuit has been rock solid. The Bluetooth connection has been flawless, never dropping signal or acting up. The actuation remains smooth and consistent, and the post hasn’t developed any play or quirks. It just works, which is exactly what you want from a dropper.
KS has delivered an impressive wireless dropper here. The smooth action alone is worth noting, and the battery life means you’re not constantly worrying about charging. Believe me, this can suck and ruin your riding experience. Installation is straightforward, and the performance has been reliable. For riders who value smooth, light actuation and don’t want to deal with cables, this post could be a good option.
If you’re in the market for a wireless dropper and want something that feels effortless to use, the LEV Circuit deserves serious consideration. When you’re out on the trail, pressing that button and getting the saddle to drop away without any resistance, you’ll improve the riding experience.

Bridgedale MTB Socks
Words Lester Perry
Images Thomas Falconer
RRP $2975
Distributor Shimano NZ
Socks are often overlooked when it comes to mountain biking attire, but with our feet firmly planted in stiff riding shoes for hours, perhaps they deserve a little more attention.
Bridgedale, a company from Newtownards, Ireland, has been crafting socks for over a century. Their journey began with socks for the army during World War I. Bridgedale’s focus on creating the best outdoor activity socks ensures that they pay meticulous attention to detail.
Bridgedale’s MTB socks are engineered with advanced cushioning strategically placed in key areas. The asymmetric design utilises cushioning in specific areas for each foot, while the Vibration Damping Footbed employs a unique padding to reduce pedal chatter and trail vibrations. Padded zones around the outside of the foot, ankle, and along the Achilles provide additional warmth and impact protection. Bridgedale has even developed a new Underfoot Toe Seam for this range. By moving the toe seam to the underside of the sock, they’ve added extra padding on top of the toes and increased protection against impacts in the vulnerable area.
Bridgedale’s FusionTECH process sets them apart by blending high-quality yarns and materials with the latest knitting technology. This ensures every sock is comfortable regardless of conditions. Summer-weight models use Coolmax for cooling, while Merino wool provides a soft feel, temperature regulation, warmth and anti-bacterial properties. The underfoot toe seam eliminates the cold spot across the top of the toes, an issue with traditional over- toe sock seaming. This choice of materials, construction techniques, and the availability of two different weights, ensure there is a sock in the range to keep your feet comfortable regardless of the terrain or the conditions.
Bridgedale’s new Off-Road Bike socks offer improved performance through enhanced fit and support. Utilising Lycra Sport, they provide a supportive compression fit. A structured Y-Heel band and elasticated arch ensure a close fit, eliminating movement and friction. This additional support and precise fit enhance foot positioning, stability, and balance, leading to greater bike control.
I absolutely dig a fresh pair of socks. The plush feeling wrapping around your foot is so damn luxurious. This was certainly the case when I slipped on a pair of the Bridgedale Midweight merino socks. Initially, they felt great, providing a tangible feeling of support, especially around the footbed. On the bike, the socks offered ample support and stayed up – slipping down is one of my pet hates! After several rides, including a long four-hour pedal, the socks performed well without bunching. This was achieved via the asymmetric foot-specific design which eliminates friction from cycling shoes and provides better protection than a regular sock. The moisture management wicks any dampness away effectively, keeping feet dry in both warm and cool conditions by controlling heat and sweat.
After several washes, the socks have remained in good shape. Another pet hate of mine is how quickly new socks can get destroyed by the washing machine. It’s super annoying when you drop good money on a pair and they end up out of shape after just one or two washes. Bridgedale’s range feels durable and they completely back their products with a Lifetime Guarantee. This guarantee covers any defects in workmanship or materials, reflecting their 100 years of experience in sock-making. Knowing your sock game is dialled means you can focus on your riding experience. Don’t overlook your riding sock drawer – treat yourself to a good pair that’ll last the distance. The only downside is that these socks are quite spendy – but the quality, durability and guarantee makes them worth it. These socks are incredibly comfortable, far surpassing most others in my wardrobe. They’ve been on high rotation during house duties and on most rides – they’re that bloody good!

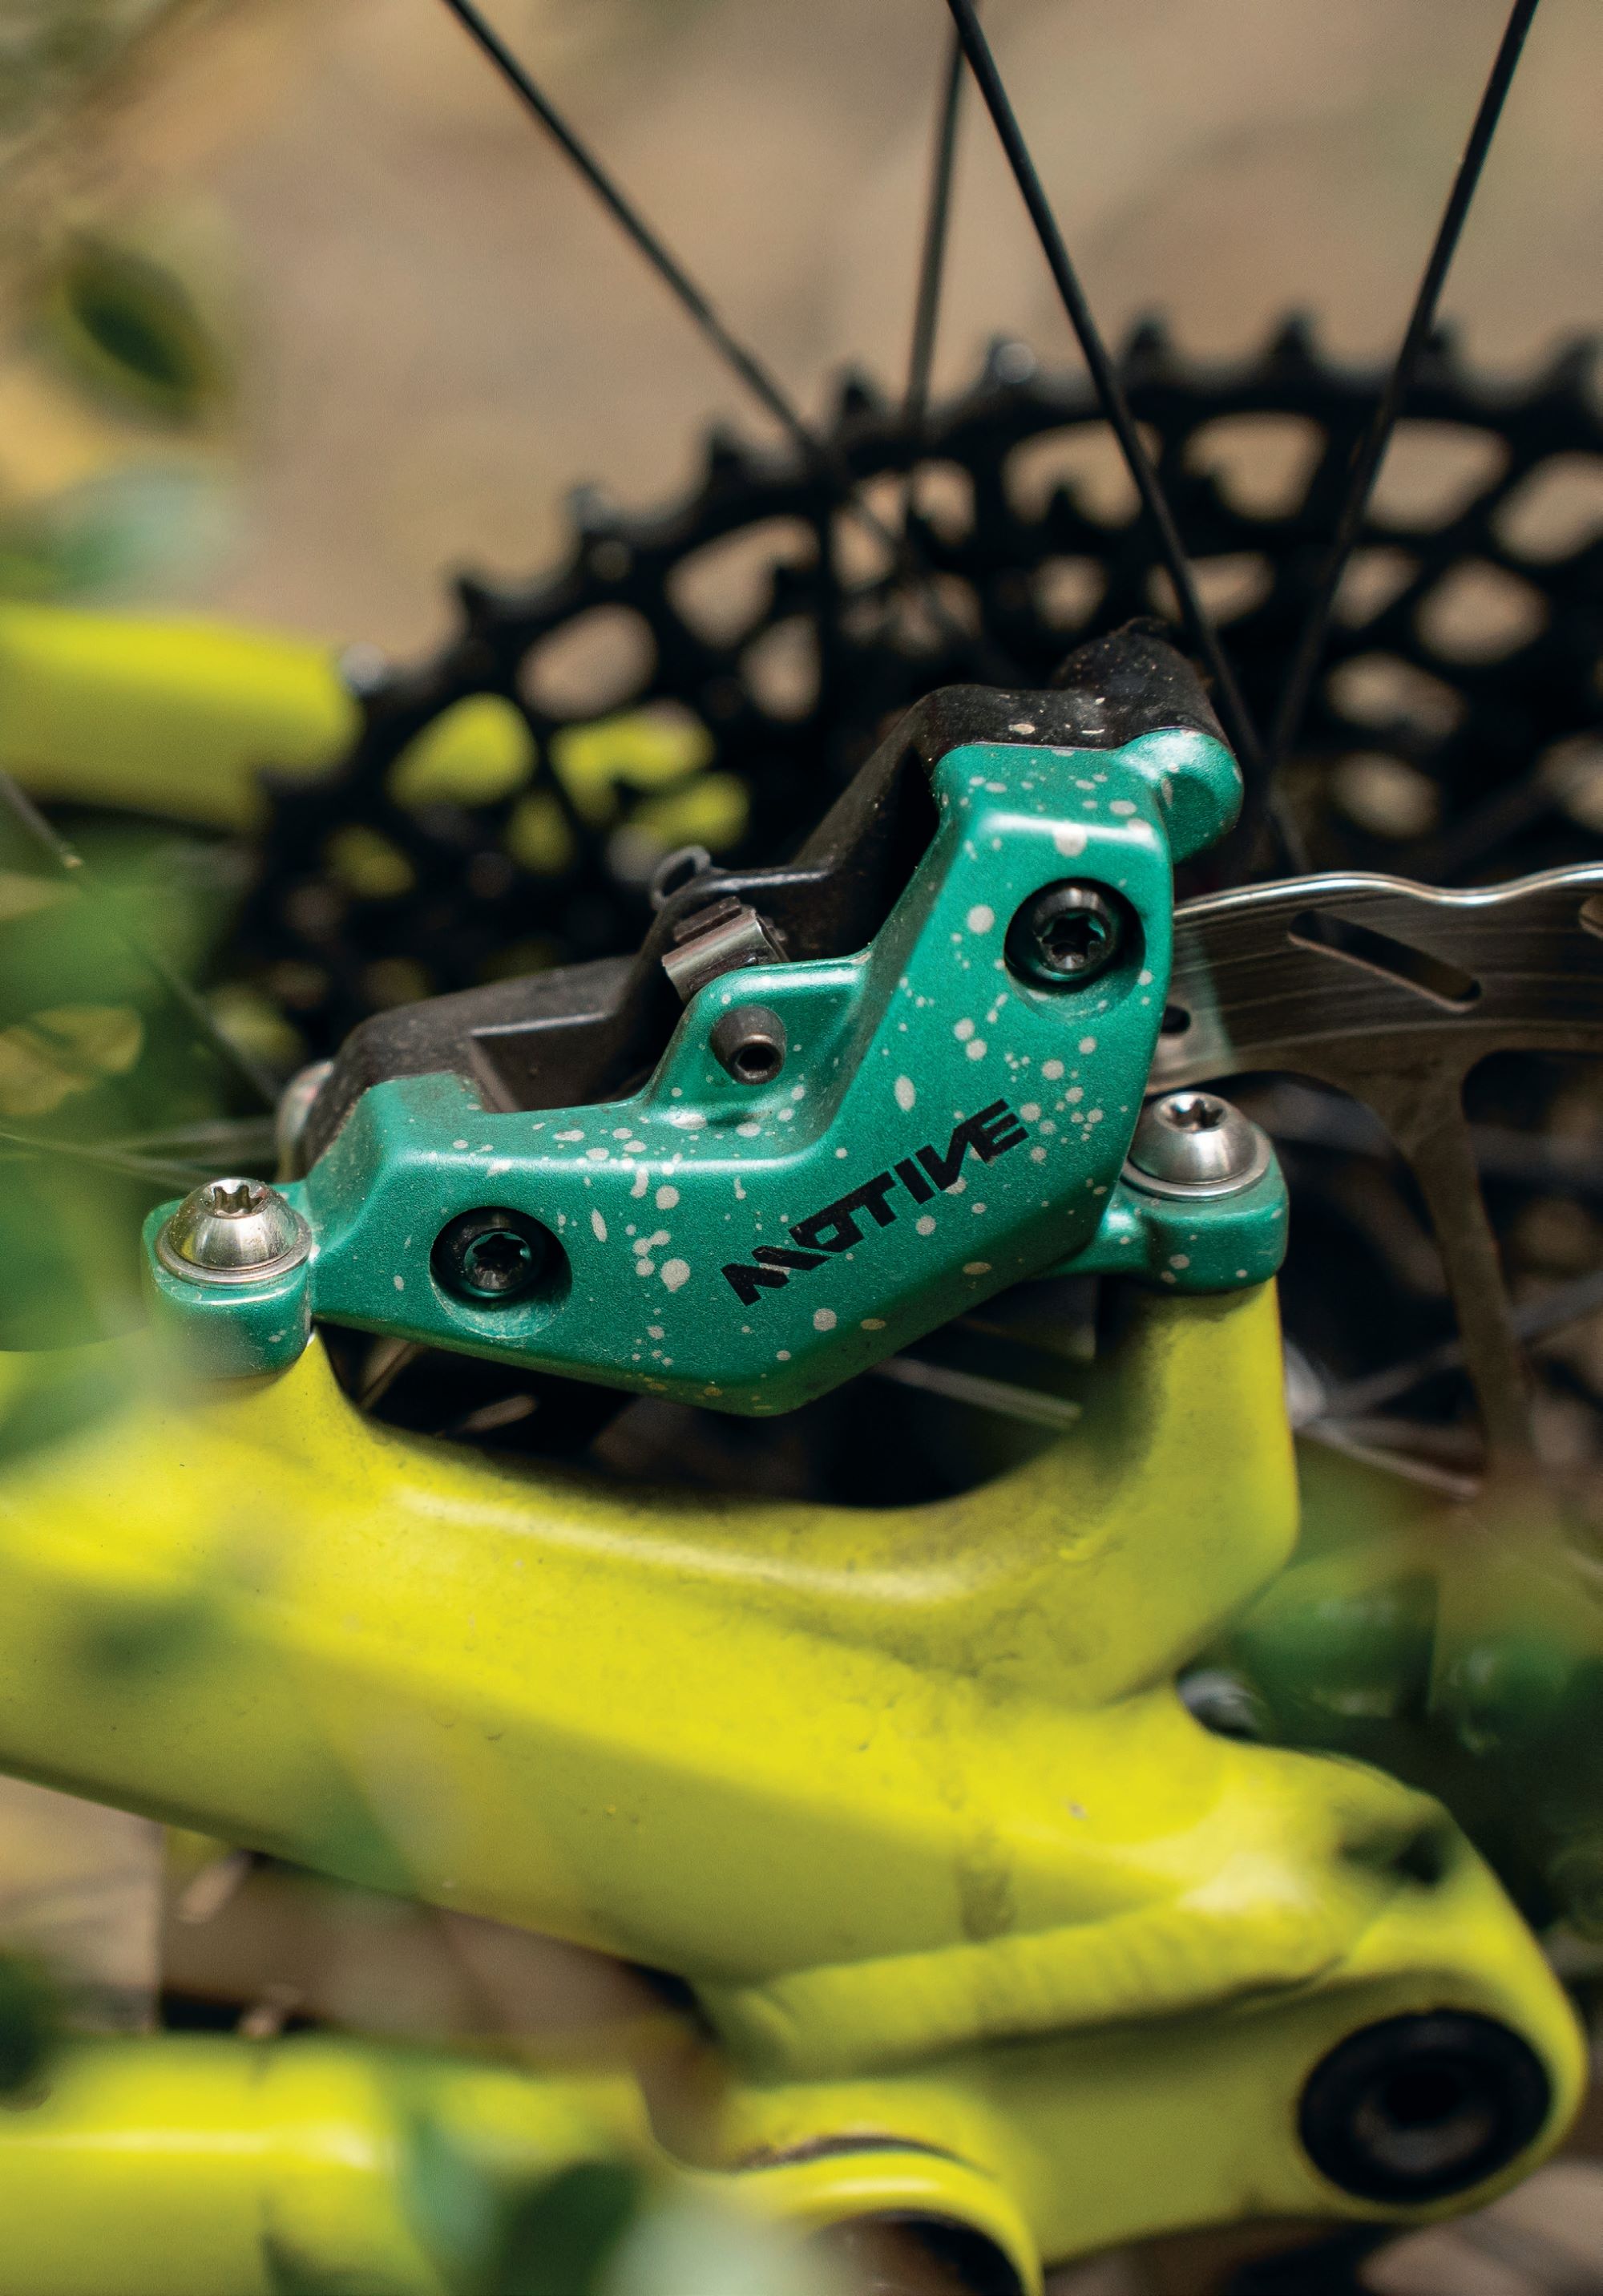
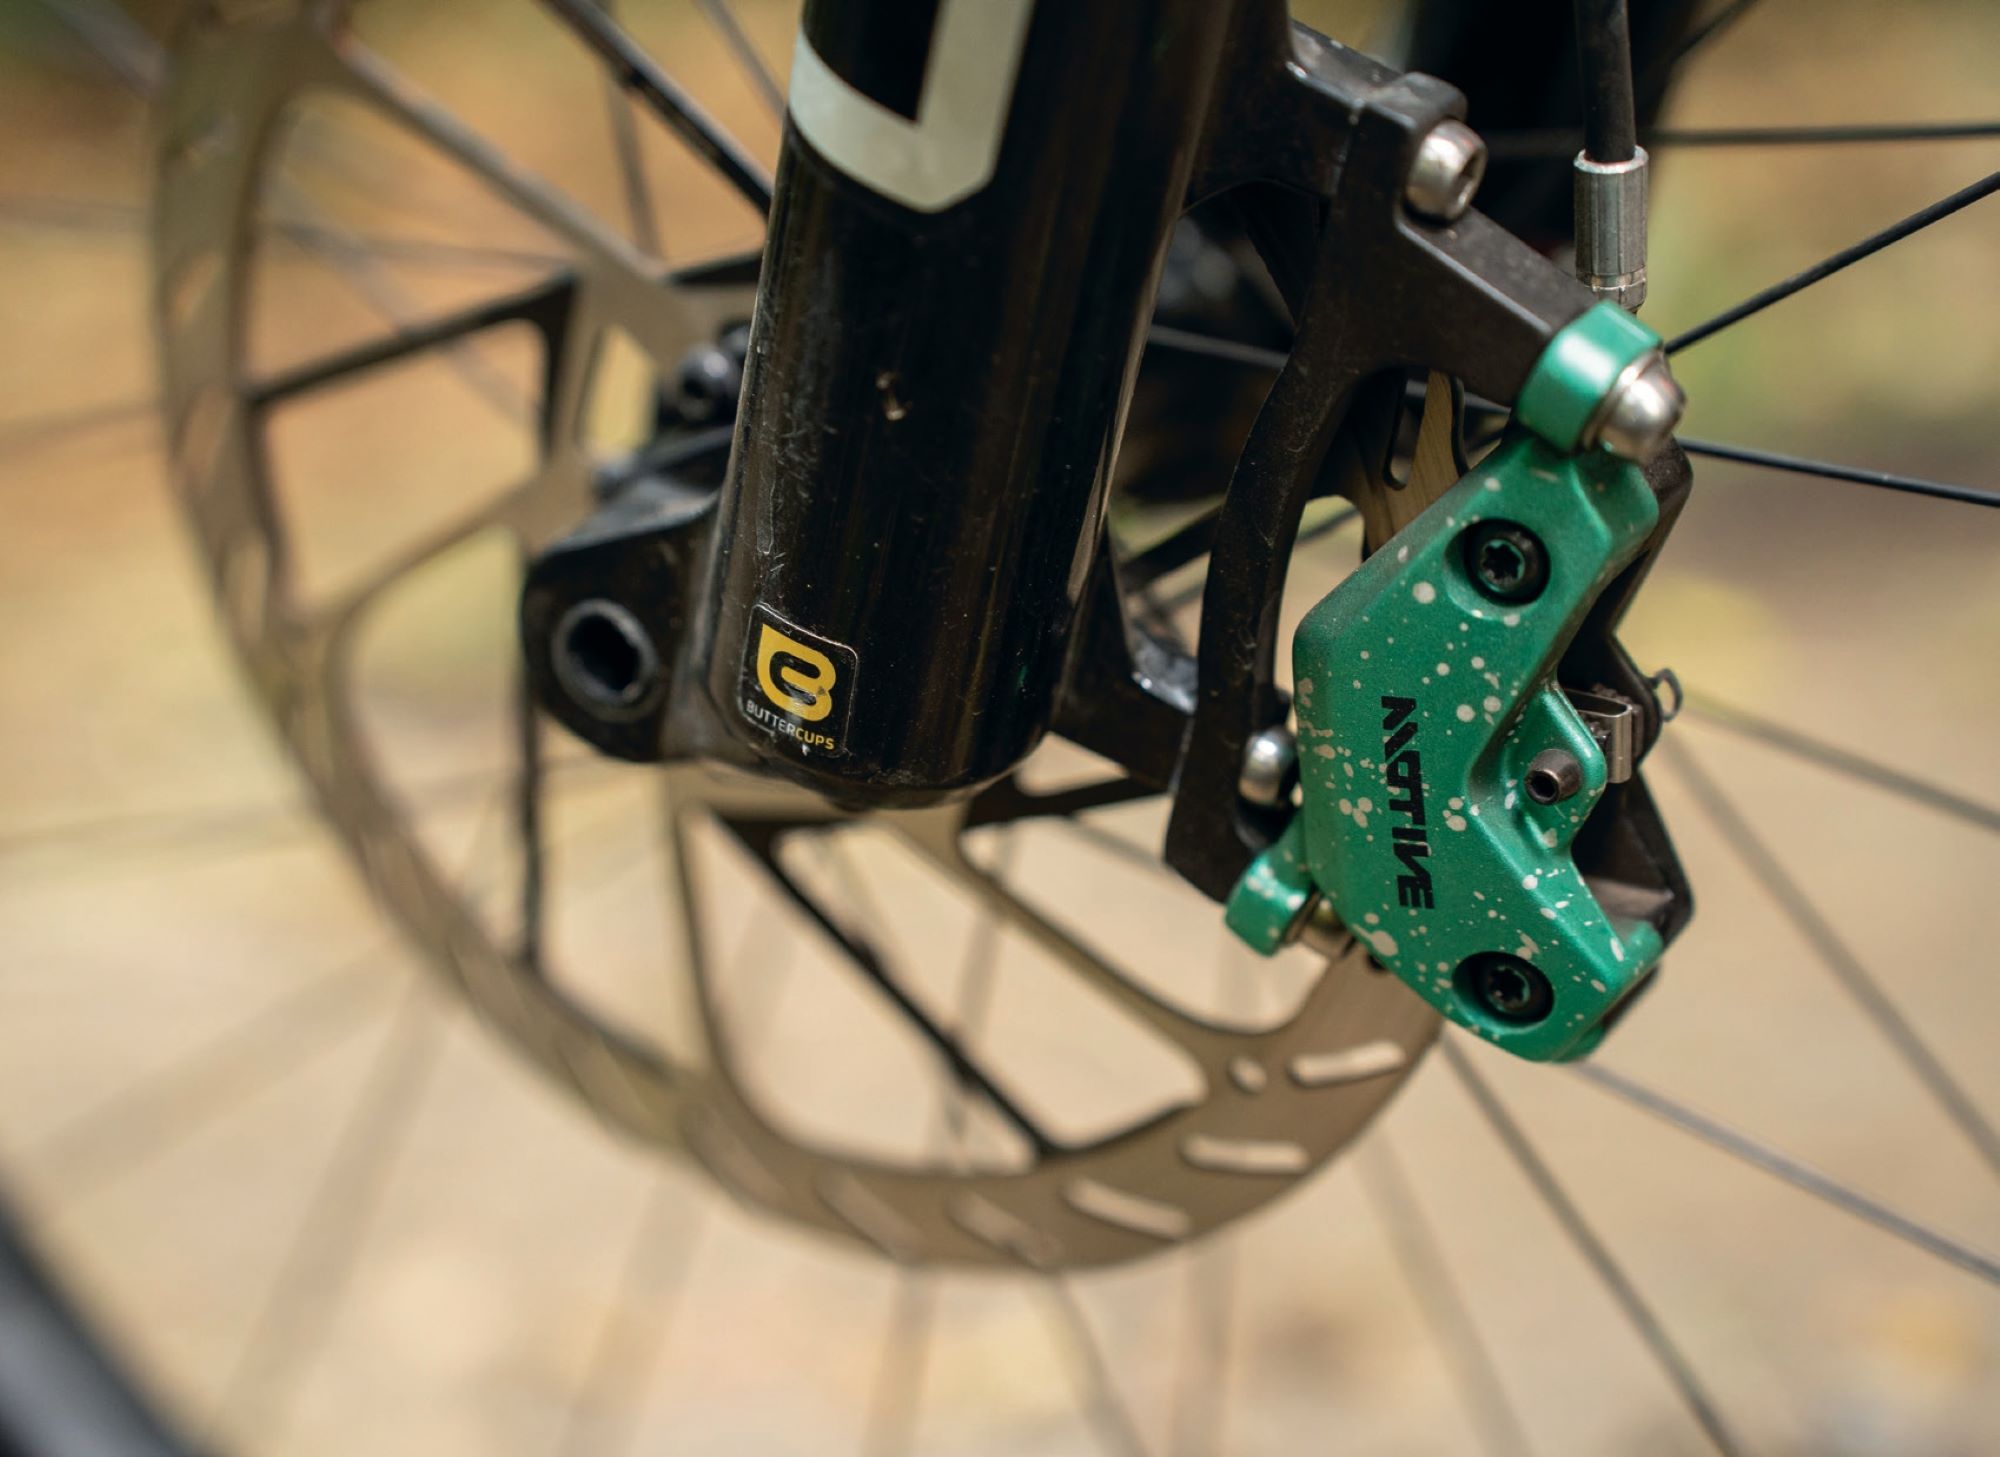
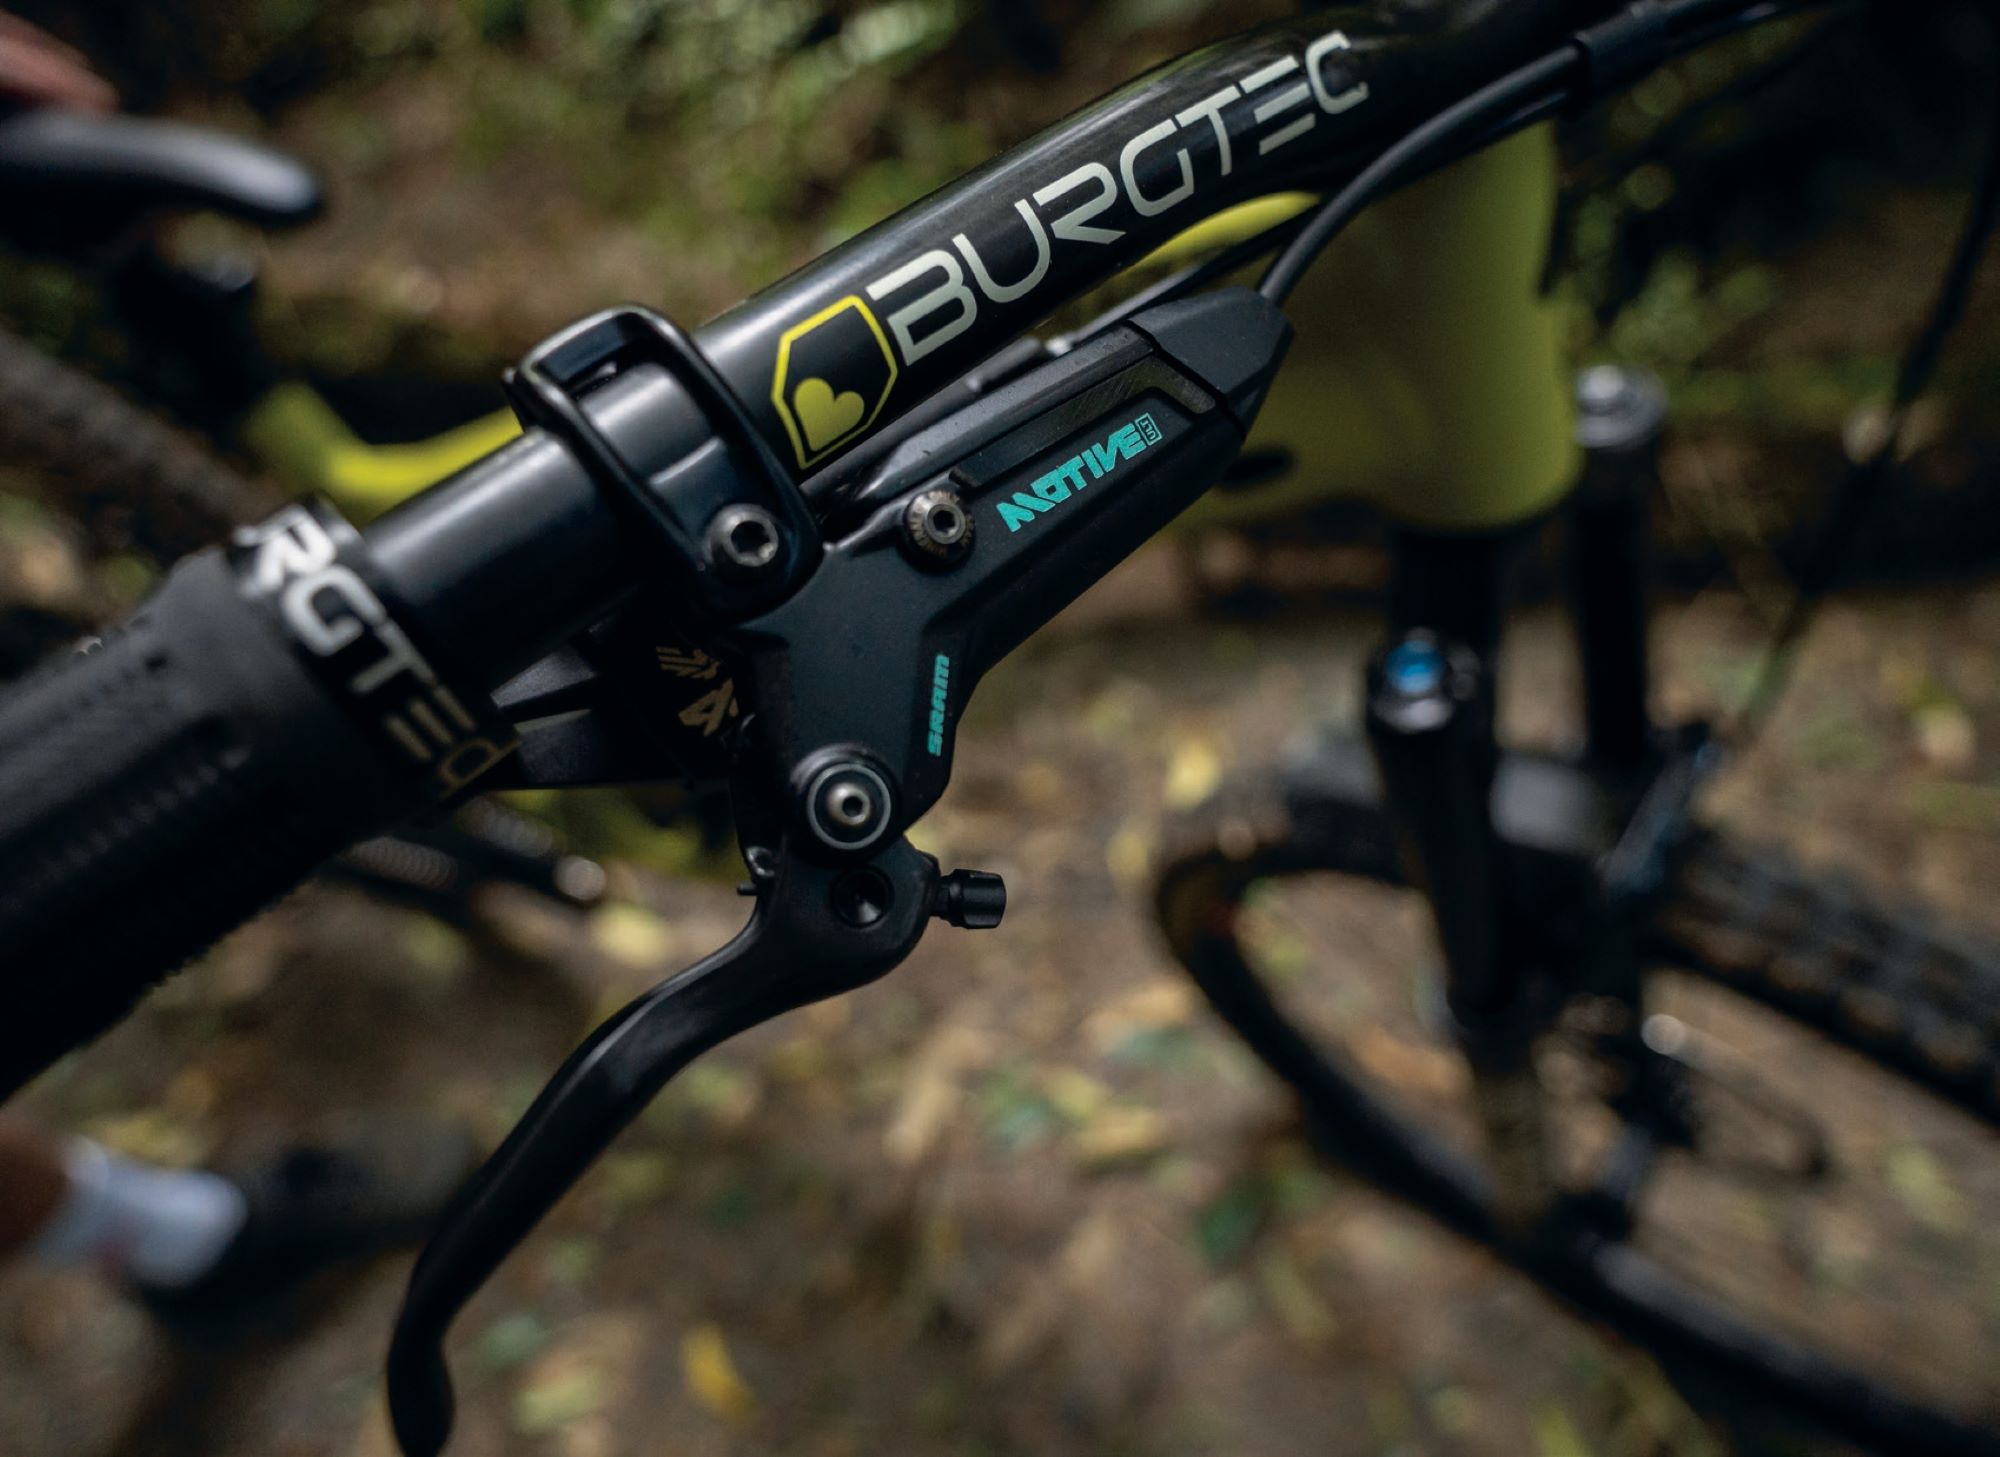
SRAM Motive Ultimate Brakes
Words Lester Perry
Images Thomas Falconer
RRP $1280
Distributor Worralls
In February 2024, SRAM dropped their fresh, brutally powerful, top-tier gravity brake; the Maven Ultimate. Although Maven was their second offering with Mineral fluid, the change to a Mineral brake fluid on this new flagship model hinted at a shift across SRAM’s brake offerings, and a move towards bleeding out DOT fluid systems, replacing them entirely with Mineral fluid brakes.
A year later, in March 2025, SRAM unveiled what many had suspected was coming: a simplified lineup of brakes based around a more user-friendly, and in most opinions, better-performing Mineral fluid.
I’ve been running a set of Mavens on one of my bikes for about a year and when I saw the Motive launch, I was keen to get on a set. Realistically, they’re squarely targeted at most of the riding I do and would suit another of my bikes perfectly.
This range revision plans to reduce the SRAM lineup from 27 models down to just ten, in a move to simplify and consolidate. The range is now split into three distinct streams: Maven targeting gravity, Motive targeting XC and Trail, and the DB series targeting power at a reduced price, thanks to fewer features and added weight.
The Motive series replaces two previous brake series from the SRAM range. The Motive brings almost the equivalent power as the now-discontinued Code, at a weight only slightly above the also-discontinued two-piston Level series, but in a Code-esque four-piston package. The Motive calliper is slightly squarer, and more boxy, than the sculpted Code, but houses the same size pistons so there are obvious similarities, although with new fluid comes new seals throughout the system.
The Motive is available in three tiers: Ultimate, Silver, and Bronze, like other SRAM brakes. All share more or less the same performance, with only minor tweaks distinguishing each level. The Ultimate has a crisp anodised finish, a swanky carbon lever with bearing pivot, and premium titanium hardware. Silver level goes to an alloy lever blade, with more basic stainless steel hardware, and less swanky finishing. The Bronze level is a little more no-frills with its bushing lever pivot, basic hardware and less premium finishing. The calliper has a fixed line fitting instead of the swivel banjo of the upper tiers. Differences in weight between the levels are subtle: Ultimate 265g, Silver 273g and Bronze 279g (rear brake, 1800mm hose, ready to ride but sans mounting hardware).
The Motive lever stays in line with the new ‘stealth’ styling, keeping the master cylinder and brake hose almost parallel to the handlebar. Thanks to the DirectLink lever, the feel is lighter than the Maven, right from the start, and has a more ‘normal’ SRAM feel of “what you put in is what you get out”; whereas the Maven’s SwingLink style lever has a cam that effectively multiplies your input power as you pull the lever, giving a different feel more suited to the demands of heavy braking over long periods. There’s no pad adjustment, which keeps things simple and lightweight, although basic reach adjust remains.
Expert Kit
The Expert Kit is a great way to purchase the Ultimate brakes. The kit includes everything you need to set up the brakes and maximise their performance over the long term. A pair of brakes, two pairs of sintered and two pairs of organic brake pads, 2x 160mm and 2x 180mm rotors, as well as all associated mounting hardware and mounts, and a multitool, complete bleed kit and oil. Essentially a one-buy solution to complete a top-tier Motive set up for XC or lighter trail use, that’s customised to the user’s specific needs.
The Ride
In my case, I threw the 180mm rotors on immediately with sintered pads. With it being the end of summer, and fitted to a 140mm travel trail bike, I opted to start with what I deemed the most powerful setup from the get-go and, if required, switch to a smaller rotor or organic pads from there. Needless to say, I haven’t changed anything.
It’s not normal for me to run a 180mm rotor up front unless I’m on a cross-country bike but, not having the option to go larger (at least out of the box), I was stuck with it. I’ve been surprised at how powerful the brakes are, even with the smaller front rotor.
The modulation is excellent, and lever feel is consistent throughout a descent. The ‘what you put in is what you get out’ feeling is certainly there and they feel like you can just squeeze harder and get more bite, however, there have been times I’ve noted I’m pulling quite hard when needing to haul anchor and stop quickly… like when one of your mates’ crashes right in front of you!
These brakes excel in the realms they’ve been designed for; cross country and trail. I wouldn’t think twice about putting these on a full-on XC race machine (in fact mine will likely end up on one) and in cases where weight is still relevant, i.e. on many ‘trail’ bikes, these would be ideal, possibly with a 200mm rotor up front, particularly if you’re heading toward the 90kg mark. For any enduro bike or rider purely focused on descending, where pedalling is just a means to an end, and where raw braking power is paramount, something less weight-focused like a Maven, or a new Shimano XT would be much more suited, particularly when trails get steep.
I think it’s worth noting here that bigger, or in this case, gruntier and more powerful, is not always better. Many people (myself included) are over-braked, choosing the most power possible rather than what’s actually best for them, often blinded by the power and large rotor sizes. The Motives have opened my eyes to some of the subtleties that make for better braking, not just having maximum power, but modulation, consistency and even the changes in using different pad compounds or rotor sizes, which help make it optimal for where, and how, I ride.
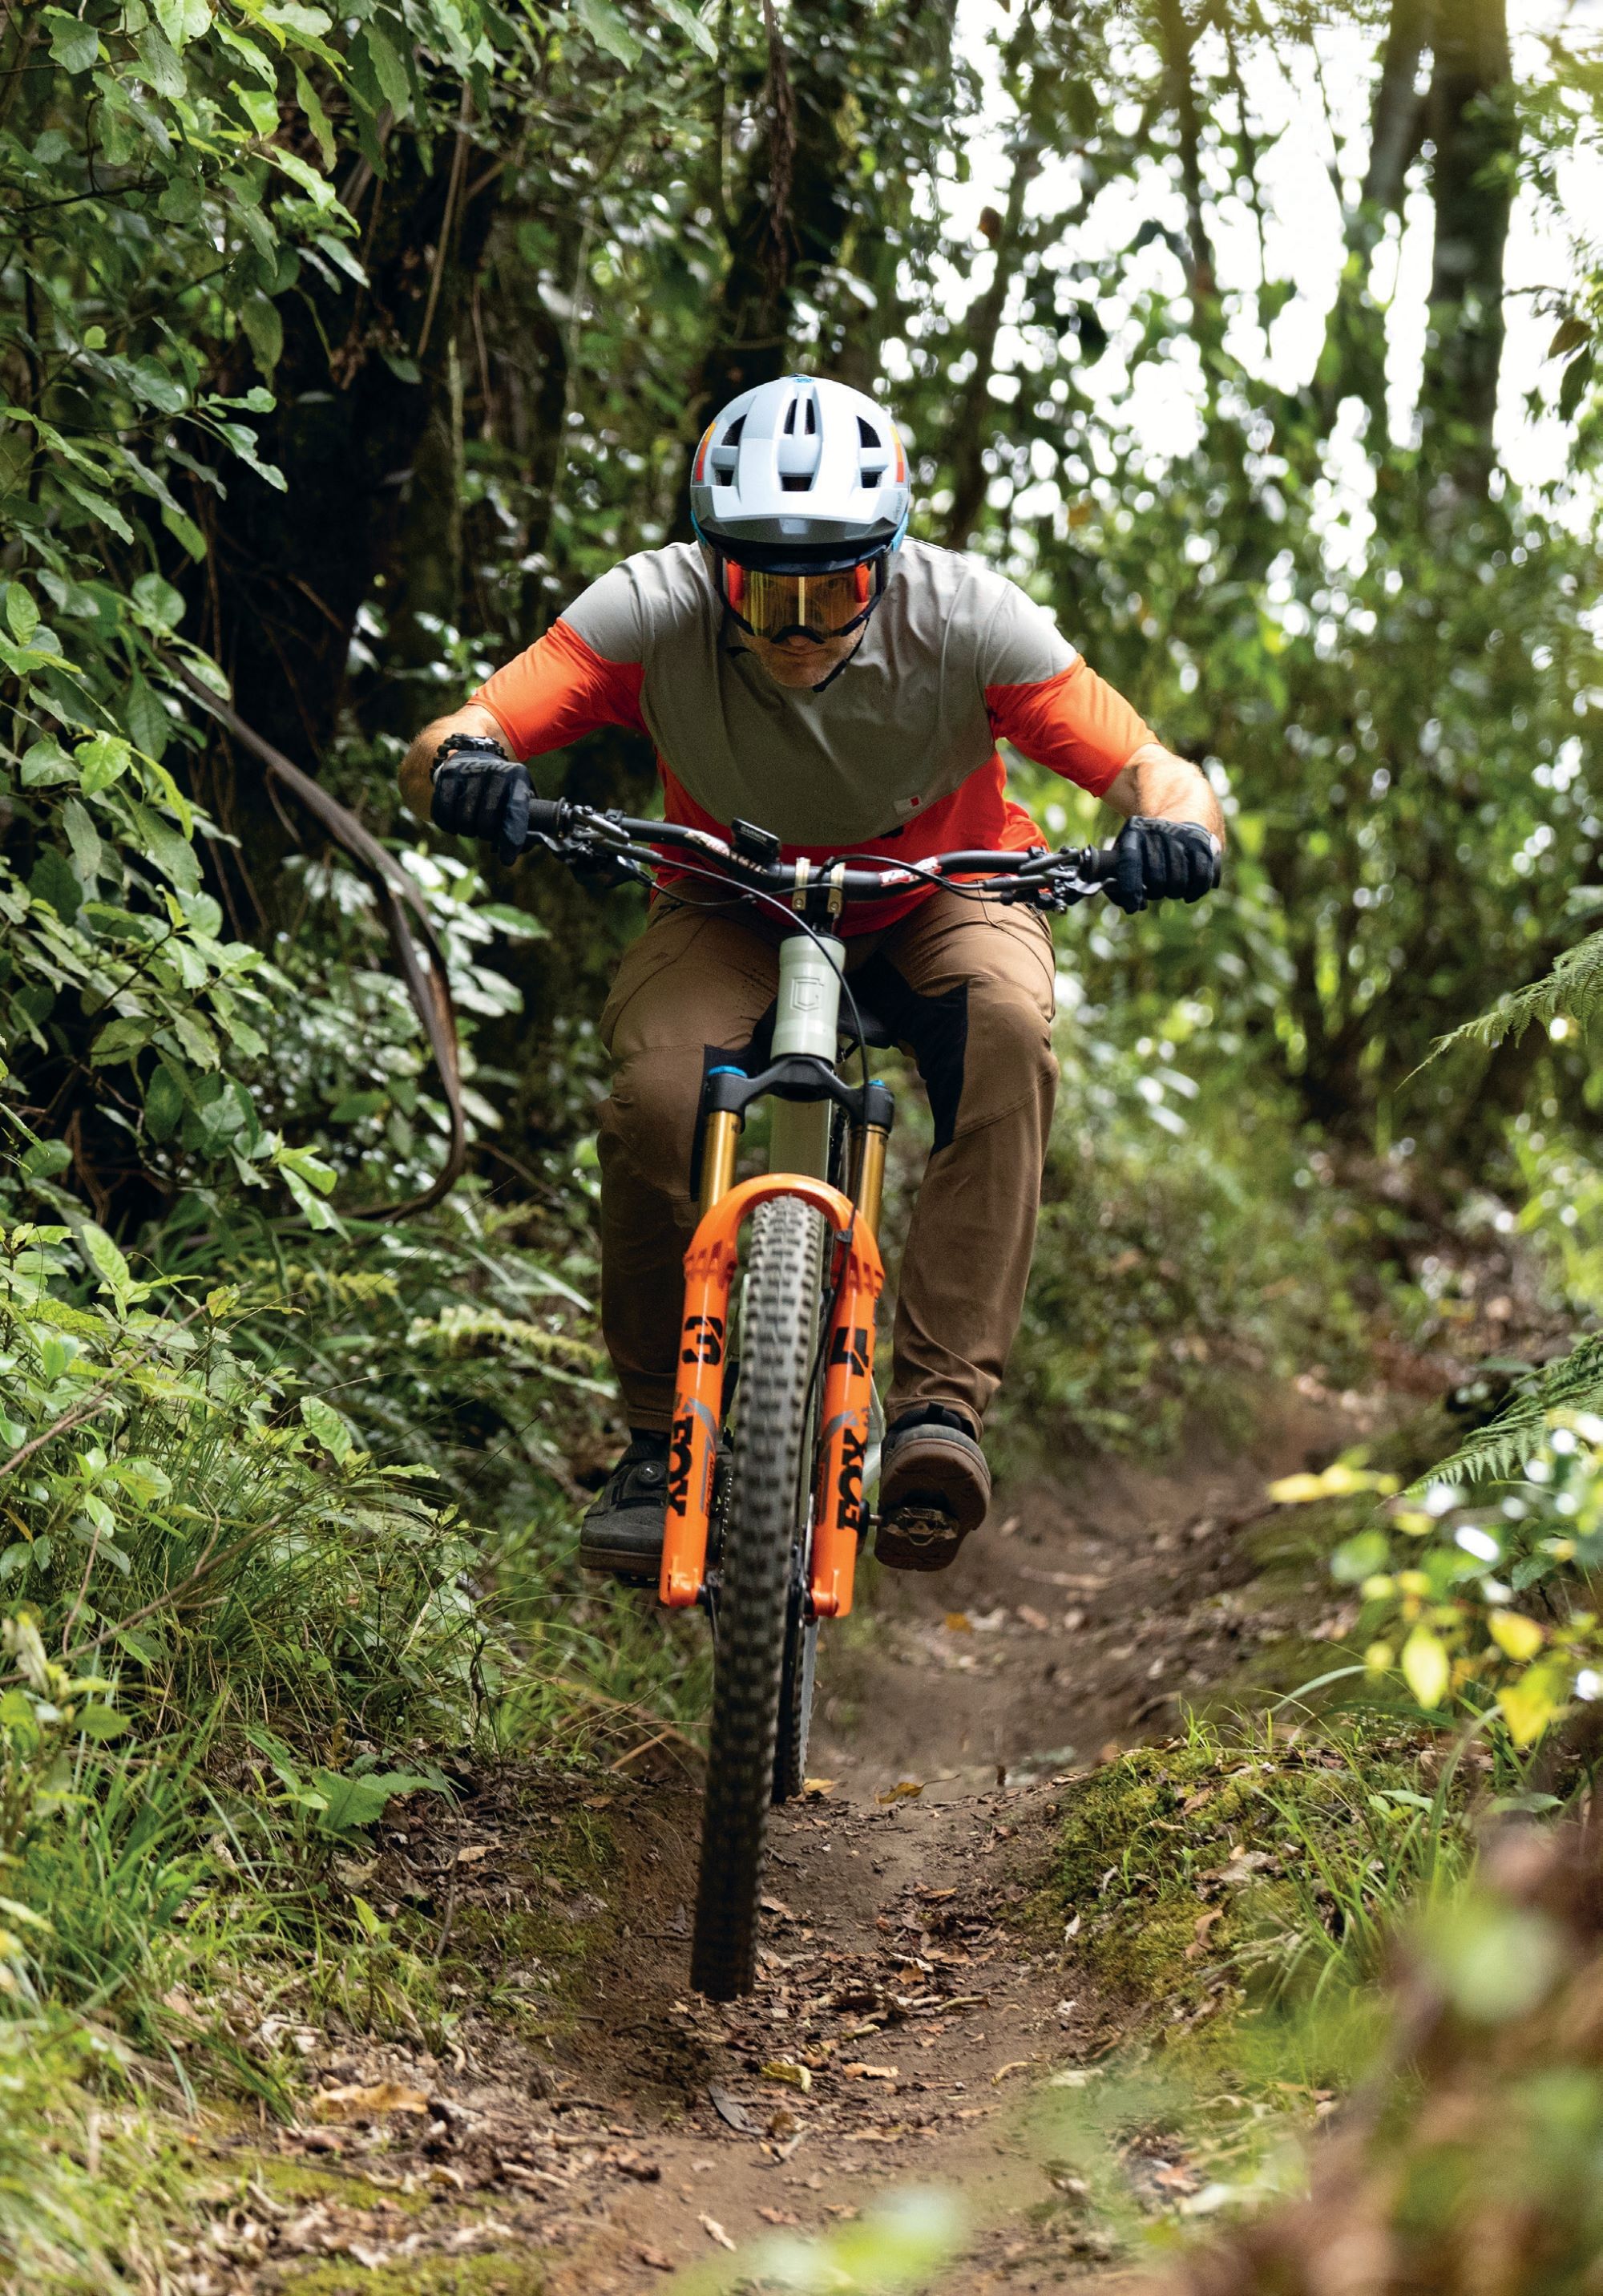
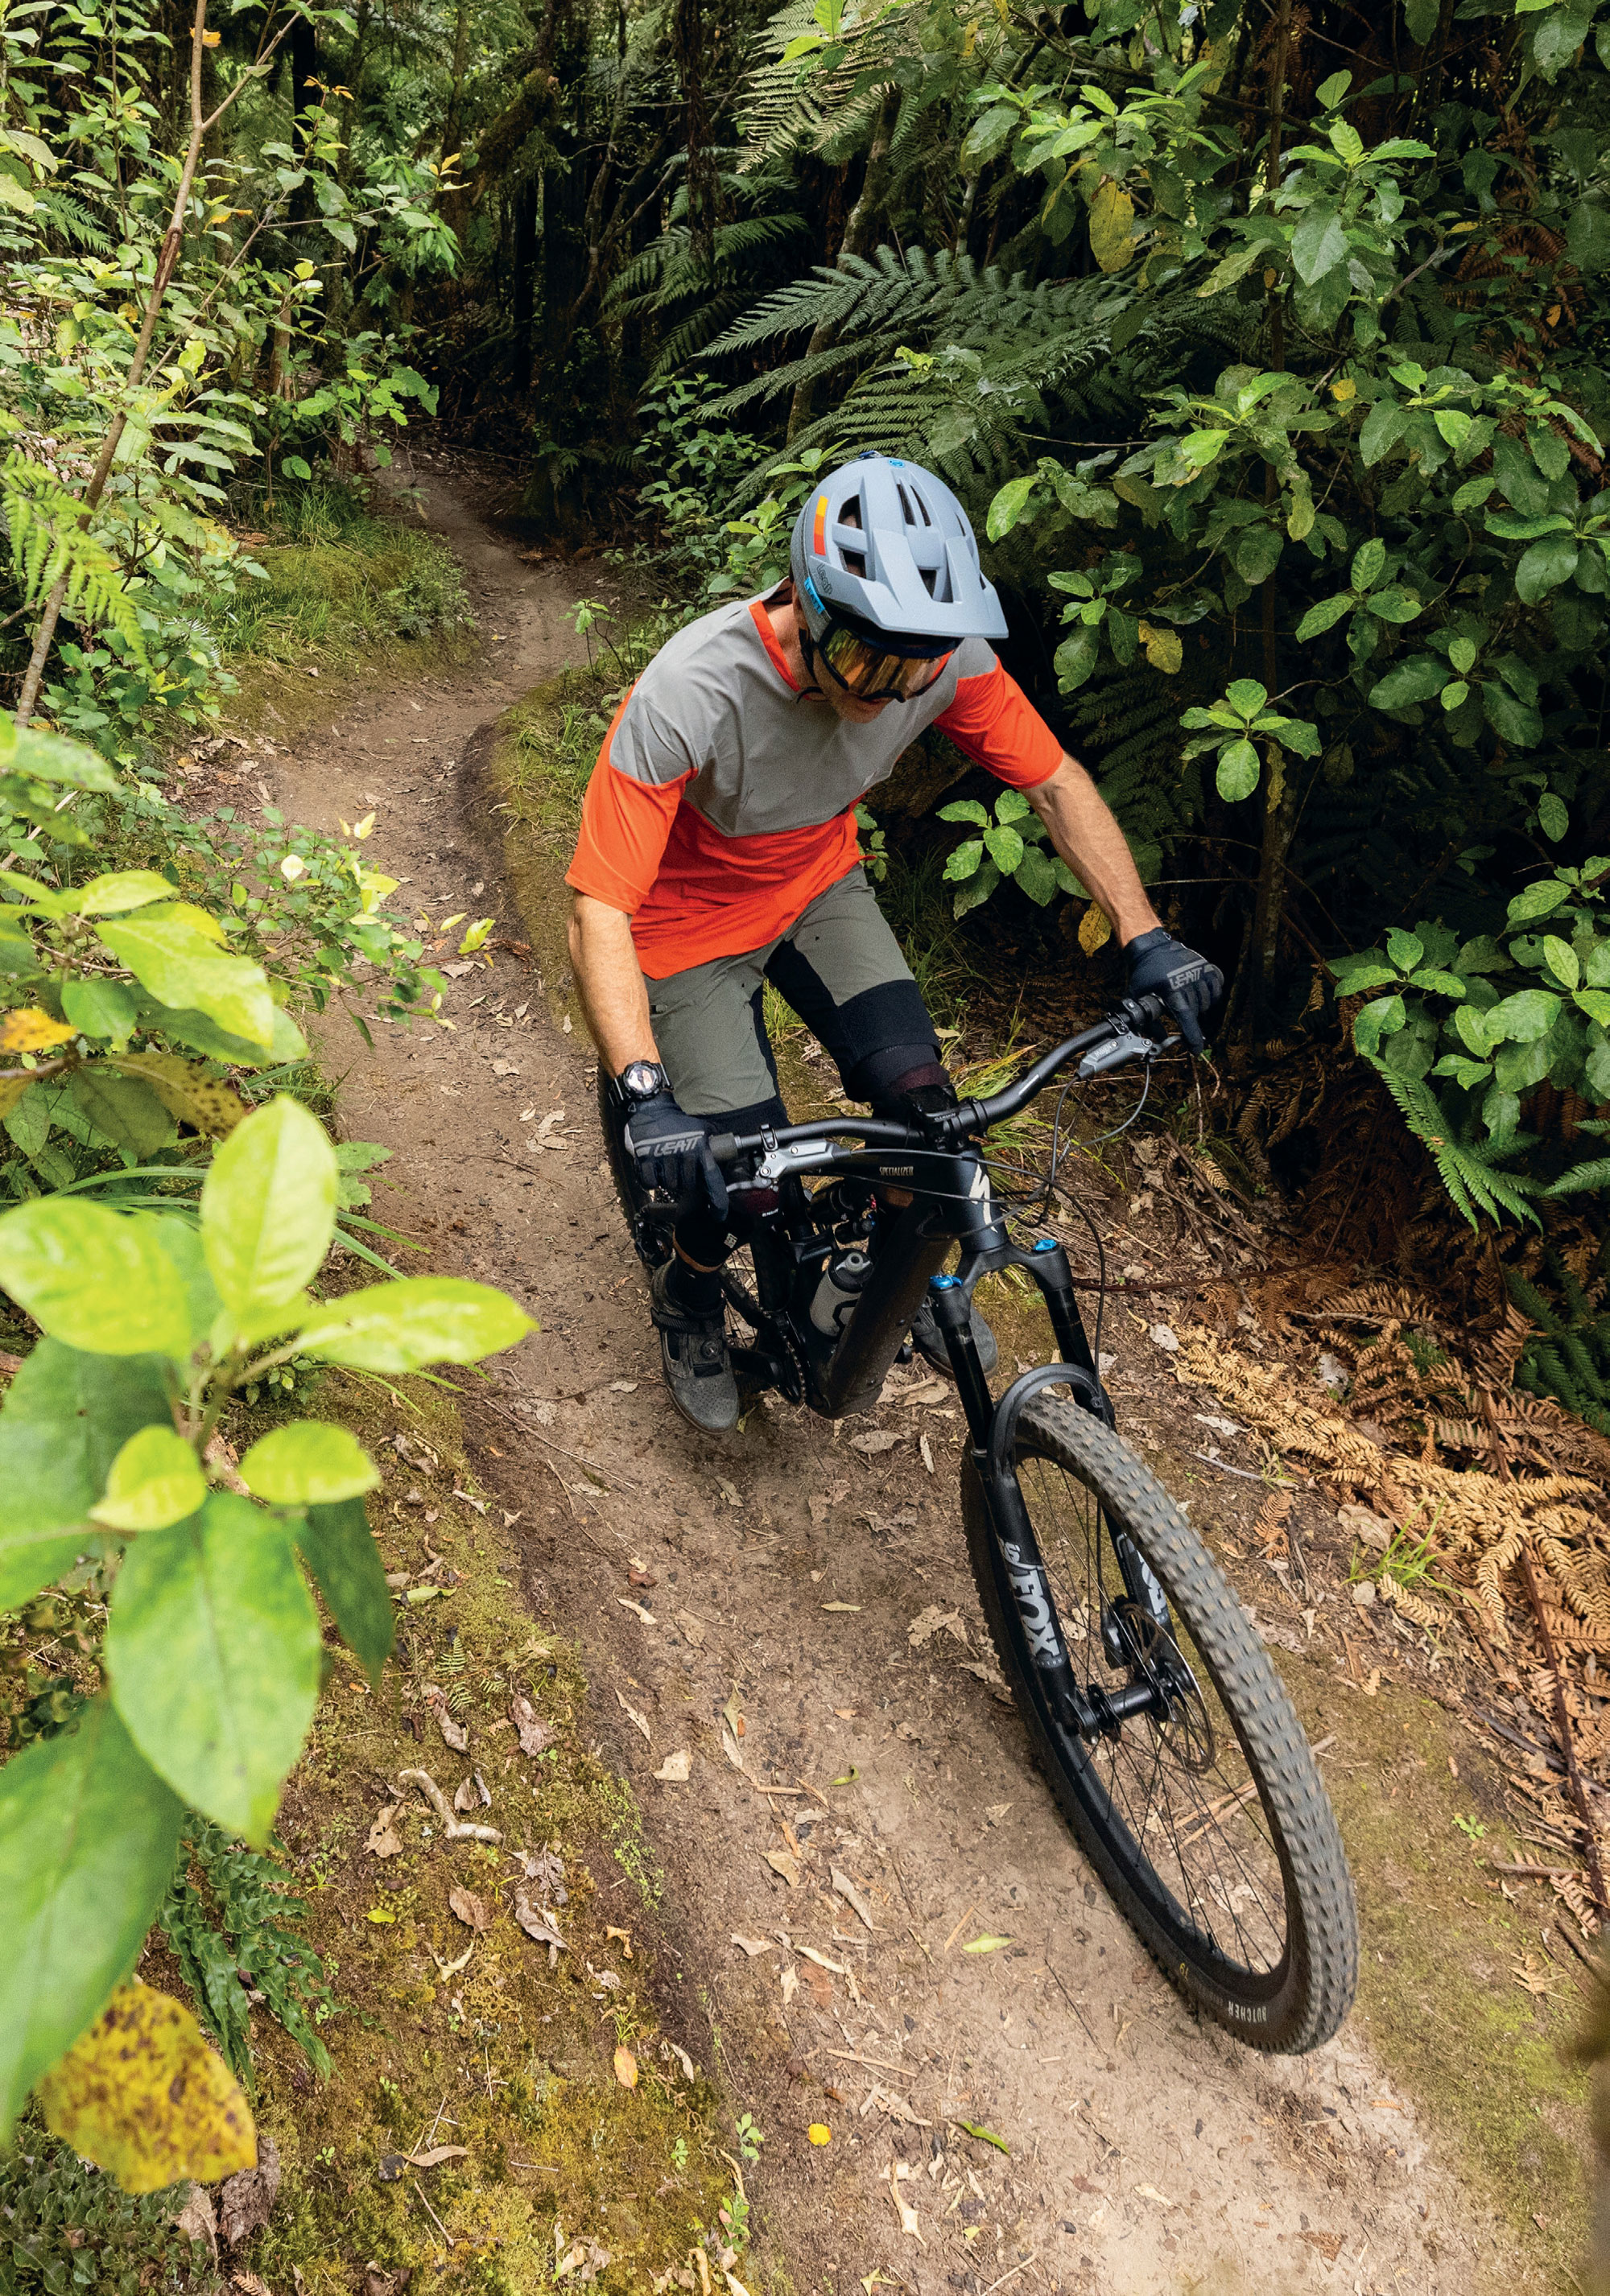
Leatt Enduro 3.0 Pant
Words Lester Perry
Images Thomas Falconer
RRP $199
Distributor BikeCorp
Launching in the moto world in 2015, Leatt first began to dabble in MTB gear with a range of helmets. By 2020, they had expanded their line to not only include helmets but pads, neck braces, shoes and apparel as well, offering a complete head-to-toe solution.
Now in its 20th year, and with numerous design awards under its belt, Leatt continues to go from strength to strength. In mid-2025, the brand announced its second quarter revenue was up 61%, its fourth consecutive quarter of growth, bucking the current industry trends in a big way.
They must be doing something right.
Through early 2025, on rides when I was reaching for long pants, a pair of Leatt Enduro 3.0 have been my preferred option. Particularly through autumn and winter, long pants win out over shorts for me. The increased protection they offer is nice, but it’s the ability to finish a filthy ride and just drop dacks and drive when I get back at the car—plus the minimal clean up required—that makes these a winner for me.
Although the name of these pants has ‘enduro’ in it, they’re far more than just an enduro pant. If there’s any time you’d wear long pants, these would do the trick, with one possible exception, which I’ll get to below.
With its regular, pre-curved fit, the pants are comfy on the bike, and there’s plenty of room for pads underneath without them being overly baggy. Long pants followed a trend of becoming slimmer and slimmer for a moment there but, thankfully, these are a bit more roomy. A Velcro waist adjuster on each side helps get the fit just right, and the medium size is in line with most 32” pants I wear, although if I were any larger, I’d likely need to step up to the large size, as I have the adjusters maxxed out as it is. The leg length is a fraction longer than ideal for me at 176cm tall, sitting partway down my ankle; my preference would be a little higher. Reality is, my legs are probably shorter than average for my height, so I’d imagine they’re optimal for most people, and the length isn’t enough to put me off.
The main fabric is lightweight and breathable, with a soft backing. Key areas are perforated to increase breathability. Around the inside of the thighs and across the seat is a three-layer, waterproof, breathable fabric. Helping keep you somewhat dry from ground water spraying up, while the pants remain breathable overall.
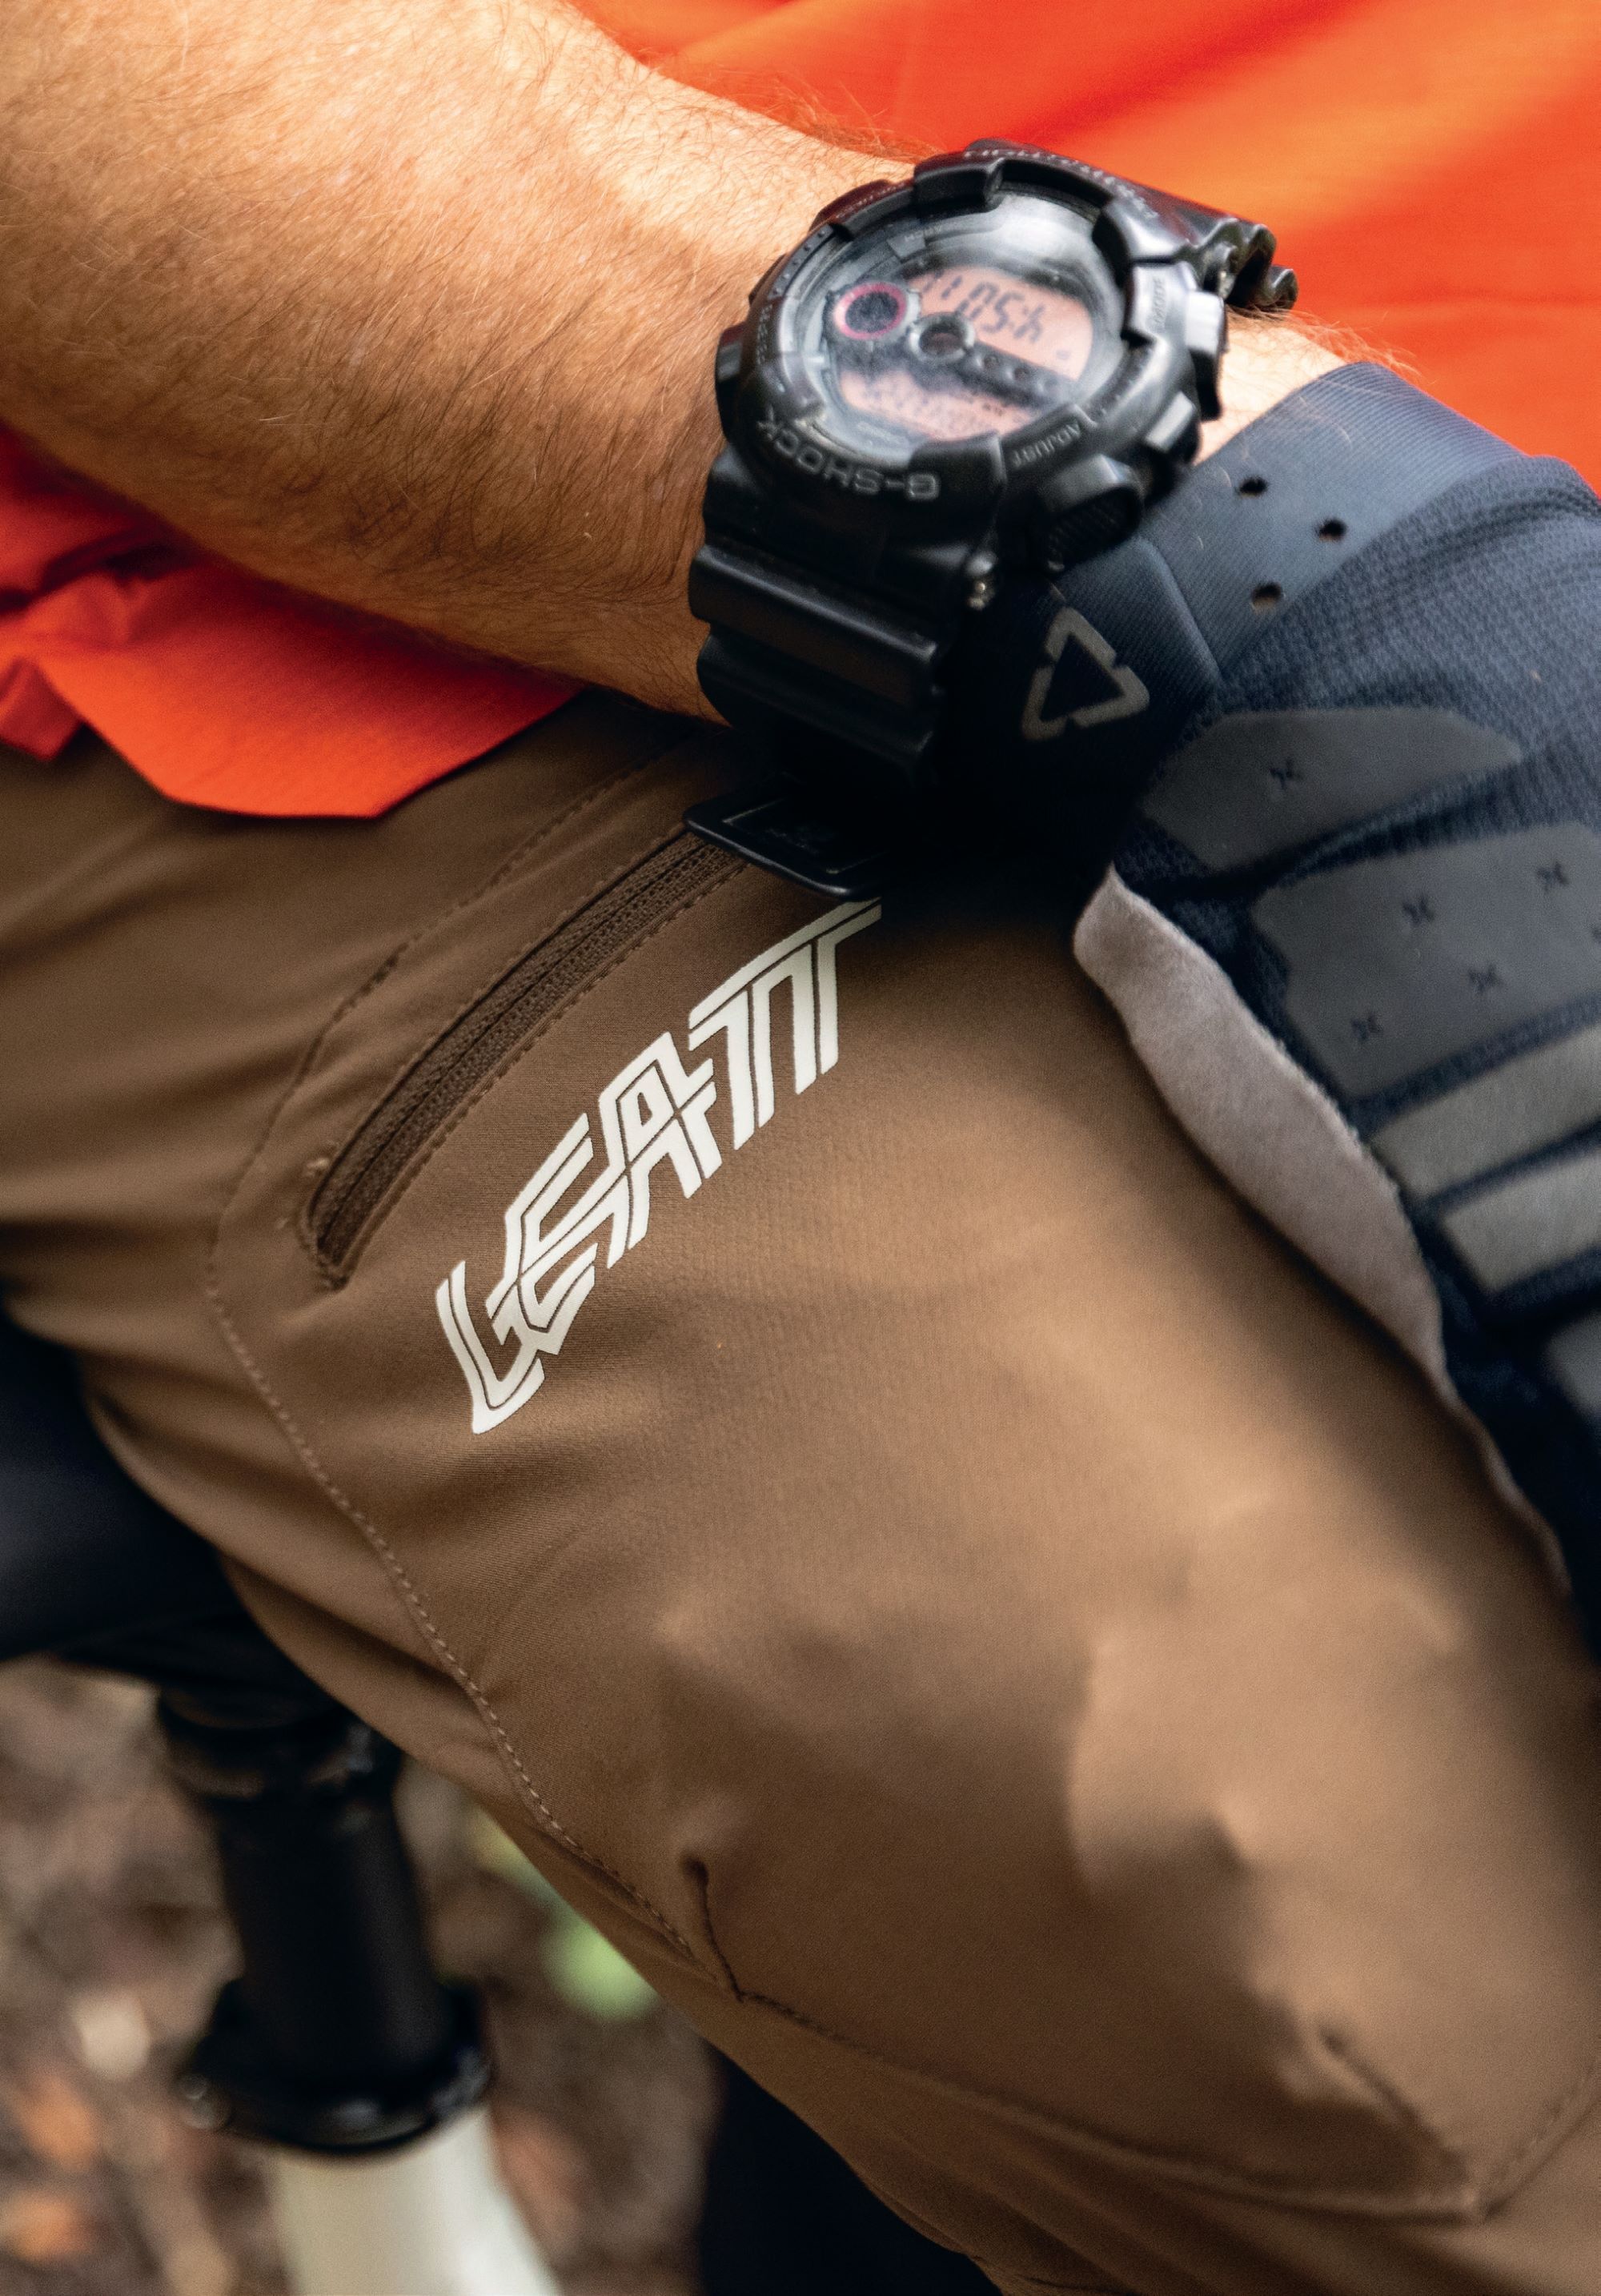
The Enduro 3.0 pant has pockets aplenty, ideal for big days out pedalling or lapping the bike park. Zipped thigh pockets feature on each leg and are large enough for a fair amount of cargo—they’re about the same size as a pack of jelly snakes. Each side also has more traditional, zipped, hip pockets; with an elastic key loop on the left side. The fifth pocket, located on the back of the waistband, is large enough to hold most cell phones—or some more snacks.
Out on the trail, the pants perform well and there’s nothing that stands out as a negative with the fit or function. The cut is perfect while seated and is fine for pedalling for long periods without excessive bunching. The fabric is a tad heavier than super lightweight trail pants, but this makes them harder wearing. The downside is that the overall weight of the pants is slightly higher, in part thanks to the fabric involved in the pockets. It’s not noticeable on the trail, but it’s worth noting these aren’t a super light trail pant, they’re sturdier and should last longer.
I wore these pants while in Christchurch reviewing the Specialized Levo 4, spending a day out pedalling around in what were near monsoon conditions. It was here I found a minor shortcoming of these pants: although the fabric repels water, it only does so to a certain degree. Thanks to the looped backing of the fabric, its overall weight and the pockets, when saturated, the pants retain more water than Leatt’s lighter-weight trail pants. They’re awesome for general use and on wet trails or in light rain, in part thanks to the waterproof seat area, however, when it’s absolutely pouring down, the lighter pants will retain less water.
So, who are these pants ideal for? I’d recommend these for anyone who has a focus on descending, who’s likely to need the extra protection they offer. Shuttle bunnies or eBikers, these will be right up your alley. If you’re into big, backcountry rides, the extra pockets will help you carry more and let you distribute the weight across your body. Just check the weather forecast before you leave home.
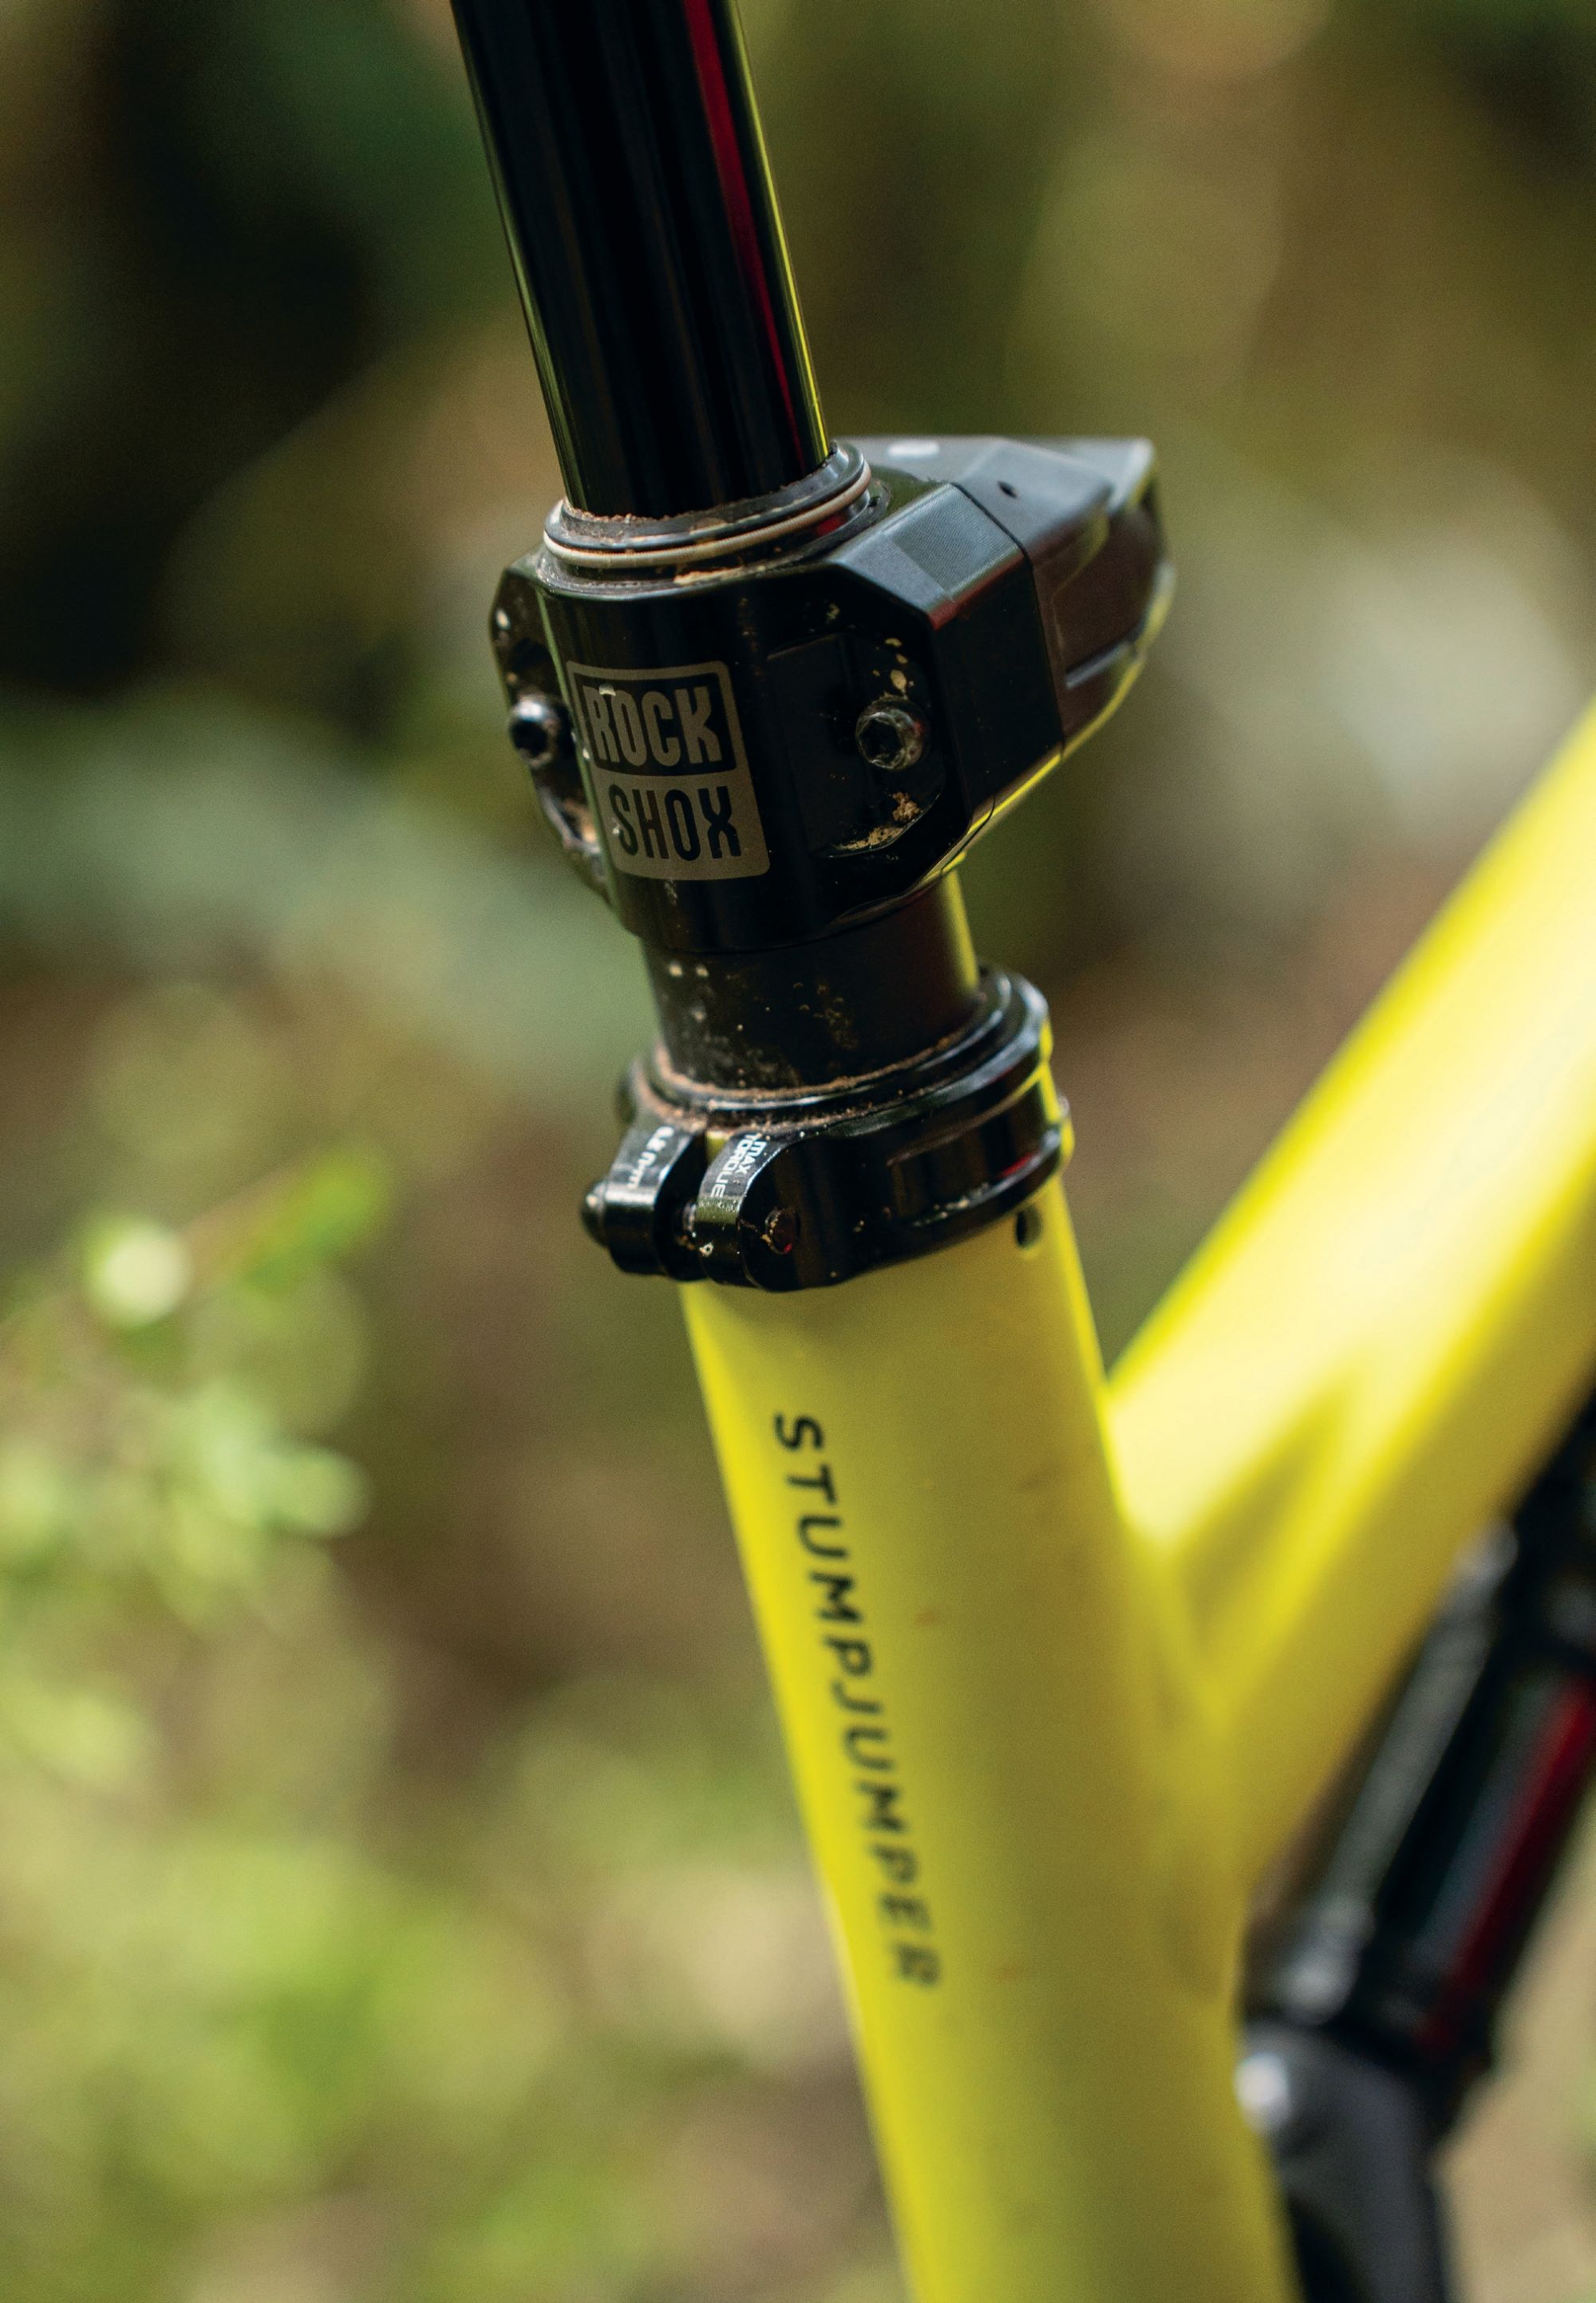
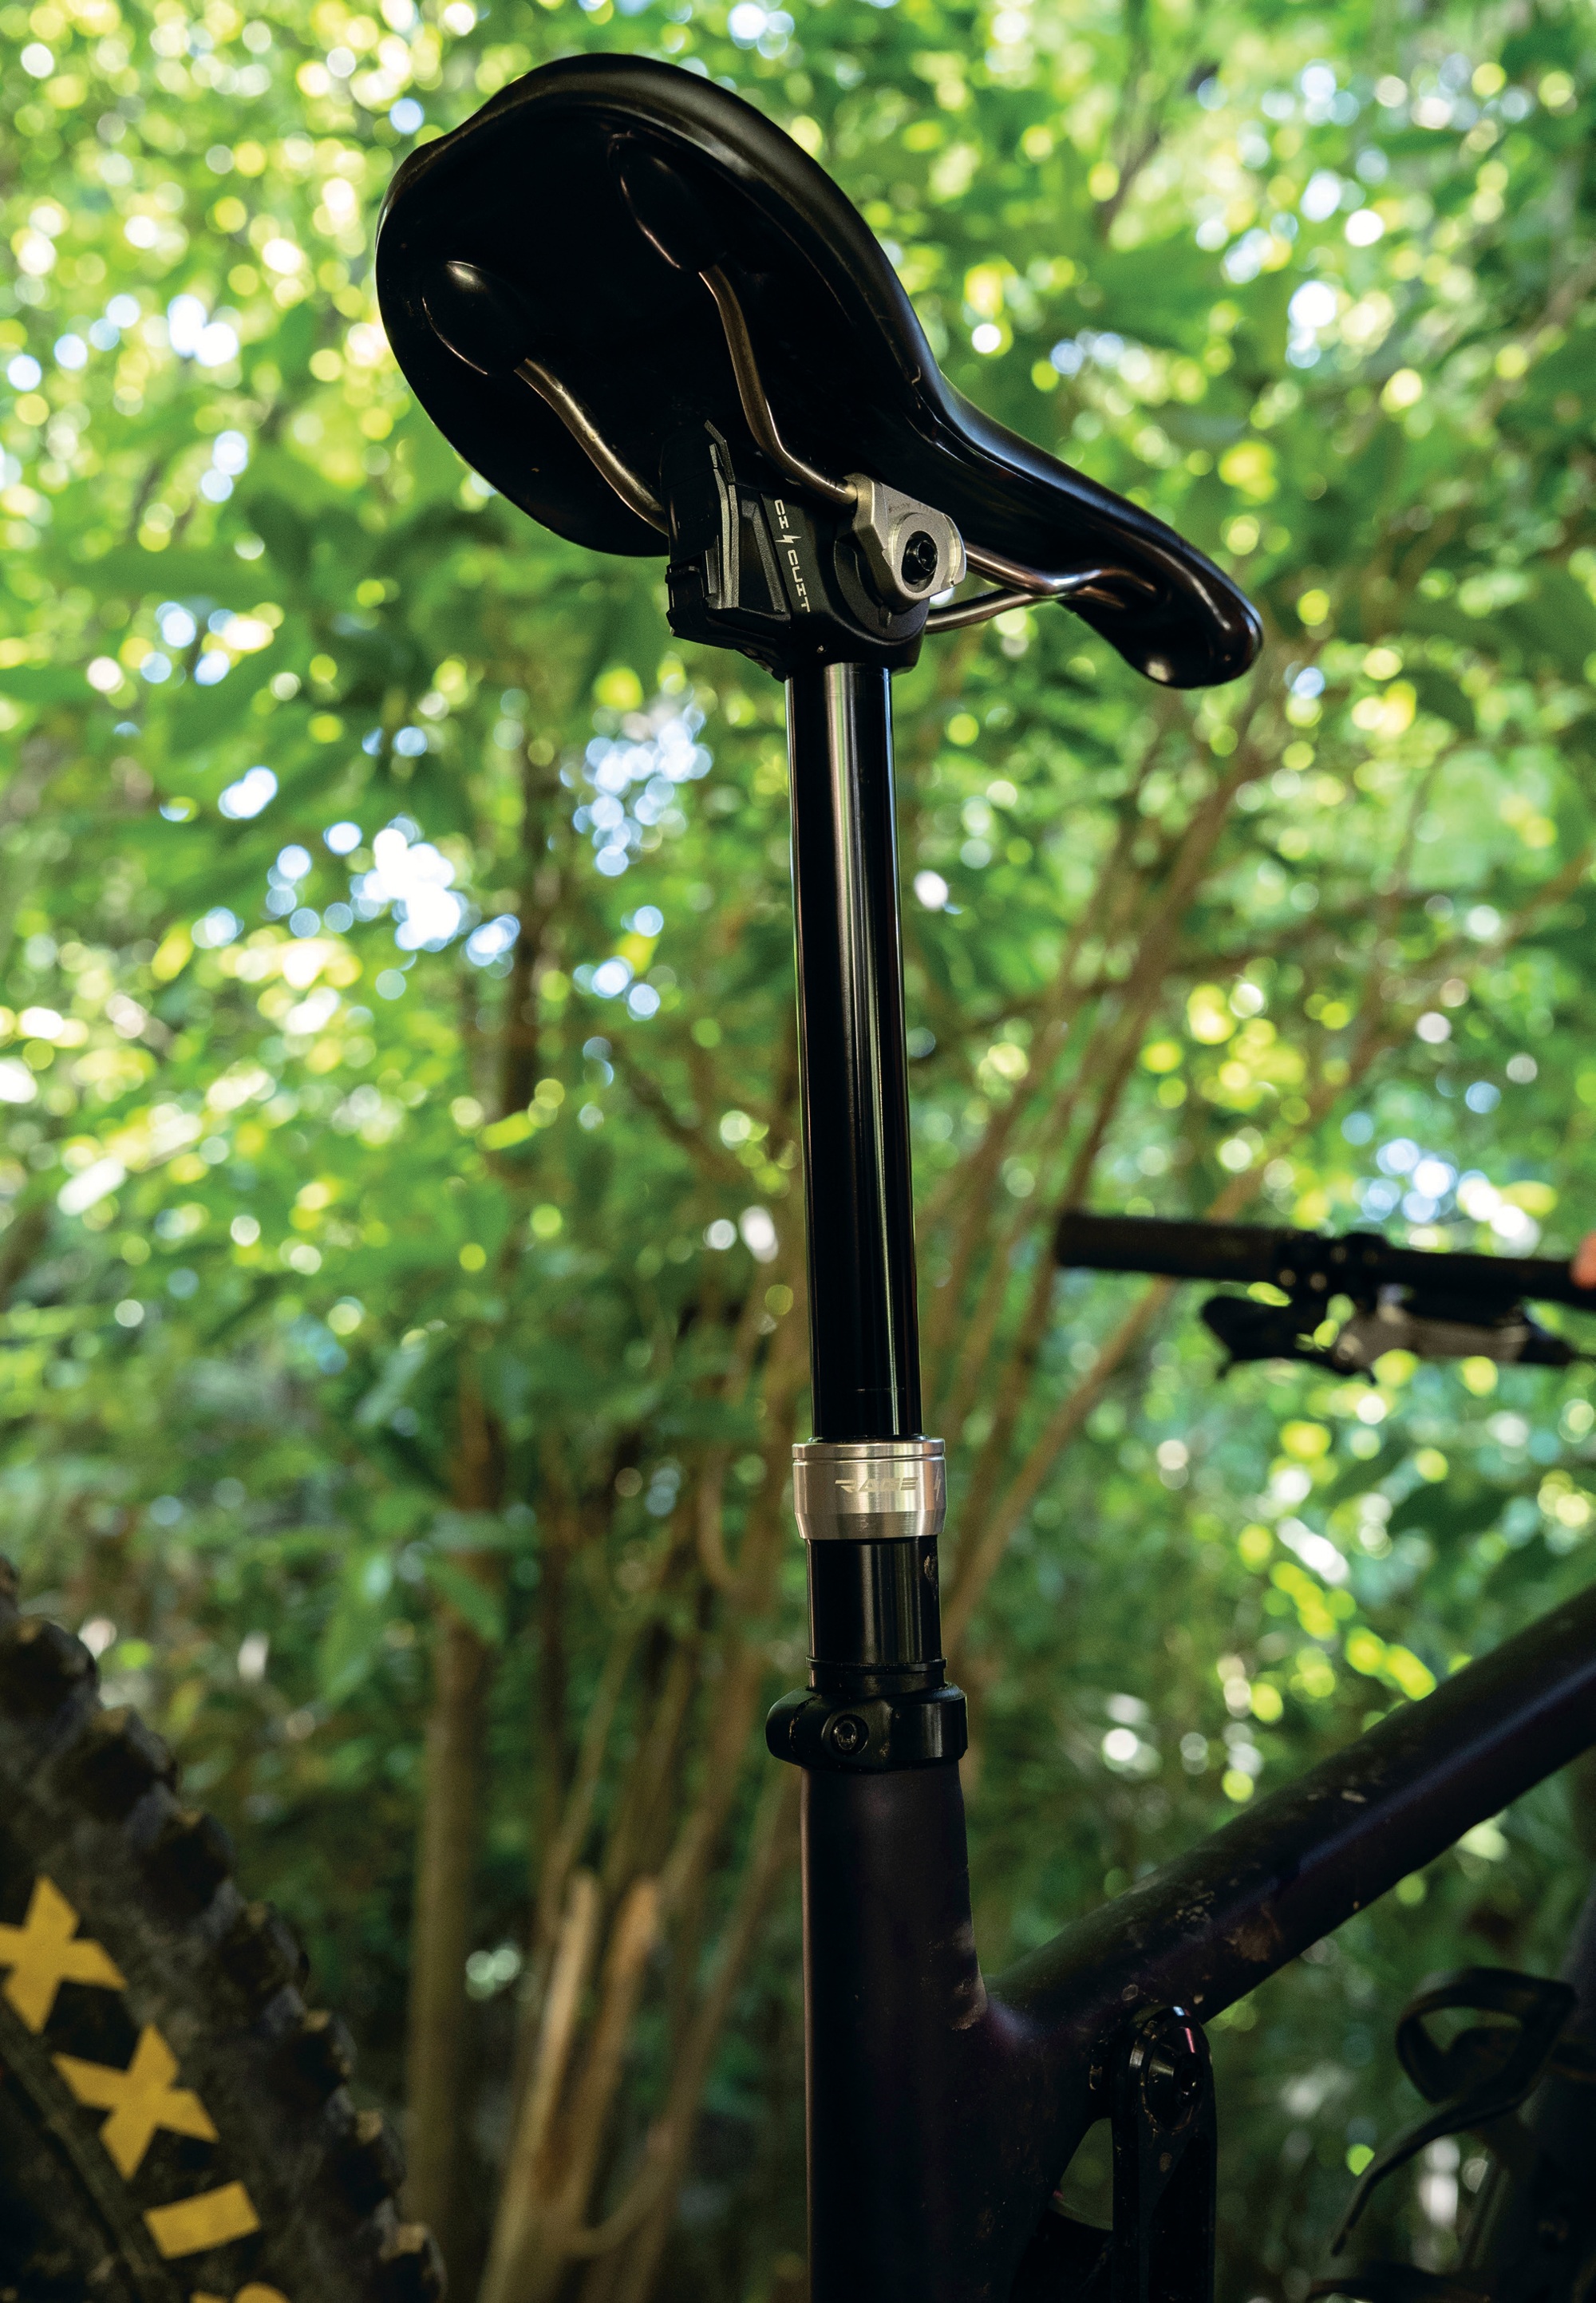
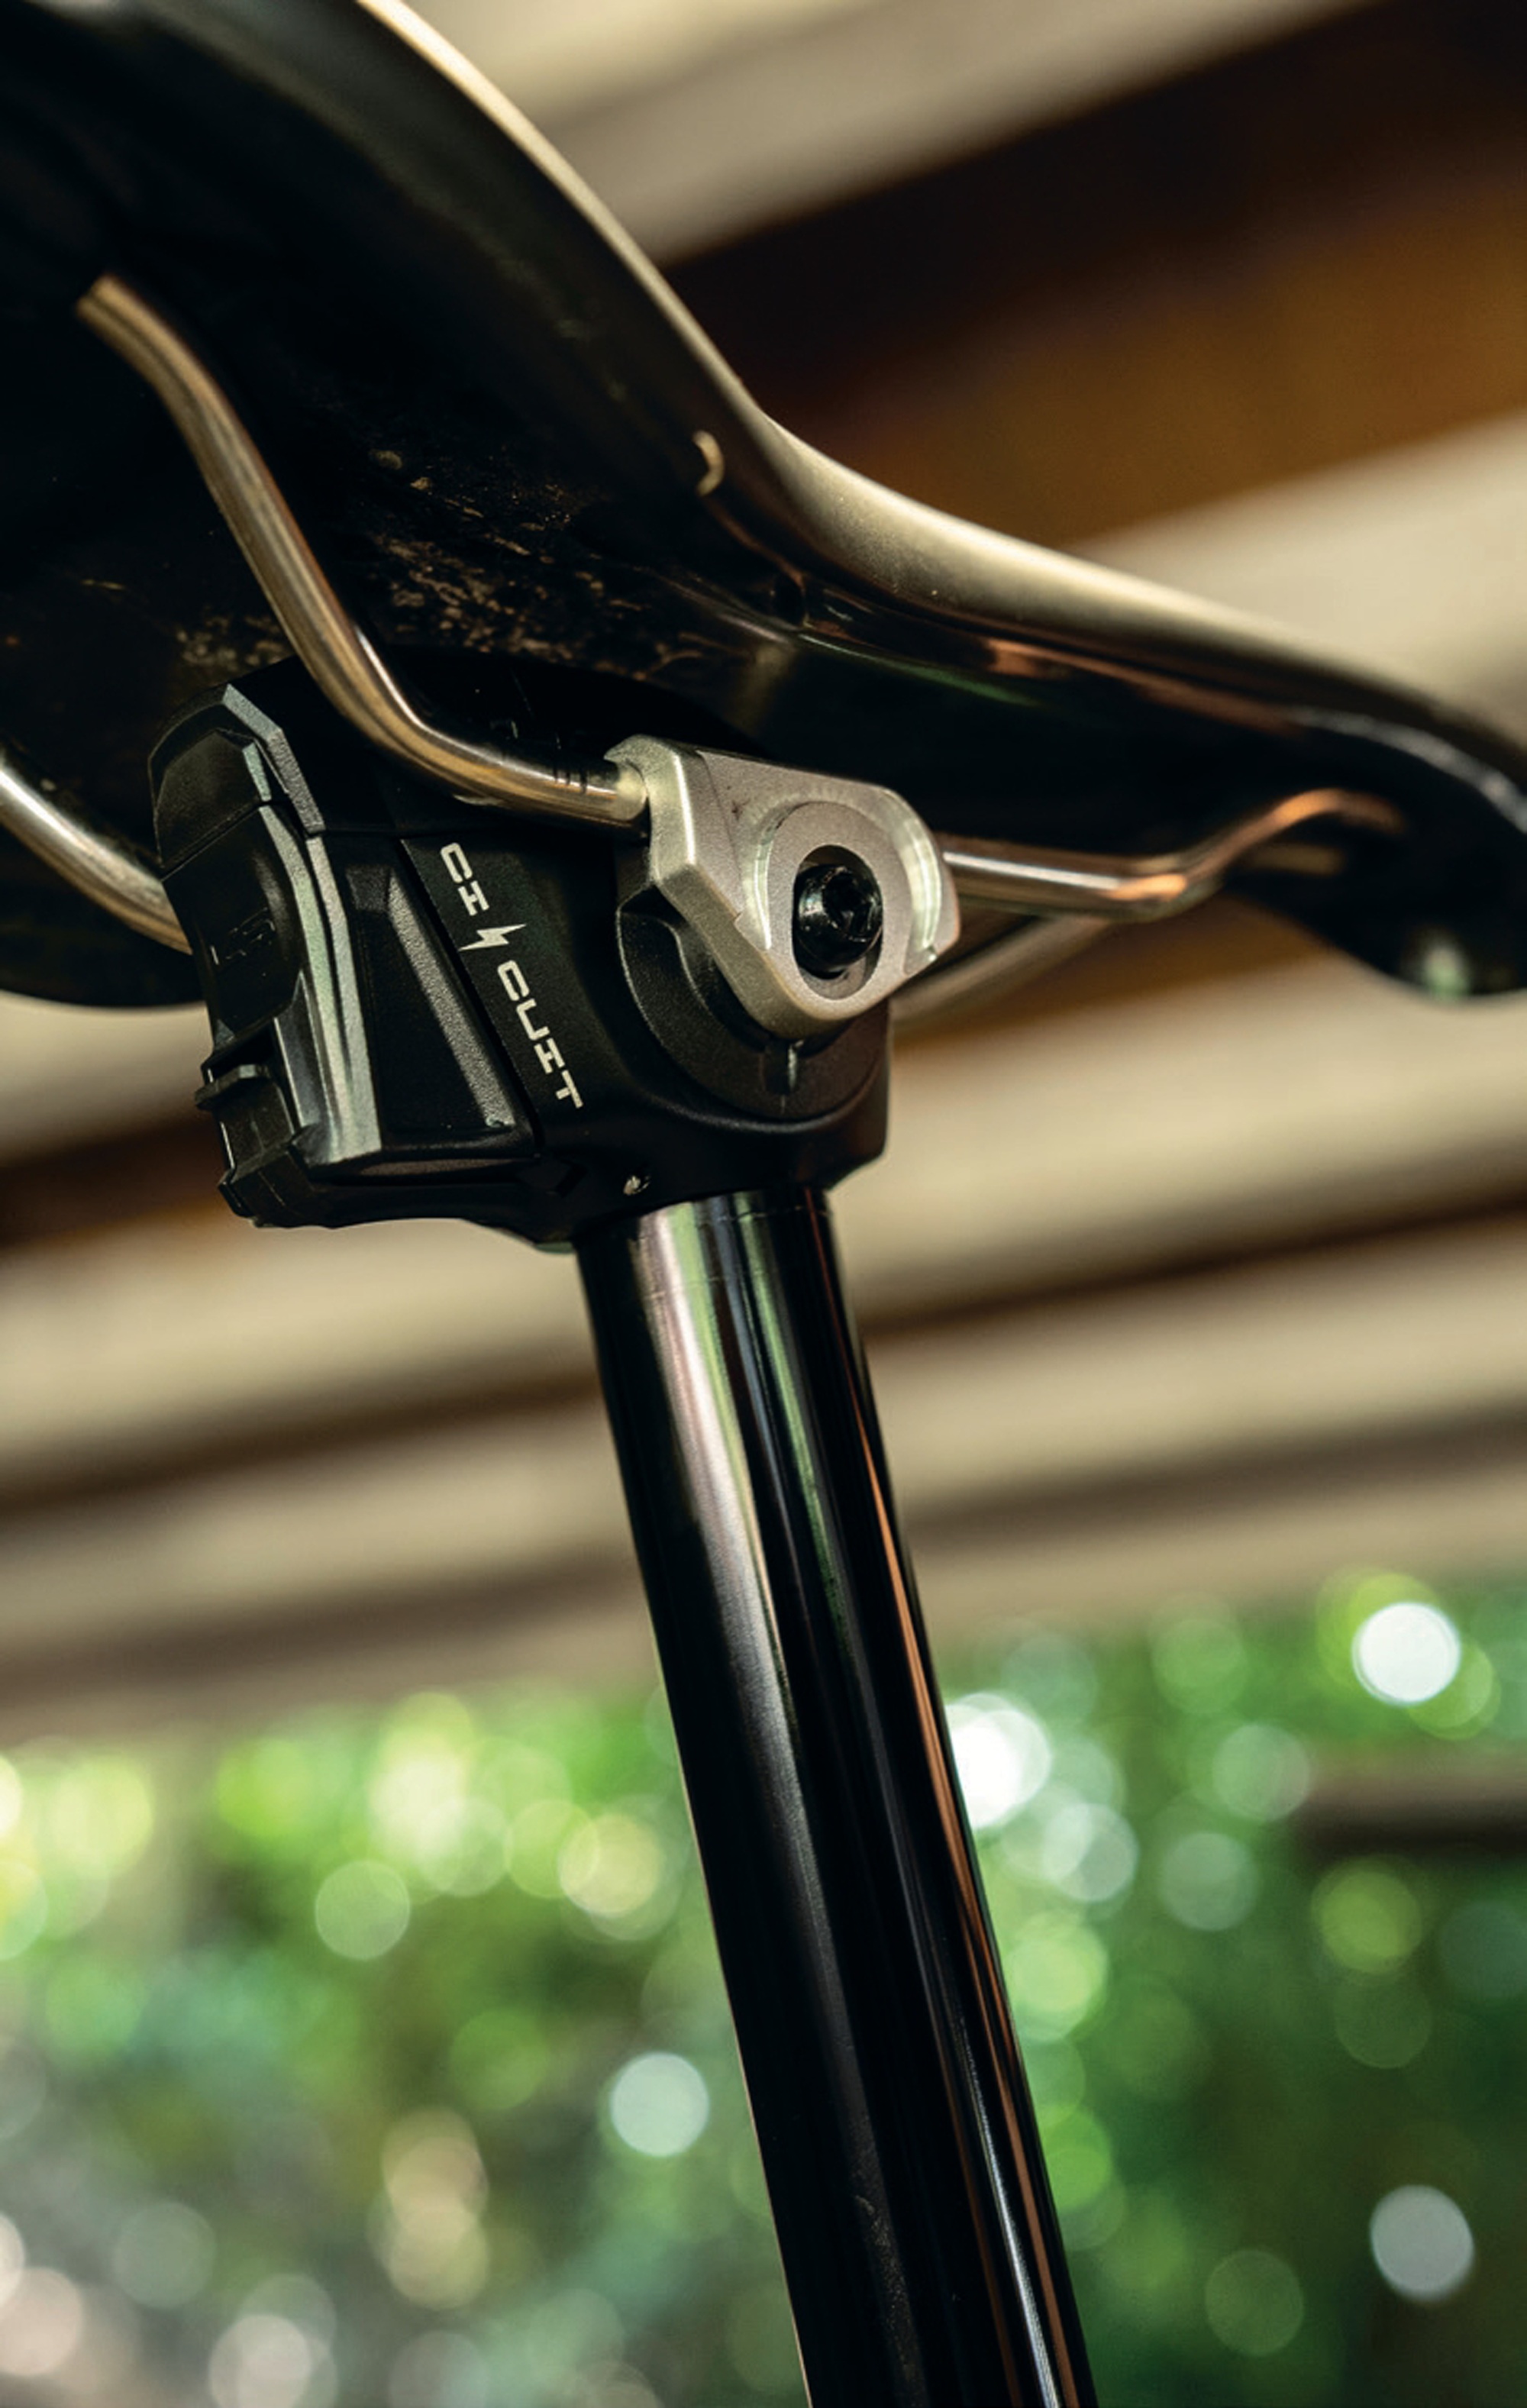
RockShox Reverb AXS B1
Words Lester Perry
Images Thomas Falconer
RRP $2975
Distributor Shimano NZ
There’s a fresh, new (and much-welcomed) dropper post in the RockShox range. The latest Reverb B1 broke cover recently, and I’ve been putting in some rides to get familiar with it. Here’s the lowdown after a month or so.
Firstly, somehow, unlike almost everything in life at the moment, the price of this new Reverb is actually less than the previous. Given its comparable simplicity, it’s also likely to save you money in the long run over that model, too. Go figure.
As with the Previous Reverb AXS post, there are no cables or wires involved. The Reverb B1 seamlessly slots into the AXS ecosystem. Simply drop the post into the bike, pair it up to an AXS controller, and you’re good to go. If you’re running an AXS drive train, it’s nice to be able to fine-tune which button on your cockpit activates the post through the SRAM AXS app; there are numerous combinations, although some make more sense than others.
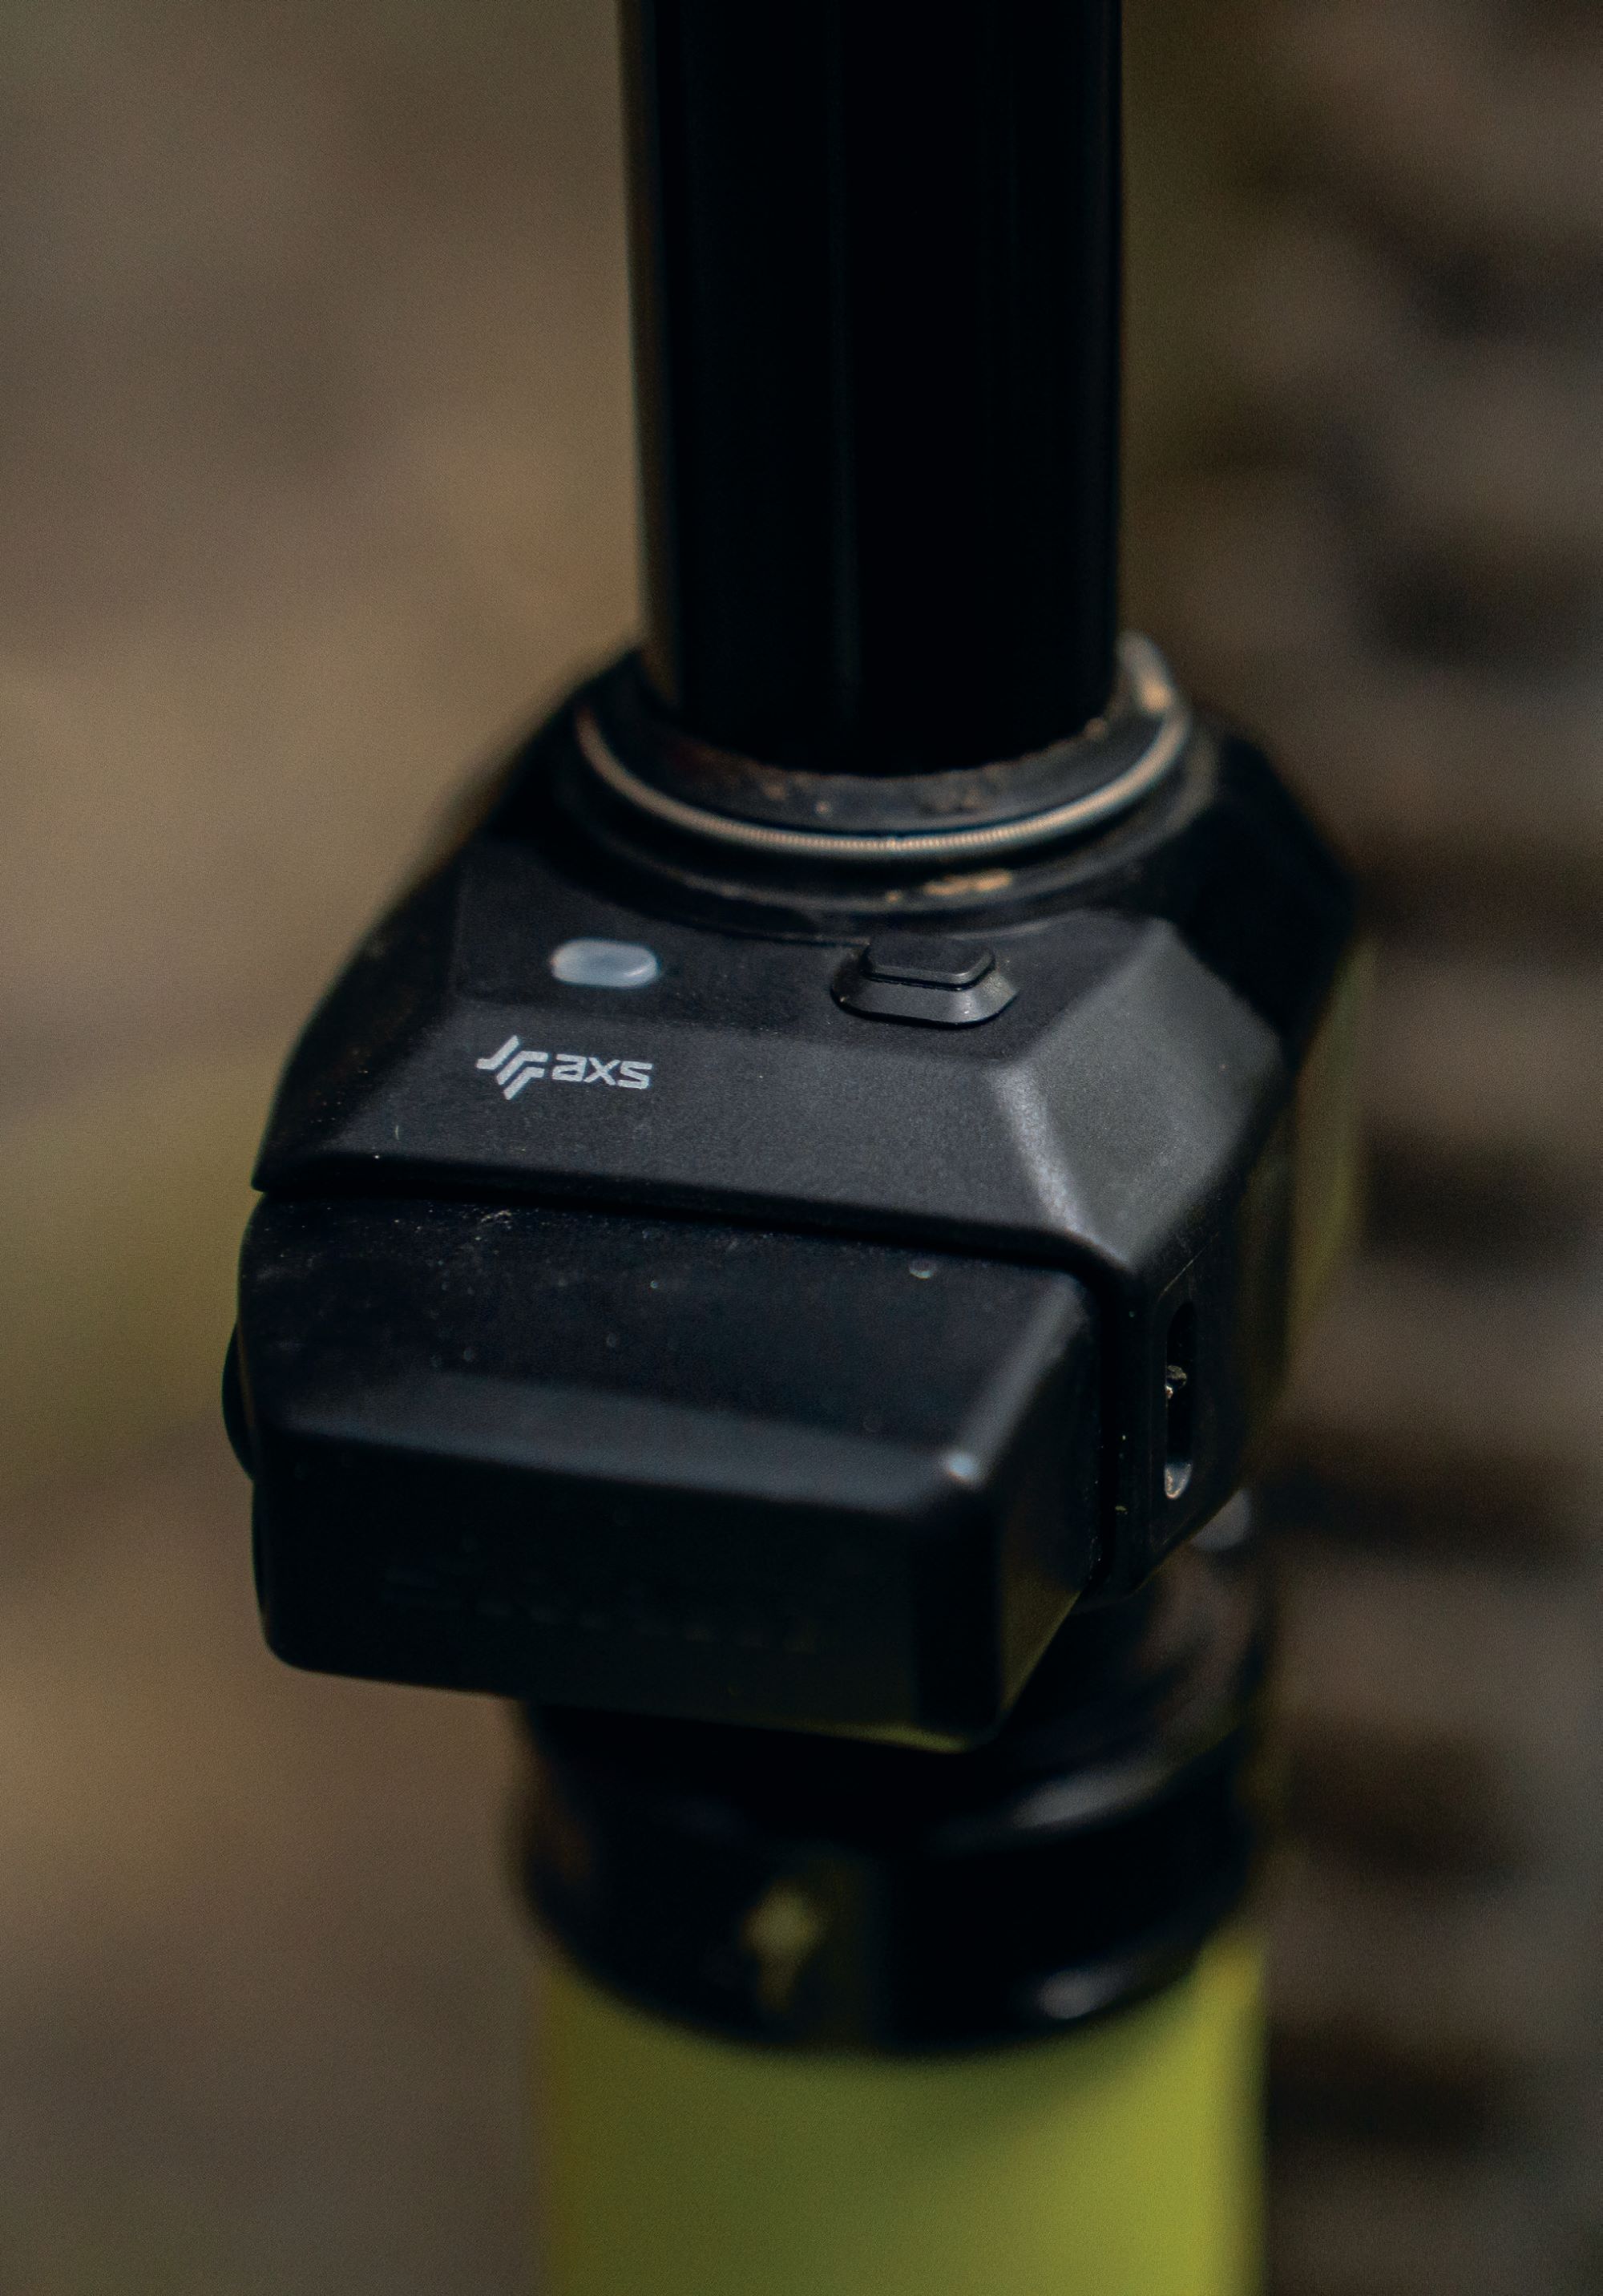
From first glance, it appears the most significant change on the post is the moving of the actuator and battery from the head of the post down to its collar. This change, combined with a redesigned seat clamp, reduces the stack height by a fraction from the previous post. Most importantly, it brings the weight more centrally on the bike. The stack height is still above the market-leading One Up V3 post, although that’s cable-actuated, so not an accurate apples-to-apples comparison. Can’t have it all, I guess. The overall length of the post is shorter than previous Reverbs, though, bringing it closer to the competition so riders can now have more drop on smaller bikes.
There are seven drops available, ranging from 100mm to a gargantuan 250mm, stepping up in 25mm increments. From what I can find, 250mm is the largest in the market by 10mm. Previously, some head scratching, measuring, and diagram drawing (true story) would ensue as I tried to figure out what the longest drop I could fit on my bike would be in relation to my preferred saddle height; thankfully, RockShox has a handy calculator on their website to help determine the best option for any frame.
With the noticeable external changes, it would be easy to miss the other significant change in the post. A new ‘air over air’ design ditches the previous hydraulics in favour of positive and negative air springs. The two air springs balance pressure against each other as the post drops, effectively supporting rider weight on the positive air spring rather than relying on the hydraulics of the past. It’s no secret that RockShox’s previous posts had issues when their air and oil mixed, leaving a flaccid, squishy post in need of an expensive service. Long term, it remains to be seen, but if this system lives up to the hype, the days of unintended squish appear to be over.
The new air-over-air spring enabled a new feature, ActiveRide, which provides a small amount of vertical movement. At full extension, the amount of pressure in the post indicates the amount of travel available when fully extended. At the maximum pressure of 600psi (425psi on the 34.9mm post), it’s rock solid at the top of the stroke; the deeper into its stroke, the more travel or squish is available. It’s not a lot, but it’s there, and it increases if you drop the pressure in the post. Why build what is effectively suspension travel in the post? RockShox theory suggests that at full height, it enables a rider to stay fully weighted on the saddle over rougher terrain, which is particularly beneficial while climbing, as the rider can continue to apply consistent power without needing to disrupt their rhythm by unweighting. When tackling a particularly technical climb with steps or moves where dropping the saddle slightly is advantageous, the travel in the post again allows some damping against the terrain, helping you stay seated for longer. The conspiracist in me thinks that maybe, just maybe, RockShox couldn’t get the post to be rock solid when partially compressed with this new air spring, so they embraced the squish and gave it a name. Whatever the case, it seems to do what they claim, although I’m not so sure there’s a performance advantage on anything other than a hardtail.
The AXS button is now easier to reach while in the saddle, located at the top of the actuator (by the battery). It’s used to sync the post with its controller or as a manual actuator should a controller go offline. The post works with any actuator in the AXS ecosystem, including older paddle-style controllers and the now- common double-button pod controller.
With a claimed 60 hours of use from a full charge, or over 20 weeks for most of us regular folks, the battery will last a long time, but it’s easy to forget about it, too. If you’re running other AXS components, you’ll likely have the same battery elsewhere, so swapping a derailleur battery to a post, or vice versa, could be a saviour. I’ve seen this swap done on more than one race start line when a rider realised their derailleur was nearing flat.
Servicing on previous Reverbs was a total headache, and if an issue resulted in a complete rebuild, it was often cheaper to just replace the post with one other than a Reverb. This simpler design, combined with some forethought from the product team, means the B1 is completely user-serviceable. A simple ‘clean and grease’ 1-year service can be completed in literally minutes and requires only a few standard tools. No seal kits or oil faff required. The 2-year (600-hour) service is a bit more involved and requires some more specialist tools, but is still achievable for a competent home mechanic, thanks in part to SRAM’s in-depth online service manuals and YouTube tutorials.
Riding the new Reverb is not unlike the old version: push the button while you’re sitting on the saddle, and the post drops. Stand up, press the button, and the post shoots back to full extension. I’ve found myself reaching down at times to feel if the ActiveRide is doing anything, and sure enough, it’s going up and down slightly as I ride over bumps, although it’s hard to say if it’s offering any sort of advantage. There’s no rotational slop at all in the post and, so far, no sign of forward and backward movement either.
It’s nice to see RockShox are not resting on their laurels with their previous post, but recognising there were some shortcomings and developing something new in the form of the B1. They should get extra points for a complete revision rather than just minor updates. While it would be nice to see some fine-tuning of the drop available, like many mechanical posts, I guess that leaves something for RockShox to strive for in their next release. Maybe?
Given how simple the post is to install, and its price tag, it’s likely the post could be passed from bike to bike as its owner updates or changes their frame. However, with how new the post is to the market, it’s only fair to mention that no one’s 100% sure of its lifespan.
Bosch Performance Line CX Upgrade & Kiox 400C
Words Lester Perry
Images Thomas Falconer
RRP $2975
Distributor Shimano NZ
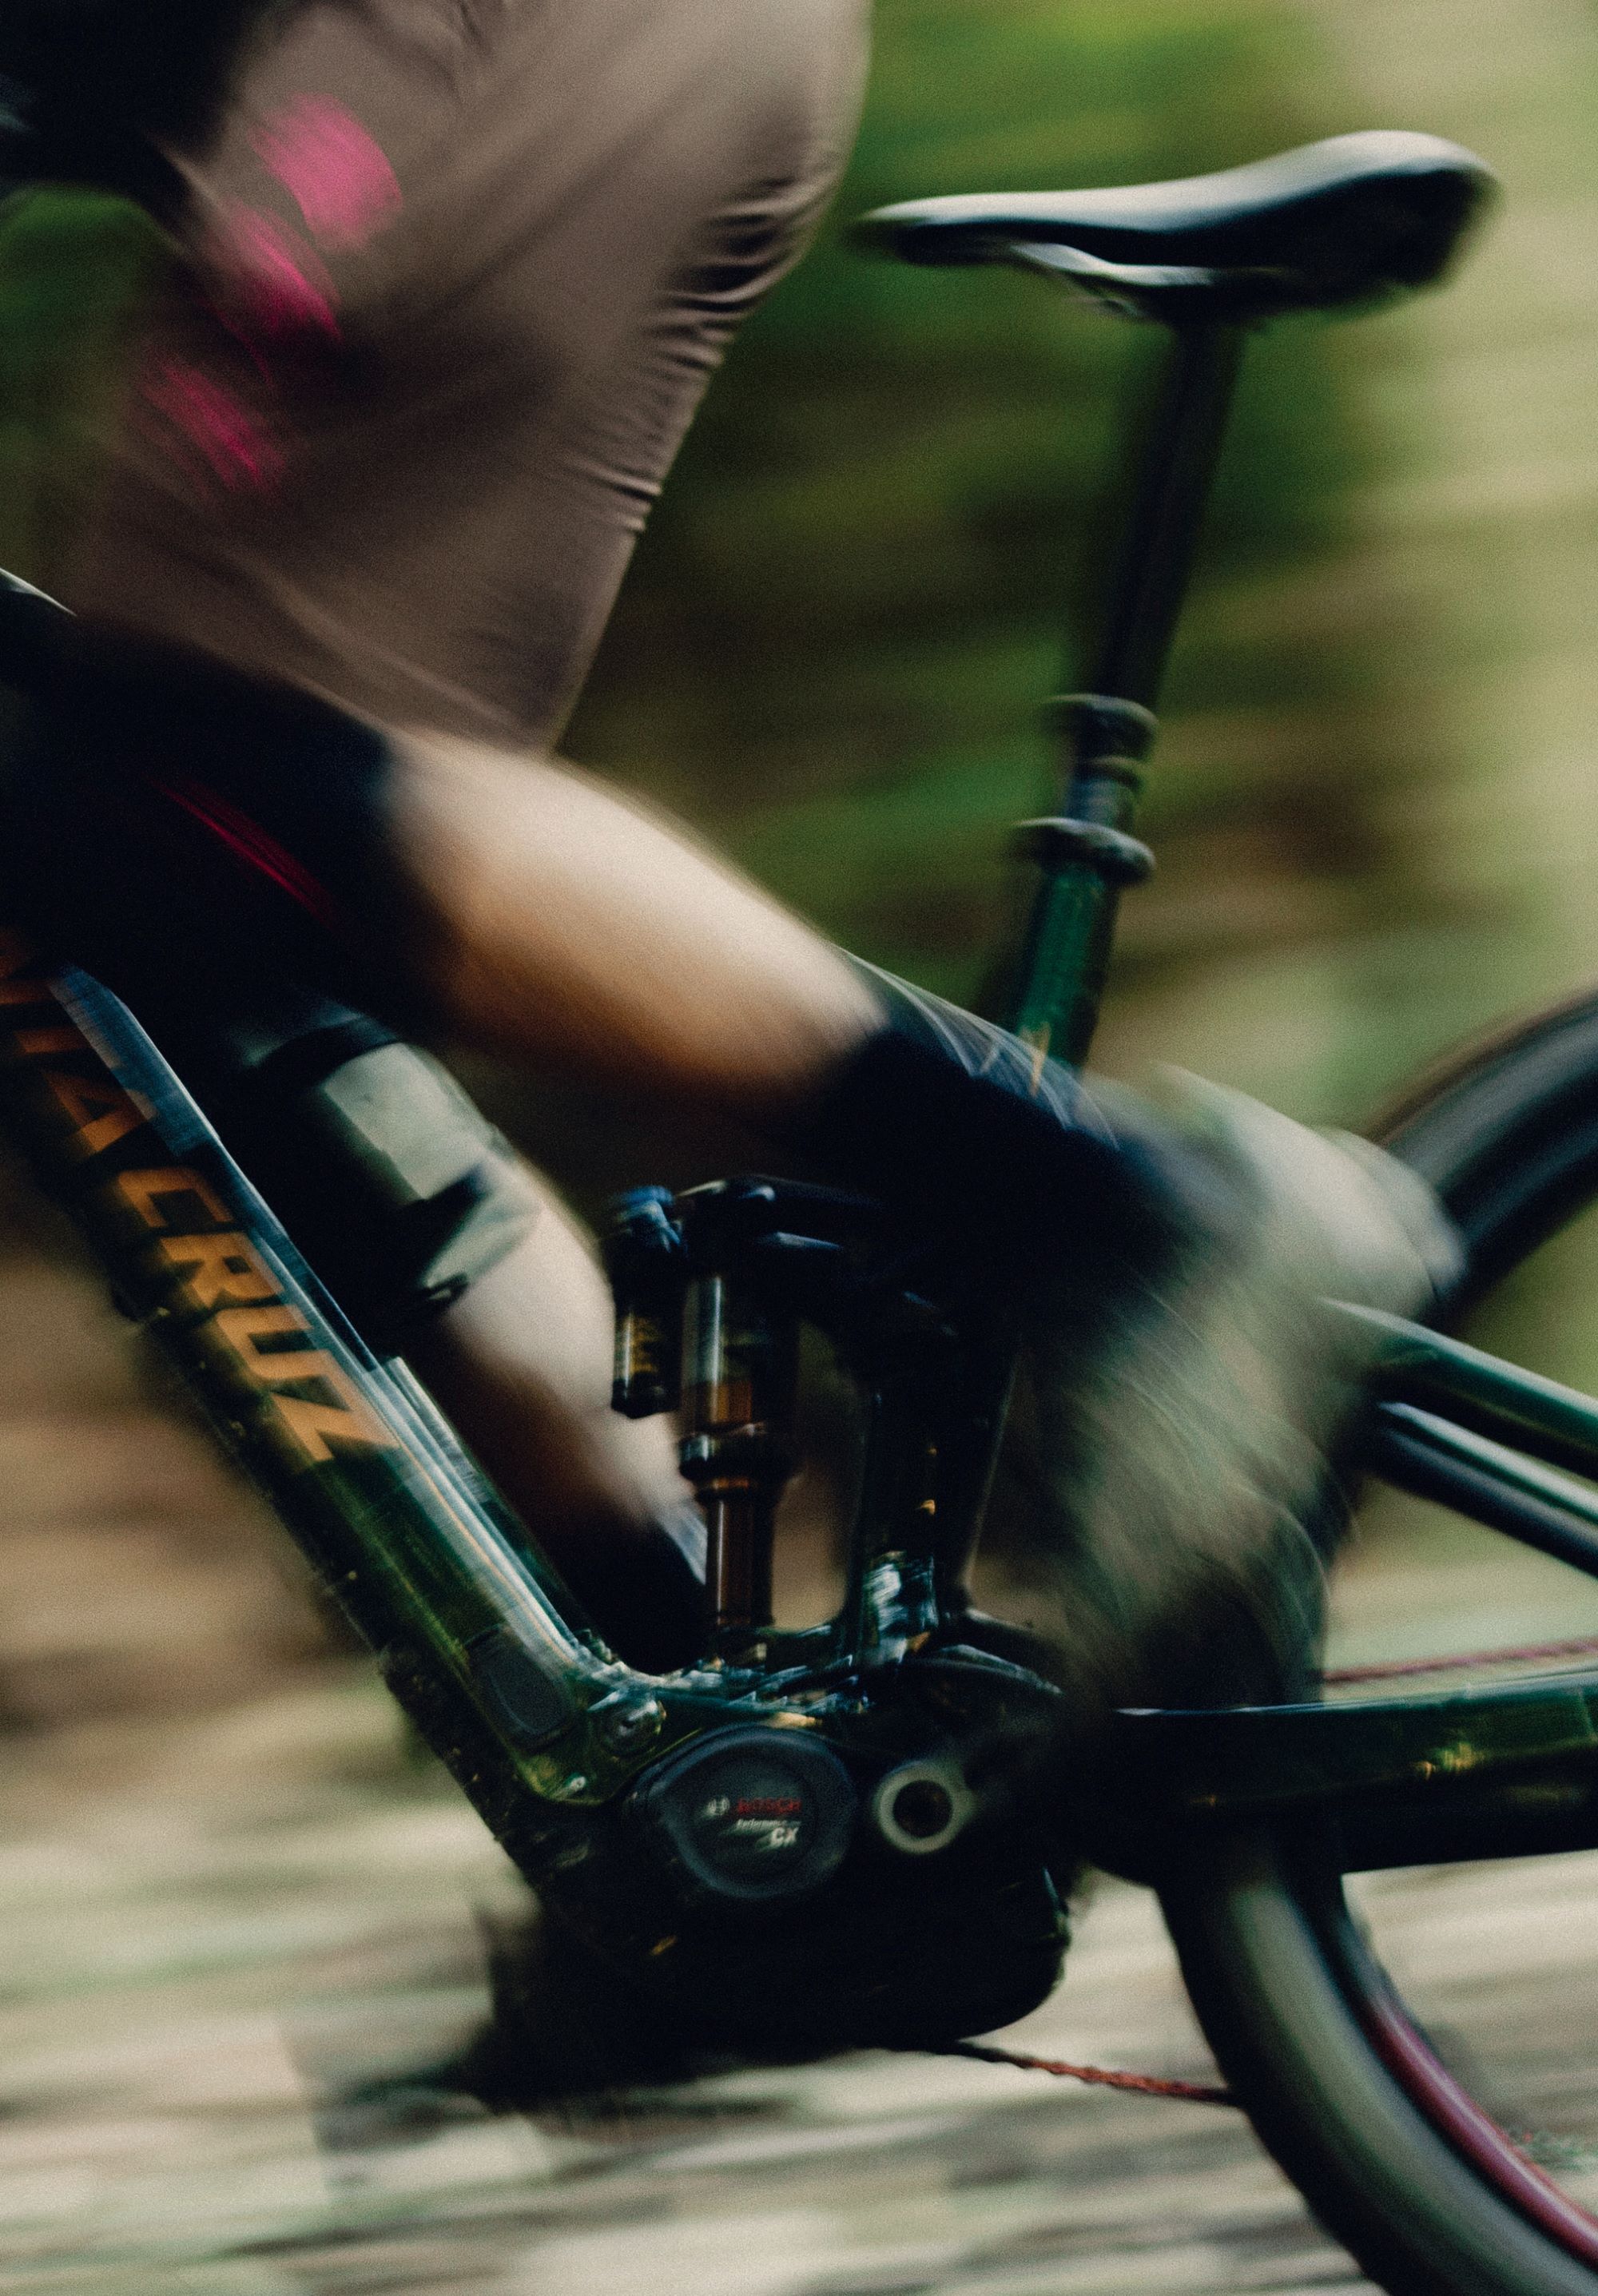
The electric mountain bike landscape moves at breakneck speed—literally. Often, it’s hard to keep track of the near constant changes but, as riders, we’re the ones who benefit from these shifts. Recently, Bosch eBike Systems has delivered significant performance upgrades. The German engineering giant has not only listened, but delivered exactly what riders want from modern eMTBs.
Performance Line CX Upgrade
The Performance Line CX’s (BDU384Y) upgrade to 100 Newton metres (Nm) of torque, represents a substantial leap from the 85Nm standard. The upgraded system now delivers up to 750 watts of peak power while maintaining support levels of up to 400 percent of pedal input. This power enhancement becomes available through a software update for the latest Generation 5 motors—excellent news for current Bosch Performance Line CX Gen5 owners, as it essentially future-proofs your eMTB investment.
The best part? This upgrade can be done seamlessly via the Flow app, where you can customise power delivery characteristics to match your riding style and terrain preferences. Another key element of this upgrade is the introduction of the new eMTB+ mode, which leverages advanced algorithms to deliver power with what Bosch describes as “sensitive precision exactly when the rider needs it”. This represents a significant shift from simply providing more power, to providing smarter power distribution.
I tested this upgrade on a Santa Cruz Vala during a trip to Silvan Forest MTB Park (featured in this issue). First, the update was simple via the Flow app, and what immediately impressed me was its intuitive nature—neither under- nor over-compensating, just enhancing my riding. It adapted to my cadence and provided a boost when needed over tricky obstacles. Some other eMTB systems I’ve ridden rely heavily on higher cadence, especially with lightweight models, but that’s not the case here.
The clear standout for me was the new eMTB+ mode. I didn’t need to toggle between any other modes at all. The technical difference between eMTB and eMTB+ is 15Nm of torque and a maximum power output difference of 150W. This difference is definitely noticeable, though as a heavier rider the benefits might be more pronounced for me. Riding in eMTB+ mode, the power delivery felt intuitive, and I appreciated that extra assistance and traction when hitting steep inclines.
This isn’t simply about raw numbers—it’s about the intelligent delivery of power that adapts to the rider’s demands with superior sensitivity.
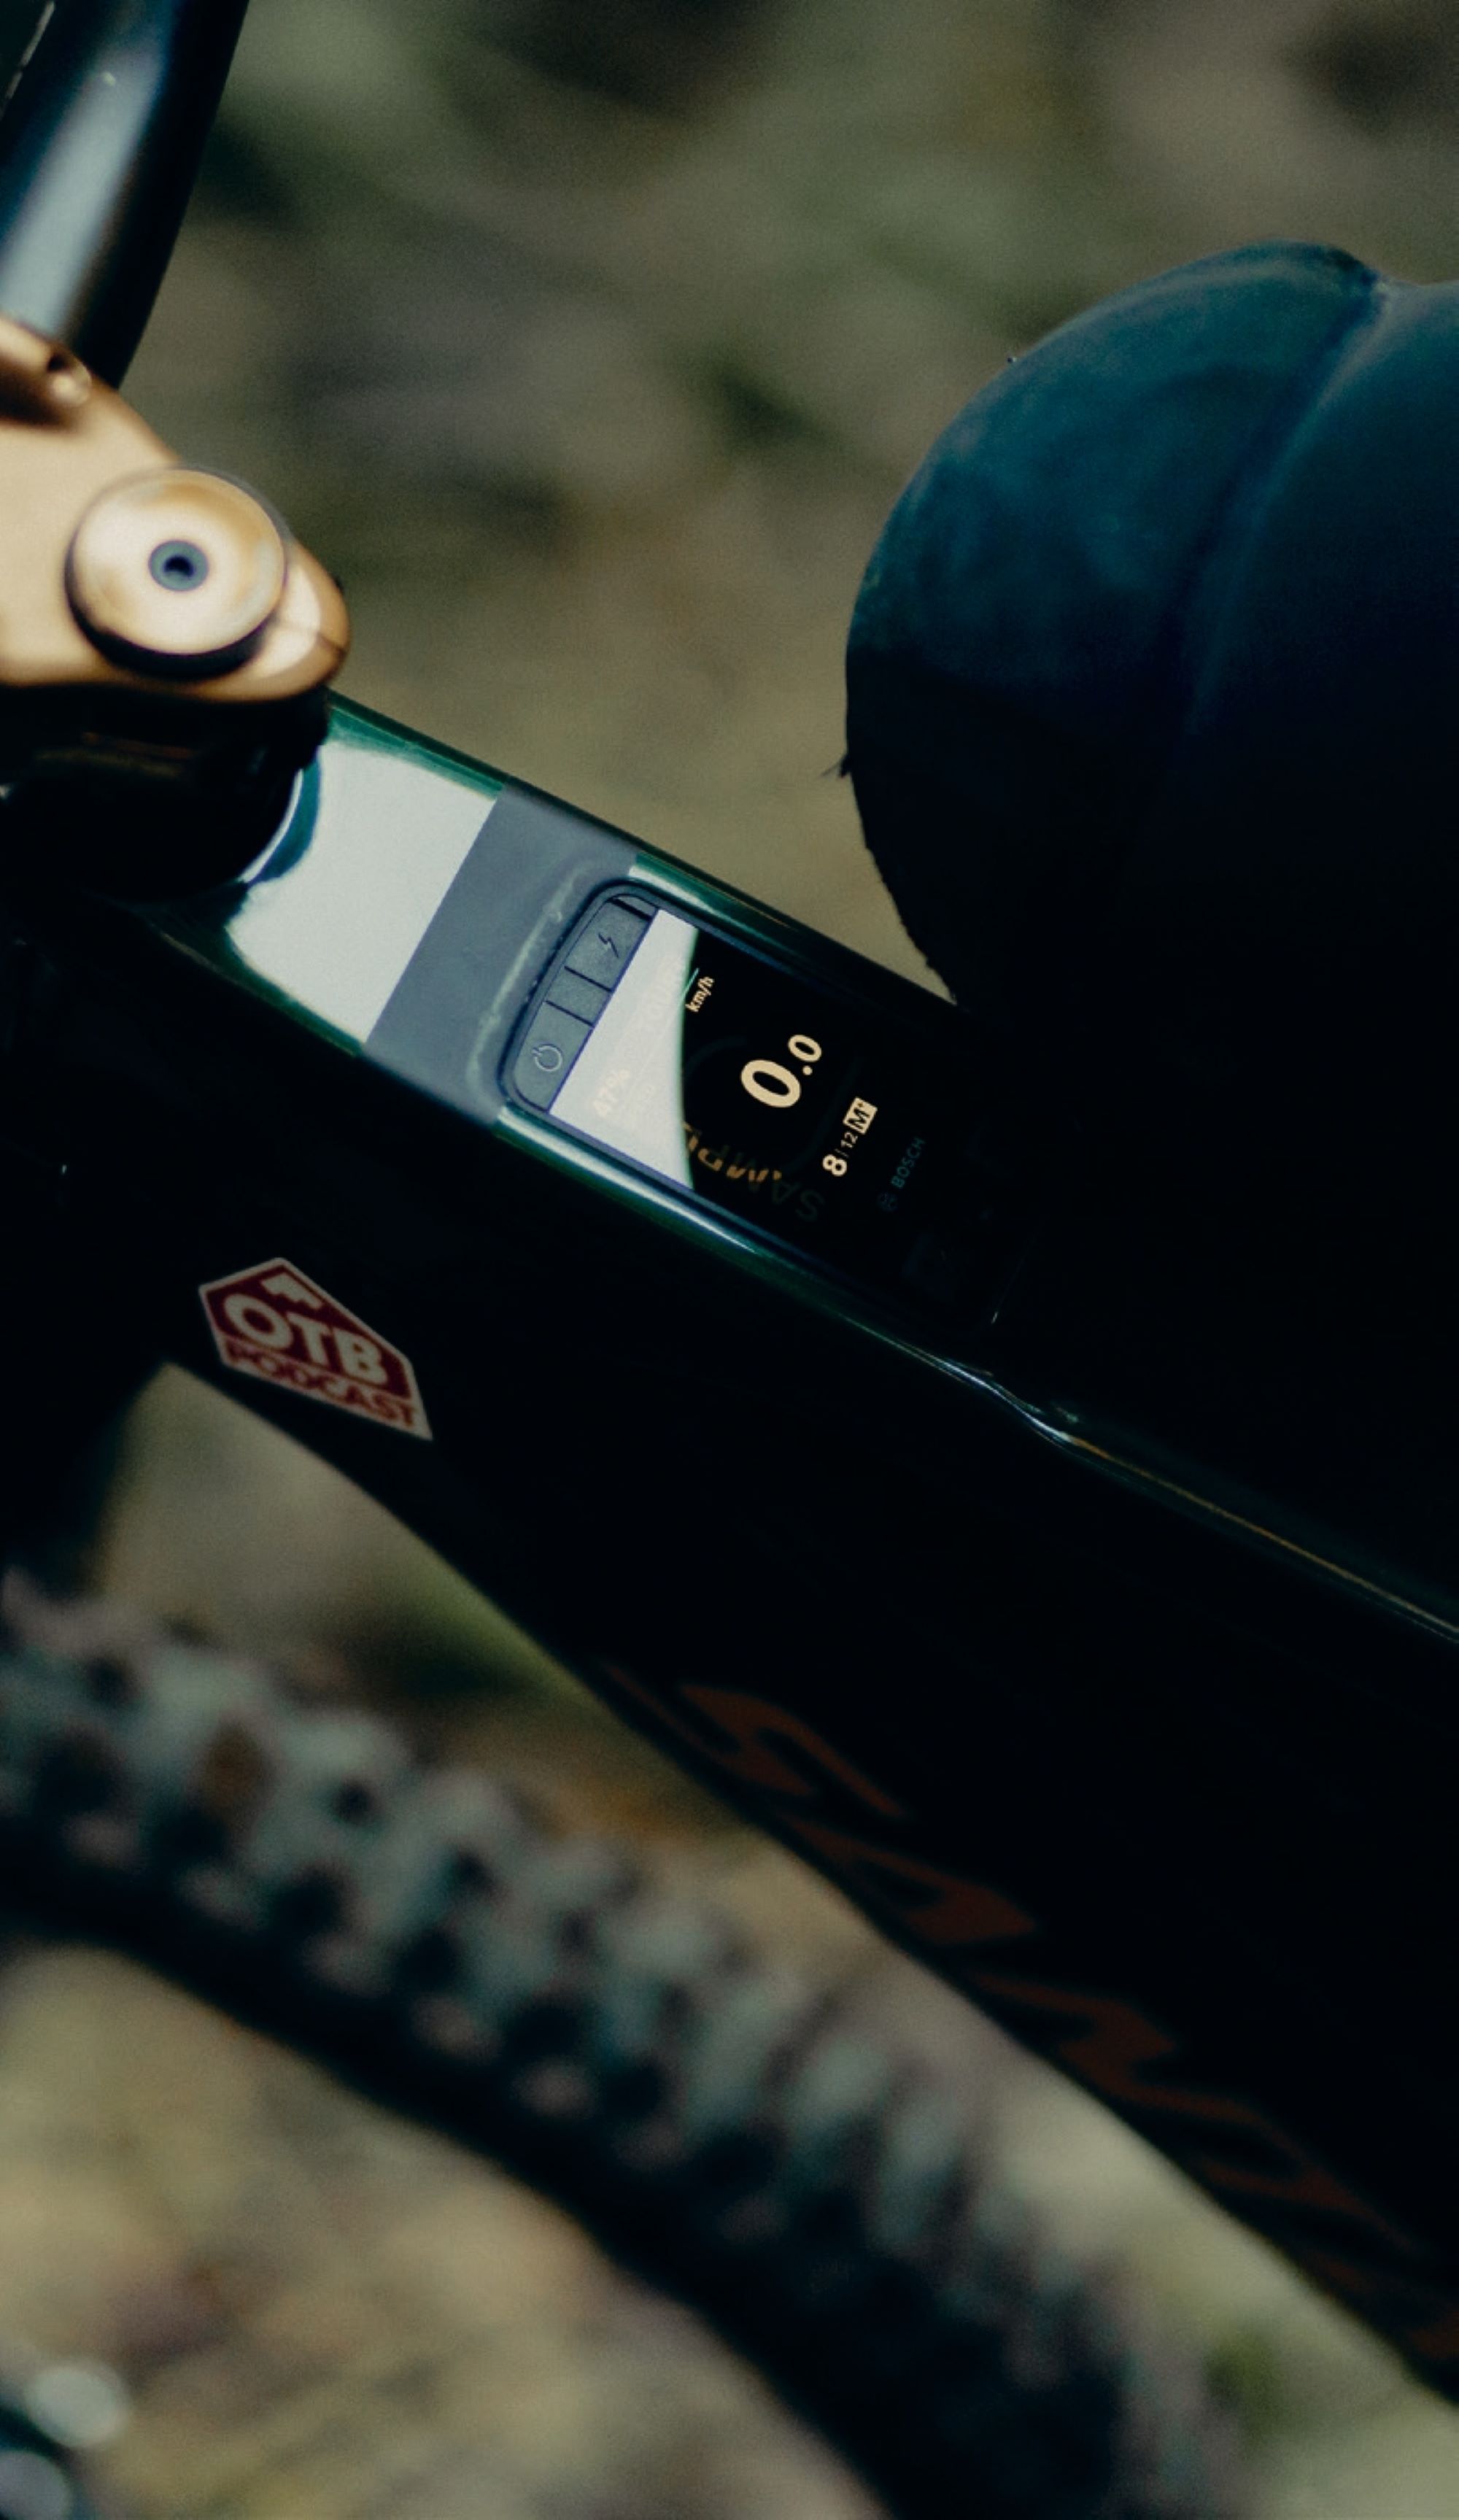
Kiox 400C
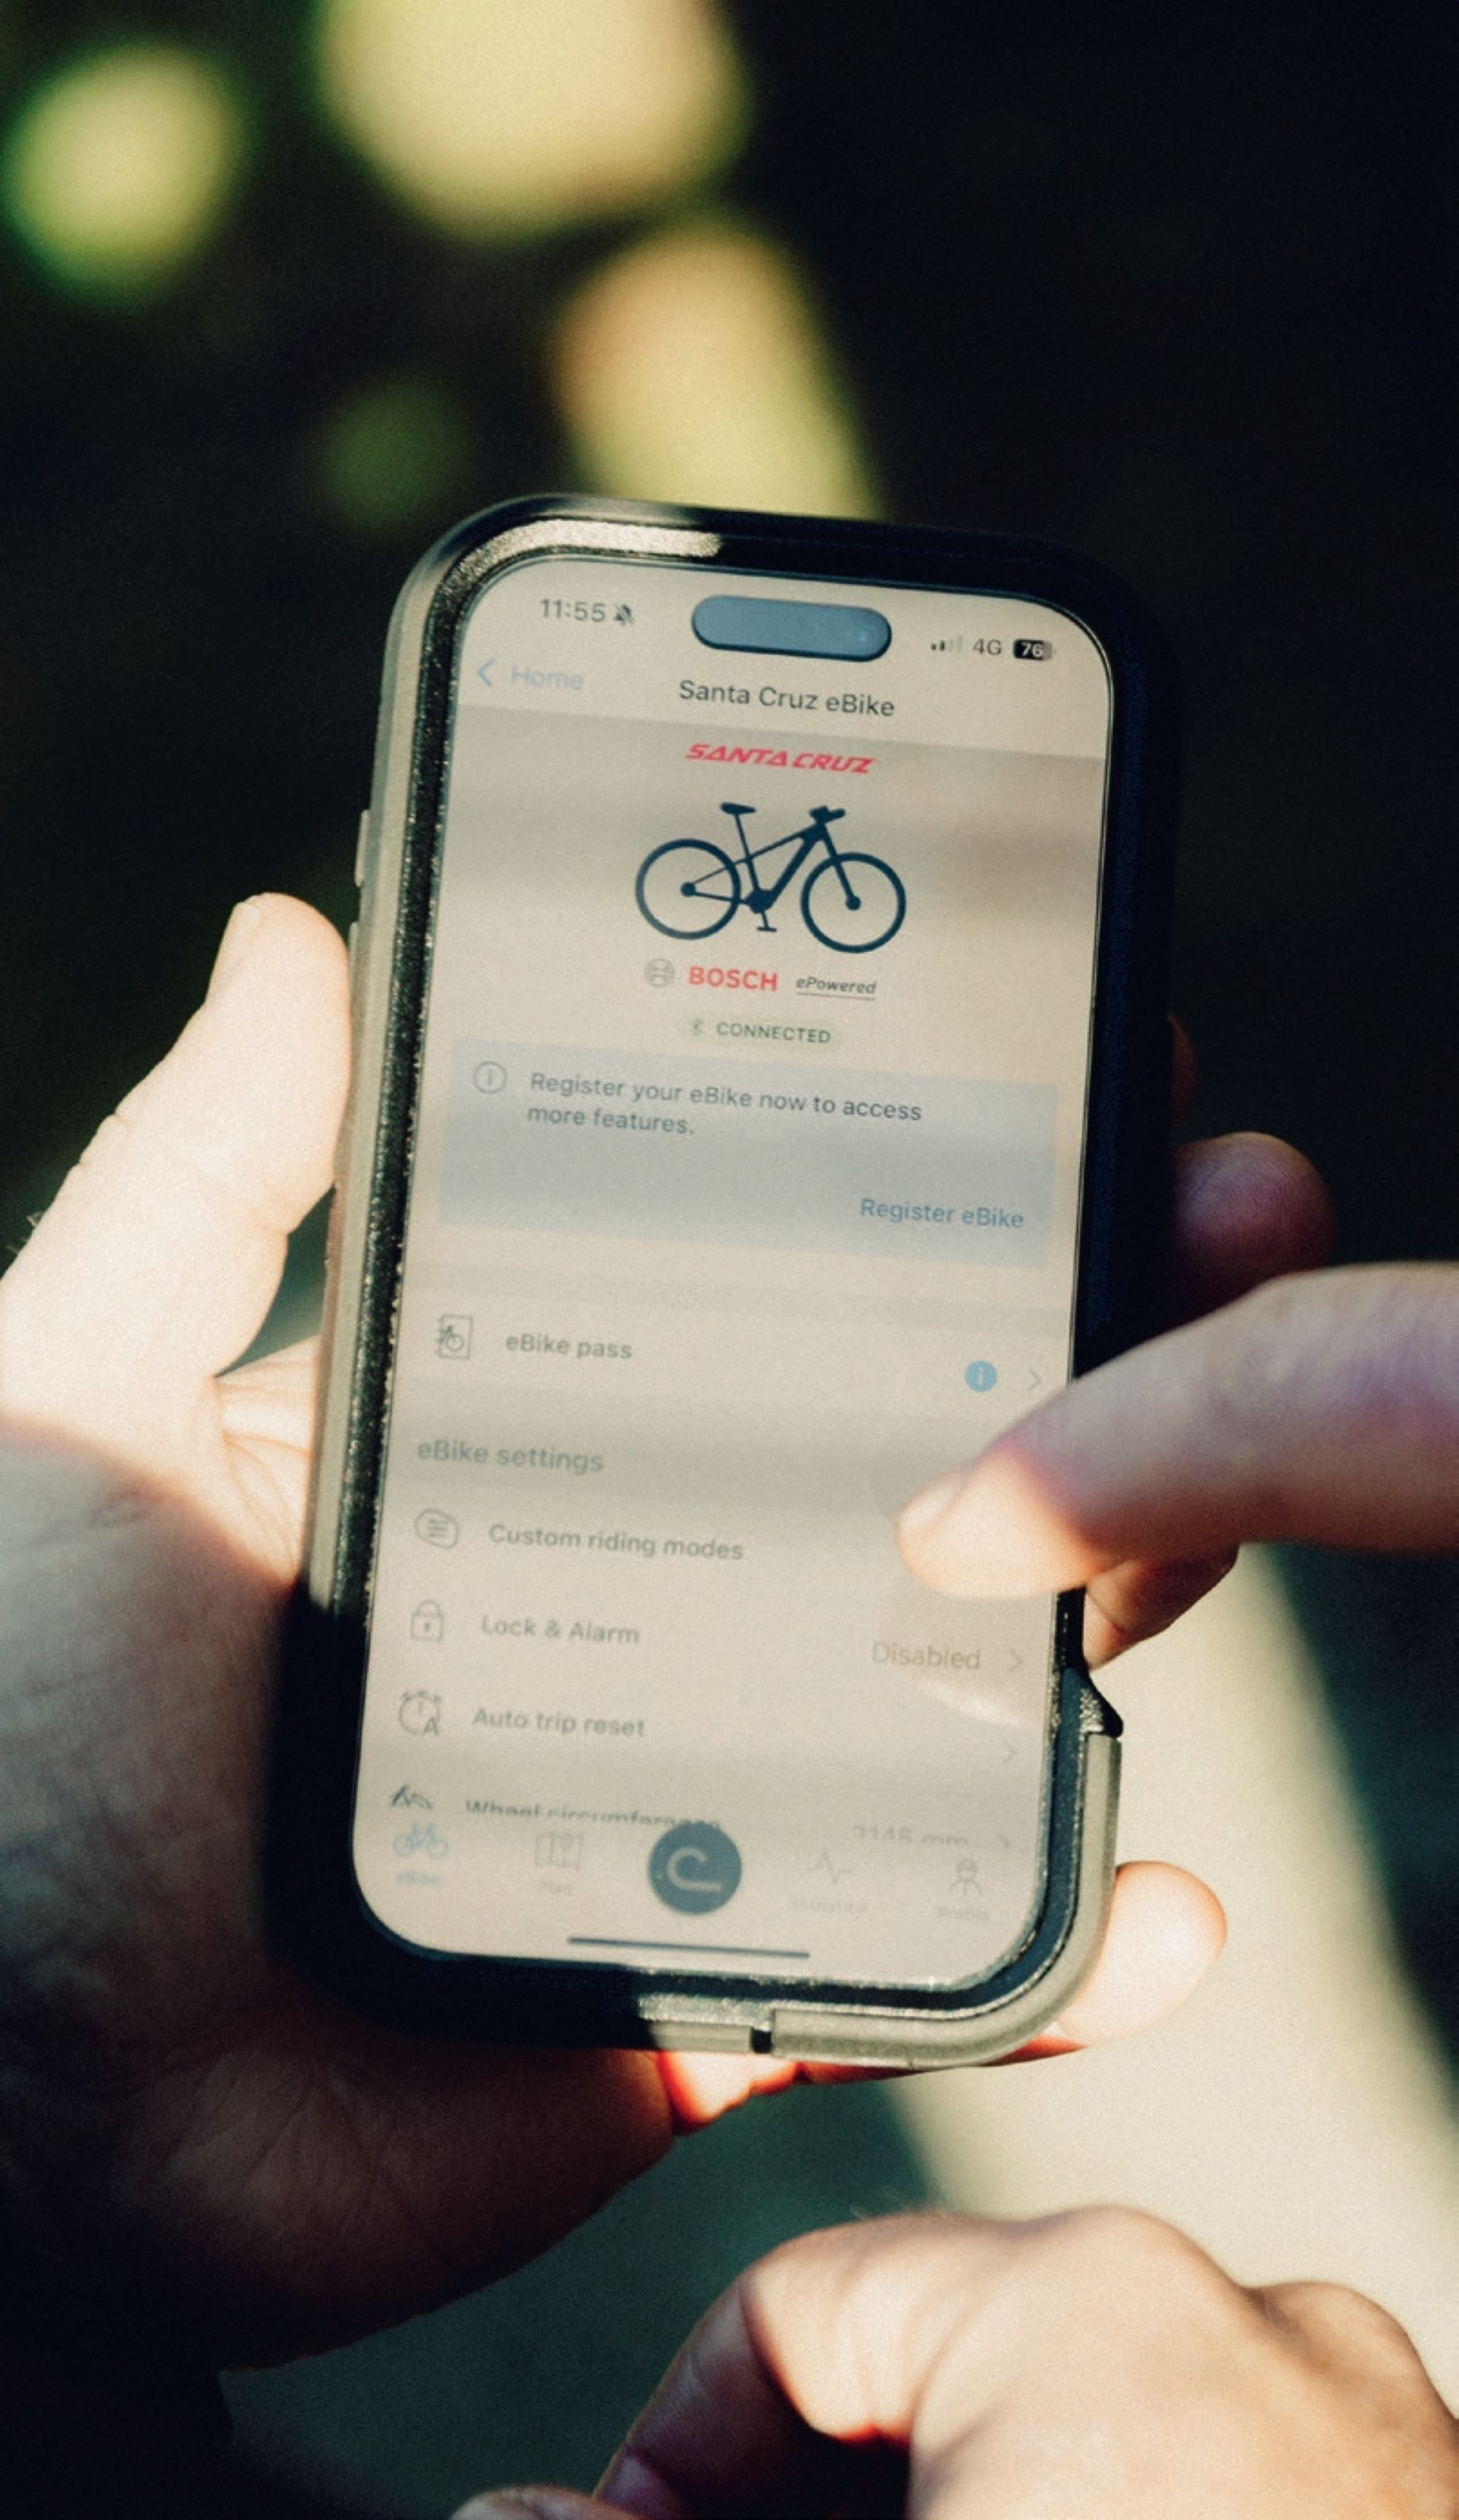
The Kiox 400C represents Bosch’s vision for the next generation of eBike displays, moving beyond basic readouts to become the command centre for modern eMTBs.
Designed for integration into the top tube rather than handlebar mounting, the Kiox 400C offers a cleaner cockpit aesthetic while maintaining full functionality. The display features customisable settings and automatic brightness adjustment, addressing one of the persistent complaints about previous generation displays that struggled in varying light conditions. Tactile buttons provide direct control, while the optional bar-mounted Mini Remote ensures riders can maintain proper hand positioning during technical sections.
Perhaps most significantly, the Kiox 400C includes an integrated USB-C port, finally addressing the evolving needs of modern riders who rely on multiple devices during extended rides. The system also supports navigation functions, transforming the display from a simple readout into a genuine trail companion.
On the trails, the Kiox 400C remained perfectly readable in all light conditions, and perhaps its best feature was the dynamic screen cycling. Essentially, various Bosch Smart System algorithms detect what you’re doing—like tackling a climb – and automatically display the most relevant screen for that situation. I appreciated the simplicity of having the display show only the most pertinent data, which helped me stay focused on the ride itself.
The sleek display’s integration into the top tube creates a much tidier cockpit, which is certainly appealing from both aesthetic and functional perspectives. And having the Kiox 400C’s ability to charge USB-C devices like my iPhone during a ride proved super handy—no more dead phone anxiety on longer adventures.
The Bigger Picture
Bosch has taken a measured approach to rolling out these innovations. The Performance Line CX software upgrades are available now, accessible through both dealer updates and the Flow app for end users. This dual-path approach ensures accessibility while maintaining professional oversight for riders who prefer dealer support. The Kiox 400C, while designed for 2026 model bikes, offers retrofit compatibility with select 2025 models from participating manufacturers. The backwards compatibility of both the Performance Line CX upgrade and Kiox 400C is a solid addition—especially valuable if you’ve recently purchased a Bosch-powered eMTB.
The timing is particularly significant as the eMTB market continues its rapid expansion, with riders increasingly demanding sophisticated performance. These developments signal a new maturity in motor technology, where software updates can deliver meaningful performance improvements and where display technology finally matches the premium level of the power systems they control.
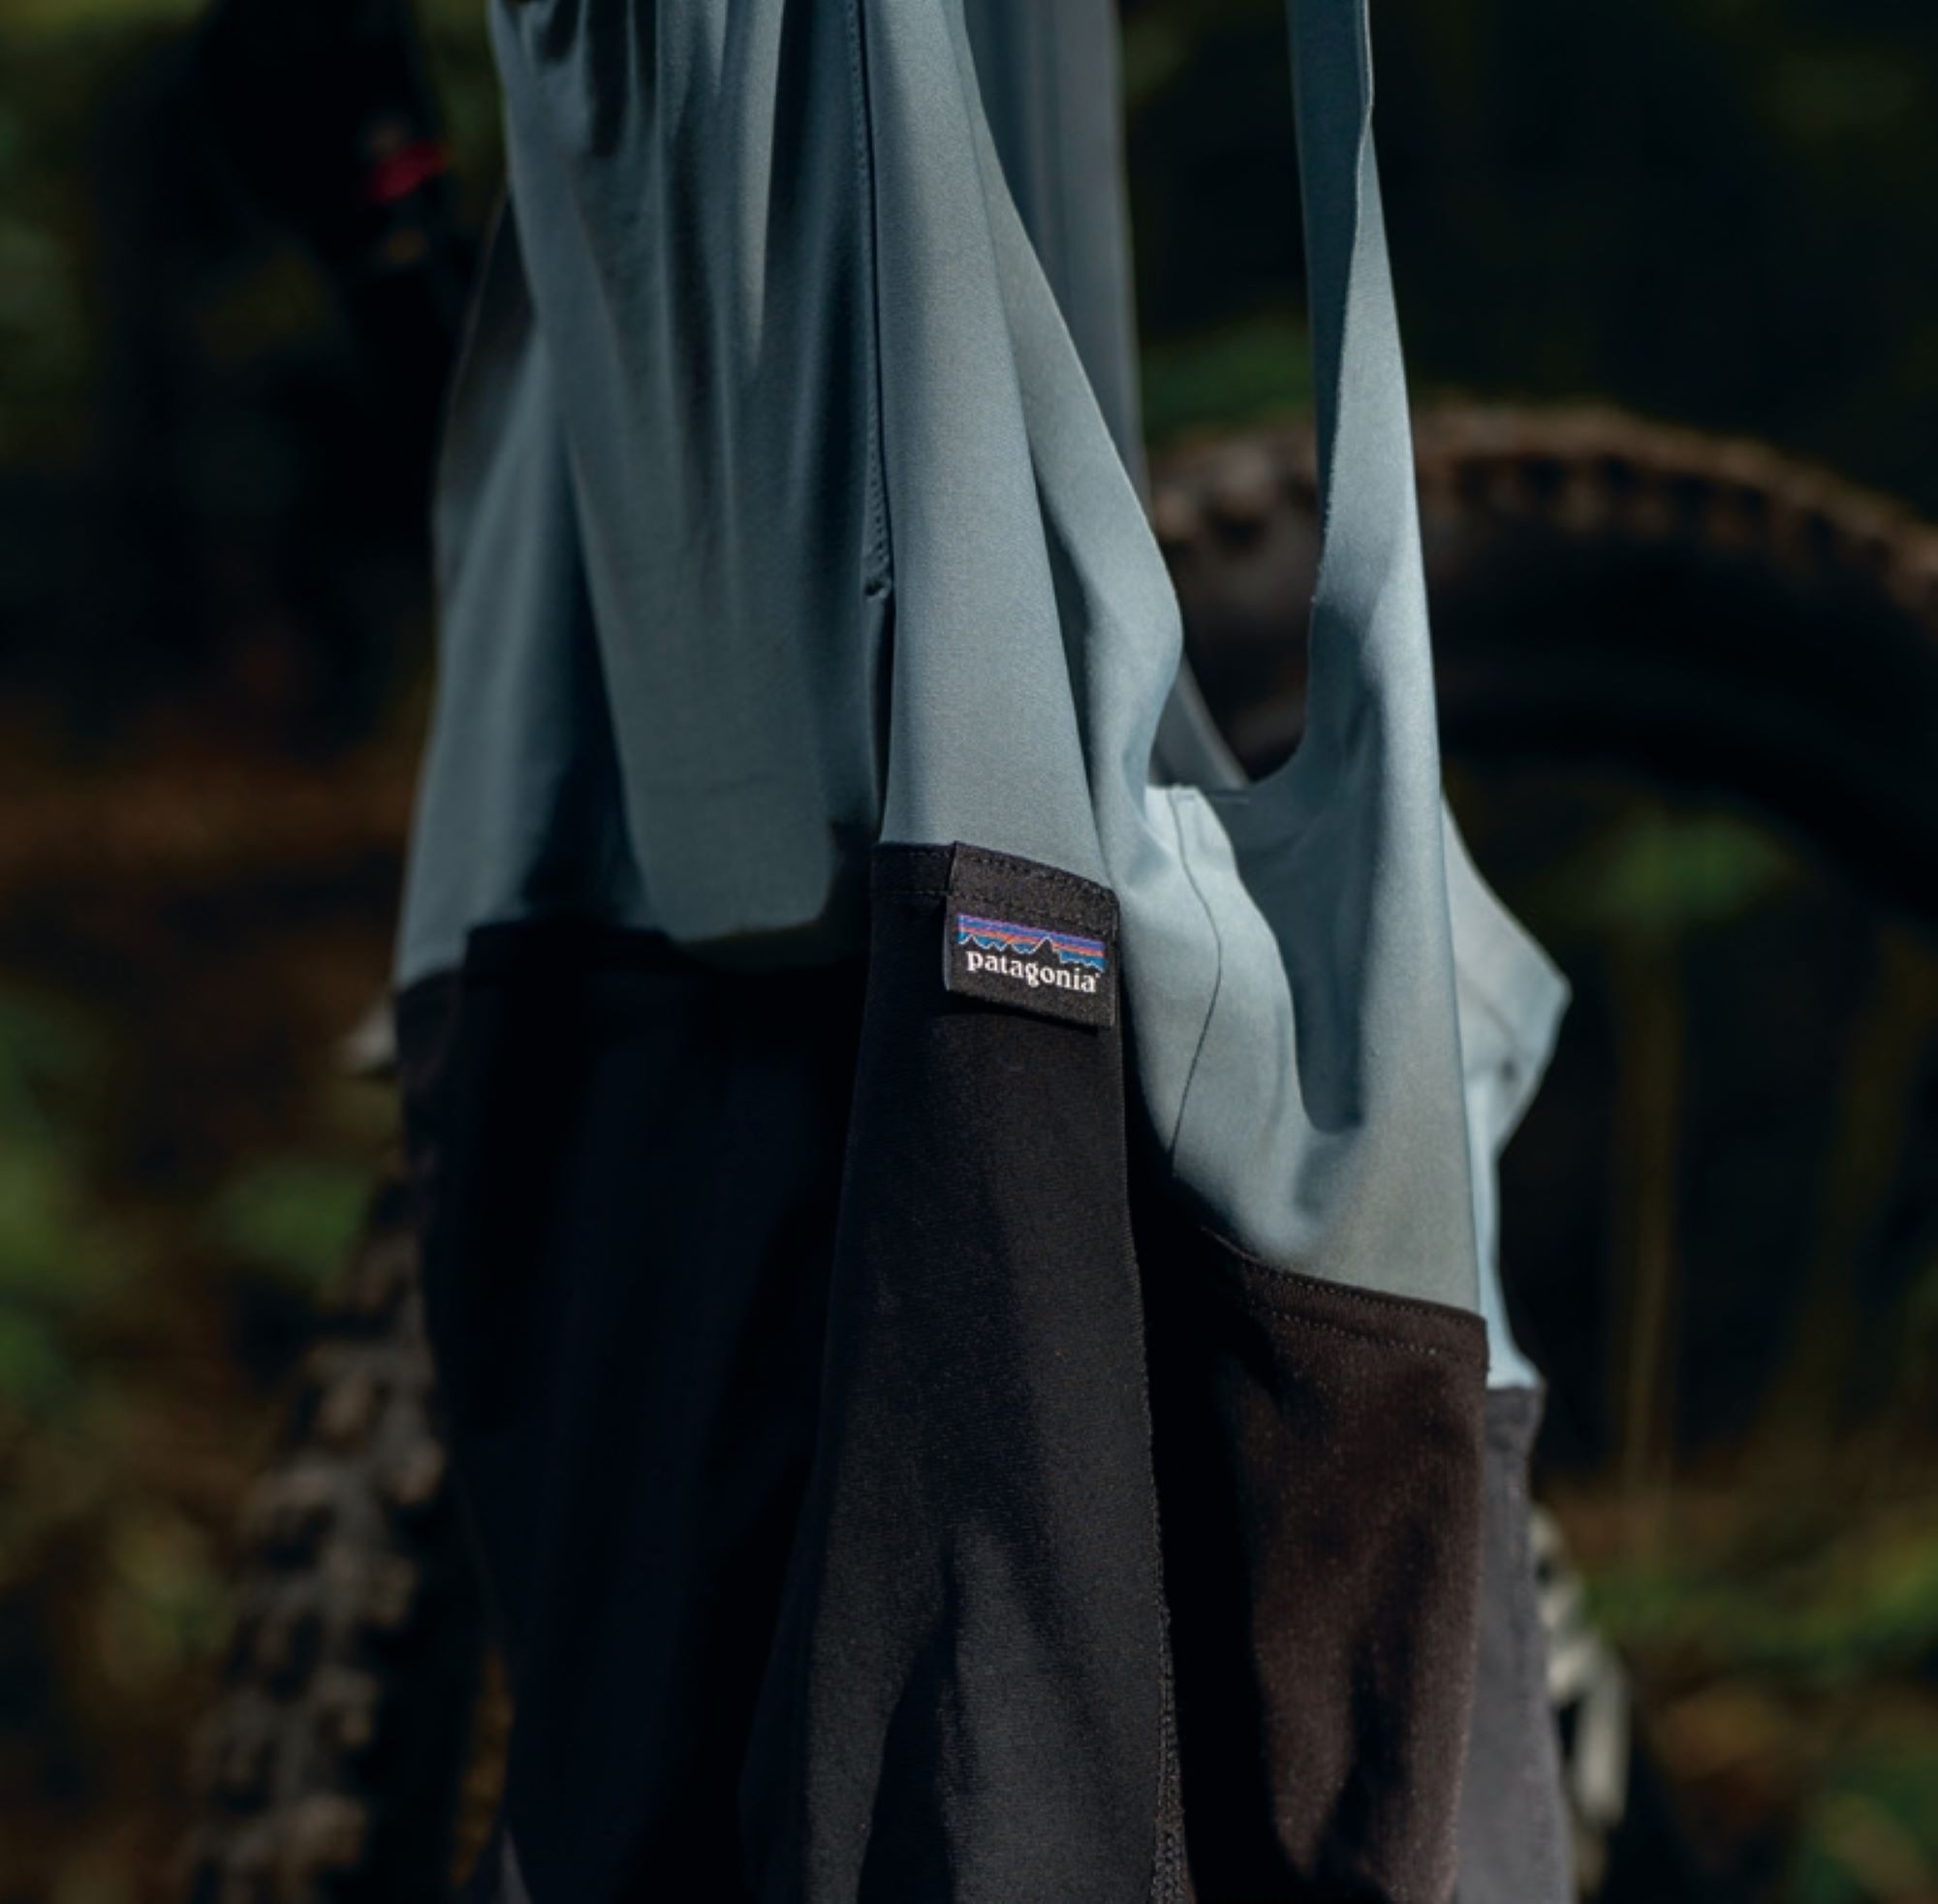
Patagonia Kit
Words Lester Perry
Images Thomas Falconer & Jamie Fox
RRP $229 Men’s Dirt Roamer Bike Shorts 12″ | $349 Dirt Roamer Liner Bike Bibs
Distributor Patagonia NZ
“Don’t buy these shorts”
In 2011, the brand Patagonia made headlines with their “Don’t Buy This Jacket” ad campaign in The New York Times. This was a shout out to anti- consumerism and their lifetime repair program that aims to ensure garments last forever, rather than be turfed on a rubbish heap and replaced.
Let’s rewind the clock back to the 1950s. Yvon Chouinard, a blacksmith, was producing a line of reusable Pitons (climbing anchor points) for local Californian climbers. By the early 1970s, climbing was booming and Chouinard pivoted, launching the Patagonia brand to offer climbing and outdoor soft goods with a focus on sustainability and durability, which he felt were lacking in the market at the time.
By the early 2000s, Patagonia was not only covering mountain sports but also starting to dabble in water sports, initially making some wetsuits for its staff. Then, in 2008, they launched a range of non-neoprene wetsuits, using limestone-based rubber, reducing dependency on petrochemicals and adhering to the company’s eco-friendly ethos.
In 2012, the team took another leap forward, offering an entirely plant-based rubber wetsuit range. By 2019, Patagonia was beginning to dabble in a different type of surfing: dirt surfing, AKA mountain biking, and by 2021 they had a tight but comprehensive range.
Around the same time as MTB apparel was breaking cover, Chouinard announced the transfer of Patagonia’s ownership to a trust and nonprofit to fight climate change, their $100 million+ yearly profits now going to environmental causes.
Drawing on experience and technologies from their existing ranges, they now offer quality, durable and eco-conscious shred-ready gear at a price. They’re sticking to their tried- and-true block colours and aren’t diving too hard into the latest trends—no garish “this will last a season” all-over prints here; just dependable, timeless silhouettes and colours.
There’s a reason Patagonia has been referred to as “Pata-Gucci”: their gear trends towards the premium end of the spectrum, not just in quality, but in price. If you can look past the price tag, there’s a lot on offer with Patagonia MTB gear, but you need to be prepared to take advantage of what’s on offer to really get the most from your investment. It requires a mind shift to buck the current industry trend of fast fashion. First off, if it doesn’t live up to the hype or expectation, take advantage of their “Ironclad Guarantee” for a refund, replacement or repair. Ripped a hole in a crash? Worn something out? Check out their free repair program, and you can either DIY repair with a patch kit—which they’ll send out—or send your gear in for repairs.
Patagonia’s strong environmental and social stance steers each decision made during garment production. Beginning with the goal to create better gear that lasts longer, meaning consumers buy less of it. With a key business goal being “cause no unnecessary harm”, their efforts to reduce environmental impact sometimes seem counterintuitive, but I guess this proves they’re walking the talk. Prioritising recycled, organic and plant-based materials, over 80% of Patagonia’s range is Fair Trade Certified, and their factories ensure staff receive a fair, legal wage and working conditions. Each part of their supply chain is optimised to ensure minimum environmental and social impact, while publicly available data ensures transparency, keeping them accountable.
Back to the MTB range. Split into two streams, the “Dirt Roamer” is lightweight, breathable and designed for big backcountry days in the saddle, while the “Dirt Craft” collection puts more focus on durability and less on lightweight, lending itself more to heavy-trail and bike park use.
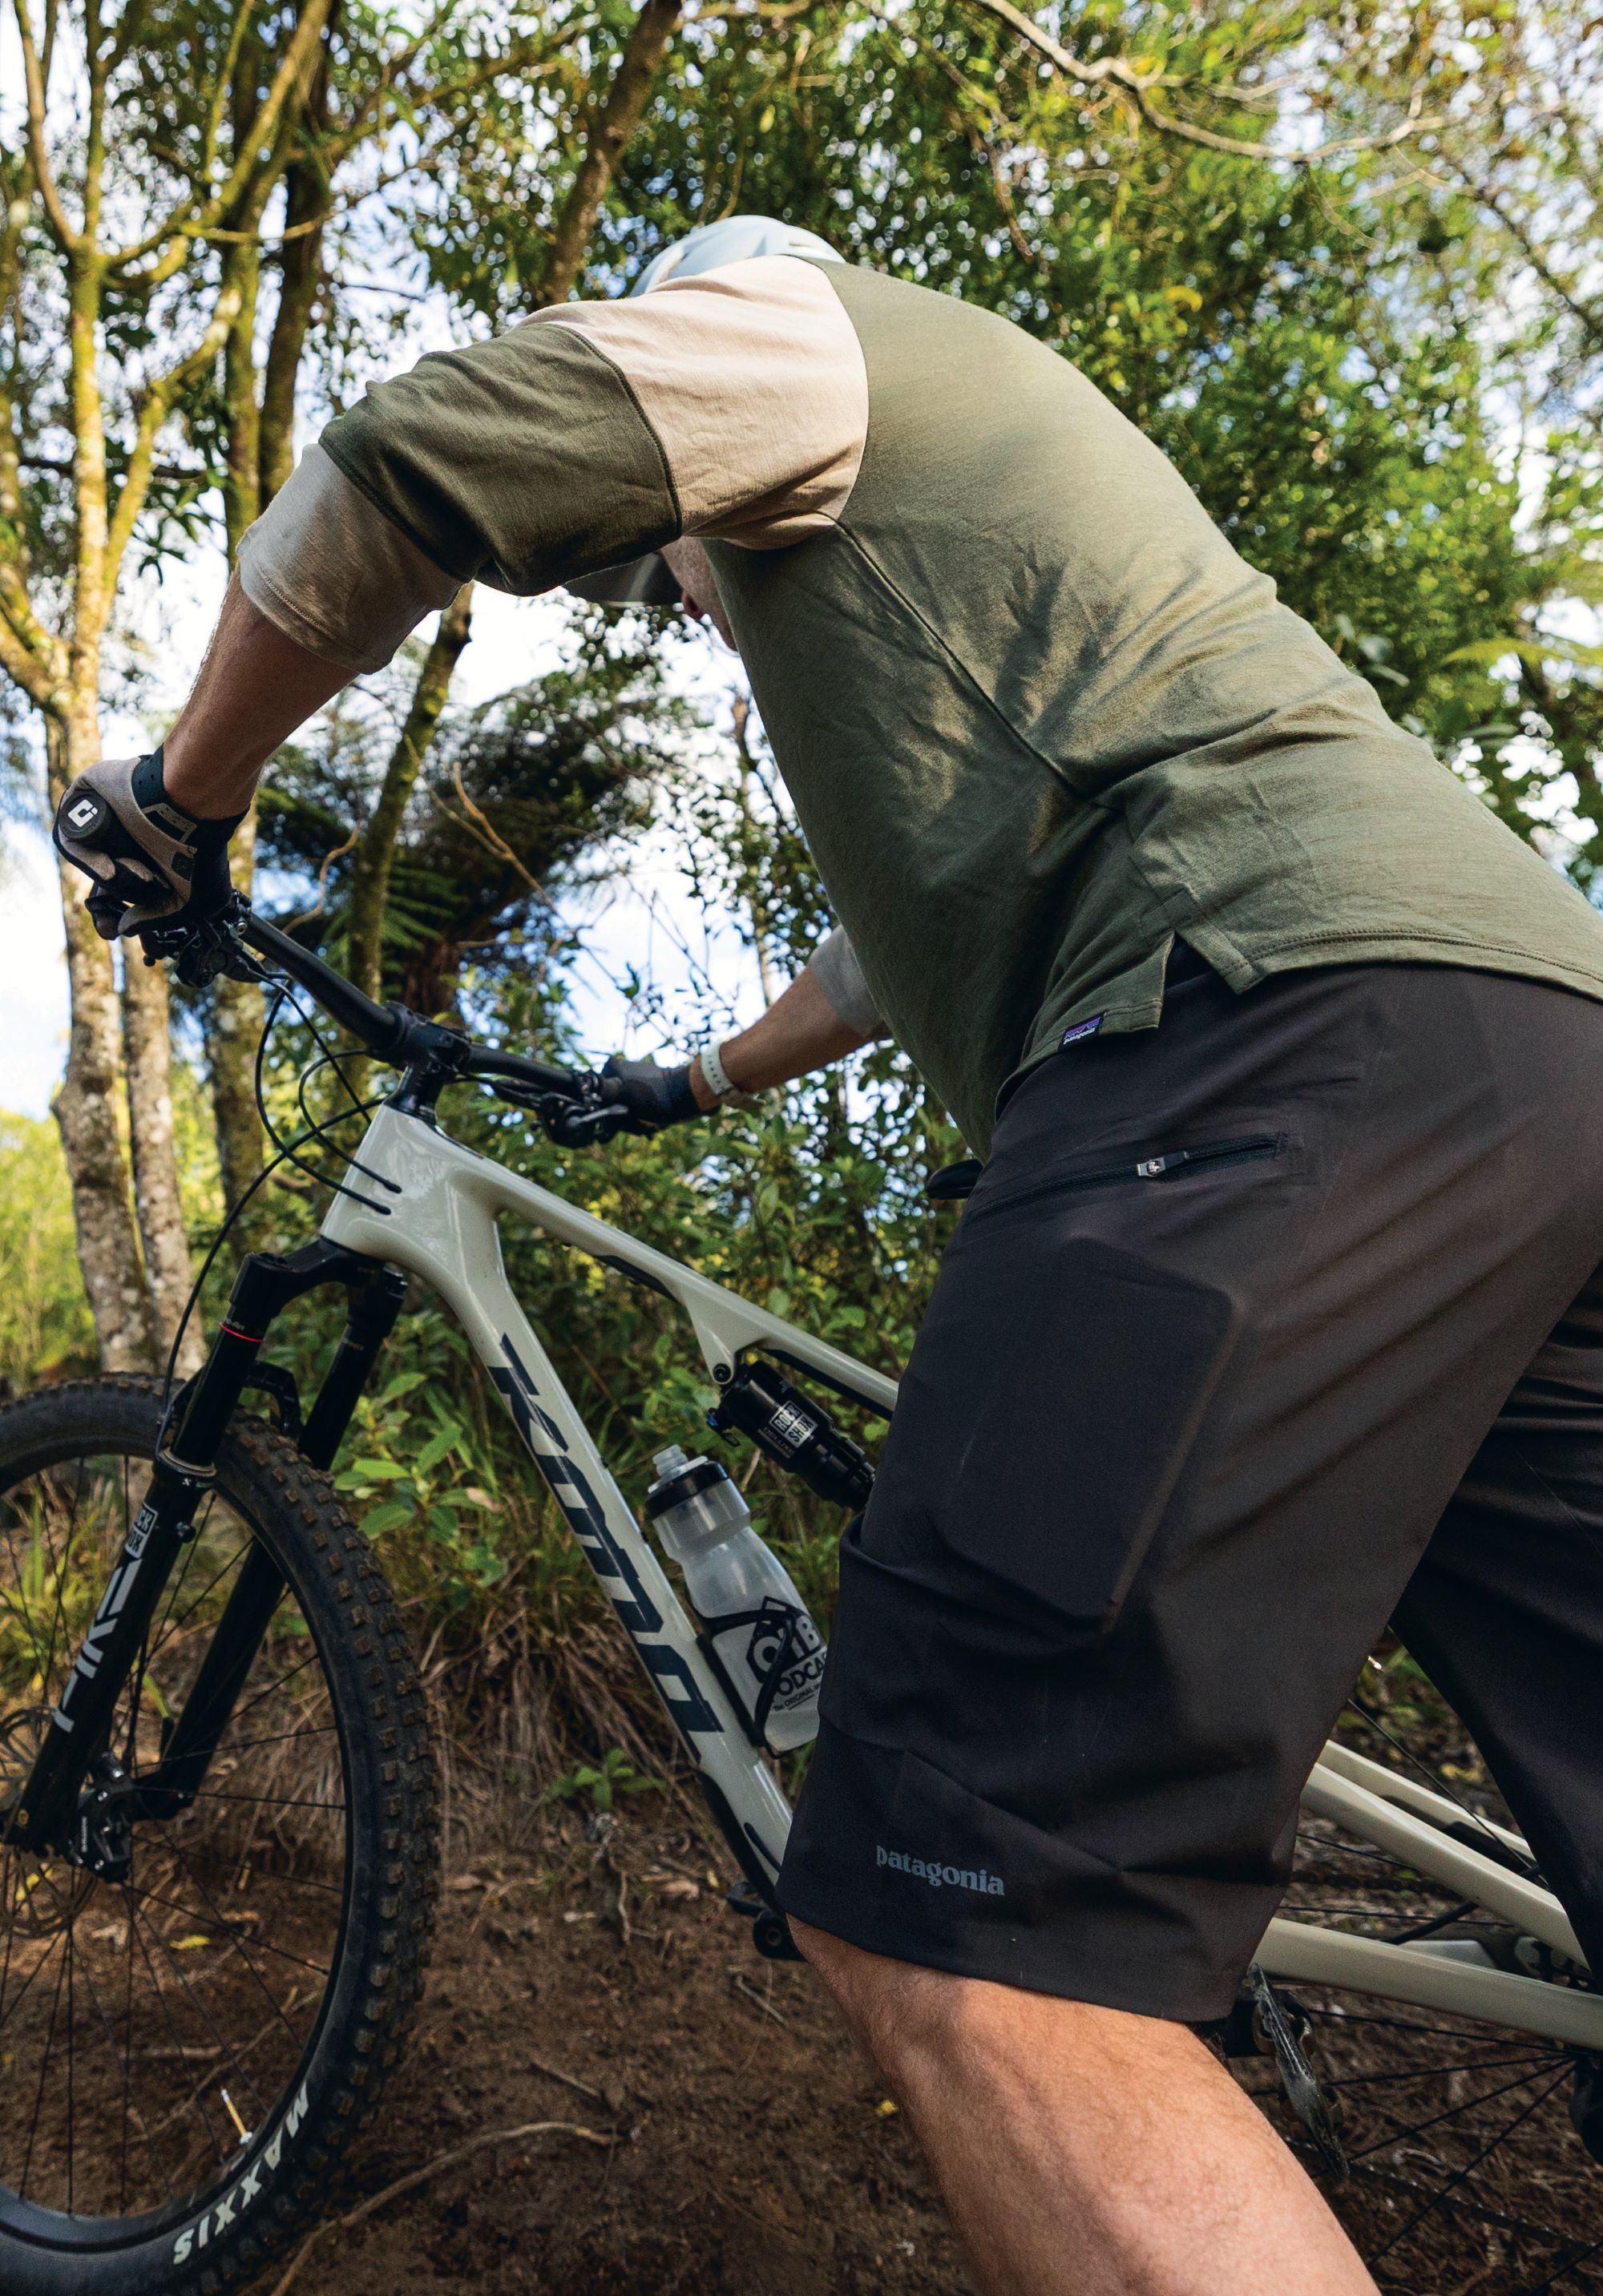
Men’s Dirt Roamer Bike Shorts – 12″
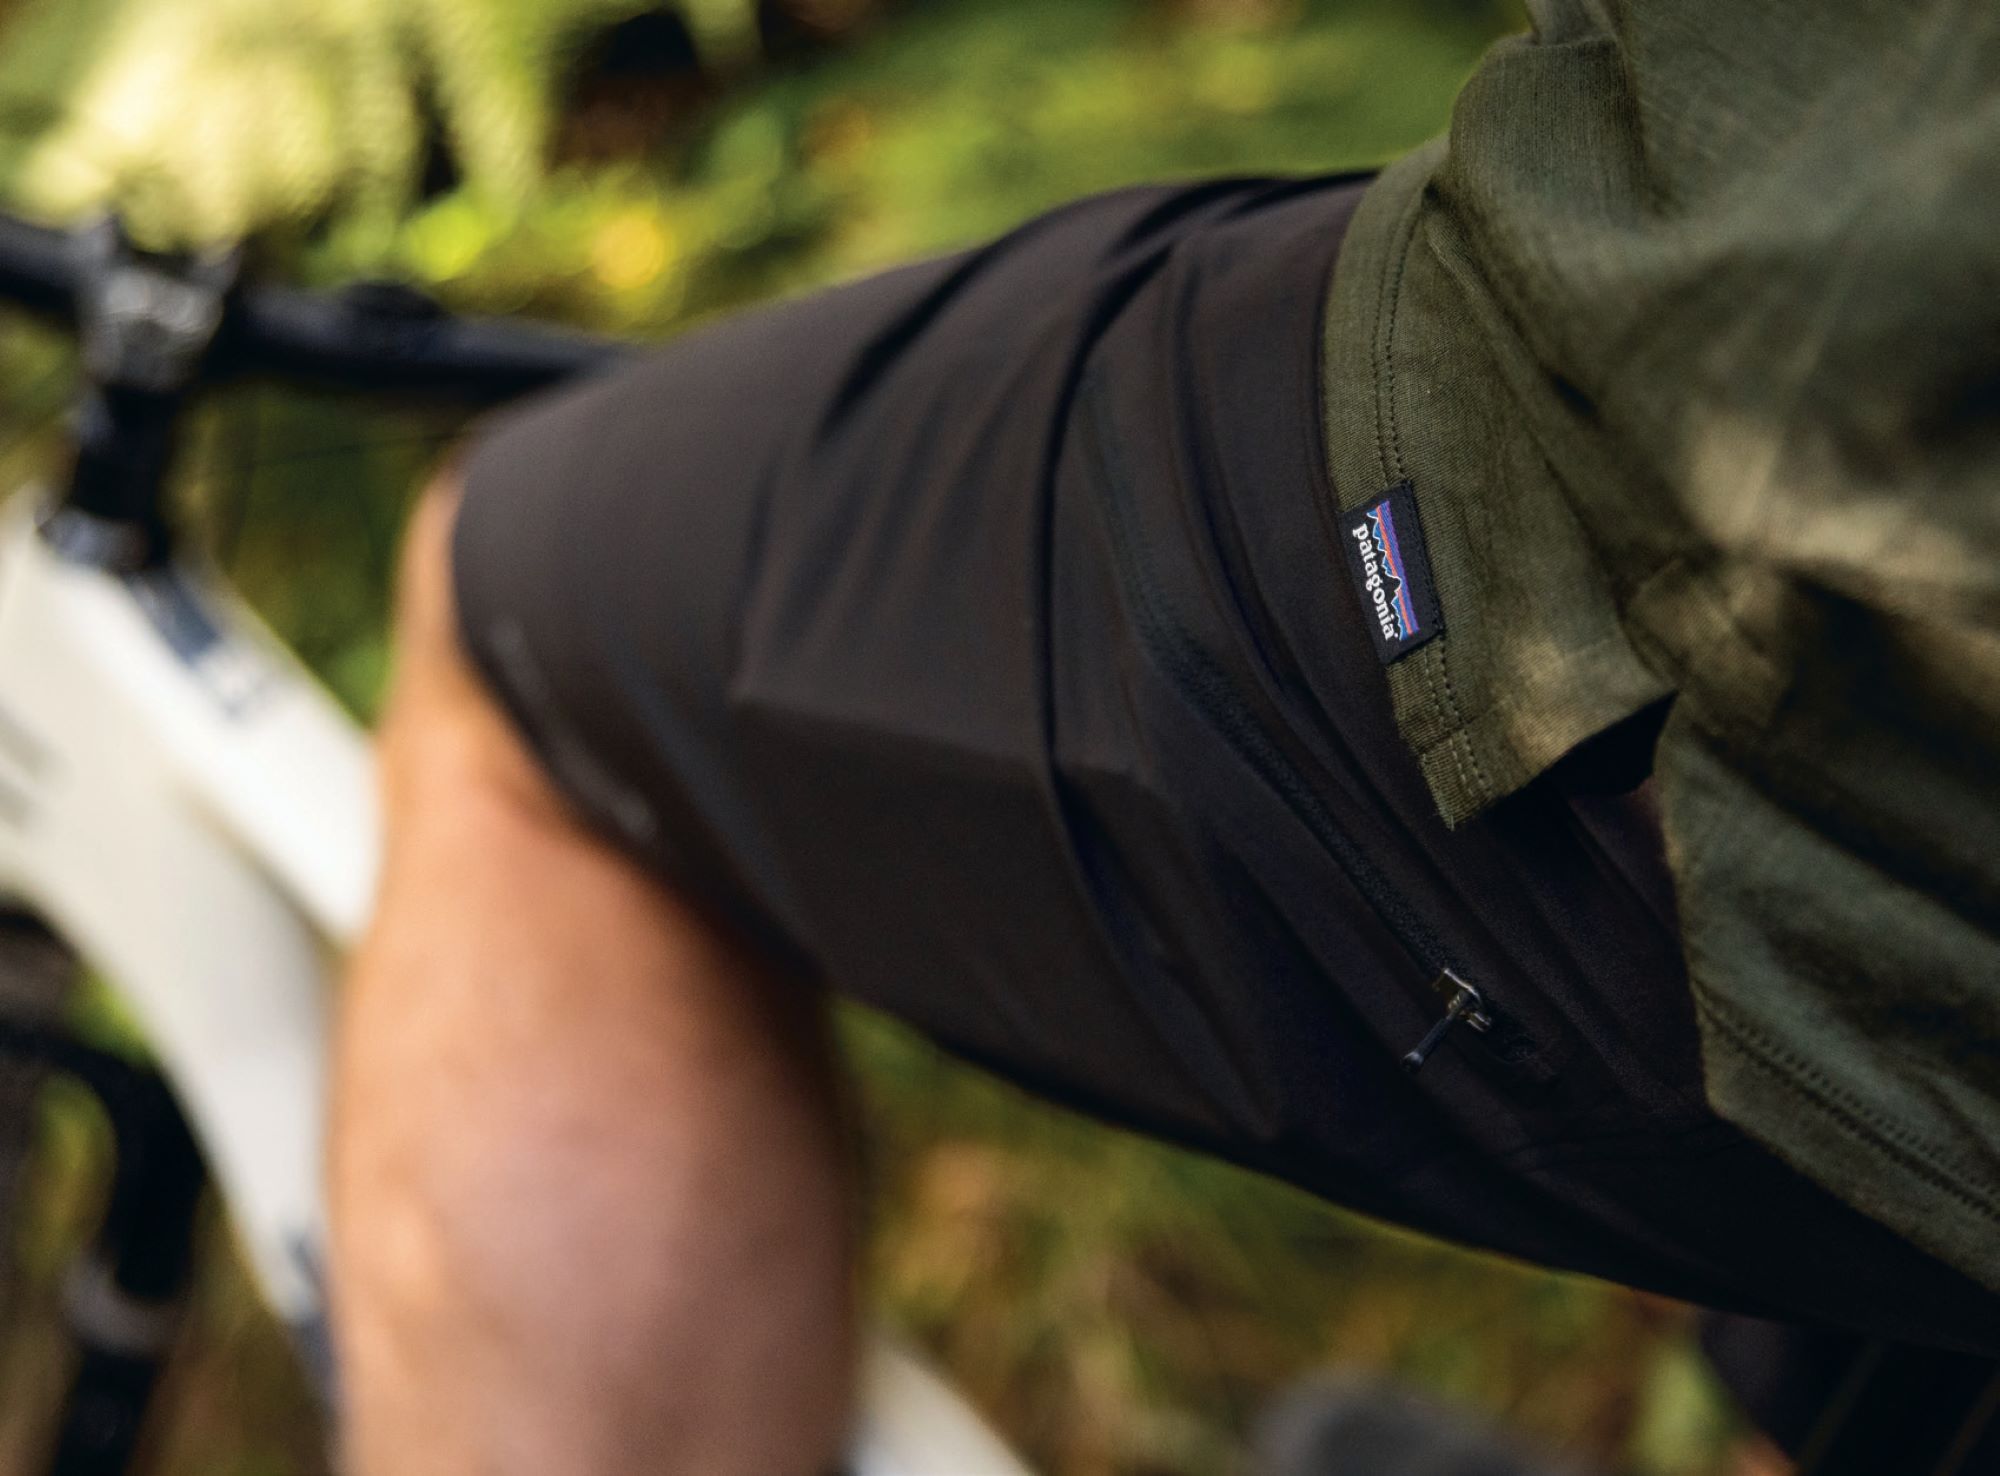
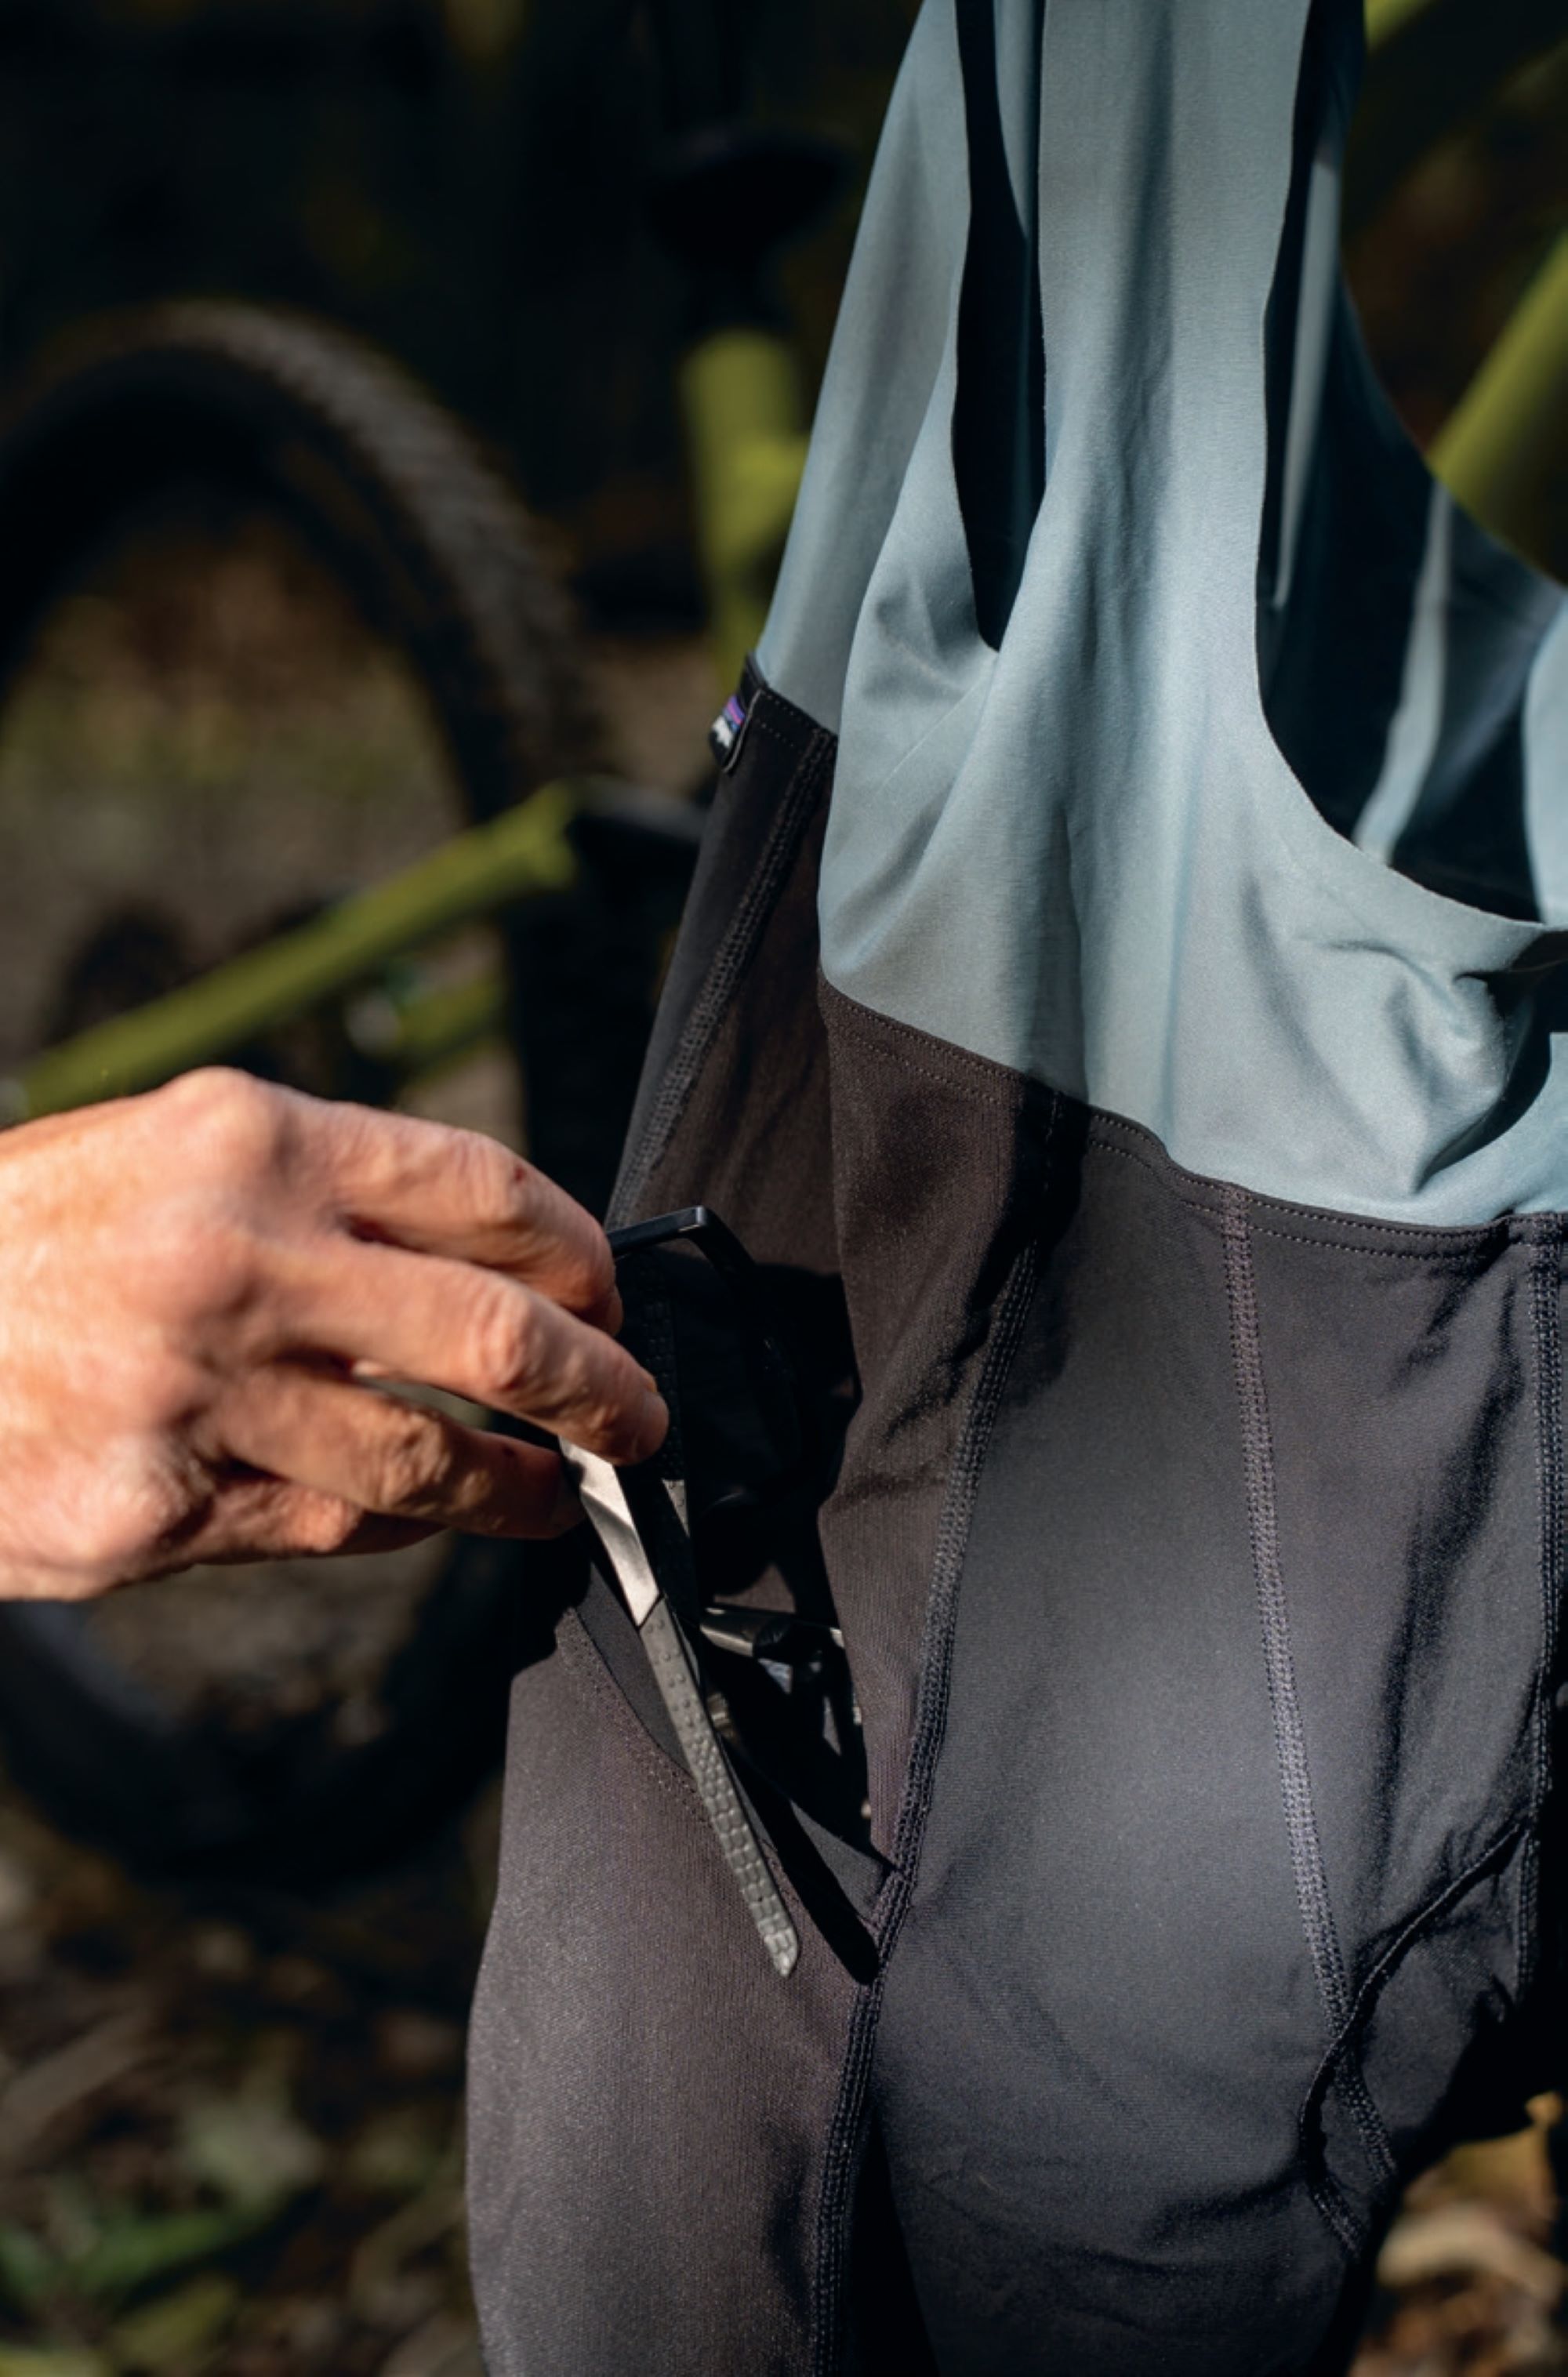
Slicing open the package, if I didn’t know better, I’d swear I’d been sent a pair of board shorts. Fortunately, I do know better, and what was in the package was in fact a pair of Patagonia Dirt Roamer 12” bike shorts. My first impressions were about the short’s weight, or lack of it, and their construction. Similar to their boardshorts, the stretch fabric is seam- welded rather than sewn, keeping the weight low and comfort high with no stitched seams rubbing.
The fit is ‘regular’ and true to size. I wear 32” pants across most brands, and these 32” shorts are right on the money. There’s an adjuster to customise the waist if required. Lengthwise, these sit partway down my kneecap, an ideal length for pedalling with or without pads.
Initially, I thought the pockets were a bit odd. Rather than being a more traditional ‘hip’ pocket, these are lower down the leg on the thigh; not wrong, just different. A zipped opening keeps belongings in place, and there’s plenty of space to load them up. Internally, there’s an envelope-style flap that gives access to pockets of a liner short. Clearly intended to be used with the Dirt Roamer Liner Bibs, the opening lines up perfectly with the liner’s cargo pockets. This is something unique that I haven’t seen before, and ideal if you’d rather stow gear in the liner, with it being firmer against the leg rather than looser and able to move around in the pockets of the baggy outer shorts.
The lightweight fabric breathes well and feels soft against the skin. As they say on the tin, these are a trail short designed to pedal in, and they’re ideal for this. I’ve put in some decent 3+ hour rides in them, and at no point did I find them lacking. The fit was spot on, just baggy enough not to appear too XC-like, but slim enough so as not to snag on the saddle or flap around unnecessarily. The welded seams look like they will continue to be sturdy and secure, and as long as the fabric continues to be wear-free, I’d see these shorts lasting a long, long time.
Men’s Dirt Roamer Liner Bike Bibs
I’m a huge fan of a bib-style liner, but not all are created equal. I’ve purchased no less than three pairs which, after a couple of wears, have remained in the kit drawer, just not quite right. There’s a lot that can go wrong during the design and construction processes of bibs; get one wrong and they won’t be OK to wear for lengthy periods. Fit is paramount and nailing it for all body types would be near impossible—instead, design for the middle of the bell-curve and hope for the best. The layout of the panels, straps, and their associated seams needs to be just right to get that Goldilocks fit. If the seams aren’t in the right place, not only will the fit be off, but the wearer will probably get rubbed the wrong way. The chamois choice is an area a lot of liners fall short: too thin, too thick, not the right shape, not secured in a rub-free manner; there’s a lot to consider.
The Patagonia Dirt Roamer Liner Bib shorts fit me exceptionally, fitting my middle-of-the-bell-curve, medium-sized frame to perfection. The body of the bib is lightweight, breathable, and extremely stretchy; all edges are nicely welded flat. All the stretch involved means that at least the top half of the bibs should fit a wide range of heights. On the centre back is a single vertical cargo pocket, sized to fit a water bottle.
In keeping with Patagonia’s eco-ethos, all fabrics involved are made largely from recycled nylon. Downstairs, the body of the shorts is made from a power-stretch knit fabric for a comfy, taut, supportive feel. Breathable mesh panels and cargo pockets feature on each thigh. The laser-cut leg openings have a couple of rows of silicone, which, when combined with the power-stretch fabric, keep the legs nicely in place.
The Italian-designed, 3-layer chamois is a quality addition, as it should be for the price. It’s a nice medium thickness, which I’ve found offers a good level of padding and breathability, remaining chafe-free over lengthy rides.
Temperature regulation is key when running a bib liner with outer shorts; too hot, and sweat adds to chafing and discomfort. These bibs breathe well overall, keeping the temperature in check and comfort consistent, although I did find the upper body somewhat clammy at times when sodden with sweat.
These bibs are ideally combined with the Dirt Roamer shorts to take advantage of their pass-through pockets, giving ample storage across both shorts for any-sized outing. These are one of the more expensive liner options on the market, but considering their fit, chamois, and overall performance, not to mention the repair program, they’re good value in my book and should last many seasons.
Overall thoughts
I’ve been super impressed and quietly surprised by these shorts and bibs. This isn’t a case of a massive clothing brand just throwing their label on an underdeveloped, off-the-shelf garment, but a case of careful forethought, design and manufacture. A big blue sign approved green tick from me. Although they perform exceptionally, it’s up to a buyer to determine if the after-sales service and manufacturing ethos is worth the price of admission.
If you’re a keen trail rider who’s after top-tier, long-lasting shorts and liners, then look no further; just be sure to get the most out of them by using the repair service if needed.
Leatt Products
Words Lester Perry
Images Jamie Fox
RRP $249—ProClip 4.0 Shoes | $119 — Velocity 4.0 MTB X-Flow Iriz Goggle $69 — Glove MTB 2.0 X-Flow Stealth
Distributor BikeCorp
I remember wandering the expo at Crankworx 2020, in Rotorua, when I was called over to the Leatt booth with the promise of seeing something exciting. I was indeed excited as I checked out Leatt’s first range of MTB shoes. It wasn’t perfect, but it showed glimmers of hope that Leatt could become a legitimate player in the MTB footwear game, completing their head-to-toe ethos.
ProClip 4.0 Shoes
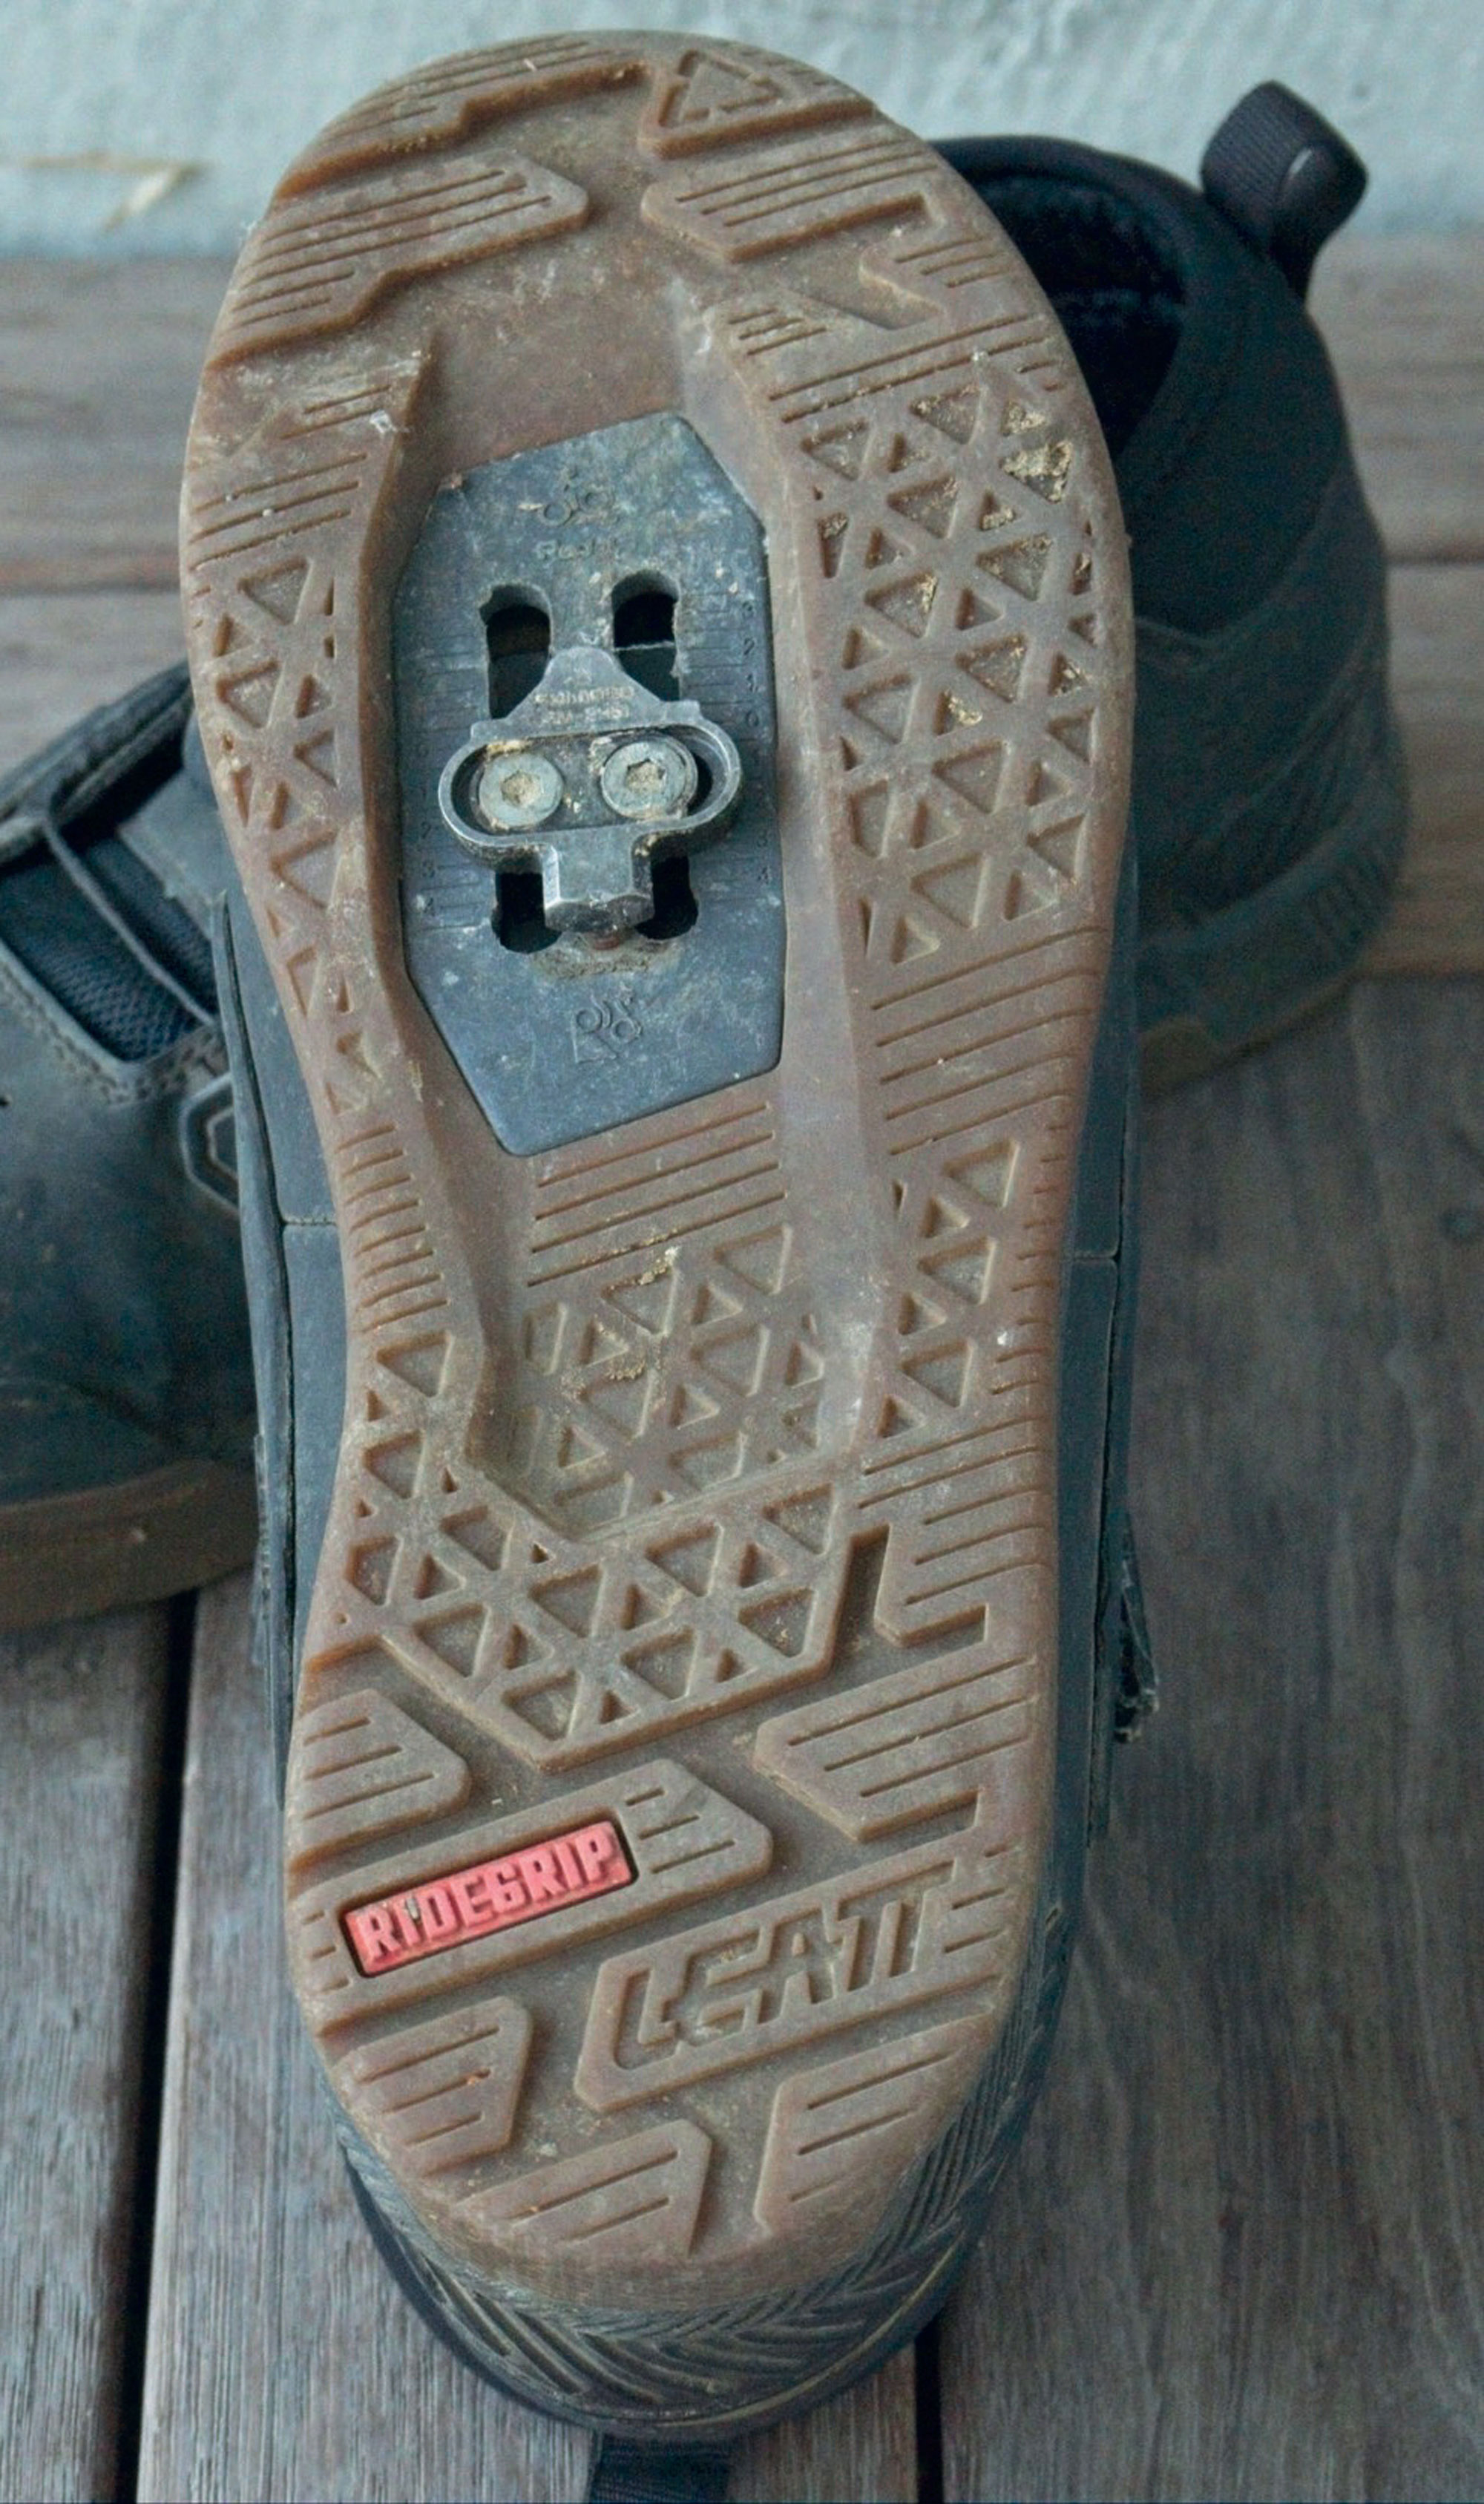
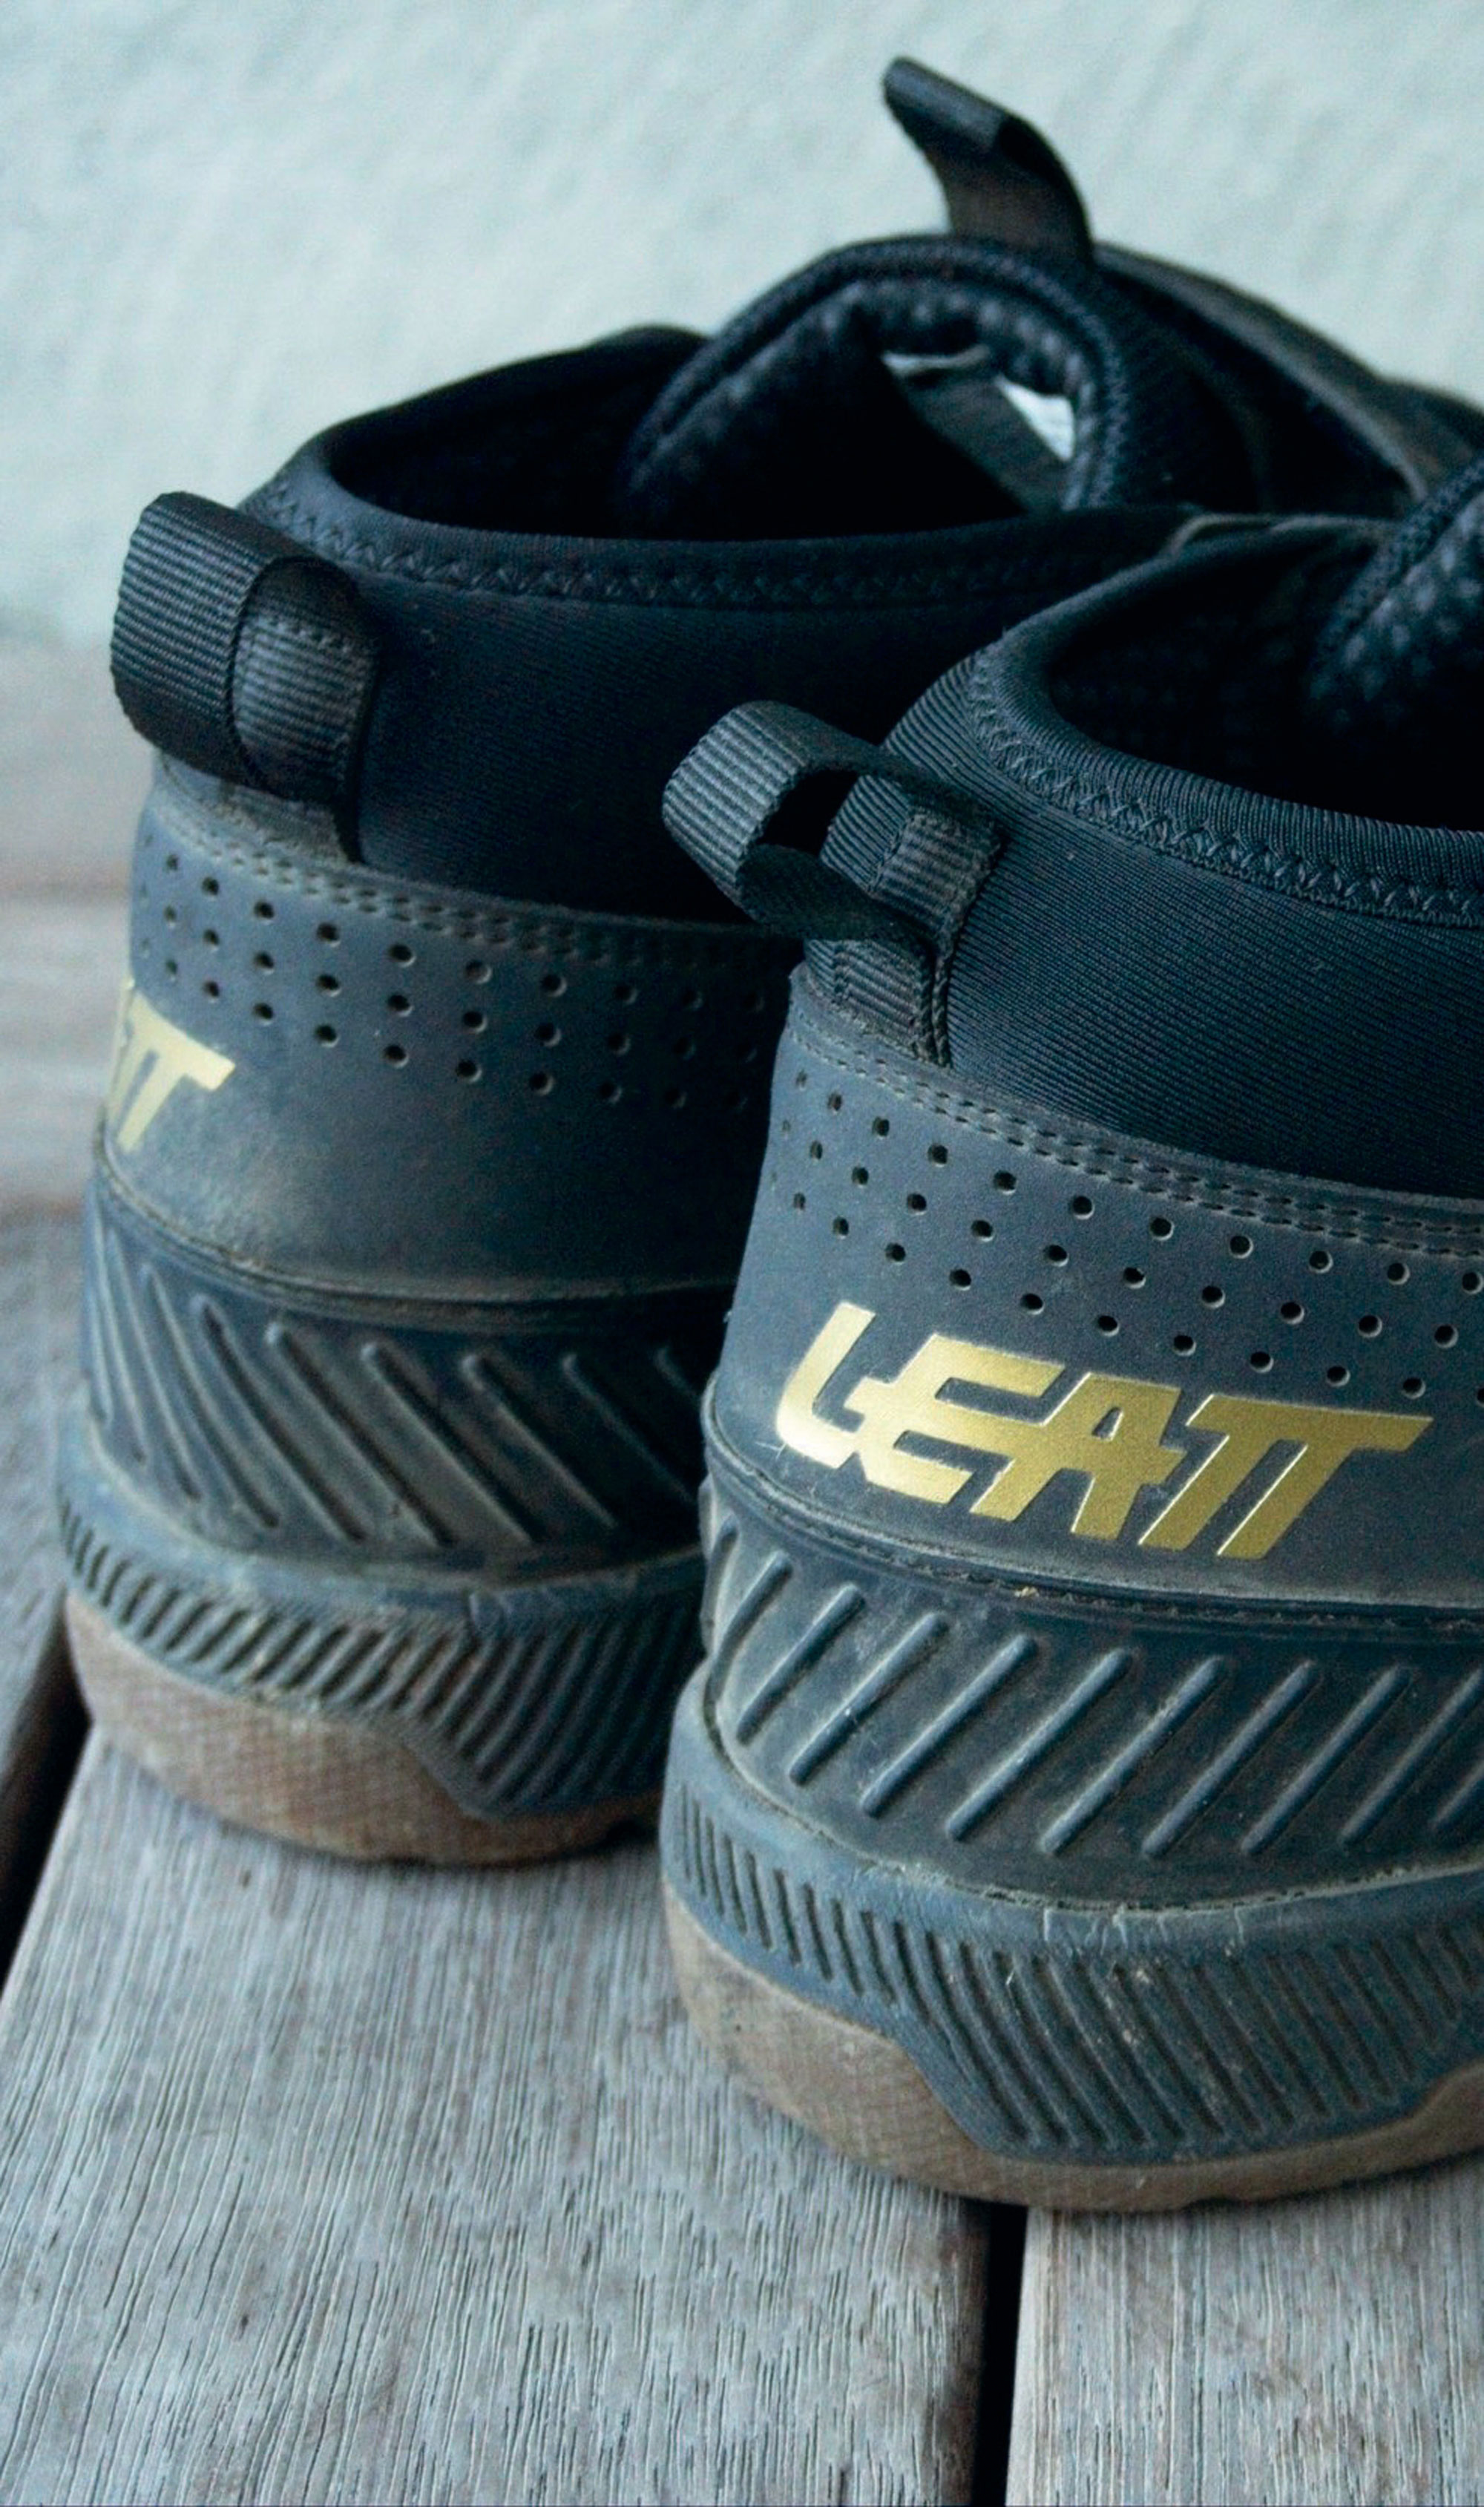
Fast-forward five years and I’m rolling deep in a fresh pair of Leatt ProClip 4.0 shoes to review. The 4.0 ProClip is a gravity-focused shoe that aims to protect – rather than be lightweight – without detracting from pedalling performance or power transfer.
There’s no missing the MOZ dial cable lacing system at the front and centre of the tongue. MOZ allows micro-adjust tension, with a pull to release its complete tension. The system makes for an easy-on, easy-off shoe. The dial is simple to use and has a decent rubberised outer edge, allowing it to be tensioned as tight as you’d ever need. I’ve encountered some dial styles that don’t have enough grip to grunt on them, but they work well. Over the front of the foot seems to make more sense than the all-too- common venerable dials on the side of shoes.
My only comment on the MOZ would be that it would be nice to see micro-adjust for tension release rather than the pull release that dumps all the tension in one go… but perhaps I’m being a little picky, and it’s by no means a deal breaker. A nice firm Velcro strap tensions the ankle area; there’s no stretch in the strap, so I can pull it nice and tight. I need to get it in just the right place to give perfect tension as there is no ‘give’ in the strap, meaning once it’s in place, it stays firm.
Visually, the shoe takes cues from the classic skate shoes of the 90s. The ProClip 4.0 doesn’t strike a slim silhouette; they’re a protective item, so we wouldn’t want a shoe that’s too slim. There’s no excess padding to absorb water; once wet, they dry pretty quickly compared to some. The outer is a mid-cut with a higher neoprene cuff to keep the loam and niggly pebbles from entering the shoe. It works great and has the nice touch of being slightly perforated to help with breathability. Heel and toe reinforcements offer some peace of mind that your tootsies should come out unscathed after those sketchy moments when you’re dabbing feet, or clipping a sniper root with your toes.
The gum sole is oh-so-hot right now. It features a familiar waffle pattern throughout most of its length, with strategically placed lugs under the toes and heel for walking grip. Thanks to the RideGrip rubber compound, the platform is surprisingly stable when not clipped in, assisted by a shallow concave section under the arch. A soft EVA midsole makes them comfy on foot while walking or hiking. The EVA does a noticeable job of absorbing chatter and vibrations, helping to reduce fatigue in the feet and lower legs. Traction for walking is reasonable in the dry, and the rubber is tacky enough to offer confidence, although scrambling around in the mud is as slippery as you’d expect; these are riding shoes, not hiking or “all-mountain” shoes. Pedalling stiffness is similar to the pair of Shimano GE-700s I recently reviewed, with a good medium flex for efficient pedalling and comfort for standing in lift queues or hiking jump lines. The 4.0 ProClip could take the win for having the most extended cleat channels in any shoe I’ve seen – there’s a serious amount of fore and aft adjustment, allowing for an almost mid-foot through to under-the-toe cleat mounting if you so desire. Gravity riders rejoice.
Size wise, I found these run on the larger size compared to most, so you may be able to downsize. As with almost all footwear: try before you buy.
Overall, the ProClip 4.0 is plenty comfortable and offers great protection for all eventualities. I like the mega cleat channels; it’s the first shoe I haven’t had to slam my cleat right back on. They aren’t the lightest or stiffest shoes out there but, if you’re more suited to cutting downhill laps, riding shuttles or just goofing off on the bike rather than pedalling significant distances, you can’t go wrong with these.
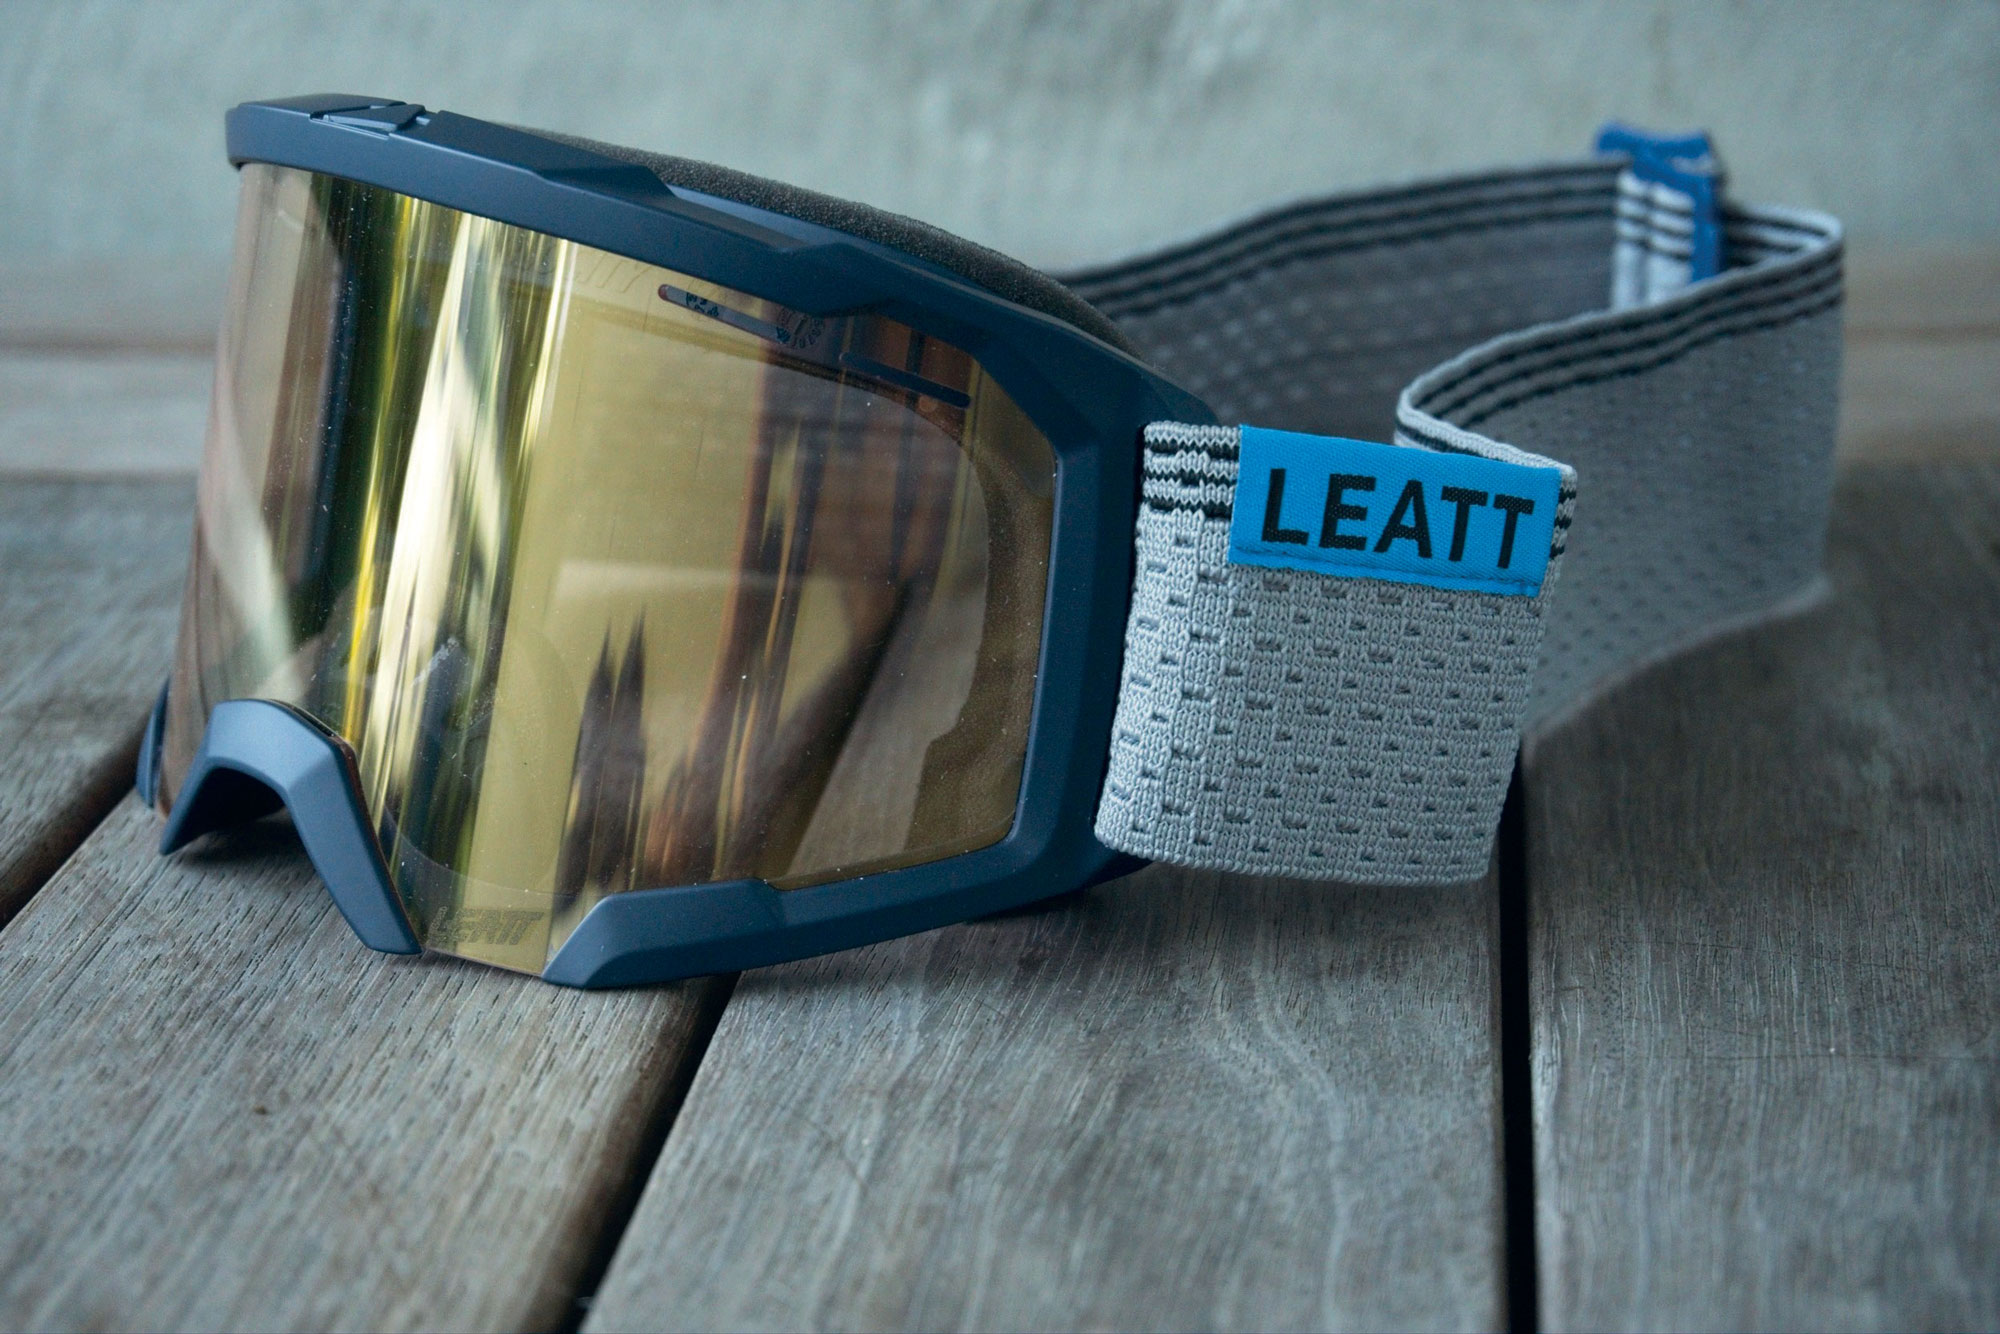
Velocity 4.0 MTB X-Flow Iriz Goggle
Ask anyone who’s gone over the bars and landed on their face if they think goggles are an essential part of their protective kit, and I’m confident you’ll get a resounding “yes”. Speaking from experience and a nice scar down my cheek, I’d agree. On a hot January day, while practising for a downhill race at Cardrona, in the early 2000s, I stopped on a corner to remove my goggles as they were saturated in sweat and stifling my face. As I rolled back onto the track my front wheel caught a rock, and I was pitched headfirst down a bank. A rock shot the gap in my full-face and got me just beneath my right eye, splitting my face open like a tomato. Fortunately, I sustained no lasting effects other than a scar, but the doctors determined the cut was millimetres from causing severe damage to my eye. The funny thing is, had I been wearing the Velocity 4.0 X-Flow goggles, I’d probably not have overheated and would have kept the goggles on rather than hanging them off my handlebars, and likely walked away from the crash with just a bruised ego and scratched goggles. Goggles or glasses? I’m not entirely sure what to call these. They have advantages similar to glasses but with the extra cushion and a more secure fit. They also have the protection and field of view of goggles, which is, to some degree, the best of both worlds. Mountain bike riders generally don’t see the same speeds as motocross riders, and there’s seldom debris or dust flung from a rider in front, so in the form of the 4.0 X-Flow, the traditional moto goggle has been tweaked to suit mountain biker’s needs.
The use case for wearing goggles has become much broader with the advent of the Velocity X-Flow series from Leatt, which has ruled out – or at least minimised – the downsides of wearing regular goggles. The minor trade-off of having open areas in the frame is that debris could make it into the goggle cavity. I haven’t experienced this, but I imagine it could happen, particularly in the wet, when worn with an open-face helmet.
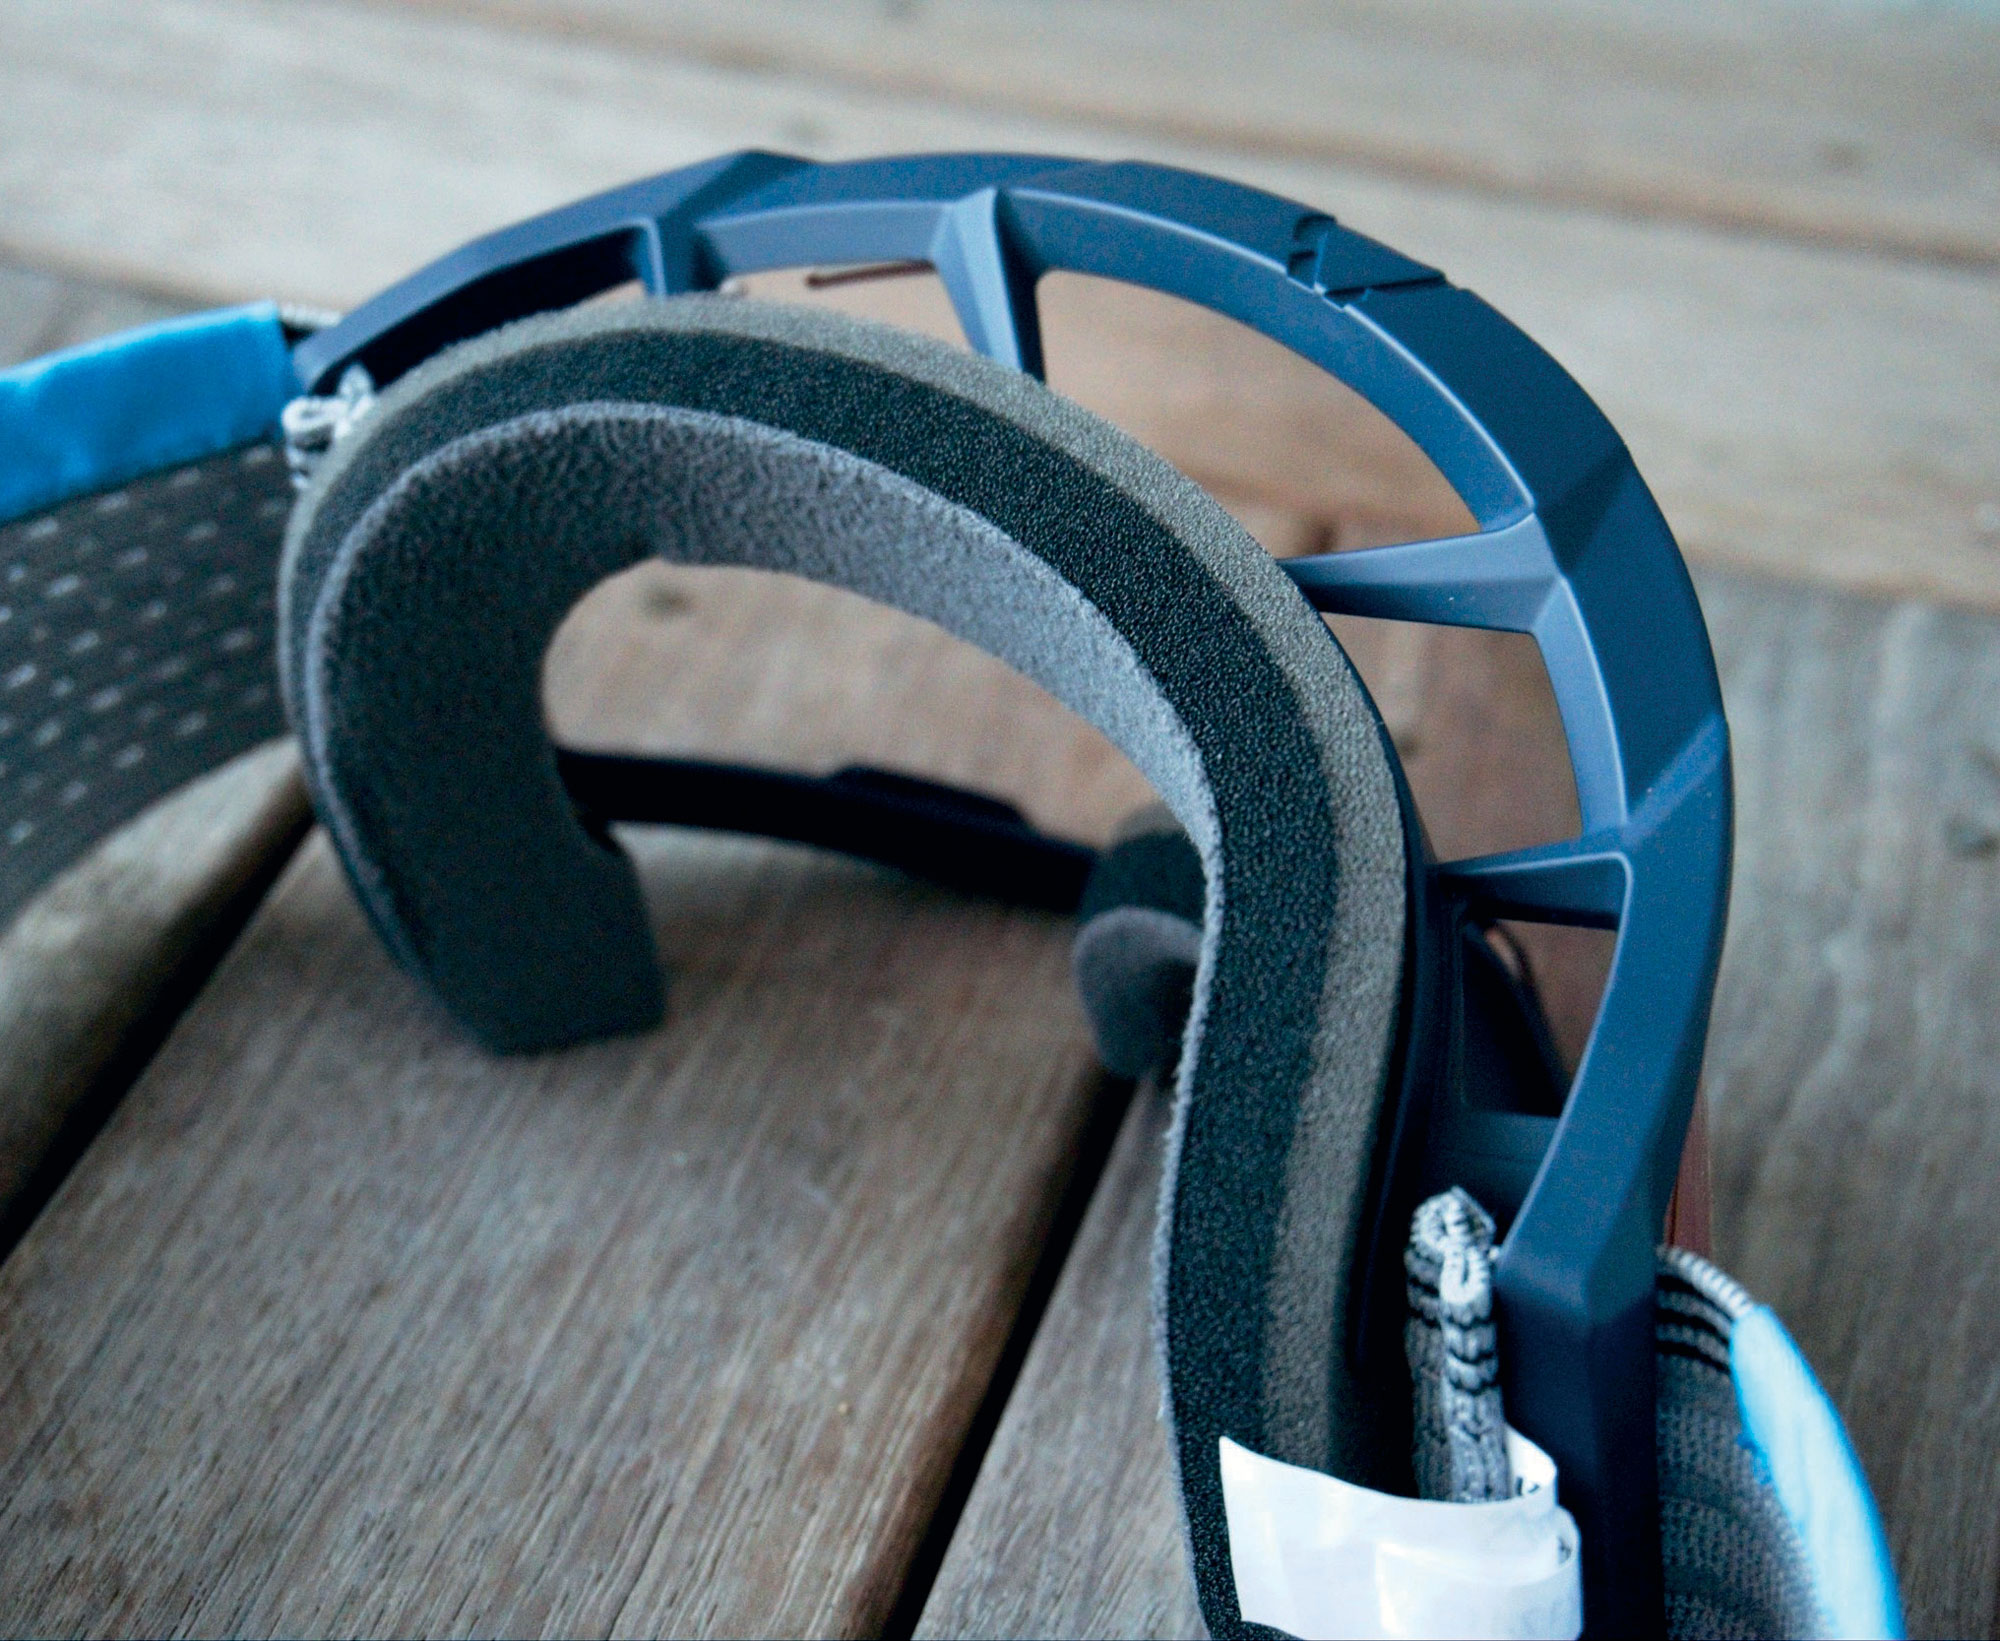
The fit is similar to that of a good pair of goggles, with a twist. Leatt designers strategically removed sections of the foam padding, allowing for a vast amount of breathability from the top and bottom of the frame. They also nailed the look by keeping them looking like a pair of goggles, rather than the more polarising hybrid goggles/glasses style of some competitors.
The Rideviz lens features permanent anti-fog and scratch-resistant coatings and meets the ‘Military Ballistic Impact Standard (MIL-DTL- 43511D)’ – so the rock that pierced my face wouldn’t stand a chance against this lens! The Iriz tint strikes the sweet spot between being too dark and too light; I find it spot on for almost all conditions, taking the harshness out of the light on open trails but not dark enough to dull the scene too much when in the bush.
My first outing with these on my face was a jaunt aboard an eBike on a muggy, blue sky spring day, not the usual conditions for me to reach for a pair of goggles. The increased airflow over a regular goggle was immediately noticeable. My face didn’t feel sealed in a hot box, and air flowed between the lens and my face, controlling the temperature. The field of view is mega and no different to a quality set of goggles.
The top foam absorbs sweat, which is excellent until it becomes saturated; at that point, I occasionally experience a drip of sweat down the inside of the lens. On a stinking hot day, the X-Flows are still warmer than sunglasses, but not by much. Since the lens sits further from the face than on glasses, they collect less sweat on the lens, and there’s a significant increase in protection, too. The mesh strap is a nice touch, theoretically allowing some breeze to pass through into the helmet vents—a hard one to quantify, but I see no reason it wouldn’t be the case.
I’ve become a fan of these goggles. I appreciate that they resemble traditional goggles, and Leatt has nailed it regarding breathability. I now wear them in situations or rides where I wouldn’t have even considered it with regular goggles—thumbs up.
Glove MTB 2.0 X-Flow Stealth
Is it me, or have gloves become a consumable, throwaway item? Back in the early 2000s, a pair of gloves would literally last me seasons, and my riding volume was probably twice what it is now. Since then, quality gloves seem more and more difficult to find, particularly if you’re chasing something lightweight and breathable that will last more than a summer. The stitching, particularly on the fingers, is usually the first to go, and there are only so many times I want to restitch and bodge them to be usable. I didn’t get too excited when the Leatt 2.0 X-Flow gloves arrived for review last year.
I’m pretty finicky about what gloves I’m comfortable in. A minimal palm is key, and I find the fabric tension across the back of my hand needs to be just right—not too tight to restrict movement, but with enough support to keep them snug and avoid bunching. More importantly, they must help keep the palm taut and in place. See what I mean? Finicky.
With a stretch fit and slip-on design, these take a little technique and patience to put on, but once on, the medium size fits my medium-sized hands perfectly; snug throughout with no firm points or obvious pressure points. Fingers are explicitly tailored to minimise bunching when wrapped around a handlebar, and are stitched with a specific thread to aid longevity. The main body fabric is a Leatt X-Flow material, a 4-way stretch mesh that helps with breathability and fit. Knuckles and pinky fingers get an extra layer of thin rubber material for added protection and reinforcement, adding negligible weight or bulk. The backs of the thumbs have a terry cloth wipe.
The palm is made from a single piece of Leatt’s NanoGrip material. It’s nice and thin and has a slightly furry, almost cat-paw-like surface, which gives superior grip in all conditions. The handlebar feel is exceptional, possibly the best of any gloves I’ve worn. Some wizardry in the fabric means the fingers are touchscreen compatible, which is a bonus whether you’re filming ‘shreddits’ with your mates or calling for help after a crash.
After about four months of wearing these gloves, I’m pretty impressed, and they’ve become my go- to. The X-Flow fabric has kept its shape and firm stretch, and all seams are still intact. Although the palm has some stains, it is holding up well with no signs of wear. A resounding clap for Leatt for continuing to make gear that works well and lasts the distance. There is no fast fashion here.