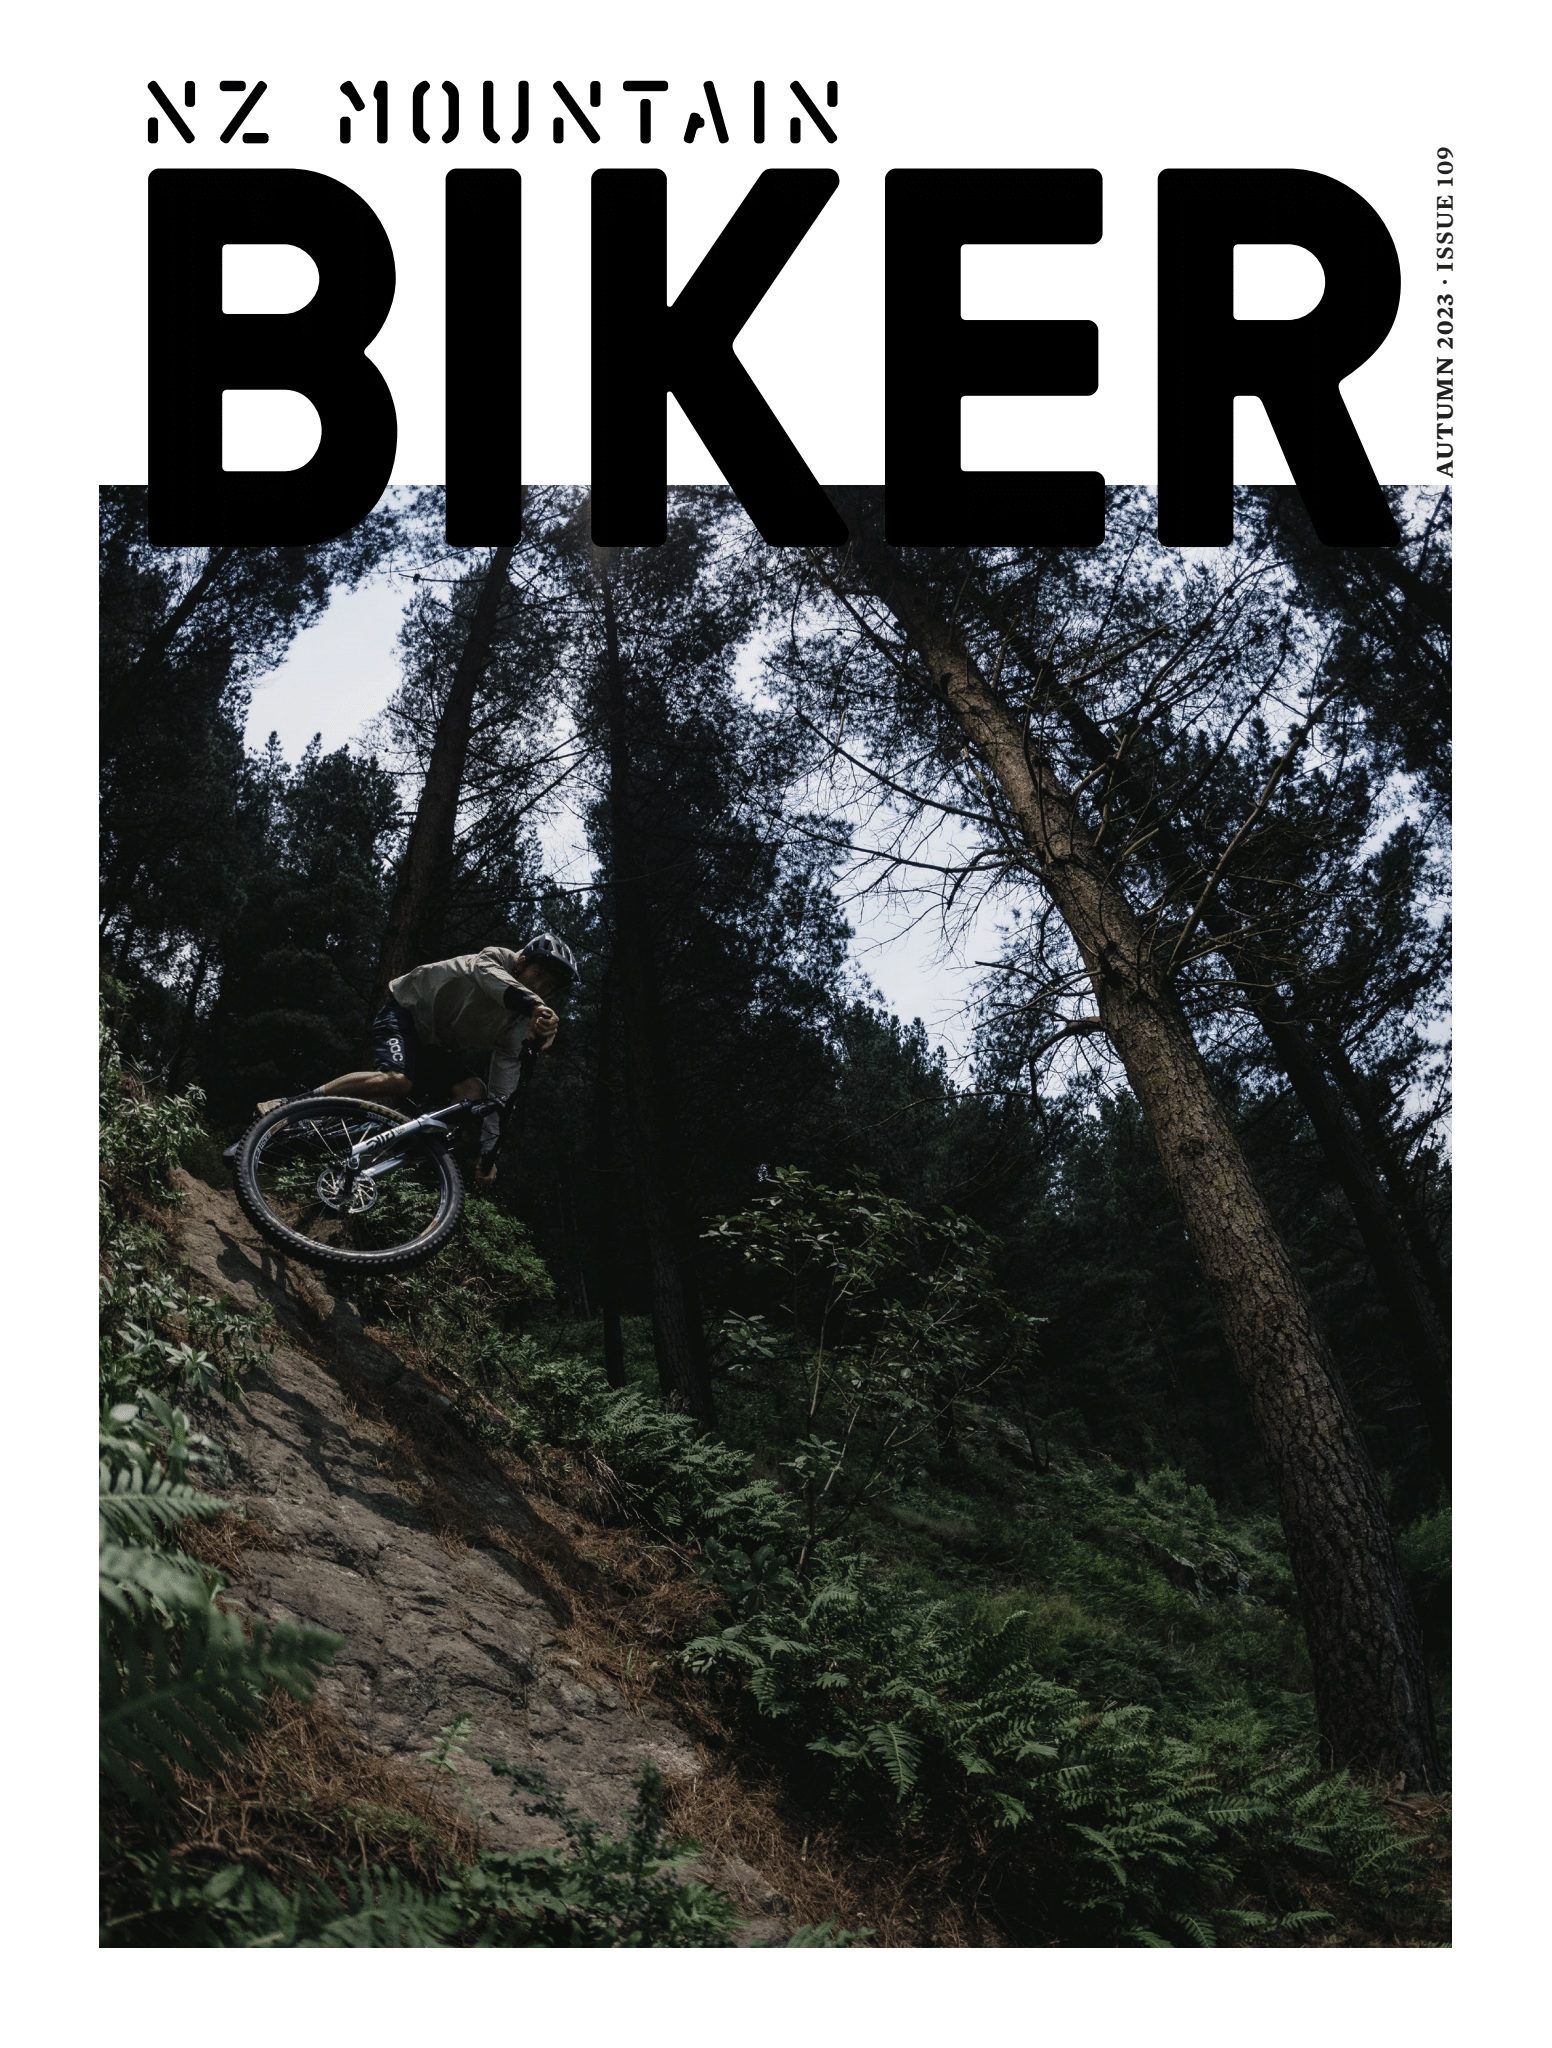
Location: Ōtautahi Christchurch
Words: Jordan Phipps
Photography: Cameron Mackenzie
Produced in partnership with Christchurch NZ

Ōtautahi Christchurch: a diverse and exciting city in the heart of New Zealand’s South Island, this is the gateway for adventurers and explorers alike.
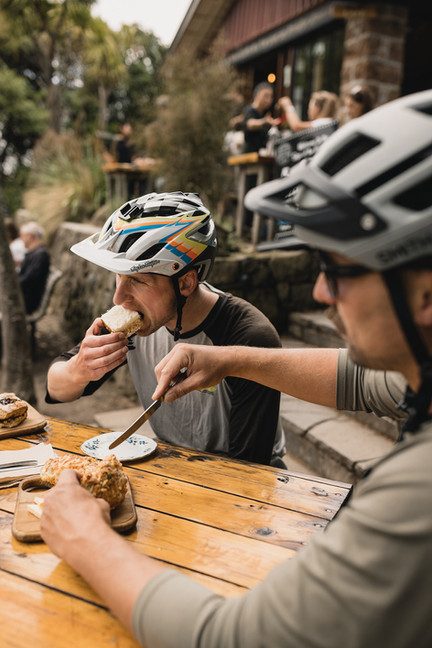
The largest city in Te Waipounamu has grown from the incredible challenges Mother Nature threw the community in 2010. These days, a real buzz can be found on the city streets, although it remains an old city at heart, with many remnants of its gothic architecture still tucked away amongst the new. There’s not many cities that can claim the new, vibrant feeling Christchurch has; the city is now flush with a number of new shops, cafes, restaurants and watering holes. Areas like the Riverside Markets and The Terrace are lined with spots to check out and the rebuild has offered a ‘re-set and re-think’ into mobility and how people get around. Go down any street in the city and you’ll see pedestrian areas and cycle lanes along with a heap of cyclists using them. The city has always had a strong cycling culture but nowadays it seems more popular than ever.
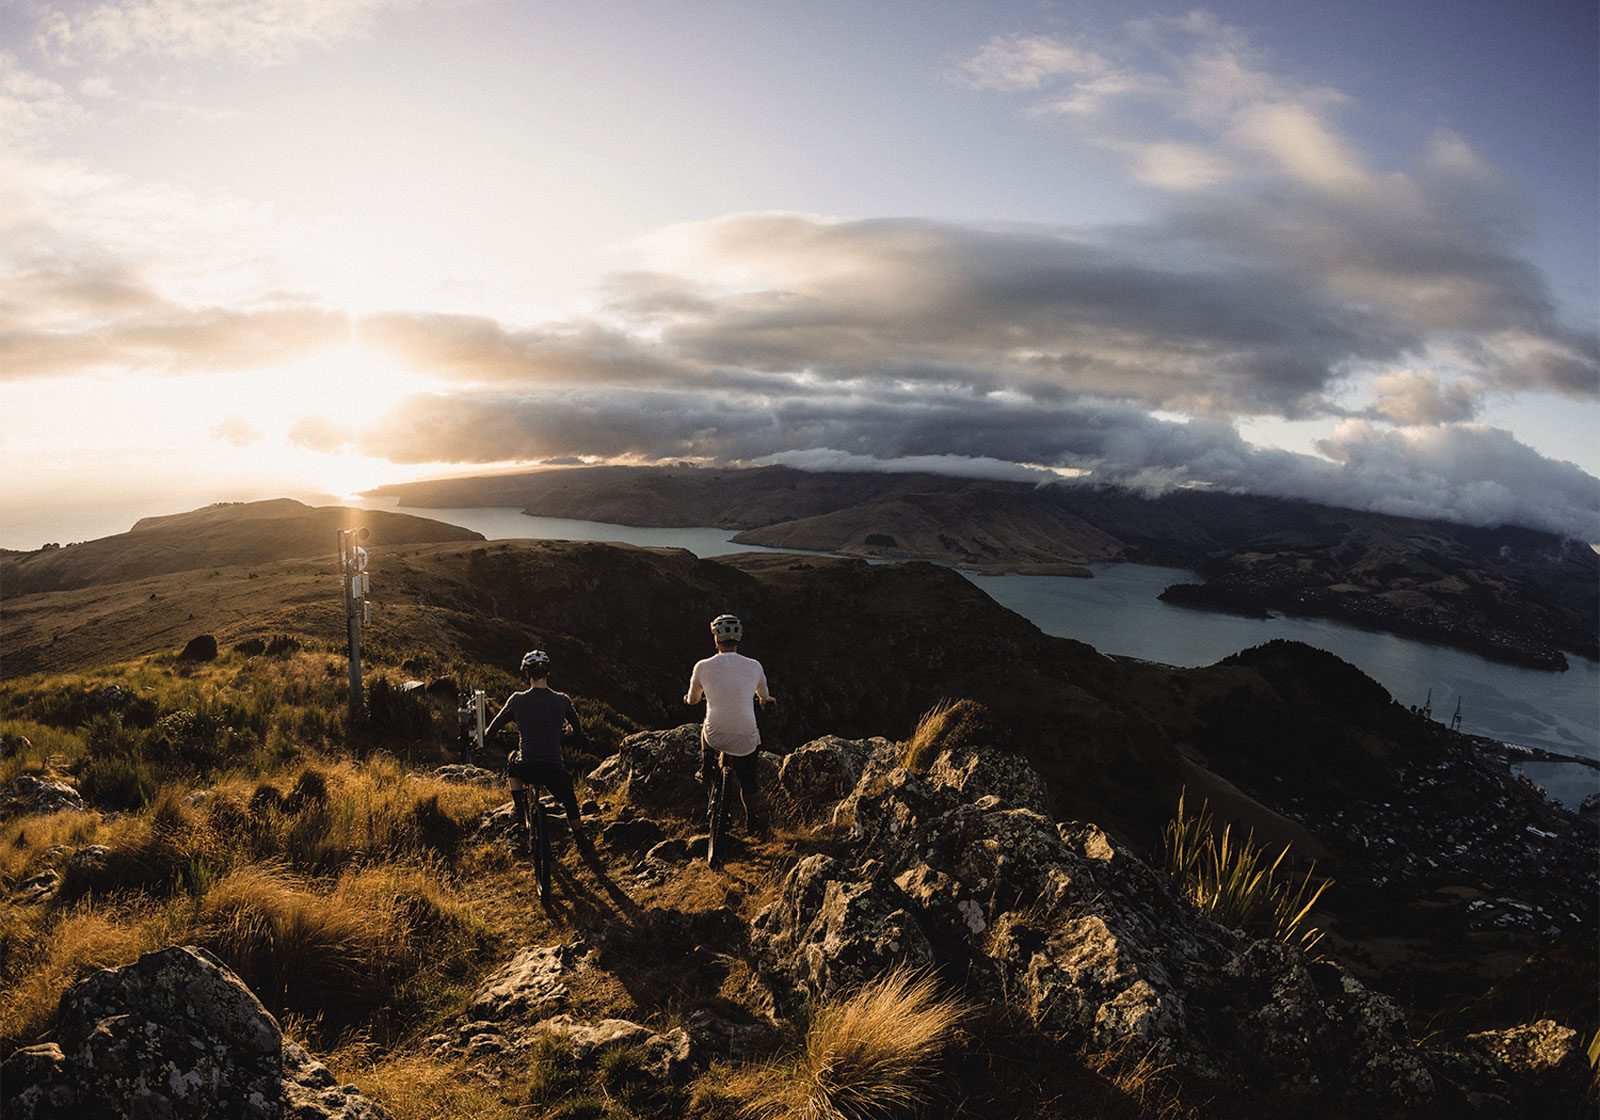
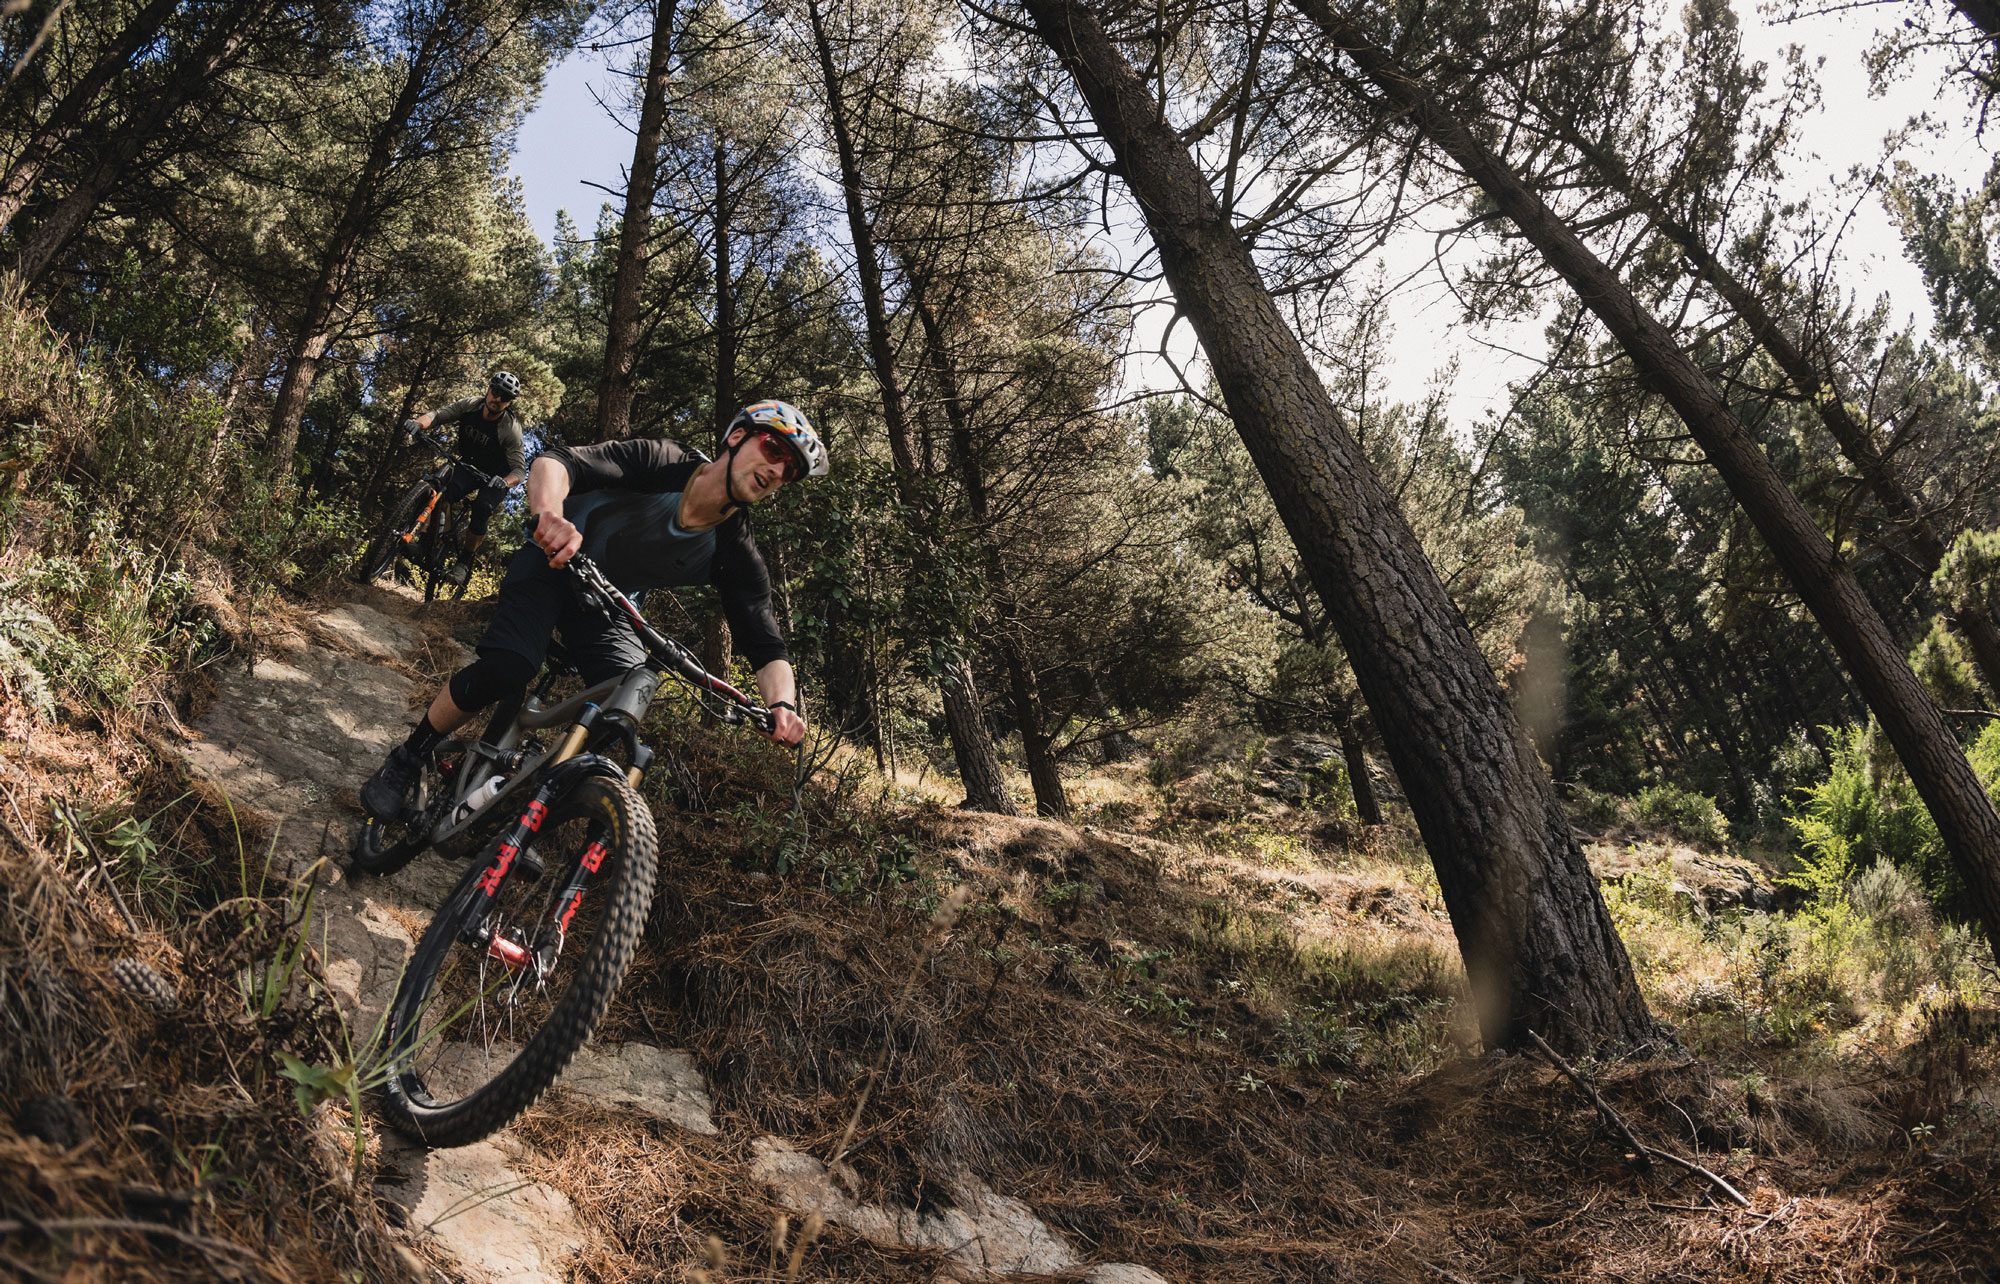
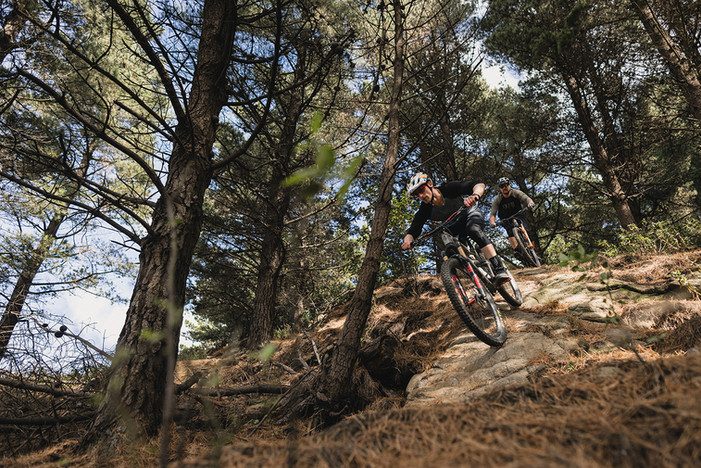
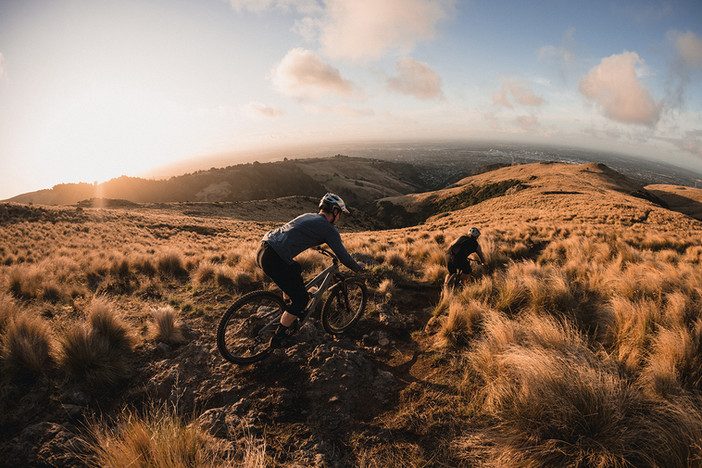
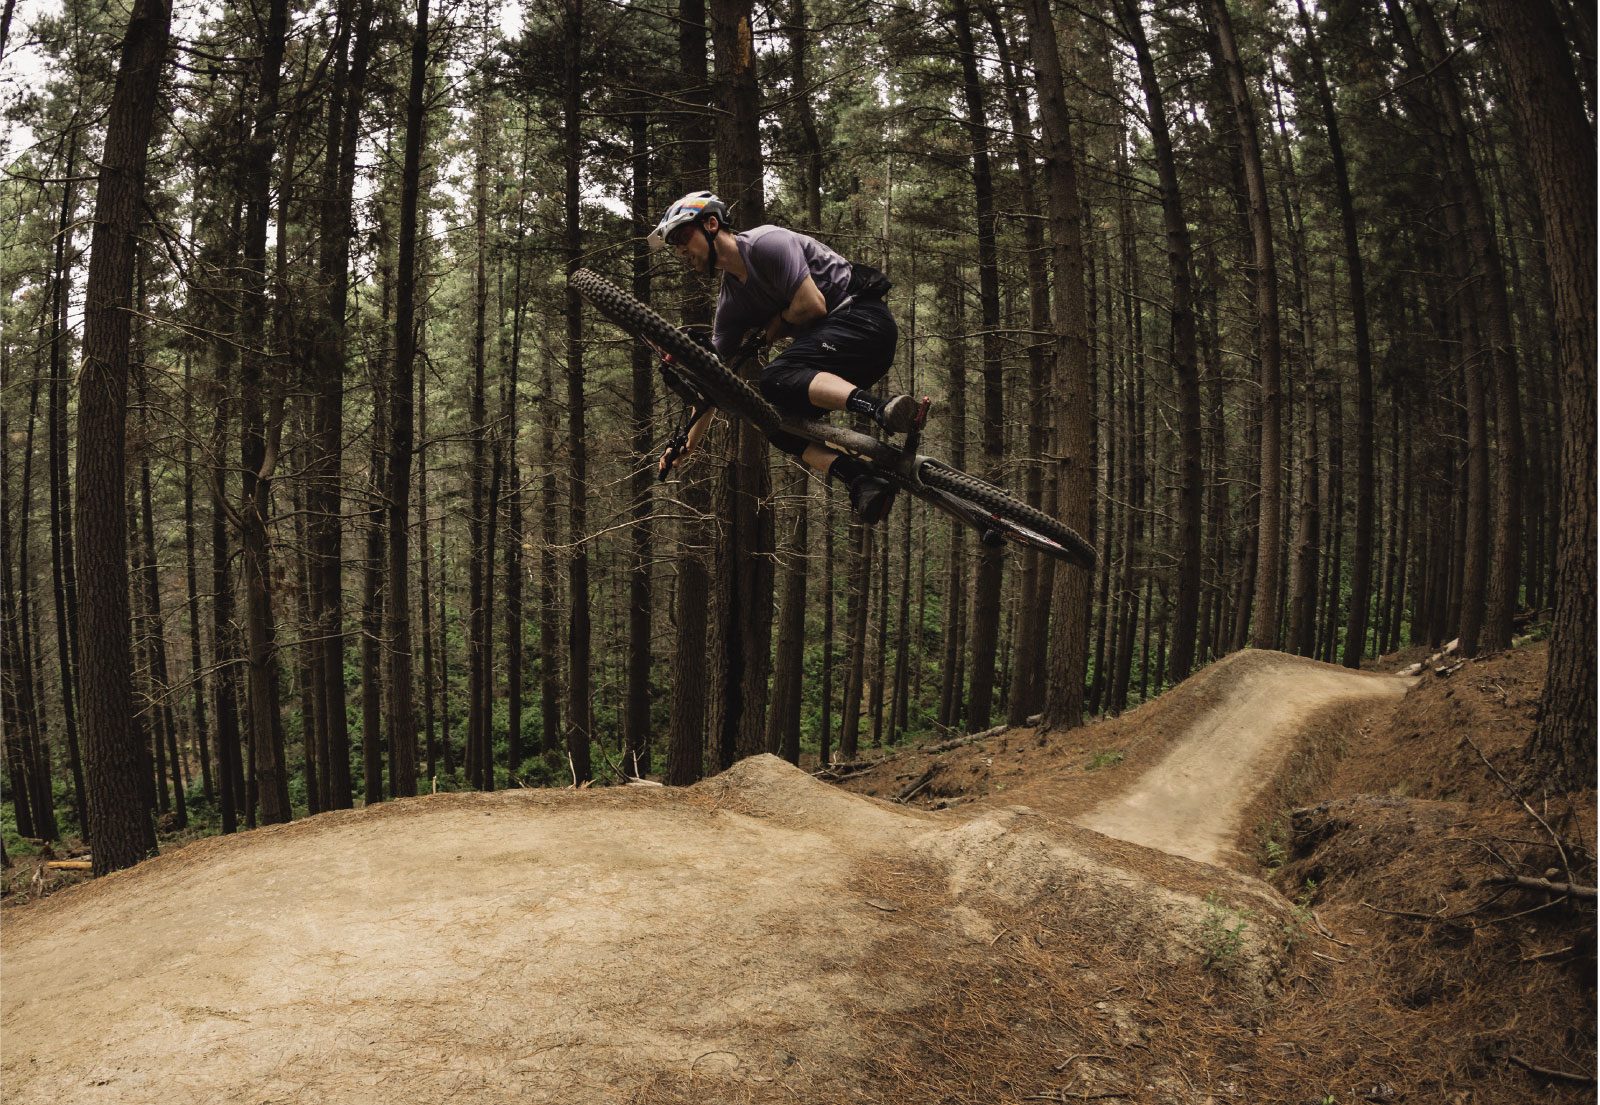
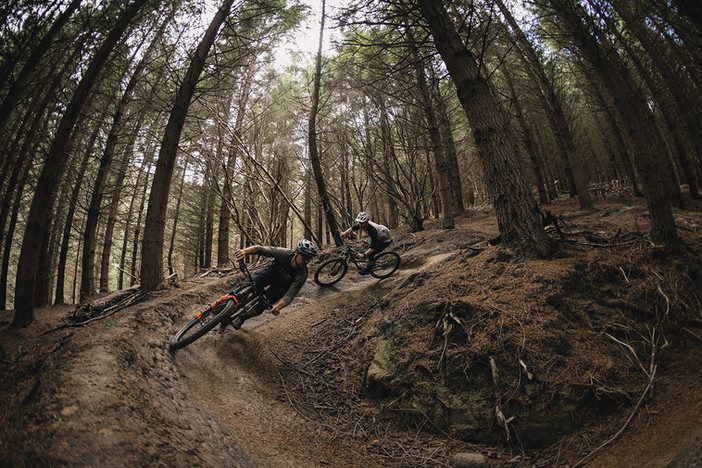
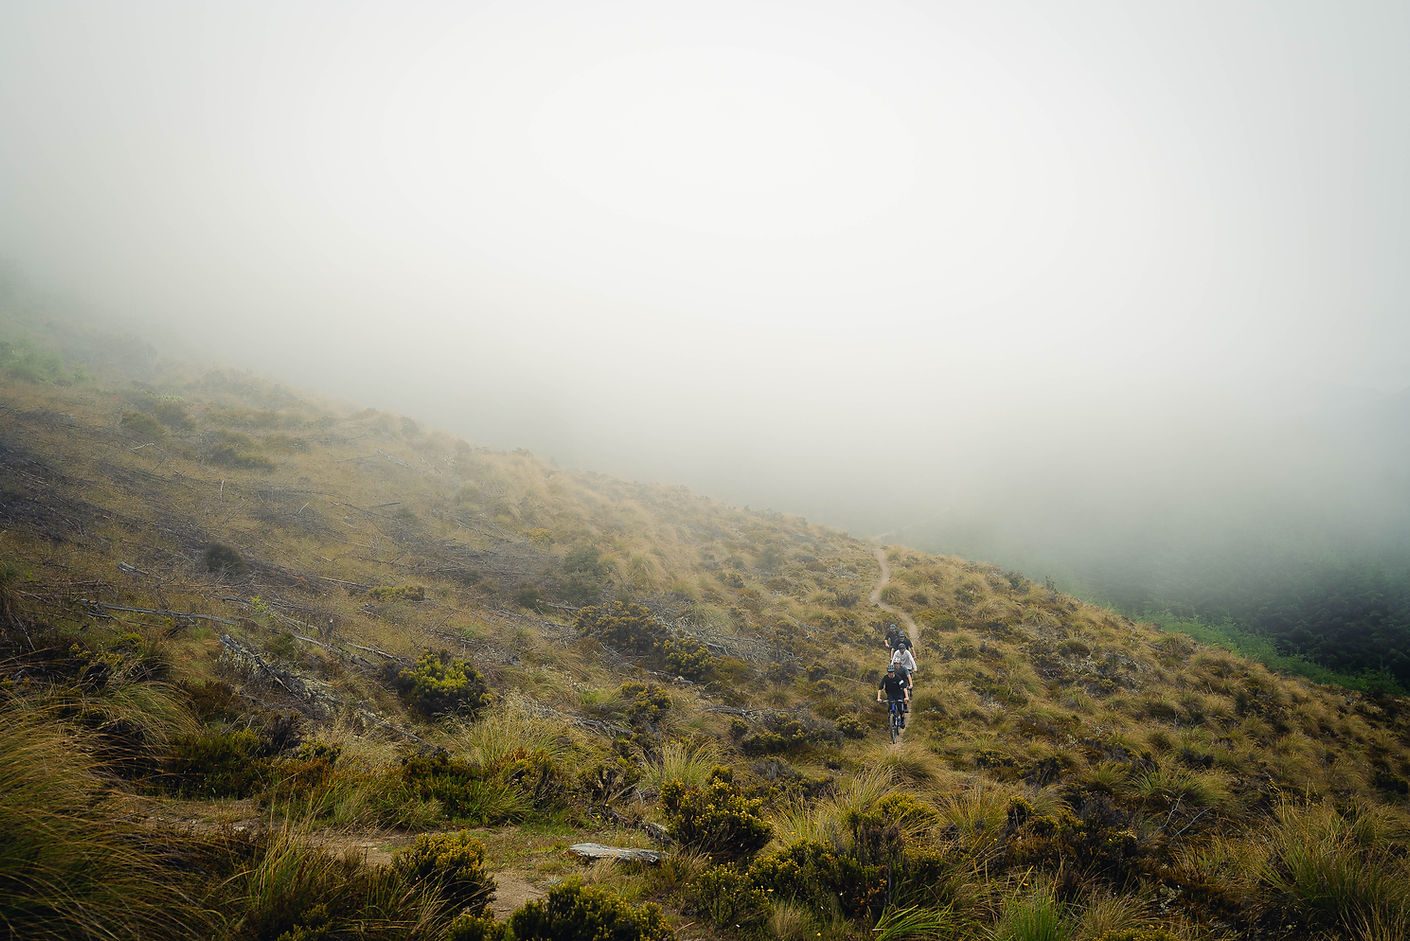
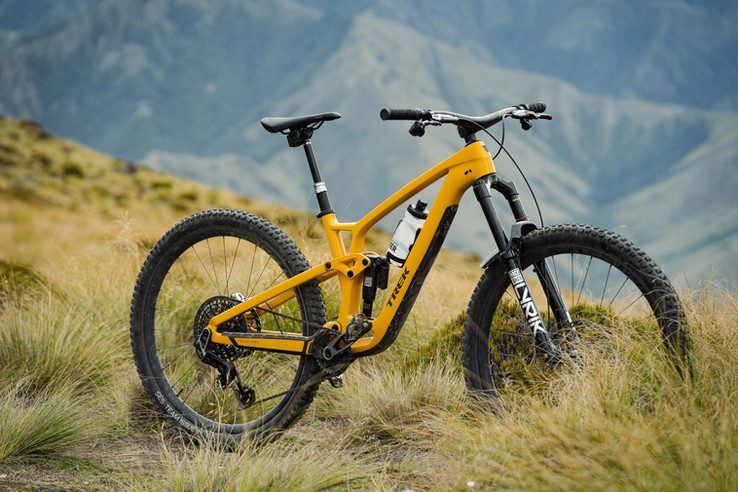
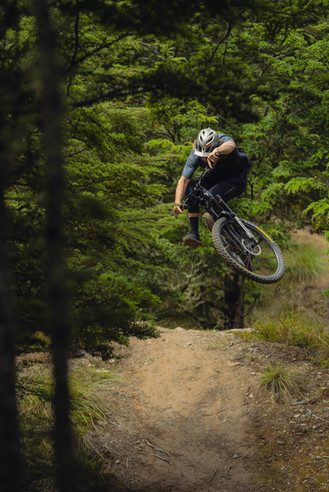
Ōtautahi exudes ‘great outdoors’ vibe and it’s clear to see why, with the white peaks of the Southern Alps standing tall, the rolling South Pacific Ocean to the east of the city and various other mountain ranges as far as the eye can see to the north. The city also has easy access to some of the best conservation and national parks, such as Craigieburn and Arthur’s Pass. Beyond that, there’s multiple options from the north, west and south. Closer to the centre, the Port Hills border the city and offer a plethora of outdoor activities. This is one of the main locations for mountain biking, with trails weaving across the city face. This, along with the addition of Christchurch Adventure Park, which opened back in 2016, make it very rider friendly, with trails from beginner to expert. The best part about the city is its proximity to the riding – you can get from the heart of town to the rolling tussocks of the Port Hills with just fifteen minutes of pedalling.
Ōtautahi blends city vibes with outdoor culture seamlessly. It’s got charm, character and so many choices of trails on its doorstep. Recently, we spent a long weekend exploring some of the best riding locations the city had to offer.
Location: Lyttelton
How’s the serenity!
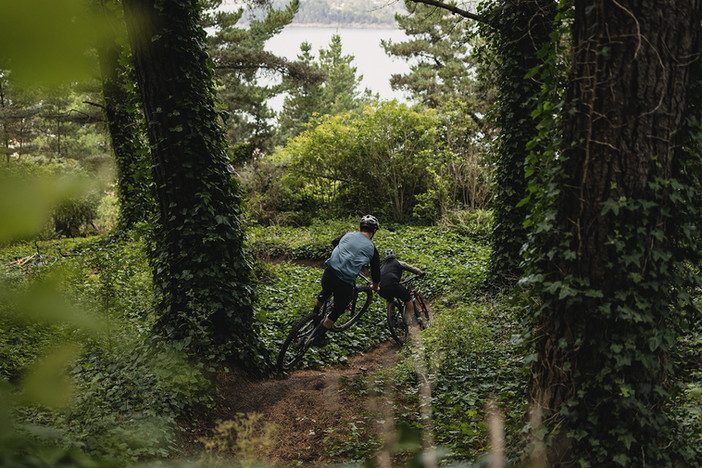
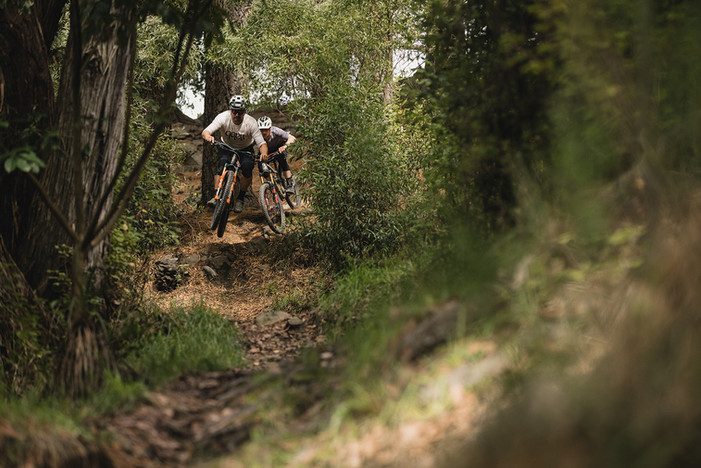
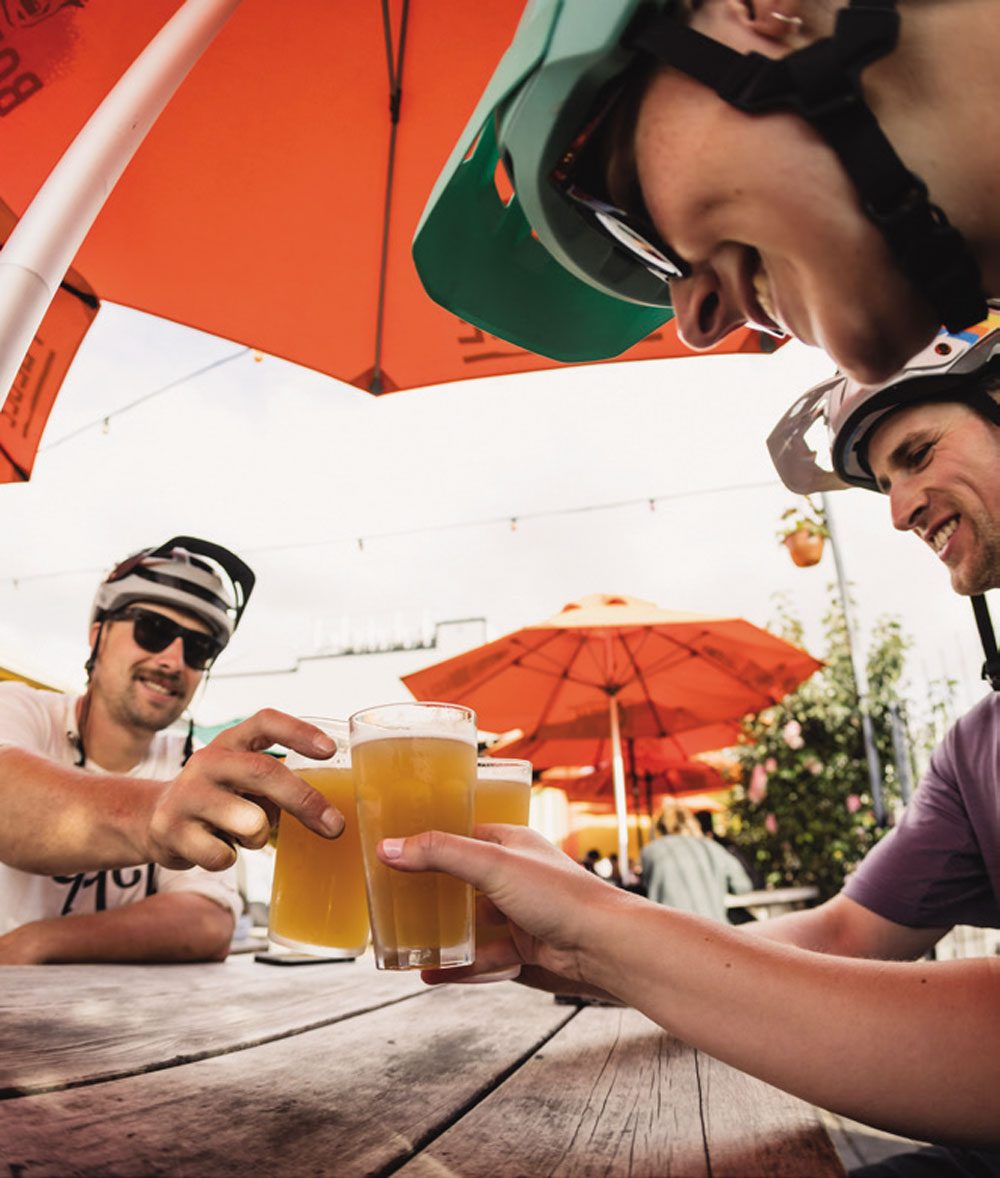
Lyttelton is a treat, its own special vibe. Whether you pop out of the tunnel or drop down off the hill it’s clear you’ve stumbled upon a gem. Lyttelton is a quirky portside town filled with welcoming locals, excited tourists and, of course, the froth-searching mountain biker.
Loading up the truck and heading through the tunnel on a Saturday morning is my favourite way to get immersed in this quirky town. There’s nothing better than smashing out a few laps of the forest, then taking the time to explore the street market with its fresh food, produce and local goods. Or maybe even an impromptu half an hour yarn struck up with a traveling American tourist named Pete. Complement all of this with a hazy and a snack at Eruption, or maybe a flat white and scone at the coffee co-op, and it’s an epic way to spend the day.
You’ll often find Lyttelton bursting at the seams but, somehow, it always manages to retain a chilled and relaxed feel. Even the trails here seem to embody the same feeling, a nice way to escape the hustle and bustle of the city side tracks. It’s not entirely uncommon to lap out the forest and only share the stoke with yourself.

The Lyttelton trails are located in the Urumau Reserve, which is accessible from the top of Foster Terrace. Parking can be a little scarce and with the classic narrow Lyttelton streets, I just find it easier parking in the township and pedalling my way up. A large bonus of parking at the bottom is being able to exit the trails down onto Evan’s Pass when the times comes for your last lap. A rad road bomb back into town for a beer certainly beats an uphill ride back to the car.
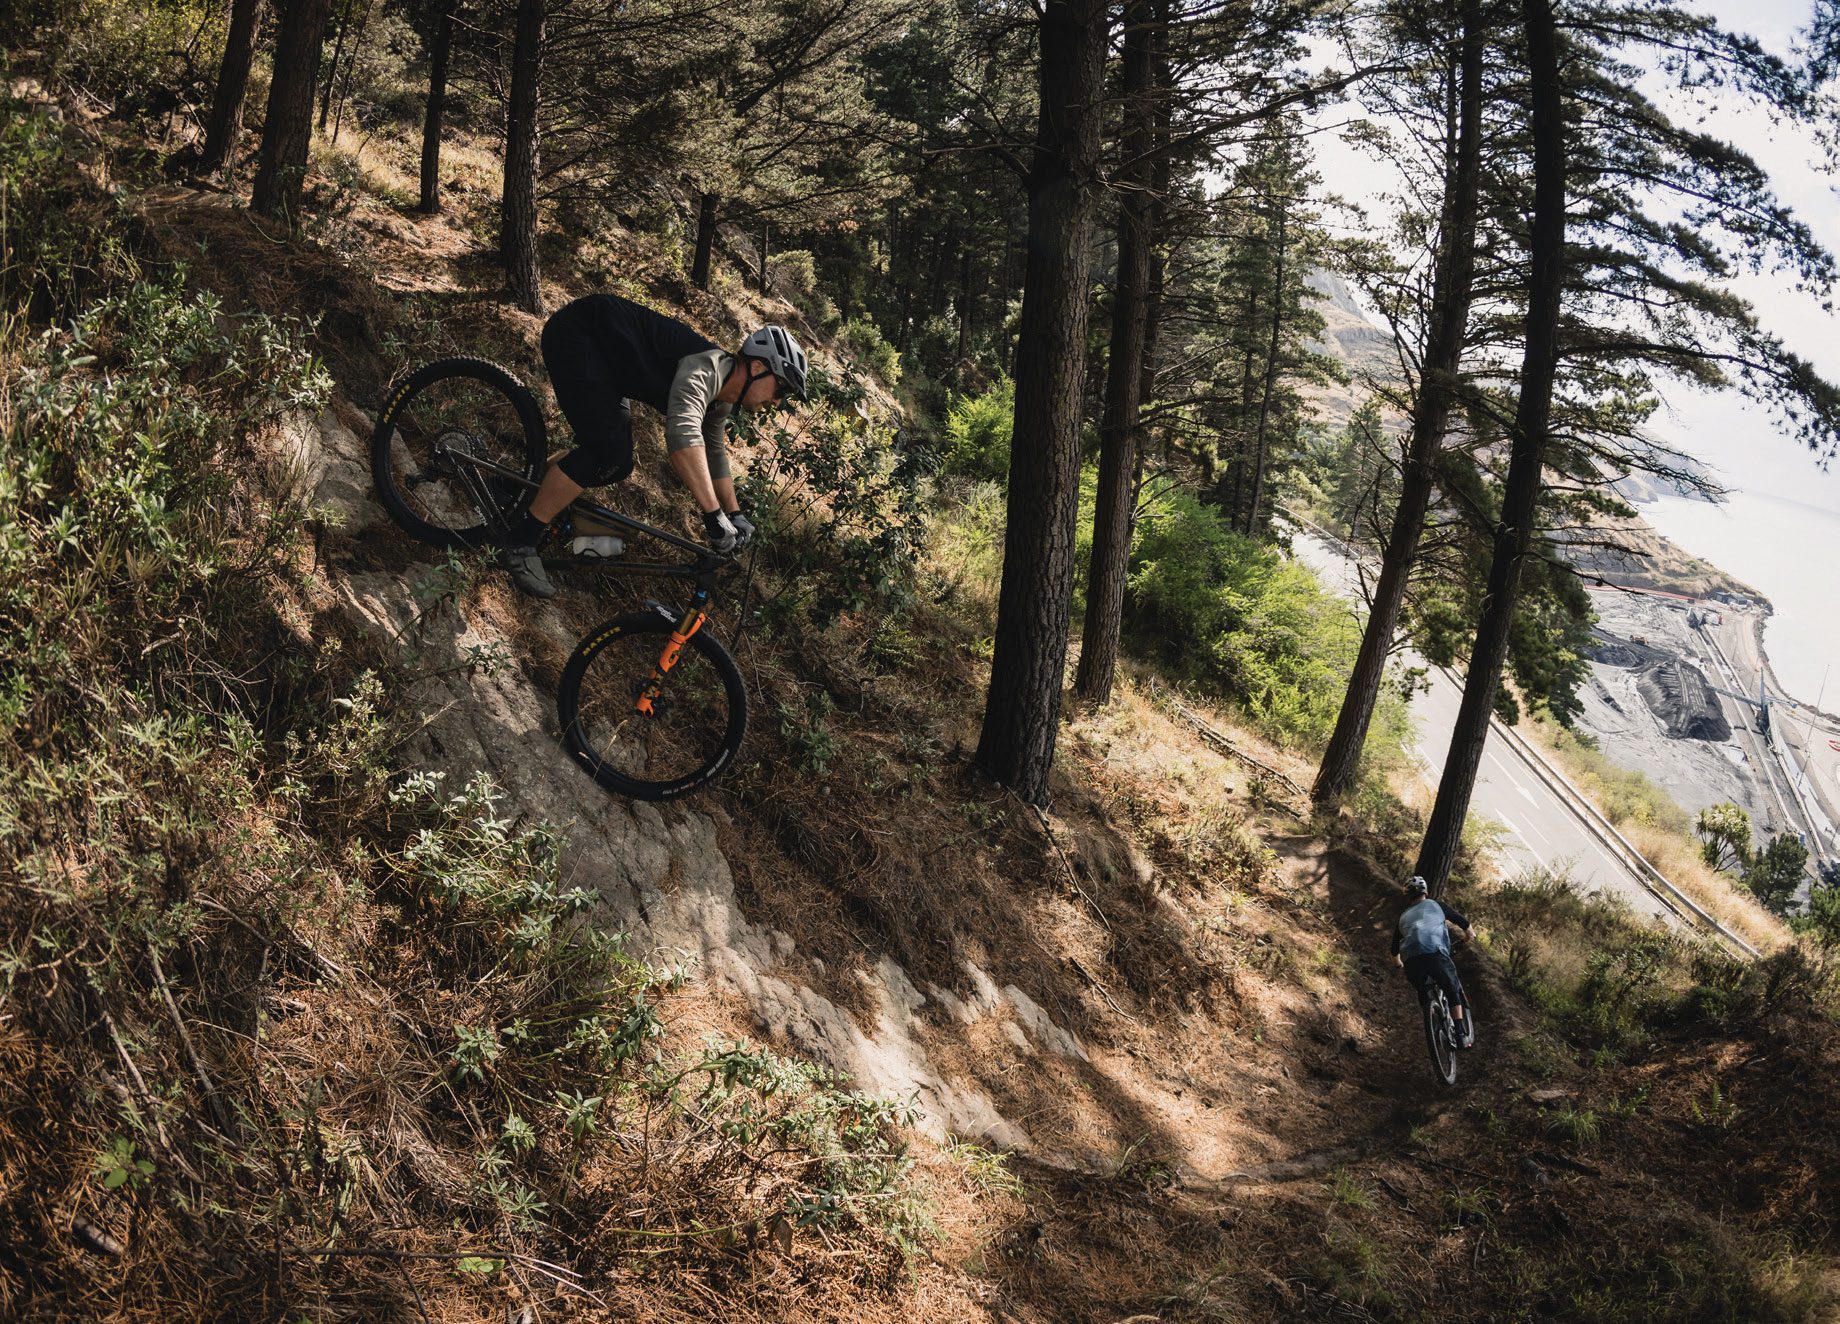
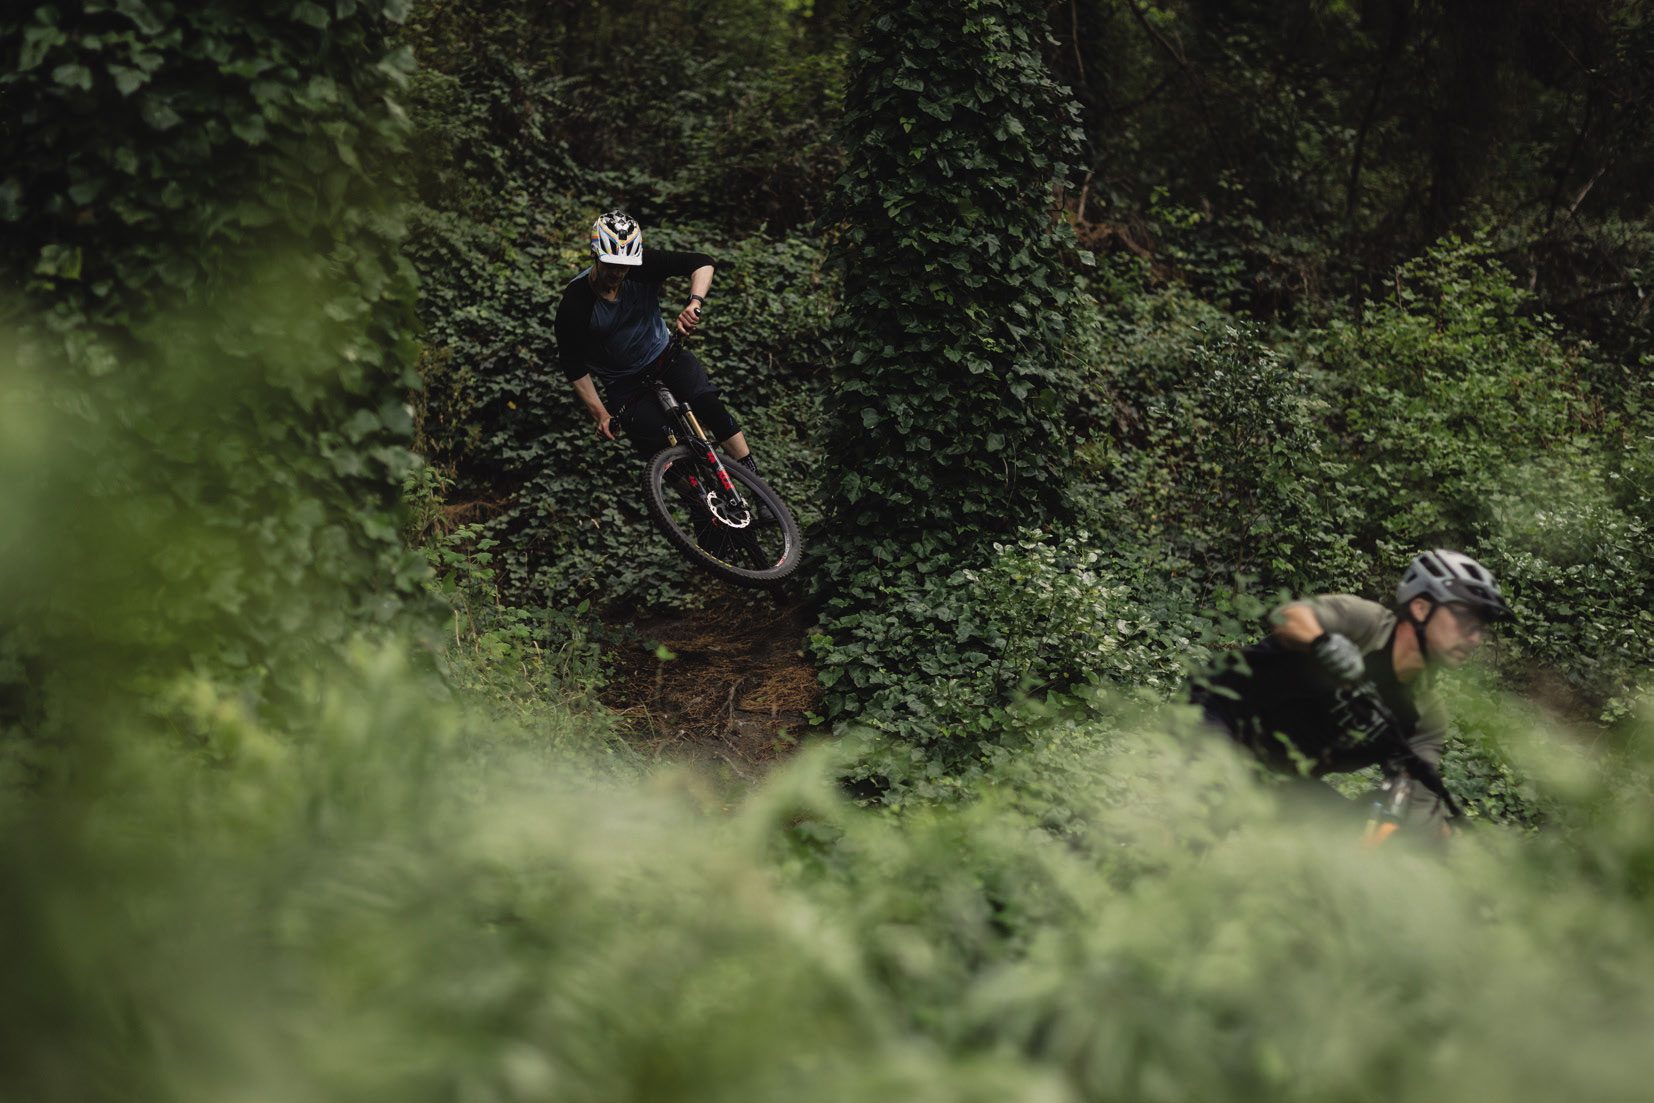
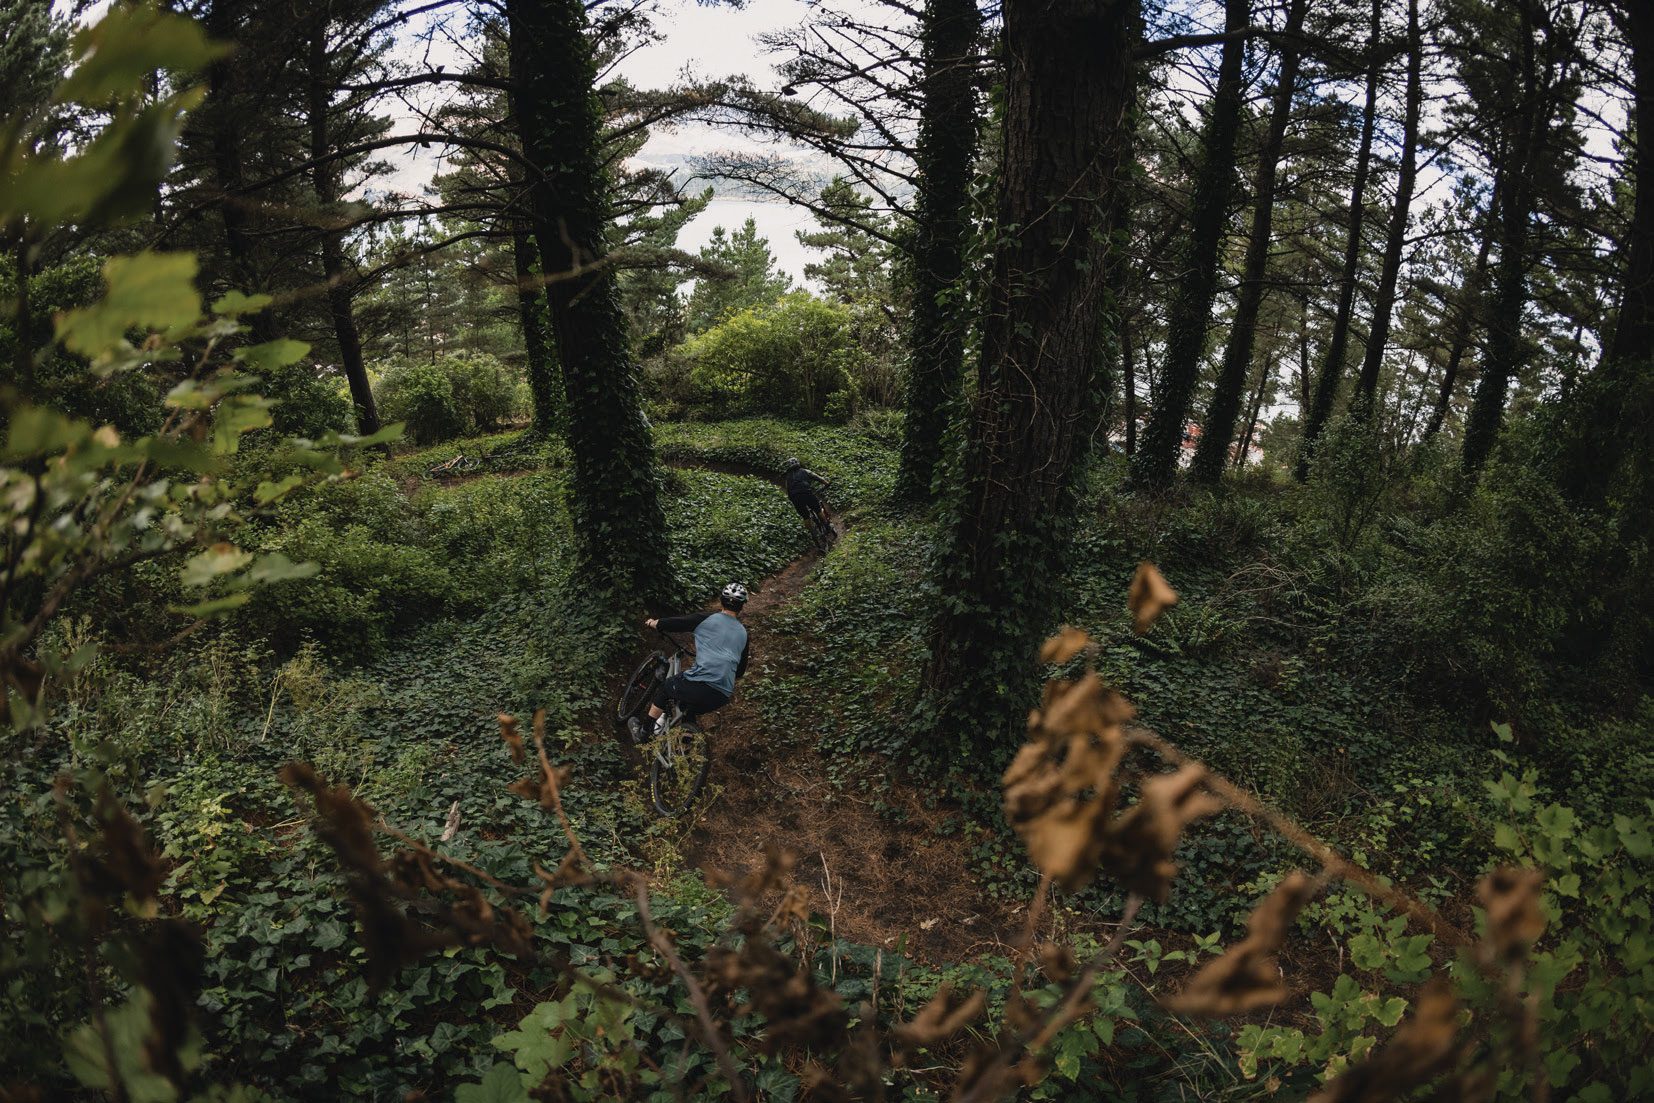
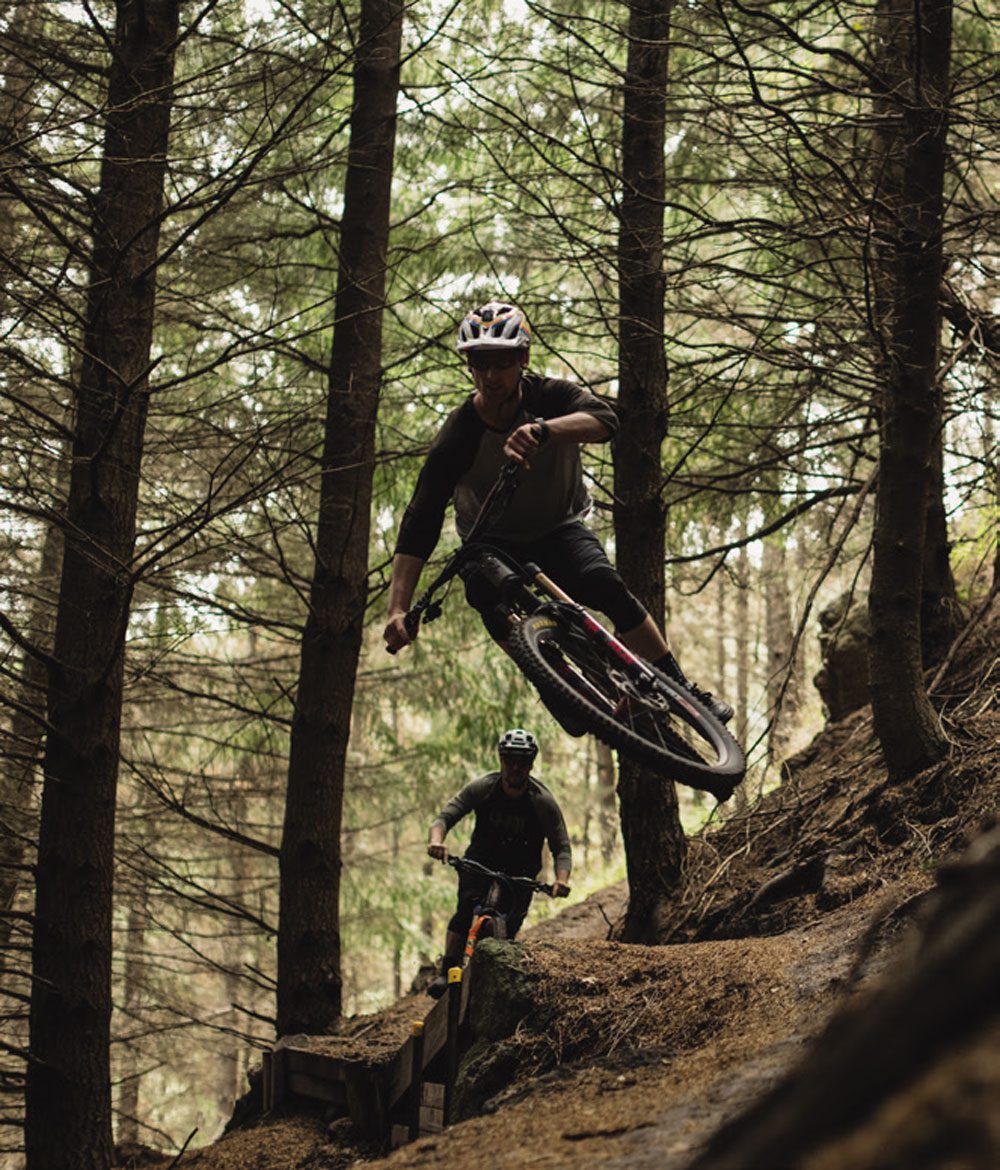
Lyttelton, it has loam! It can often be a little haven of dampness sheltered from the hot winds that the northern side of the Port Hills face. Trails like Grommies make it feel like you’ve been transferred into the rainforest, with its green, dank vibes and native flora lining the forest floor.
The Urumau trails are constructed and maintained by the Lyttelton Mountain Bike Club, and their effort and hard work shines through in the quality of rider experience. Janky descents and flowy corners duck and weave through the canopy of trees; the trails cater for everyone.
As a Christchurch local, I can say Lyttelton is a ‘must ride’ spot in Canterbury. Whether it’s a day spent lapping out trails, or perhaps visited in conjunction with an epic ride out to Godley Heads. No matter the plan, make sure Lyttleton is on your list.
Trail Recommendation
Urumau Track – Stormer – Grommies
After-Ride Recommendation
Location: Eruption Brewing
Snack: Fish Taco
Drink: Hydration – Pyroclastic Haze
Accommodation
Rydges Latimer
Location: Victoria Park & Port Hills (Te Poho-o-Tamatea).
This area was formed over 12 million years ago through intense volcanic activity. What remains is the left overs of the Lyttelton crater lake. The terrain is perfect for mountain biking – long, gradual ridges and deep valleys are dotted with trails, spreading from the east with Godley Heads and Lyttelton, across to the western side, where you’ll also find Halswell Quarry Park. Conveniently parked right in the middle is Victoria Park and the Christchurch adventure Park. It’s hard to ignore the calling of these infamous hills, even when you are immersed deep in the city centre; the tussock covered slopes are always beckoning.
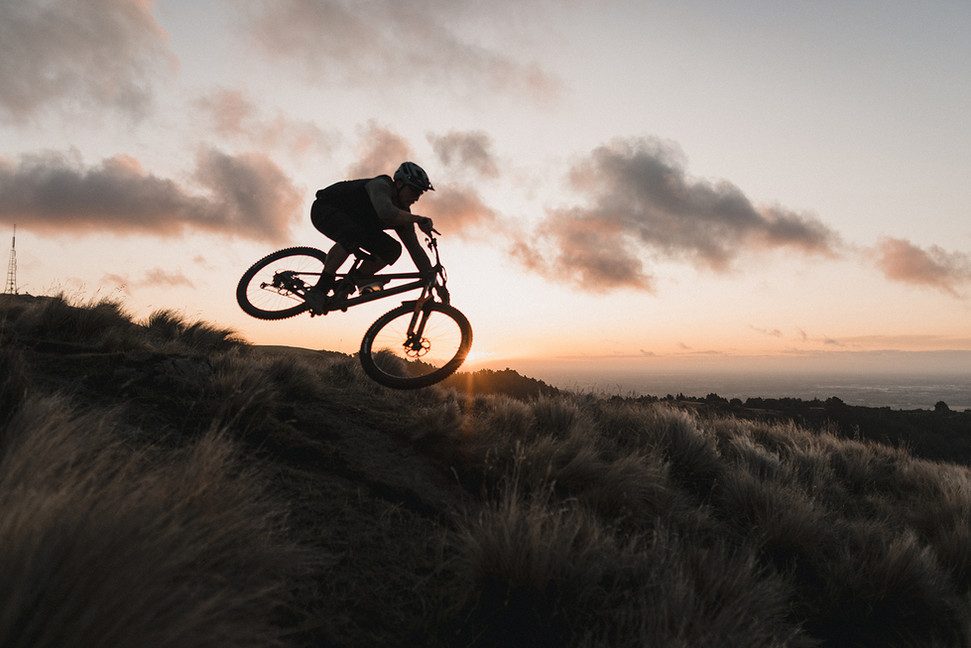
For me, Victoria Park (and Bowenvale Valley even more so) is the spiritual home of mountain biking in Canterbury. Core memories of dusty shuttle days, and time spent watching wild National Races in the early 2000’s, quickly flood back to mind. The rock and roll days of early DH racing will always be a part of Victoria Park, but it seems the times have changed – you’re more likely to find trail riders out cutting laps now, or even the odd rogue gravel rider punishing themselves battling on the drops.

The vintage days of Iron Horse Sundays and Foes Mono’s slapping corners may be a distant memory but the trails that founded my froth are still here. The likes of Lava Flow and Huntsbury DH are still local favourites and with rapid descents and epic vistas these are ‘must rides’! It’s best on a sunset so ensure you pedal up in the evening light to see and capture it.
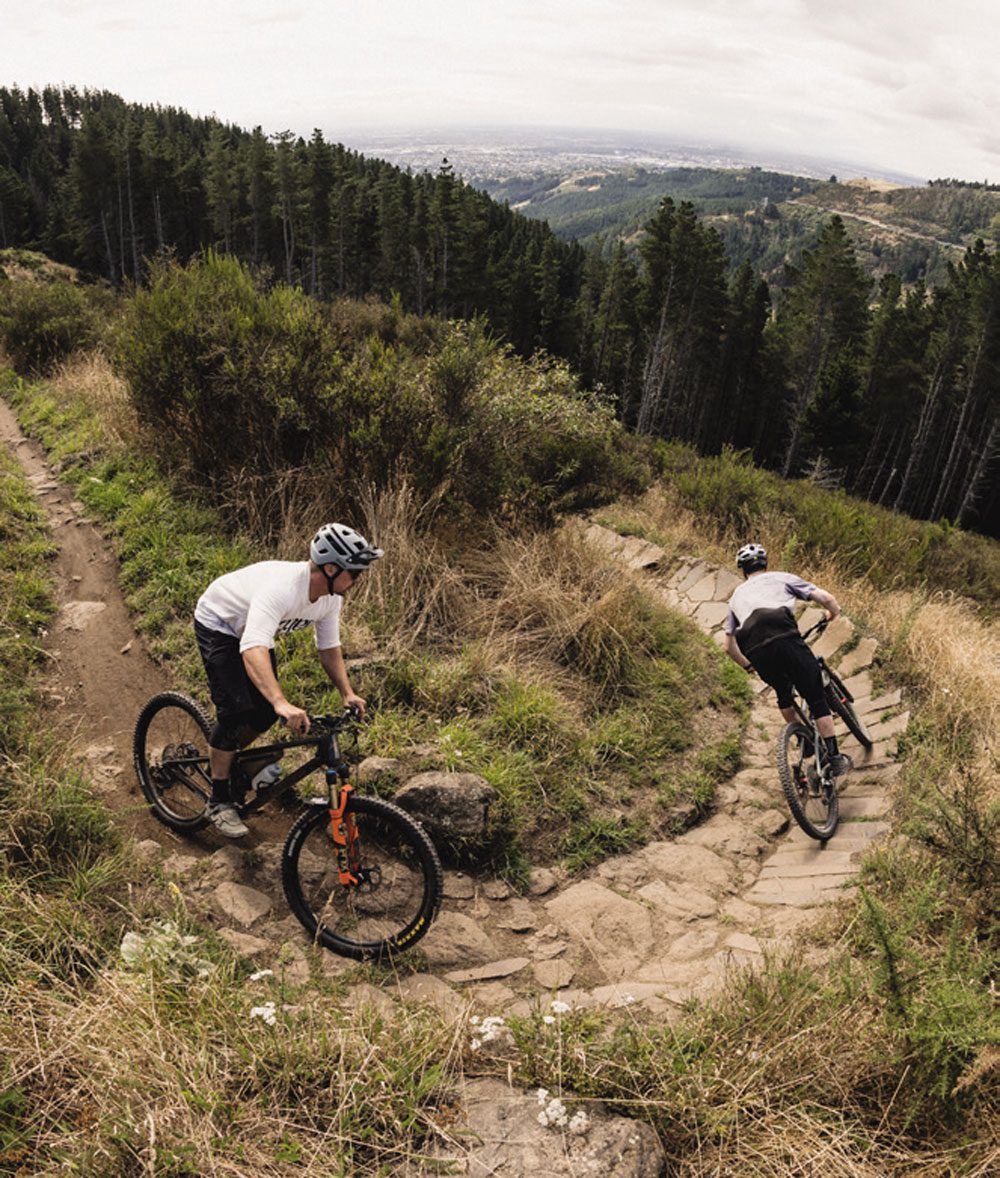
Accessing the park is a breeze – the evolution of drivetrains and wide range cassettes make climbing the fire roads a far more enjoyable affair. The park also has many access points. If you like a challenge, park up at the head of Bowenvale Valley and sweat your way up the 4WD road – see if you can clear the pinches without dabbing! Personally, I find the park best experienced when accessed with a classic Rapaki track climb. Pair that with a pedal west across the iconic traverse trail and you have an iconic loop!
The traverse trail itself is a must ride and is as Christchurch as it gets. The narrow tussock lined corridor leads riders from one side of the city to the other. A multi-direction trail, it offers both descending and climbing options and exceptional views from the Pacific Ocean right around to the Southern Alps.
Trail Recommendation – Scenic Option
Rapaki – Traverse Trail – Brakefree – Sesame ST – Bike Park Connector
2000’s Flash Back Option
Tilted Sally – East Side Bush Track – Bridges
After-Ride Recommendation
Location: Moon Under Water
Snack: Fried Chicken Burger
Hydration: Alpha Juice
Accommodation
Rydges Latimer
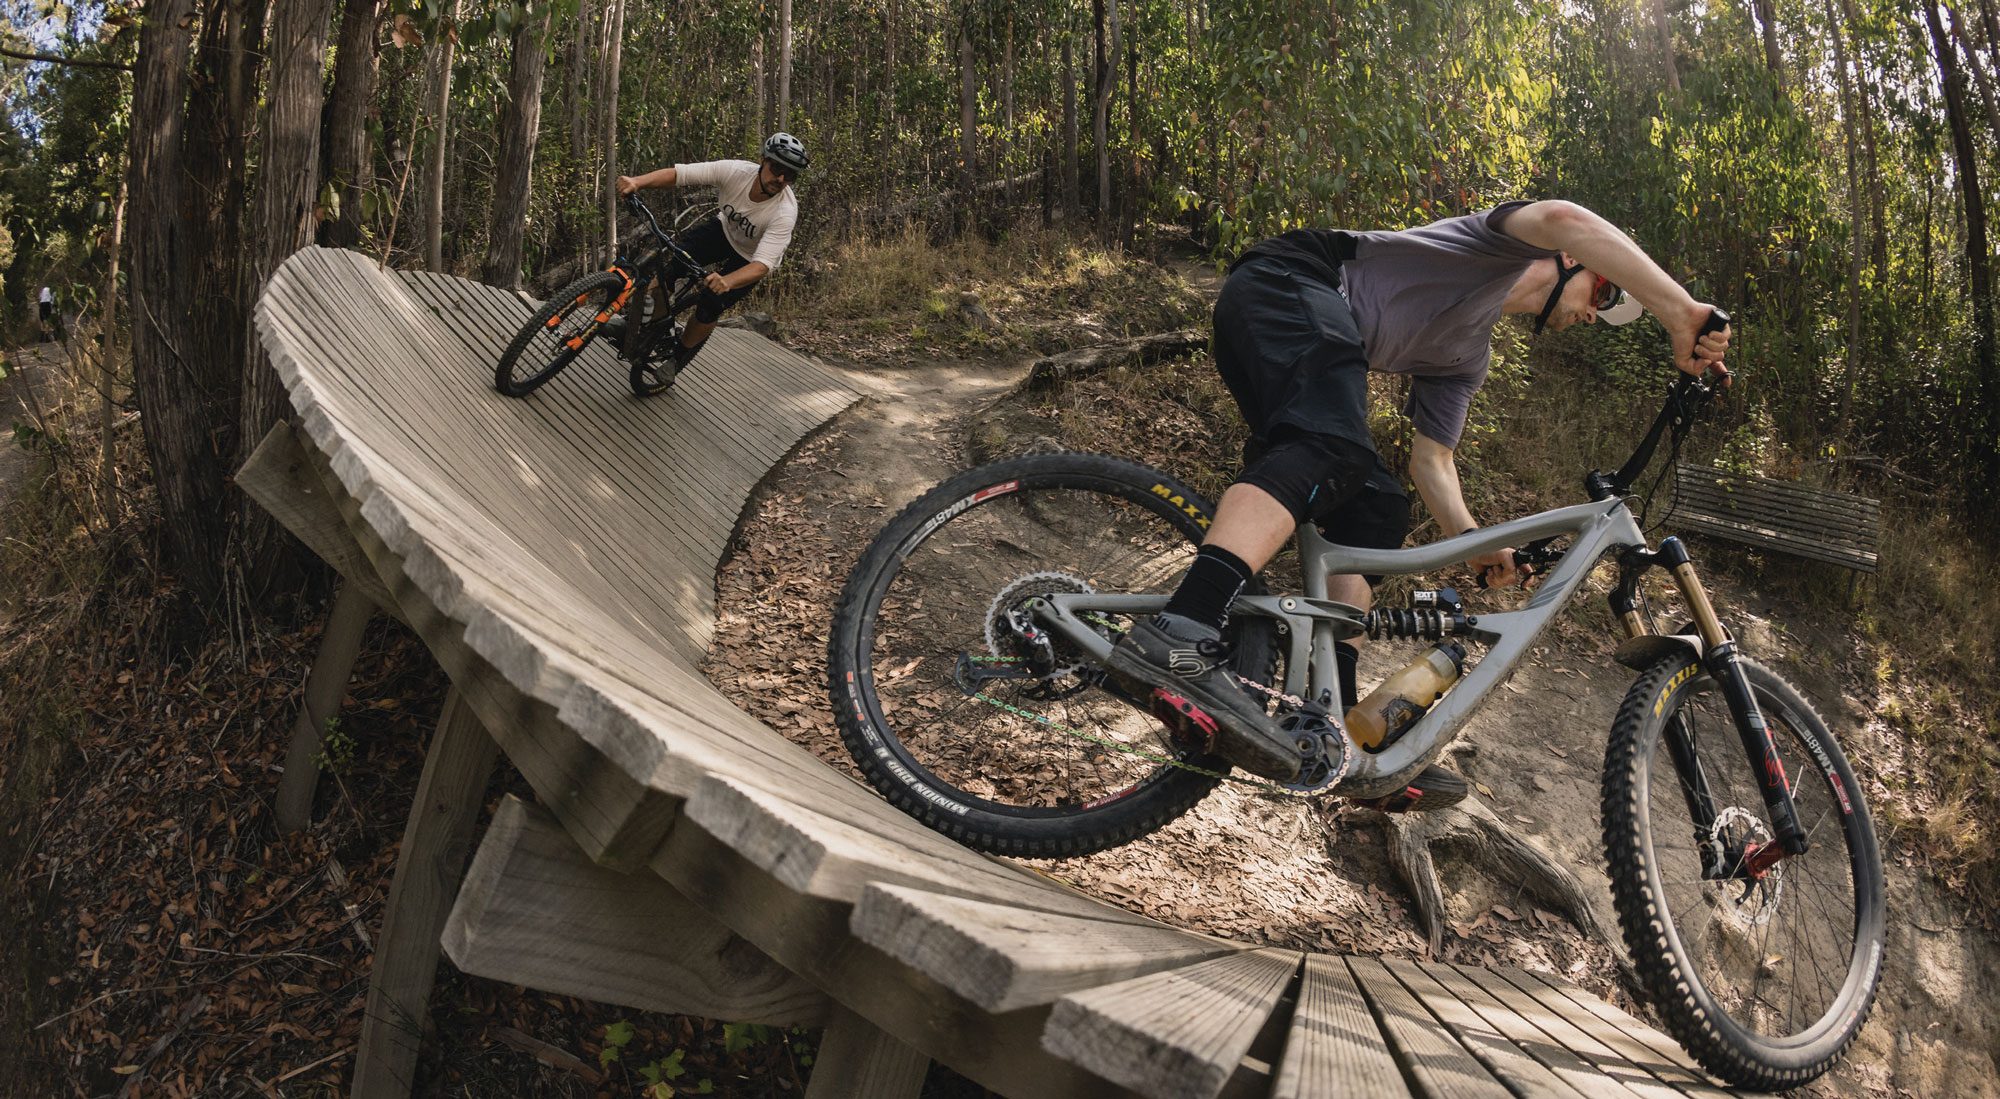
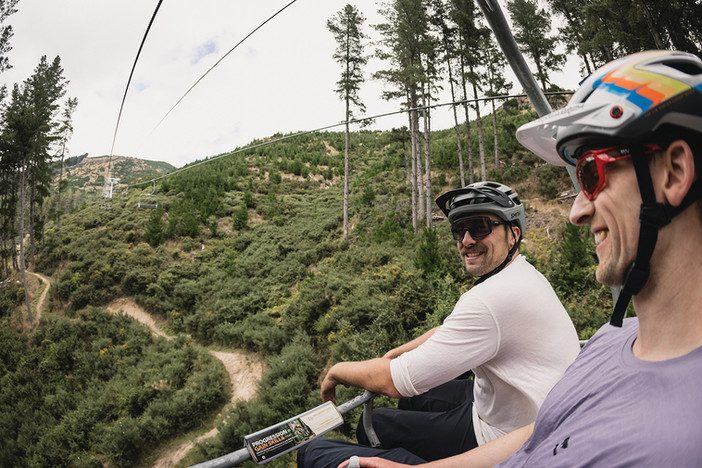
Location: Christchurch Adventure Park
Nestled in the shadow of Marley’s Hill lies the Christchurch Adventure Park. The park is a dream come true for local riders and offers a fully lift accessed mountain bike park as well as a zip line and numerous hiking trails.
The Christchurch Adventure Park (CAP) has risen like a phoenix from the ashes (hence the name of its annual Phoenix Enduro Race) after being badly damaged by the Port Hills fires, back in 2017. A strong effort from local volunteers and the trail crew at CAP meant no time was wasted in getting the park back into action.
I’ve found the park has been a great way to introduce new riders to mountain biking – the ease of lift access and variety of trails available ensures there are options for everyone. Getting your significant other involved in the sport has never been easier. Failing that, there’s always the bar at the bottom as a last resort, to reconcile any differences. Turns out, there’s only so many times someone wants to be told how to go around a corner before my instructions grow thin….
The park sits just to the west of Victoria Park, meaning an easy traverse back and forth between the two can open up an even wider network of trails, all easily accessed from the ease of a chairlift ride. I personally like to use the lift to save my legs, and every now and sneak my way over to Victoria Park for the ultimate combo of park and tech fun!
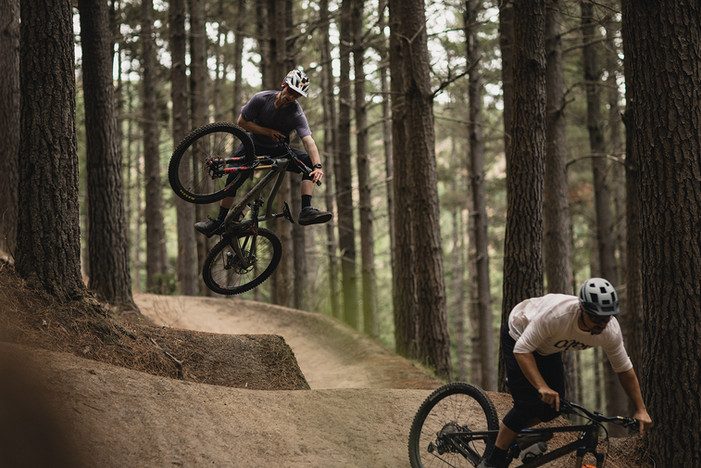
In true Park Rat style, my favourite haunts are Askins and Gung Ho, two blue trails that loved to be lapped. Gung Ho being a technical blue trail, rapid and fun at high speed, and Askins is a blue jump trail. Both I find are pretty forgiving – the kind of trail that, when you’re on one, you can fully unleash and feel like a pro – but, in contrast, also the kind of trail you could head down when you’ve got that one mate who’s convinced they were almost pro once but can’t seem to stay upright on a bike now. You’ll both still have fun.
Really, my true favourite haunt at the Christchurch Adventure Park is the café and bar – the home of hot food and cold beer! The deck here is a great spot to watch riders with more skill then myself fly over the ‘Mulch’ jump and pull shapes most gymnasts would be happy with.
After the realisation that the skills you thought were once there are definitely now gone, make sure you swing into the skills area on your ride out. An area loaded with progressive jumps, corners and drops, a few sessions there and you’ll be on the ‘Mulchie’ in no time.
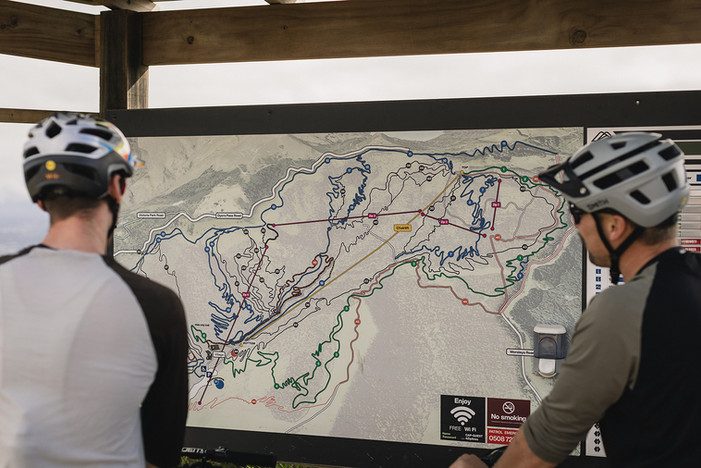
Trail Recommendation
Summit Connector – Flying Nun – Choir Boy – Gung Ho
After-Ride Recommendation
Location: Adventure Park Café & Bar
Snack: Karaage Chicken Sushi Bowl
Hydration: Cassles Nectron IPA
Accommodation
Cathedral Square Novotel

The riding gems are many within Ōtautahi’s city borders. Being predominantly flat and surrounded by hills means that whenever you descend a trail, you can easily get to your crib or digs. It’s also very easy to navigate and, in this modern age, a device will help direct you anyway. The intersection of unique city flair mixed with vibrant outdoor culture makes it shine. You can easily ride flow or technical trails and then be immersed in a café, city bar or restaurant for provisions and replenishment before heading back to the hills or calling it a day. The cycling culture is everywhere you look – people are on bikes! From commuters and roadies to gravel riders and, most often, mountain bikes – especially when you get close to the Port Hills. The riders range from young groms right through to old dogs and pretty much everyone in between.
Ōtautahi has a vibe, it’s going places and there’s a heap going on. The riding here just gets better and better, and you can see why world-class riders reside here. With riding in such close proximity to the city, with epic spots all around, this location is not to be missed.

The Next Episode: SRAM Eagle Transmission
I have to admit - we have it pretty good with today's mountain bikes, and the products that hang from them. Everything is pretty damn dialed, and reliable too. Things have really come on in the last 10 years and I'd say one of the big driving factors behind that was the introduction of the 1by drivetrain.
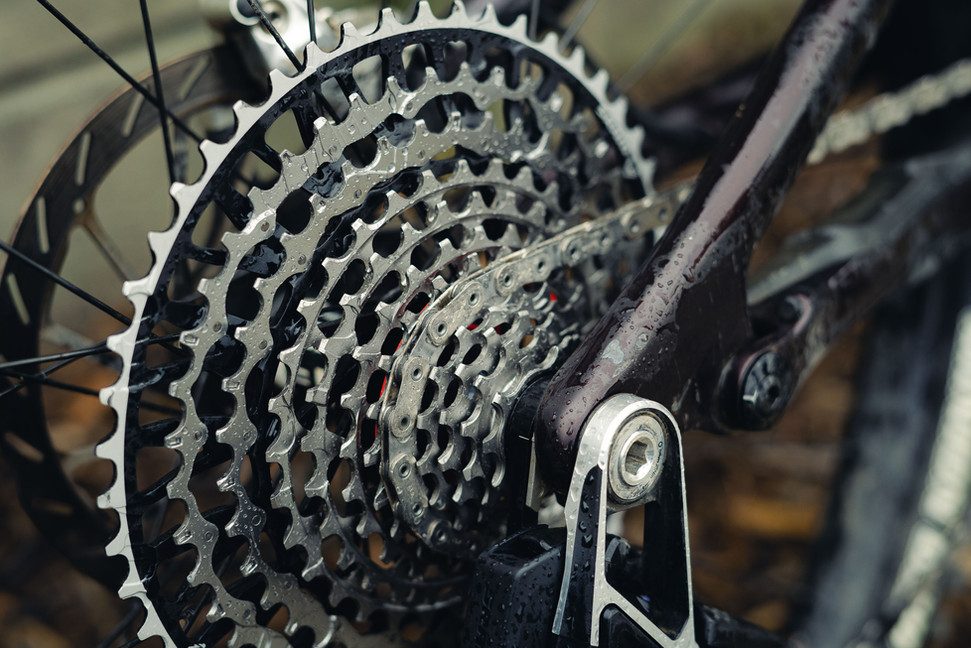
Eleven years ago, SRAM shook up the mountain biking world when they released their new-to-the-world XX1 groupset; the first 1by dedicated groupset. It was gorgeous; the narrow wide chainring blew people's minds. I remember looking at the cassette and thinking, ‘holy shit, you could eat your dinner off that, it’s so big’. Mind you, that was a measly 42t compared to today's 52t cassette. That groupset really did change the game.

Now, 11 years later, SRAM is back at it. Disrupting the normal; rewriting the rule books - and changing the game for the future. Enter, the new XX1 SL, XX1 and X01.
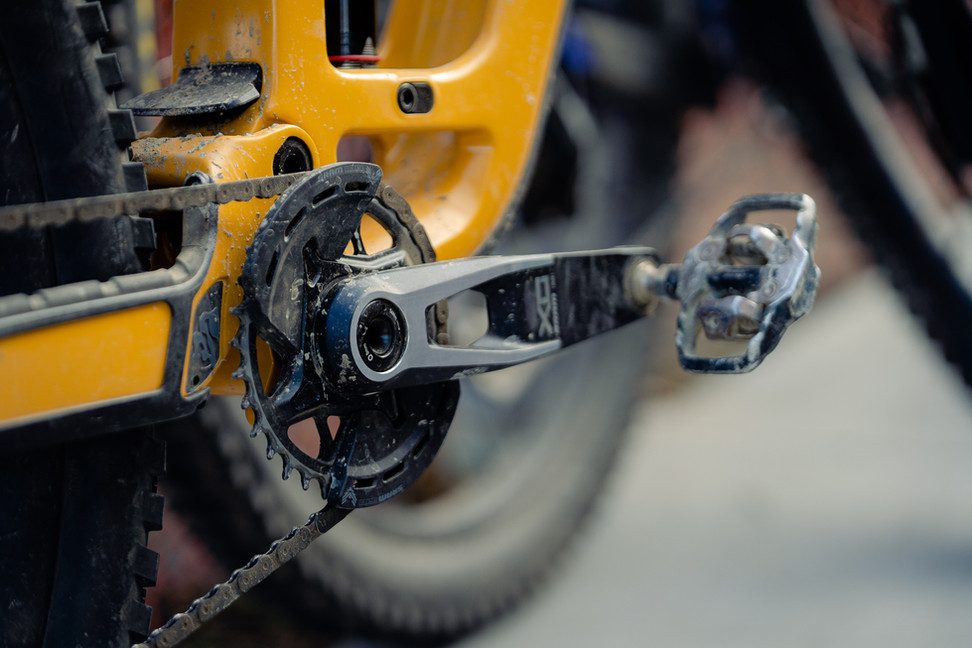
SRAM has gone back to the drawing board and reimagined the way the derailleur mounts to the frame. Gone is the hanger. In its place, a clevis mount derailleur. The new system is designed to work on bikes that use a SRAM UDH hanger interface.
A couple of years ago, SRAM brought out the UDH (universe derailleur hanger). The purpose of it was to create a better derailleur hanger, that other bike brands could adopt. It was a standard that made sense and, slowly, more and more bike brands have been getting on board with the standard. It was a really good move forward for the bike industry. This new AXS system builds on top of that. The hanger is replaced by a direct mount clevis on the frame. By making this change, you massively increase the stiffness and strength of the derailleur. It's not just held by a single bolt to the hanger; instead, it mounts both sides of the frame. When you induce the hub, frame and axle it creates an interface that is incredibly stiff and really strong, so much so that you can put your bike on the ground, stand on the derailleur on one foot then get back on your bike, ride away and the shifting will still be perfect. That's not possible on a normal hanger set-up - something will bend. I had my doubts about it until Chris showed us - it was super impressive.
The derailleur keeps the override clutch system that lets the mech move out of the way. It’s fantastic, and something that seems to get used regularly on my current GX AXS. It's saved my hanger from getting bent so many times and I’ve never needed to straighten it like I would have with a normal cable set-up. The clevis mount, combined with the override clutch, gives you a system that should (in theory) be very hard to put out of tune. Overall, it’s a much more reliable system with more pierce gear shifting offering a better experience on the trail.
SRAM has also introduced other technology to these groupsets: flat-top chains that come from their road bike groupsets. These increase efficiency and durability whilst looking flipping awesome. X Sync can now be seen on the cassette, improving the shifting and chain reaction. It really lets you shift under load without the worry of skipping gears. I’d imagine it also helps with the durability of the cassette. The recent SRAM x Dome cassettes have incredible wear life if you replace the chain regularly. I think these new ones will blow them out of the water, as long as you keep up-to-date on replacing the chain when it's worn.
The smart engineers at SRAM Germany really went to town on this, and have gone over everything with a fine-toothed comb. Chris Mandell (SRAM PR) told us that they looked at all the warranty data they had collected over the last 10 years and tried to eliminate as many of the issues as they could. The way to do this was to redesign the whole system and imagine a new way of doing things. The clevis mount gave the ability to produce a far superior product and gave the engineers more ability to optimise every last bit. There are so many little things they have done that all add up and just make it a joy to use - such as the slight bend in the derailleur cage. It looked like it had been bent on the trail but in actual fact, it was supposed to be like that. It helps keep the pulley chain interface better aligned when at the extreme ends of the cassette. There are two different modes to set the cage to, depending on the chainstay length, along with many other little things which have been optimised to create an overall better product.
Set up has become easier than ever before. I won’t go into exactly how you go about it - the SRAM technical manuals have that all dialed and are a great source of information.
“We gave this product out to some of our racers this year, on the EWS, and the mechanics keep overthinking the setting up of the system,” explained Chris. “They keep telling us: ‘it can't be this easy!’”. Easier setup leads to fewer problems and fewer tuning errors from the get-go.
Now, I imagine you're thinking; ‘that's all well and good, but what happens if I crash and absolutely smash it into a rock and manage to bend it?’. Well, yes. Shit does happen, obviously. In that case, on a normal hanger mech situation, both of them would probably be a full write-off and due for the bin. In the case of this new system, well, I'd be very surprised if you were able to bend the clevis. It is truly that strong and stiff. The good news is that the rest of the derailleurs are rebuildable. If you do damage a part, it will most probably be replaceable. You can remove the cage without using any tool. A simple little ‘tap’ while unscrewing the cage will loosen it up. The tension spring and clutch are now built into the cage, so servicing and cleaning these parts has become super easy and something that can be done in no time. The face plates of the parallelogram are replaceable as well. Is your mech looking a bit scratched up and tired after a year of use and abuse? Simply slap some new ones on, and it will look brand new. I’m really behind this - I love when brands make their products rebuildable and serviceable; products that they want to see being used for years and years; products that you can fix rather than just replace. It is the way our industry should be heading, rather than adding to a ‘throwaway society’ just because one tiny part breaks or wears out.

The derailleur looks slick – it’s futuristic looking, almost taking some of that cyberpunk aesthetic and feel that Hyundai is using in their cars. There are sharp lines throughout, highlighted by the brushed alloy metal on the black derailleur. It’s a solid unit of a mech and it looks like you could take this thing through the gates of hell and come out unscathed. The new cassette is a work of art as well. As you looked closer, you realise SRAM have added X Sync to the cassette as well. Mind-blowing stuff. The new shifter - or pods as SRAM refer to them as – have a more traditional, ergonomic design compared to the previous generation. It uses a two-button system, one placed above the other. The rubber paddles require a push, making them feel like a shift versus a tap. The return spring built into the paddle gives you that positive, almost mechanical, feel. Personally, though, the pièce de résistance was the new XO cranks. They are gorgeous. A change from carbon to alloy, they are unlike anything else on the market (well, minus 5DEV). They're minimalist, cyberpunky and abstract. You can tell they used what they learned from their AI crank program and applied it to this. There’s a hole near the crank bolt, highlighted by the brushed metal accent that gives the look of a drawing compass. The bushed metal has been placed in the part of the crank where you’re most likely to get foot rub, thus keeping the crank looking brand new for years, for us chronic shoe crank pedal rubbers. The final piece that set these off, is the return of the bash guard. Why these ever feel out of fashion I do not know, but I’m so glad to see them back. They mount on the chainring and can be removed if you see fit. I’m such a fan of these.
From the first shift, you realise this is something special - it’s not just another groupset, another new drive chain. It’s more than that. It's the crispest shifting I've ever experienced. It has such a positive feel to it. There is that reassuring ‘clunk’ as it moves into gear - almost mechanical, but with the precision of electronics. It’s lightning fast; instant, and precise. Even under load, in the worst possible moment to shift, it was still absolutely light years ahead of everything else. Everything you have learned about not shifting under load, you can now throw out the window; this new system does it with ease. I think a big factor of this is due to the added stiffness of the direct mount and the X Sync teeth on the cassette, but SRAM has also made a lot of tiny tweaks that have really optimised the system.
The more I rode the product, the more I liked using it - it's an absolute joy to use. You just know that when you push the button to shift, it will do it – there’s no worrying about a little under-power half pedal to help it shift. Just pedal as you would, and the chain will shift on the cog. It really does improve the enjoyment of climbing. The slightly altered rations in the cassette were also a welcomed improvement. No more big jumps between the 42t to 52t. Instead, you 44 - 52 jump and it feels a lot nicer. It doesn’t sound like a lot, but it makes a difference, with less of a sudden change in ratio. It's hard to put into words the feeling of the drive chain over the previous stuff; overall you’ll just have a much nicer time while shifting. A good analogy would be comparing driving a car from ten years ago to driving a brand new, modern car with all the bells and whistles. Both do the same thing, but the newer car is going to be easier and arguably more enjoyable to drive; more relaxing, quieter, with more features to assist you.
SRAM has really knocked it out of the park with this. It’s hard to think about how you can improve on what they have delivered here. It’s truly fantastic. It’s robust, designed from the ground up for mountain biking, and is finally moving on from the hanger system that came from road bikes so many years ago. I’m a massive fan of the ability to be able to rebuild and replace the parts on the derailleur.
The shifting is light years ahead of the others. Will this groupset make you ride faster? You could argue that it will, but I don’t think that’s the right question to ask. Will this groupset enhance the experience of your ride? 100% it will. It’s an absolute joy to use, and makes you want to shift more – plus, it’s easy to set up. It’s built to last, is robust, and strong, so you don’t really have to worry about it. Going off the reliability of the previous AXS stuff, which was - in my opinion - the best out there, this should be able to survive an apocalypse. I’m not normally the sort of person to fork out for an expensive drive chain. Instead, I normally run the cheapest I can get away with. Gen 1 of AXS started to change my mind about that but this new stuff has 100% flipped my view on it. It's something that's worth saving up for and putting on your next bike. It's something worth investing in. You won’t regret it.
Hat’s off to you, SRAM. Well done.
Words & Photography: Jake Hood
Review: Aeroe Spider Rack
Review by Odin Woods
RRP: $199
Find out more here.
“The Spider Rack system is comprised of a rear rack, rear cradles, front cradle, and some nice dry bag options to suit just about every bikepacking pursuit.”
When I think bikepacking, I think of drop bars, janky bags and loose straps hanging off every corner of the bike.
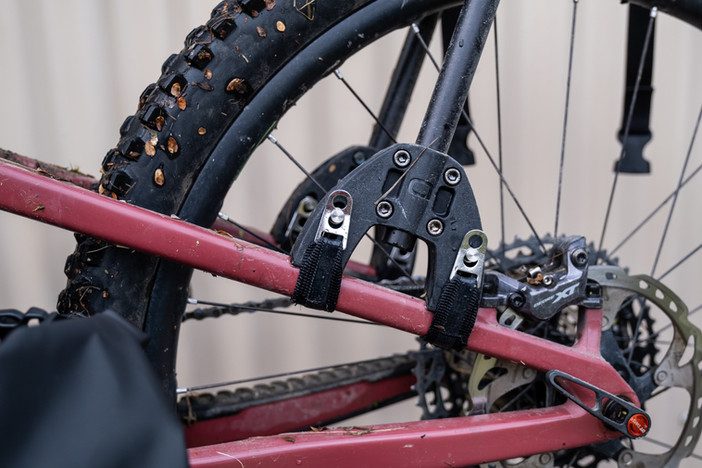
Some of those janky seat bags, front rolls and frame bags have become more refined over the years – to stop stuff bouncing, swaying, and ultimately falling off your bike – but there still isn’t the perfect solution for all occasions by any means. Consumers pushing for cleaner, simpler, less faffy ways of mounting bags on bikes continues to drive innovation. Innovators, like brothers Mike and Paddy Maguire at Aeroe, have certainly played their part in that move. You can thank them for the original freeload rack (now sold by Thule) – which I’m sure many of you have seen over the years – and now for the Aeroe Spider Rack system. The Spider Rack system is comprised of a rear rack, rear cradles, front cradle, and some nice dry bag options to suit just about every bikepacking pursuit. All the parts have a very modular feel about them, and you can tell each component has had a lot of love poured into it, design-wise, allowing for a very simple and easy-to-use product.
I’m kind of a ‘rip the packaging open first, read the instructions later’ person, and if how something is supposed to work isn’t immediately apparent then, in my opinion, it isn’t effortless for the customer. I applied this logic when first fitting the rear rack to my gravel bike and was quickly impressed with how simple and easily adjustable everything was. The mounting brackets can rotate to accommodate different seat stay angles and the rack itself can flex to achieve different widths. The rack height can also be adjusted +/- 30mm by loosening the four bolts and sliding it up and down through the mount to adjust the clearance around the rear tire. Nipping up the 5mm Allen key, the Silicone coated straps effortlessly tension up to keep the rack secure, without risking damage to your frame.
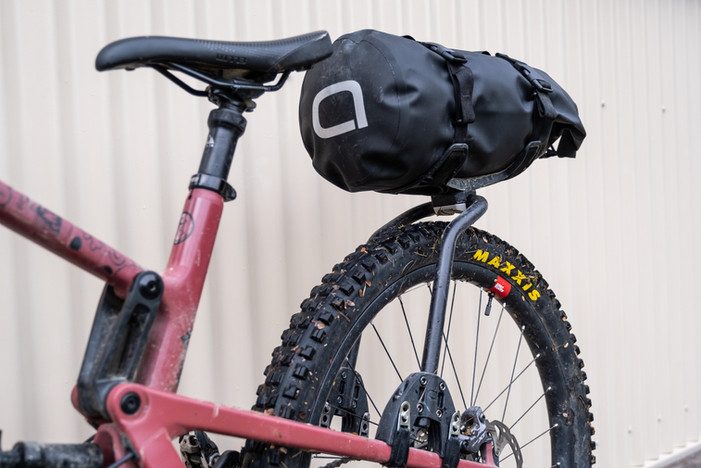
“I more or less forgot that there was a 12L dry bag strapped to the back of my bike. The rack was rock solid and didn’t make a sound.”
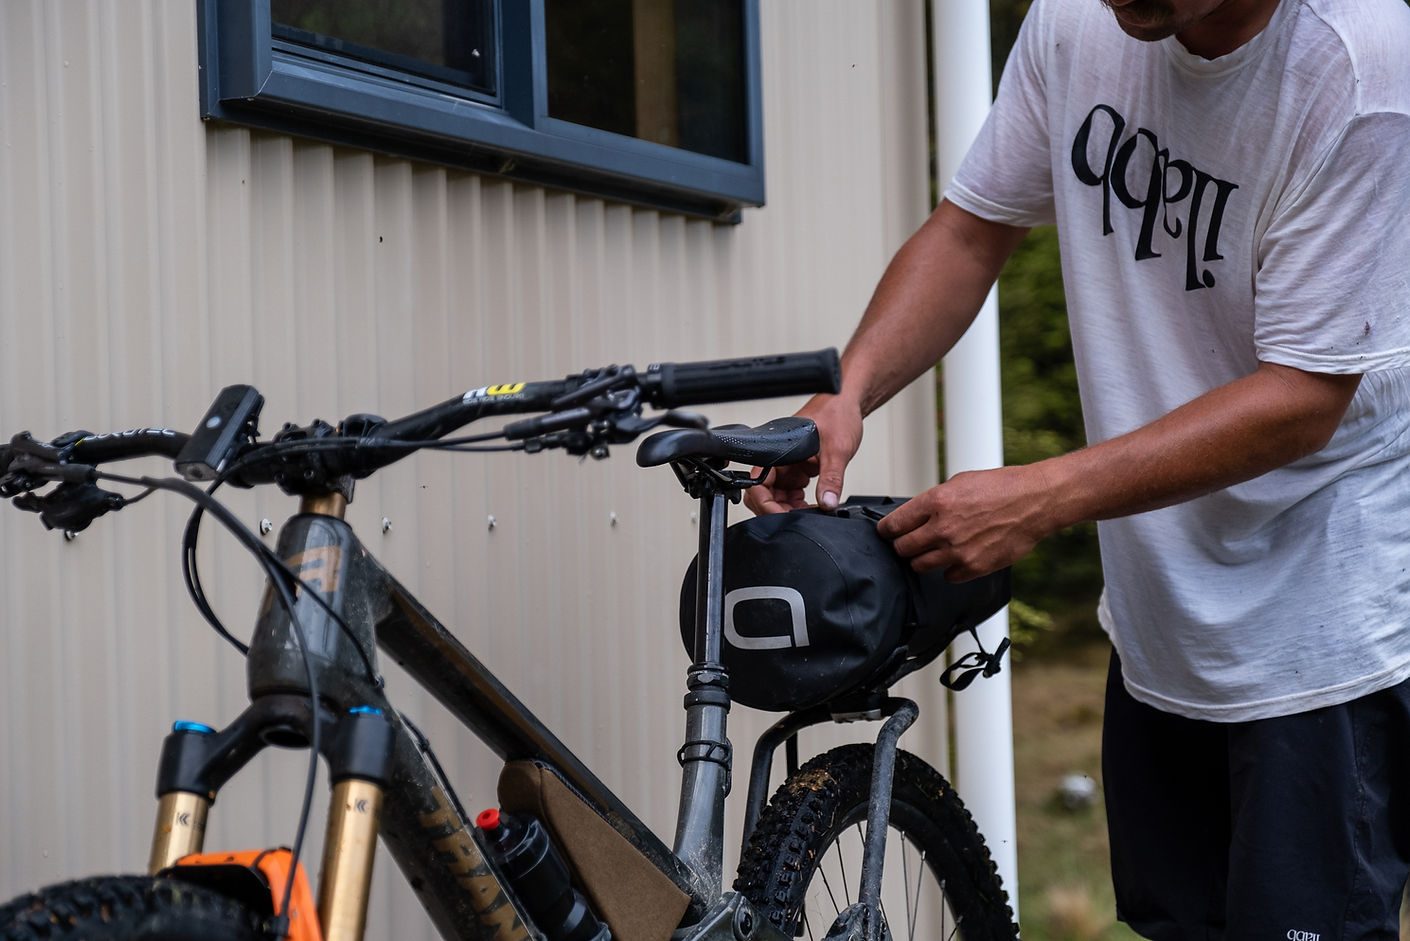
I pulled it off and within three minutes had it mounted on my Santa Cruz 5010. I chose to flip the entire rack 180° so the cradle sat back a bit further and lower down to clear my seat on compression. Aeroe note this as a ‘hot tip’ in their install guide.
It was time to put this stuff to use! We gapped it out of town to a quiet wee hut for the night and opted to use the Spider rear rack, with a single cradle, and the 12L dry bag to hump our gear up-river to the night’s accommodation. It was a quick transition in the pouring rain from empty bike to loaded bike. We simply clicked the cradle’s integrated buckles over the dry bag, then we were off. Jordan opted to mount his rack facing back as well, and had plenty of clearance over a 29er rear wheel as we bounced our way across tussock, river lands and the beech forest beyond. Without the usual constant swaying of a loaded seat bag, I more or less forgot that there was a 12L dry bag strapped to the back of my bike. The rack was rock solid and didn’t make a sound. When it came to dismounting and crossing some of the bigger rivers, I could fully drop my seat and climb off easily! Getting to the hut, it was nice to just unclip two buckles and not have to fumble around under the seat trying to pull straps through to remove a bag. My clothes and sleeping bag were nice and dry, courtesy of the super durable dry bags.
Loading up was, again, as easy as stuffing a bag full of gear and strapping it on. I gave my rack the once over just to see if anything had moved, but everything was where it was supposed to be and riding behind Jordan over some of the rougher sections of trail made me realise how little the entire system moved as well.
As mentioned, we only used the Spider rear rack with one 12L dry bag, but it’s worth noting that if you wanted to you could add another two cradles to each side and strap on another two dry bags – or a tent, fishing gear, whatever you want. One small thing to mention is that the straps that hold the rack on could be easily lost when the rack is removed, so putting a small rubber band around the end while on the rack would stop them being accidently dropped.
The weight weenies will note that the rack and cradle weigh in at 996 grams, not as light as a seat bag, but there is no questioning the robustness of the rack and cradles solid design. With that in mind, if you are planning to use this system for bikepacking, on rougher trails, it is reasonable to accept the 400-odd additional grams for the sake of longevity.
Rounding out, I found my time using the Spider Rack system sturdy and reliable with no surprises. For the price, I think it’s fairly good buying considering its versatility to move between bikes without too much hassle – plus, you can add to it when you need to.
Feature: Weekend up the Waiau
Words: Jordan Phipps
Images: Odin Woods
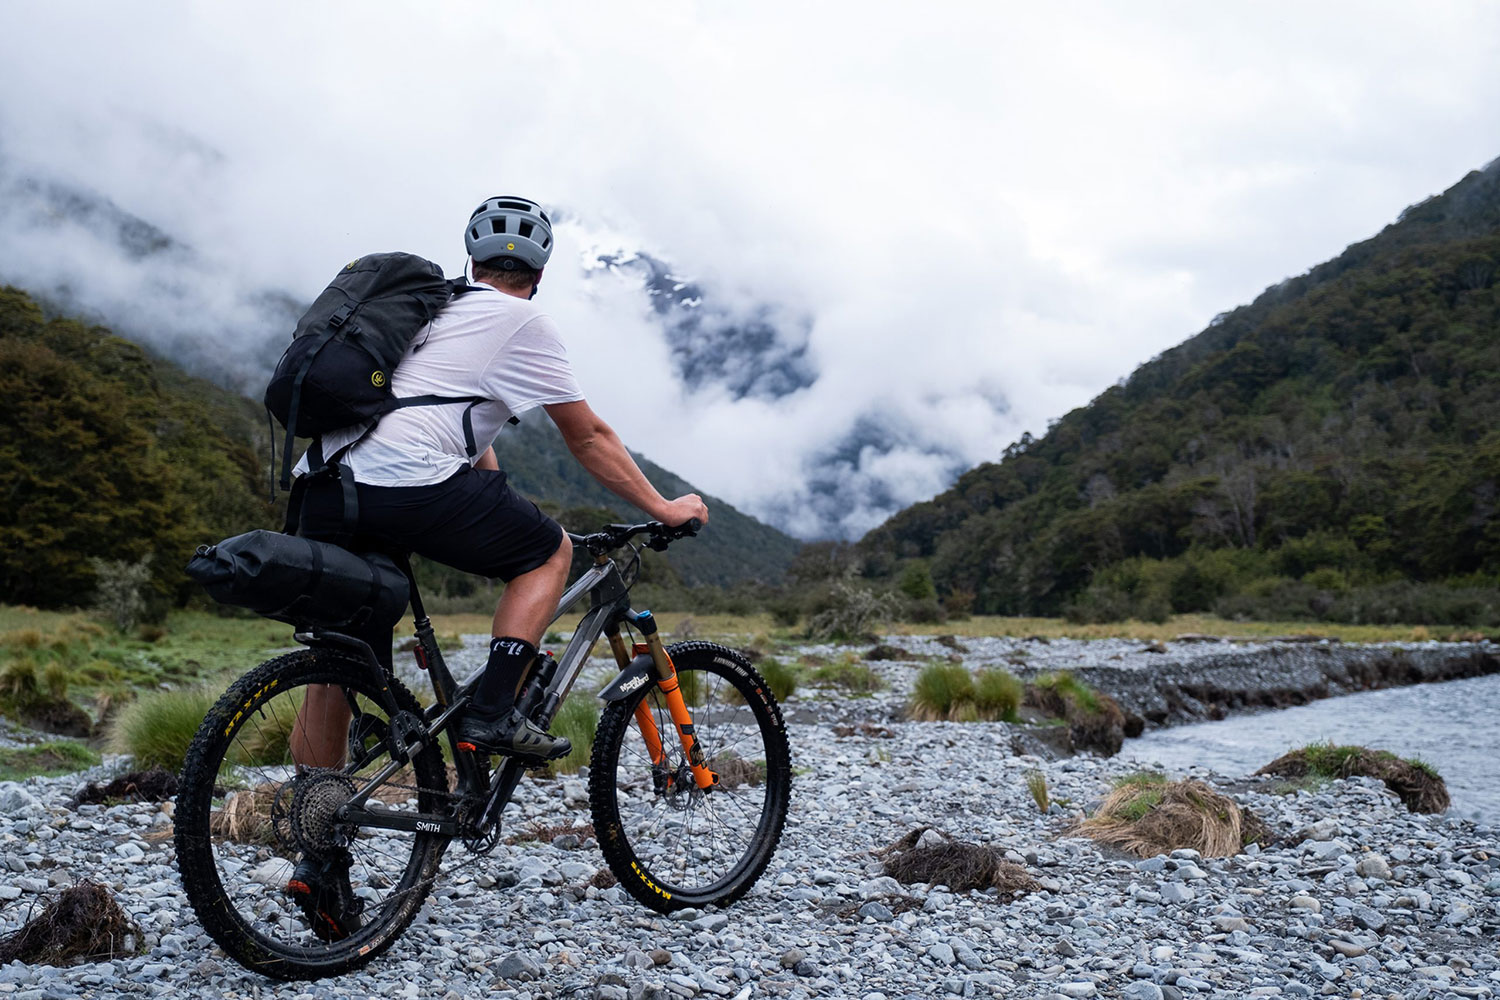
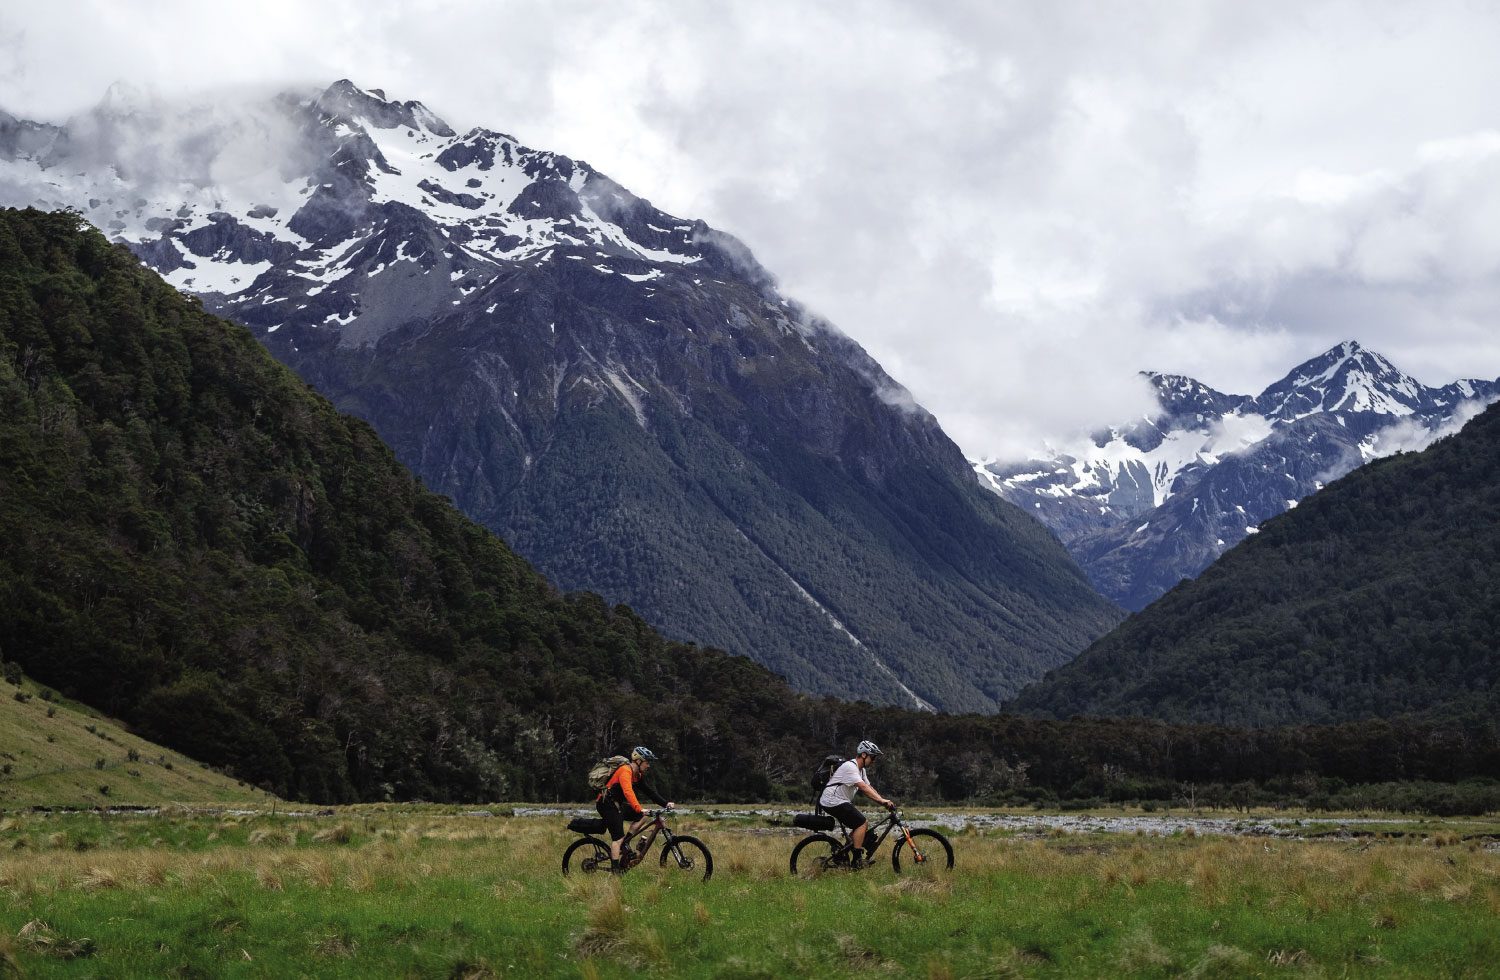
The idea of strapping crap to your bike and heading into the wilderness definitely isn’t a new one, but I’ve been feeling the urge to break out. Time to make the effort to get back outside, chuck down the tools and avoid the Christmas rush. Find fun in the misadventure and – for the first time, for me – take the bikepacking offroad.
The perfect opportunity to dip a toe into this niche practically landed in my lap. A long-planned weekend at the Wairoa Gorge was rapidly approaching, which would see me and my buddy, Odin, traversing the South Island. The journey from Christchurch to Nelson dances along the fringes of some unreal backcountry areas, giving us a plethora of rivers and valleys to explore. What better way to start a weekend of gravity-assisted riding than with a bikepacking adventure.
Driving to Nelson isn’t overly long or strenuous, but when schedules are tight and optimising time away from home is key, an after-work departure is best. Some folks may just opt for a hotel or even whack up the rooftop tent to break up the drive when tired, but when activities take priority, a backcountry hut makes perfect sense…
Stuffing a dry bag full of snacks, camping gear and the occasional hazy (of course), you’ve now got the perfect recipe to start any adventure. I’ve learned over the years, there are three things you usually like to line up to help aid a positive experience while out in the backcountry. None of them are exactly critical but a lack of all three definitely makes life slightly harder, colder and, ahh, less positive:
Good weather.
Ample daylight.
Cold beer.
A plan formed and before long we began the battle out of civilisation. Bumper-to-bumper rush hour traffic filled the roads, with the silly season undoubtedly upon us. Shop fronts were adorned with Christmas livery, and footpaths struggled to contain the masses. My mind begins to wander: have I got my partner the right thing for Christmas? Shit, did I remember to book the campsite for New Year’s Eve? Am I going to be able to pull off a flawless pav on Christmas Day? In my present reality, the only pressing questions were when the traffic was finally going to move and which flavour dehydrated meal I should have for dinner that night.
The slow crawl across the city only intensified the urge to get the hell outta there and be completely immersed in the wilderness. Eventually, the houses thinned out and the tar seal quickly turned to gravel. The inconvenience of the city and that pesky traffic became nothing but a smoke-fuelled memory.
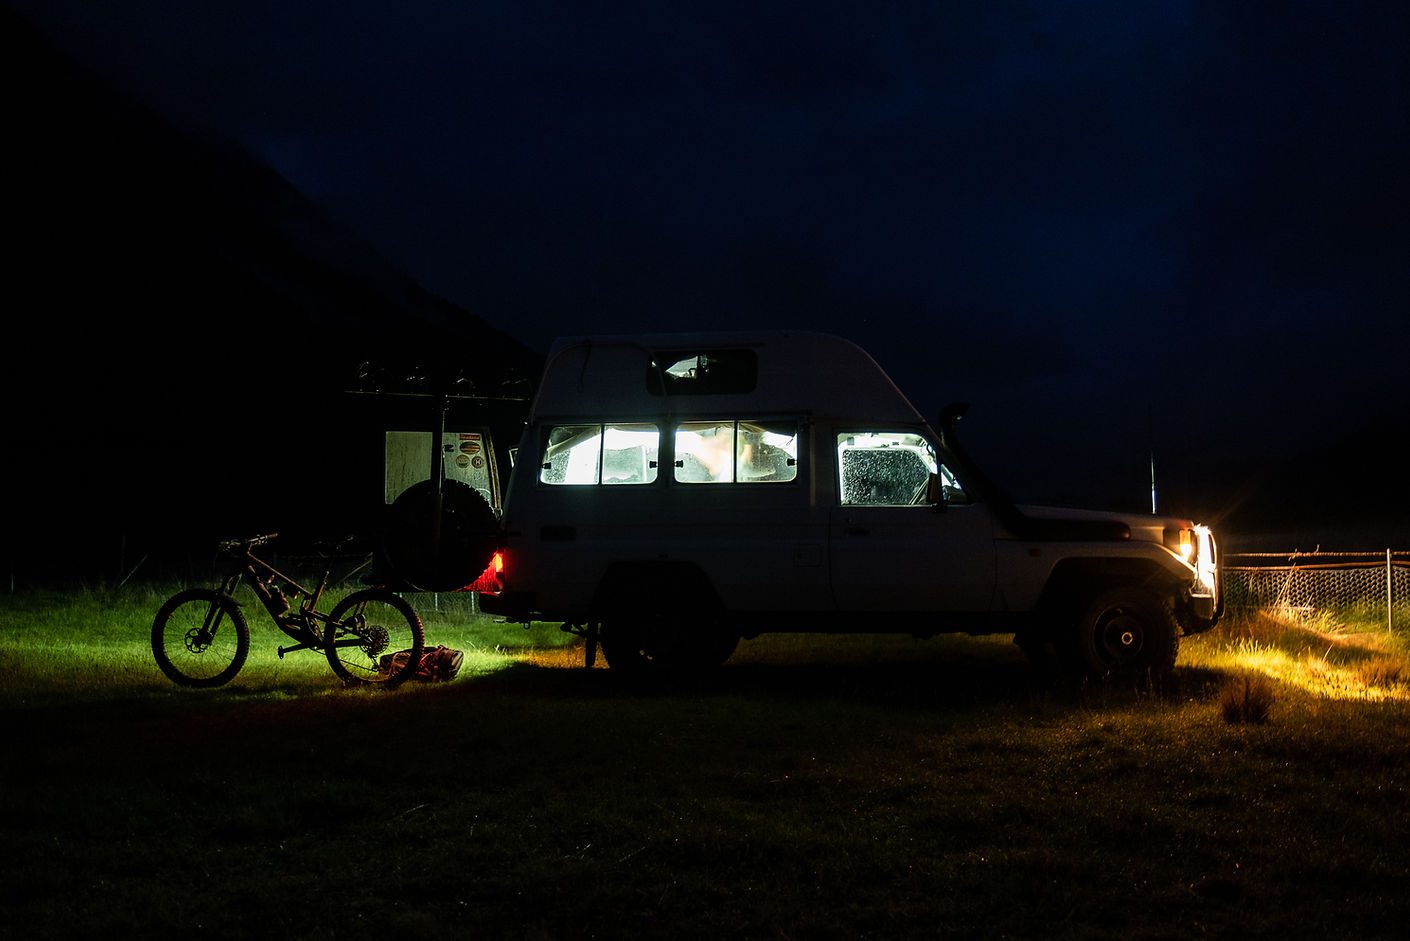
The Landcruiser was loaded to the gunnels: two different disciplines and a weekend’s worth of supplies had stretched our Tetris packing skills. This was demonstrated almost as soon as we hit the first 4WD track – everything that could possibly fall off the shelves and create chaos through the interior, did. As bags collected our heads, we were forced to stop and rearrange, taking the time to observe the dank playground that sat in the valley below.
Alas, the peaceful serenity was momentarily broken by the sound of the windscreen wipers reaching Mach 10 on the Landcruiser. Cool, it was raining…
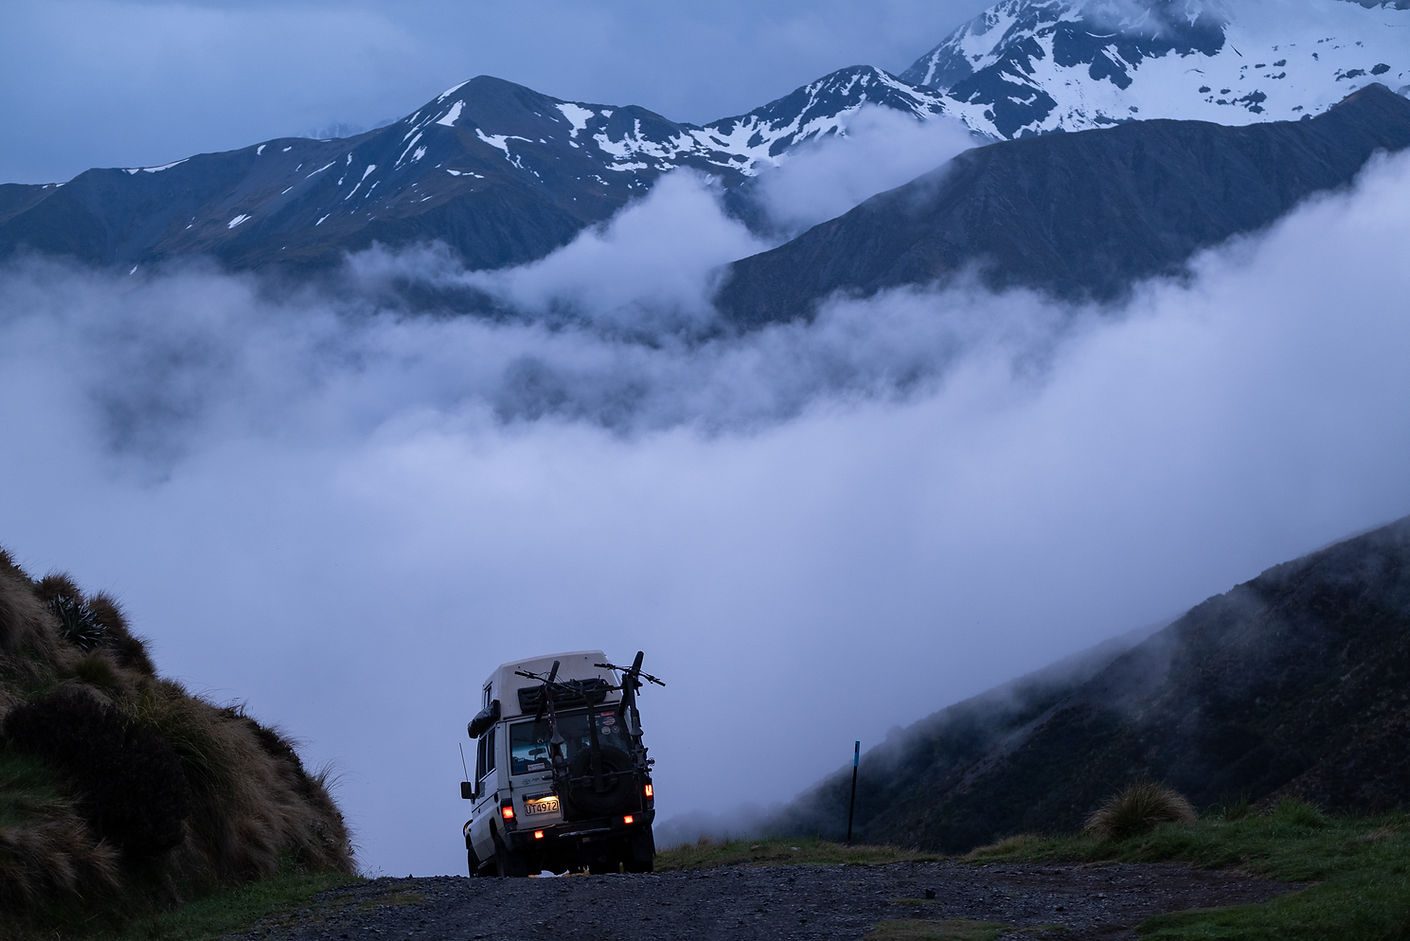
I downshifted the truck and let the old girl roll down the hill, headlights on as we watched the sun dip below the snow-capped peaks. The weather was packing in and the daylight running away, but hey – at least we’d made it outta the city. Plus, we still had beer.
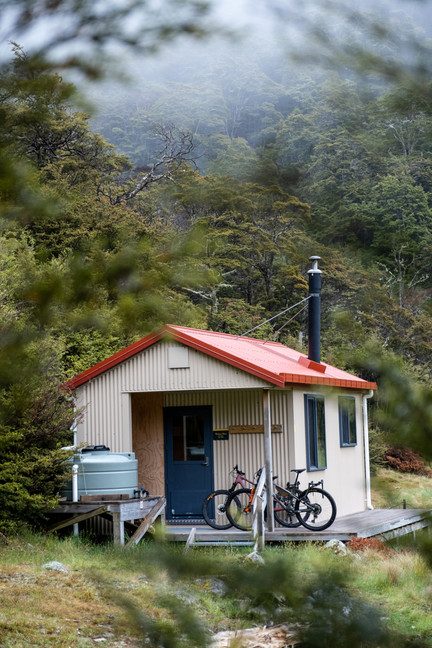
Under the last ounce of light, we parked the old girl up, had a quick shuffle of gear, then strapped our dry bags down to their racks. With our head torches illuminating the way, our road had become a singletrack adventure. New to me for this excursion, was the Aeroe spider rack system. The simplicity of having a drybag strapped to the back of my bike while still maintaining use of a dropper post was a win indeed. With no movement or the admin of having to stop mid-ride and tighten anything up, this product got a thumbs up from me.
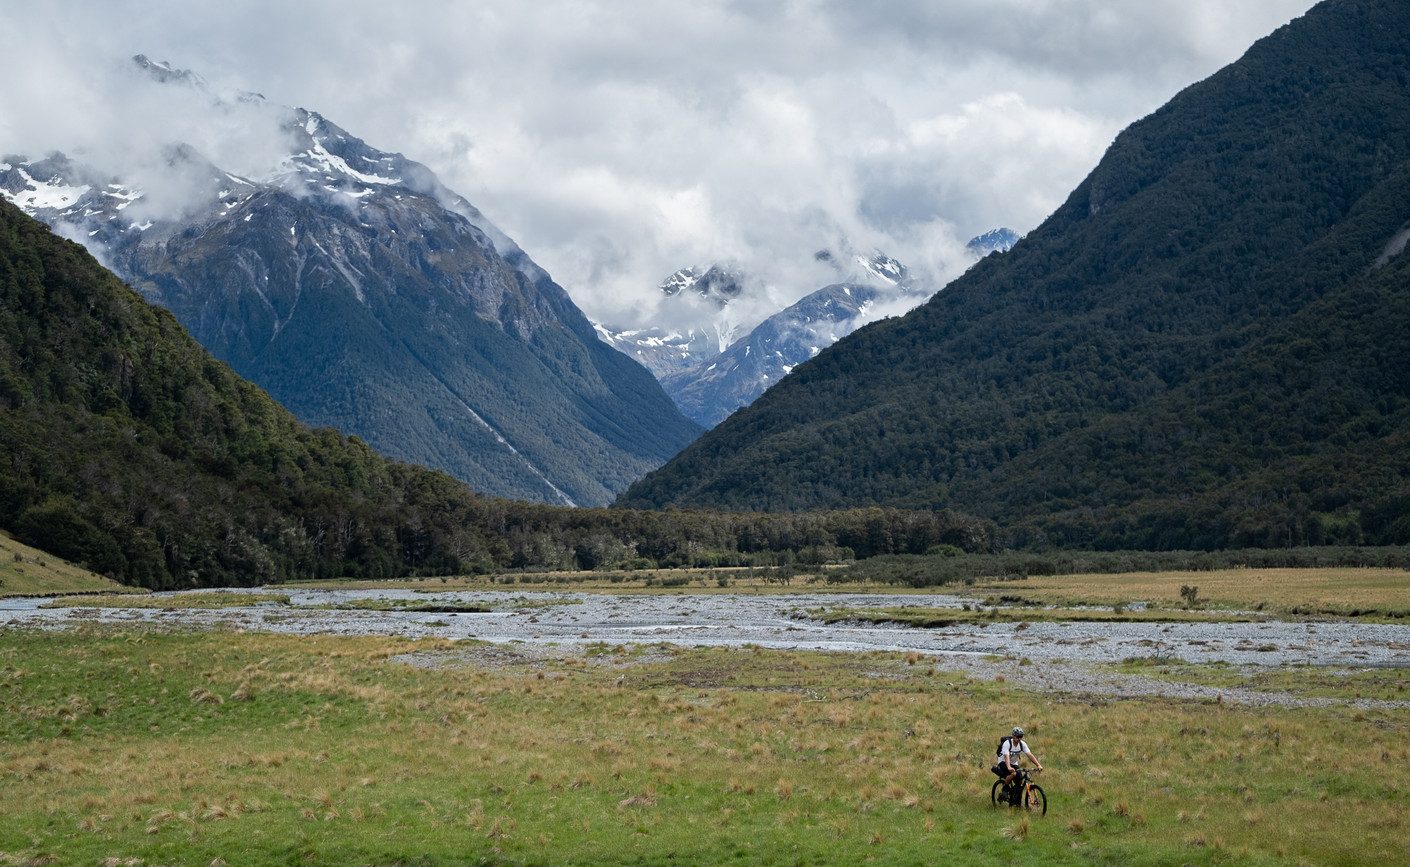
I’d never actually ventured into this part of the country before, but Odin assured me I was in for a treat. A narrow goat trail through tussock flat lands carried us away from the carpark and upstream towards the mountains. Navigating seemed a breeze… for the time being.
It’s strange, but for some reason I tend to always be overly confident in my navigational skills. There’s not really any skill set or valid reason to justify why, I’ve just always been the one to charge ahead and find the way. But, as it transpired, navigating from one small orange DOC marker to the next in the dark is a skill I’ve yet to learn. Toppo maps came out and assurances were made that as long as we were heading upstream, eventually we’d reach the hut. Right? Oh yeah, and technically ‘upstream’ also means ‘downstream’, ‘back across stream’ and ‘across that other stream’, too.
We were, by then, doused in darkness and navigating river crossings, however, the dedication to sustaining dry feet was strong. Our shoes stayed firmly strapped to our handlebars, and socks tucked in our pockets – a decision I questioned as my bare feet felt helplessly for the path ahead, fumbling over rocks and navigating the murky waters one dainty step at a time. It was about then that I reminded myself; ‘it’s not the destination, it’s the journey’. Or was it #notallwhowanderarelost? Either way, the realisation that only a few hours previously I was slinging tools at work and watching the hours slowly tick by, yet now here I was immersed in the wilderness, wading upstream, bike in tow, pushed me further into the unknown.
I don’t know about you, but to me, that’s pure bliss.
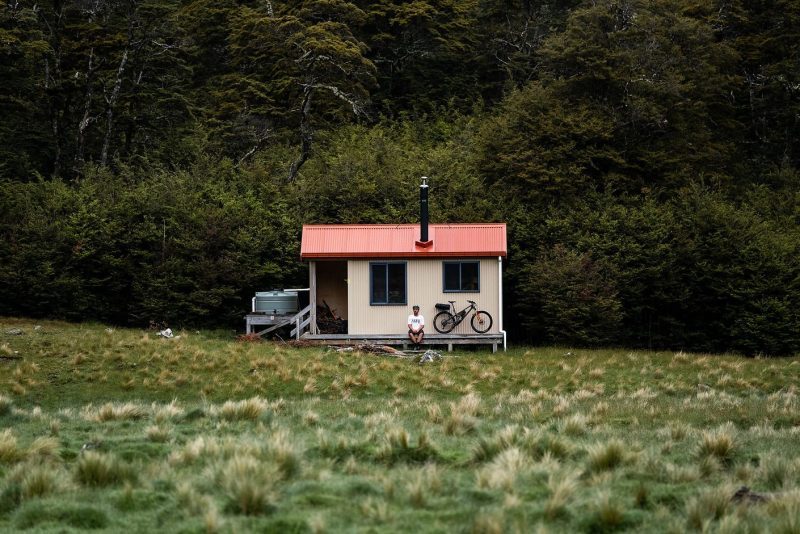
Our chosen abode for the night happened to be placed on the Te Araroa trail. We started to broach the subject that there was every chance the hut would be chocka block full of other intrepid travellers, and the question arose of whether we would be pitching our tent in the rain? What was proper hut protocol when arriving late at night? Ah well, I decided that was future Jordan’s problem, and kept the pedals turning.
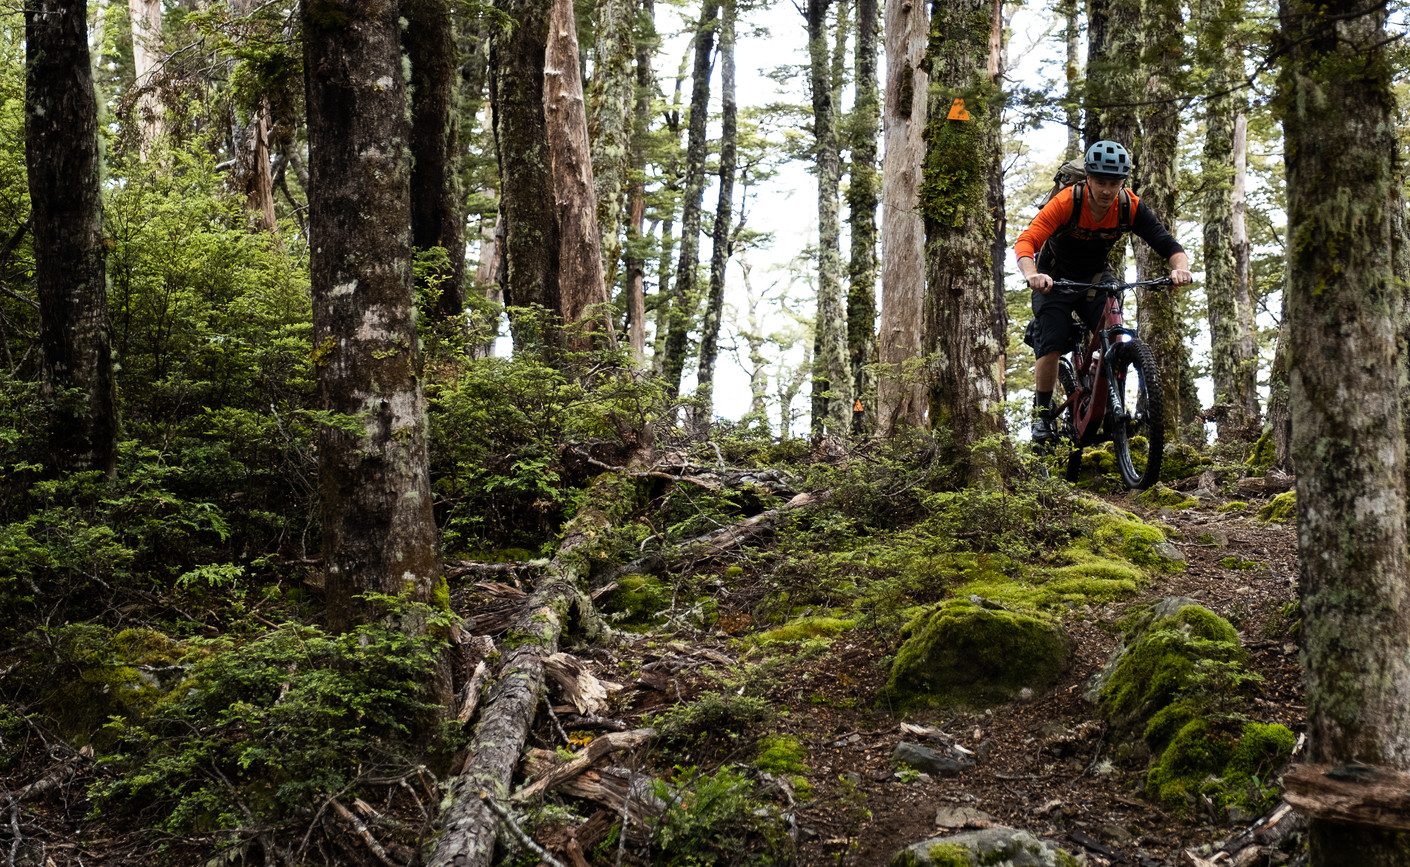
This was night riding like I’d never experienced it before. To be fair, it was more a combination of multi-sport, orienteering and cycling all thrown into a mixing pot of Type 2 adventure. Mental notes were made on which sections to avoid on our return ride through, and which rock cairns were actually helping us. Somehow, it seemed that each time we’d battle our way through an off-piste excursion, we were only ever metres away from the trail.
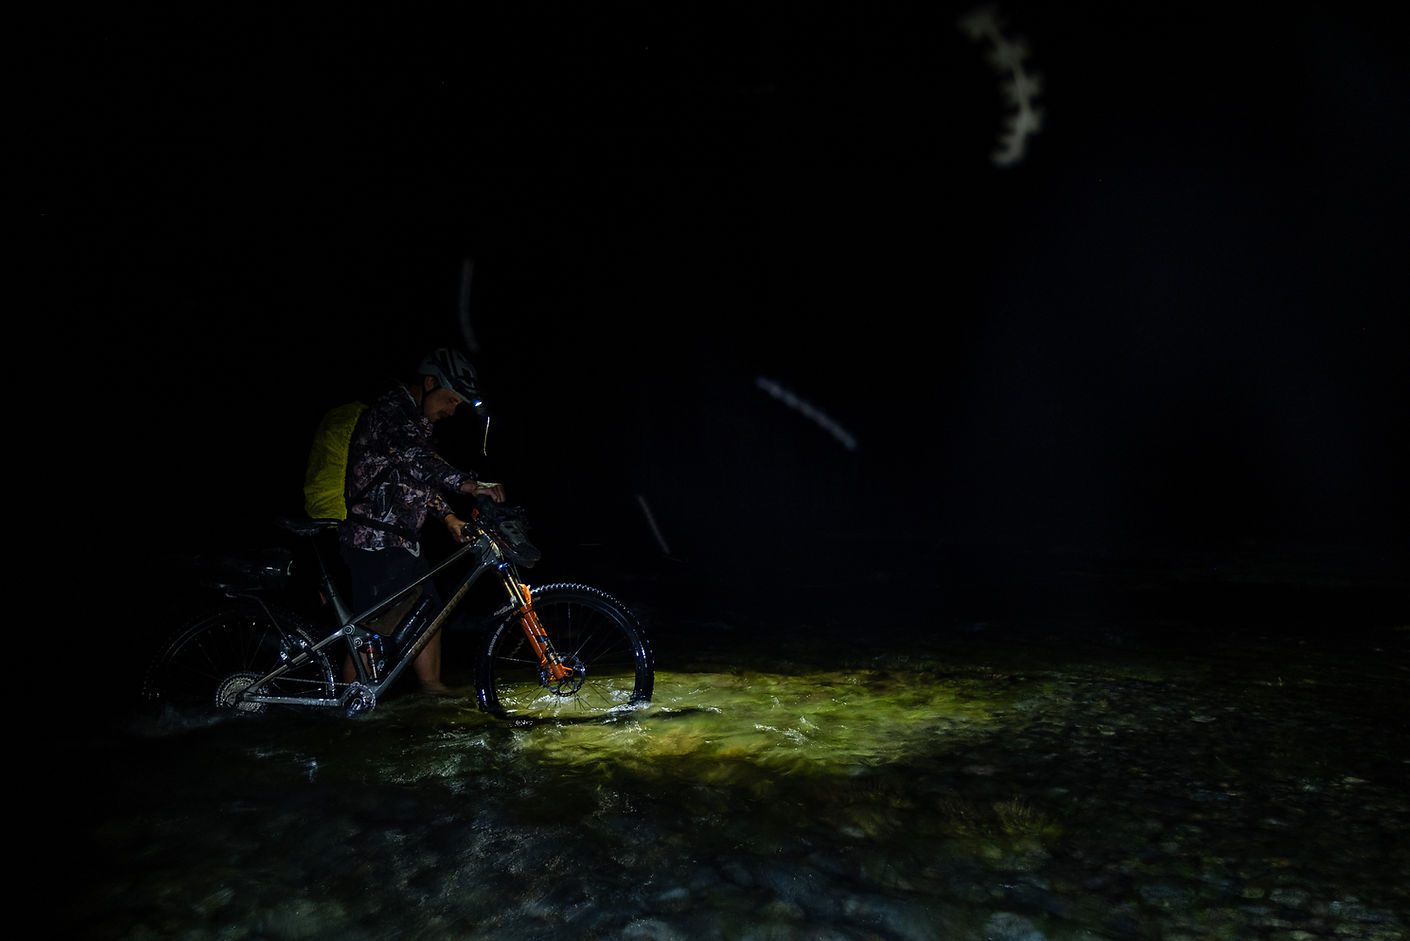
Finding ourselves on opposite sides of the river, we reconvened to once again check our course. After a couple of hours of fumbling athletically through the dark, we had success – the hut was in reach and the legs could sense it, so we cranked up through the dank beach forest and summited the last climb. I soon found myself yahooing, taking in the cornflake descent, corners getting slapped, and any feeling of tiredness seemingly having left my brain.
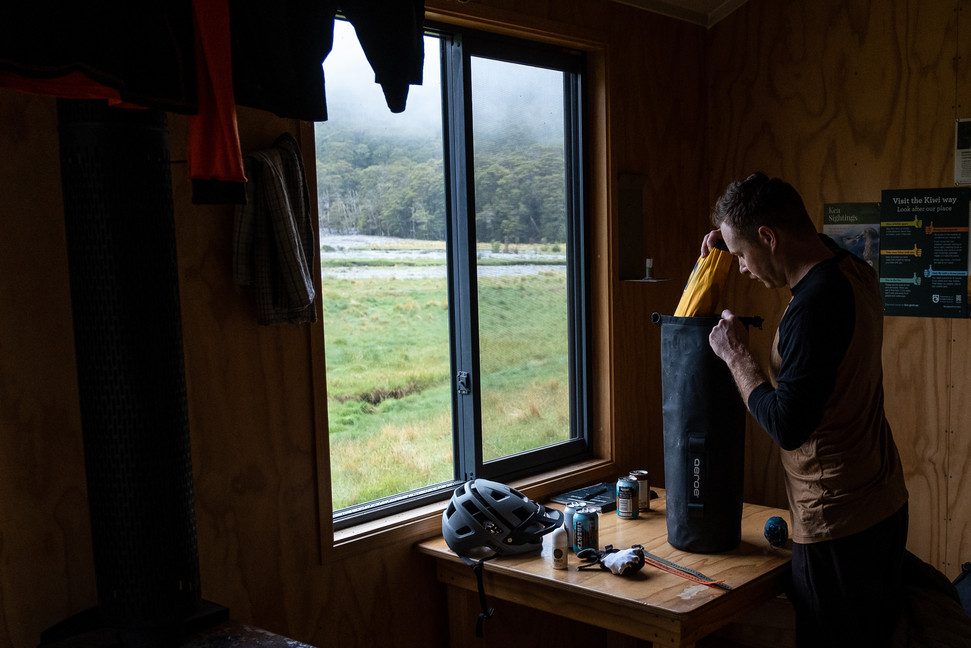
Sliding to a stop, we couldn’t believe our luck – checking, then double checking, then triple checking that we did indeed have an empty hut at our disposal. Yes, an empty hut! We couldn’t believe it; our intrepid trail of cornflakes had led us right to the front door and not a soul was in sight. Our bikes were safely tucked away and, with two simple clicks, my dry bag was released from its cradle. Ahh, that first crispy beer was cracked.
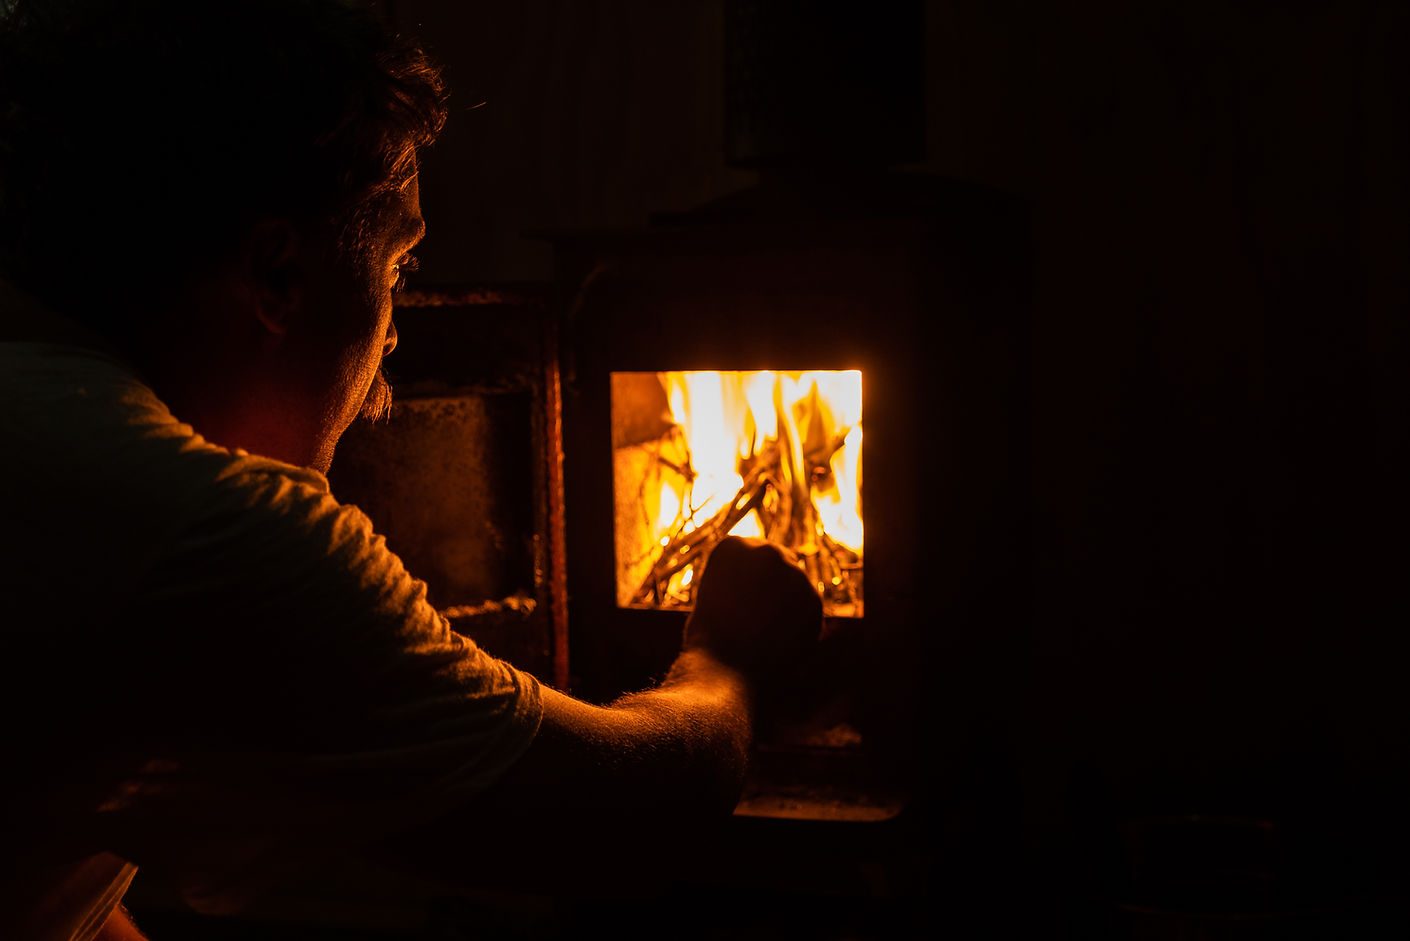
Hut life is an easy life – not to mention, a much-needed change of pace from the standard 9 – 5 back home. It’s the simple things for me: the rhythmic crackle of a fire and the anticipation of a dehydrated meal. We were more than content. This was a heck of a way to spend a Thursday night. With the fire cranking and beverages poured, the quality of our chat started to fade and it wasn’t long before the night slipped away.
The beauty of arriving at 11:30pm the previous night was that neither of us actually knew what to expect of our surroundings when we woke the following morning. Our subpar porridge was inhaled while glassing the numerous slips and clearings, adamant to scan some creatures. This trip, as all of them seem to be these days, was a squeeze in our schedule. It was the sort of trip that, at the time, could have felt rushed and a tad flustered, but that’s when it’s key to remember something like this is always worth doing.
After a morning scanning and exploring the terrain, our bags were back on as quickly as they were unpacked, ready for the downstream trip – which we expected to be an absolute treat. I was quickly humbled by how off track my self-proclaimed mastery navigation skills were the previous night, as the amount of river crossings were halved. The sheer vastness of the valley was hard to absorb.
On any adventure, every positive is balanced with a – sometimes – a small negative. The small negative on this trip was the kind that liked to fly around our faces and bite any exposed skin. Sandflies weren’t going to put a damper on this trip, but boy did they give it a nudge. Luckily for the sandfly population, the majestic sight of the Landcruiser was on the horizon. We’d managed to make it back to the truck in half the time and almost half the distance we’d covered the previous night, but both exploits were just as fun.
Sometimes life needs a bit of spice. Not necessarily the whole Cajun vibe, but maybe more of a paprika hit. It doesn’t take much to mix it up and get out of your environment and into another. Squeeze it in the schedule and get it done. You might be surprised how enjoyable a moonlight ride upstream in the rain actually is.