

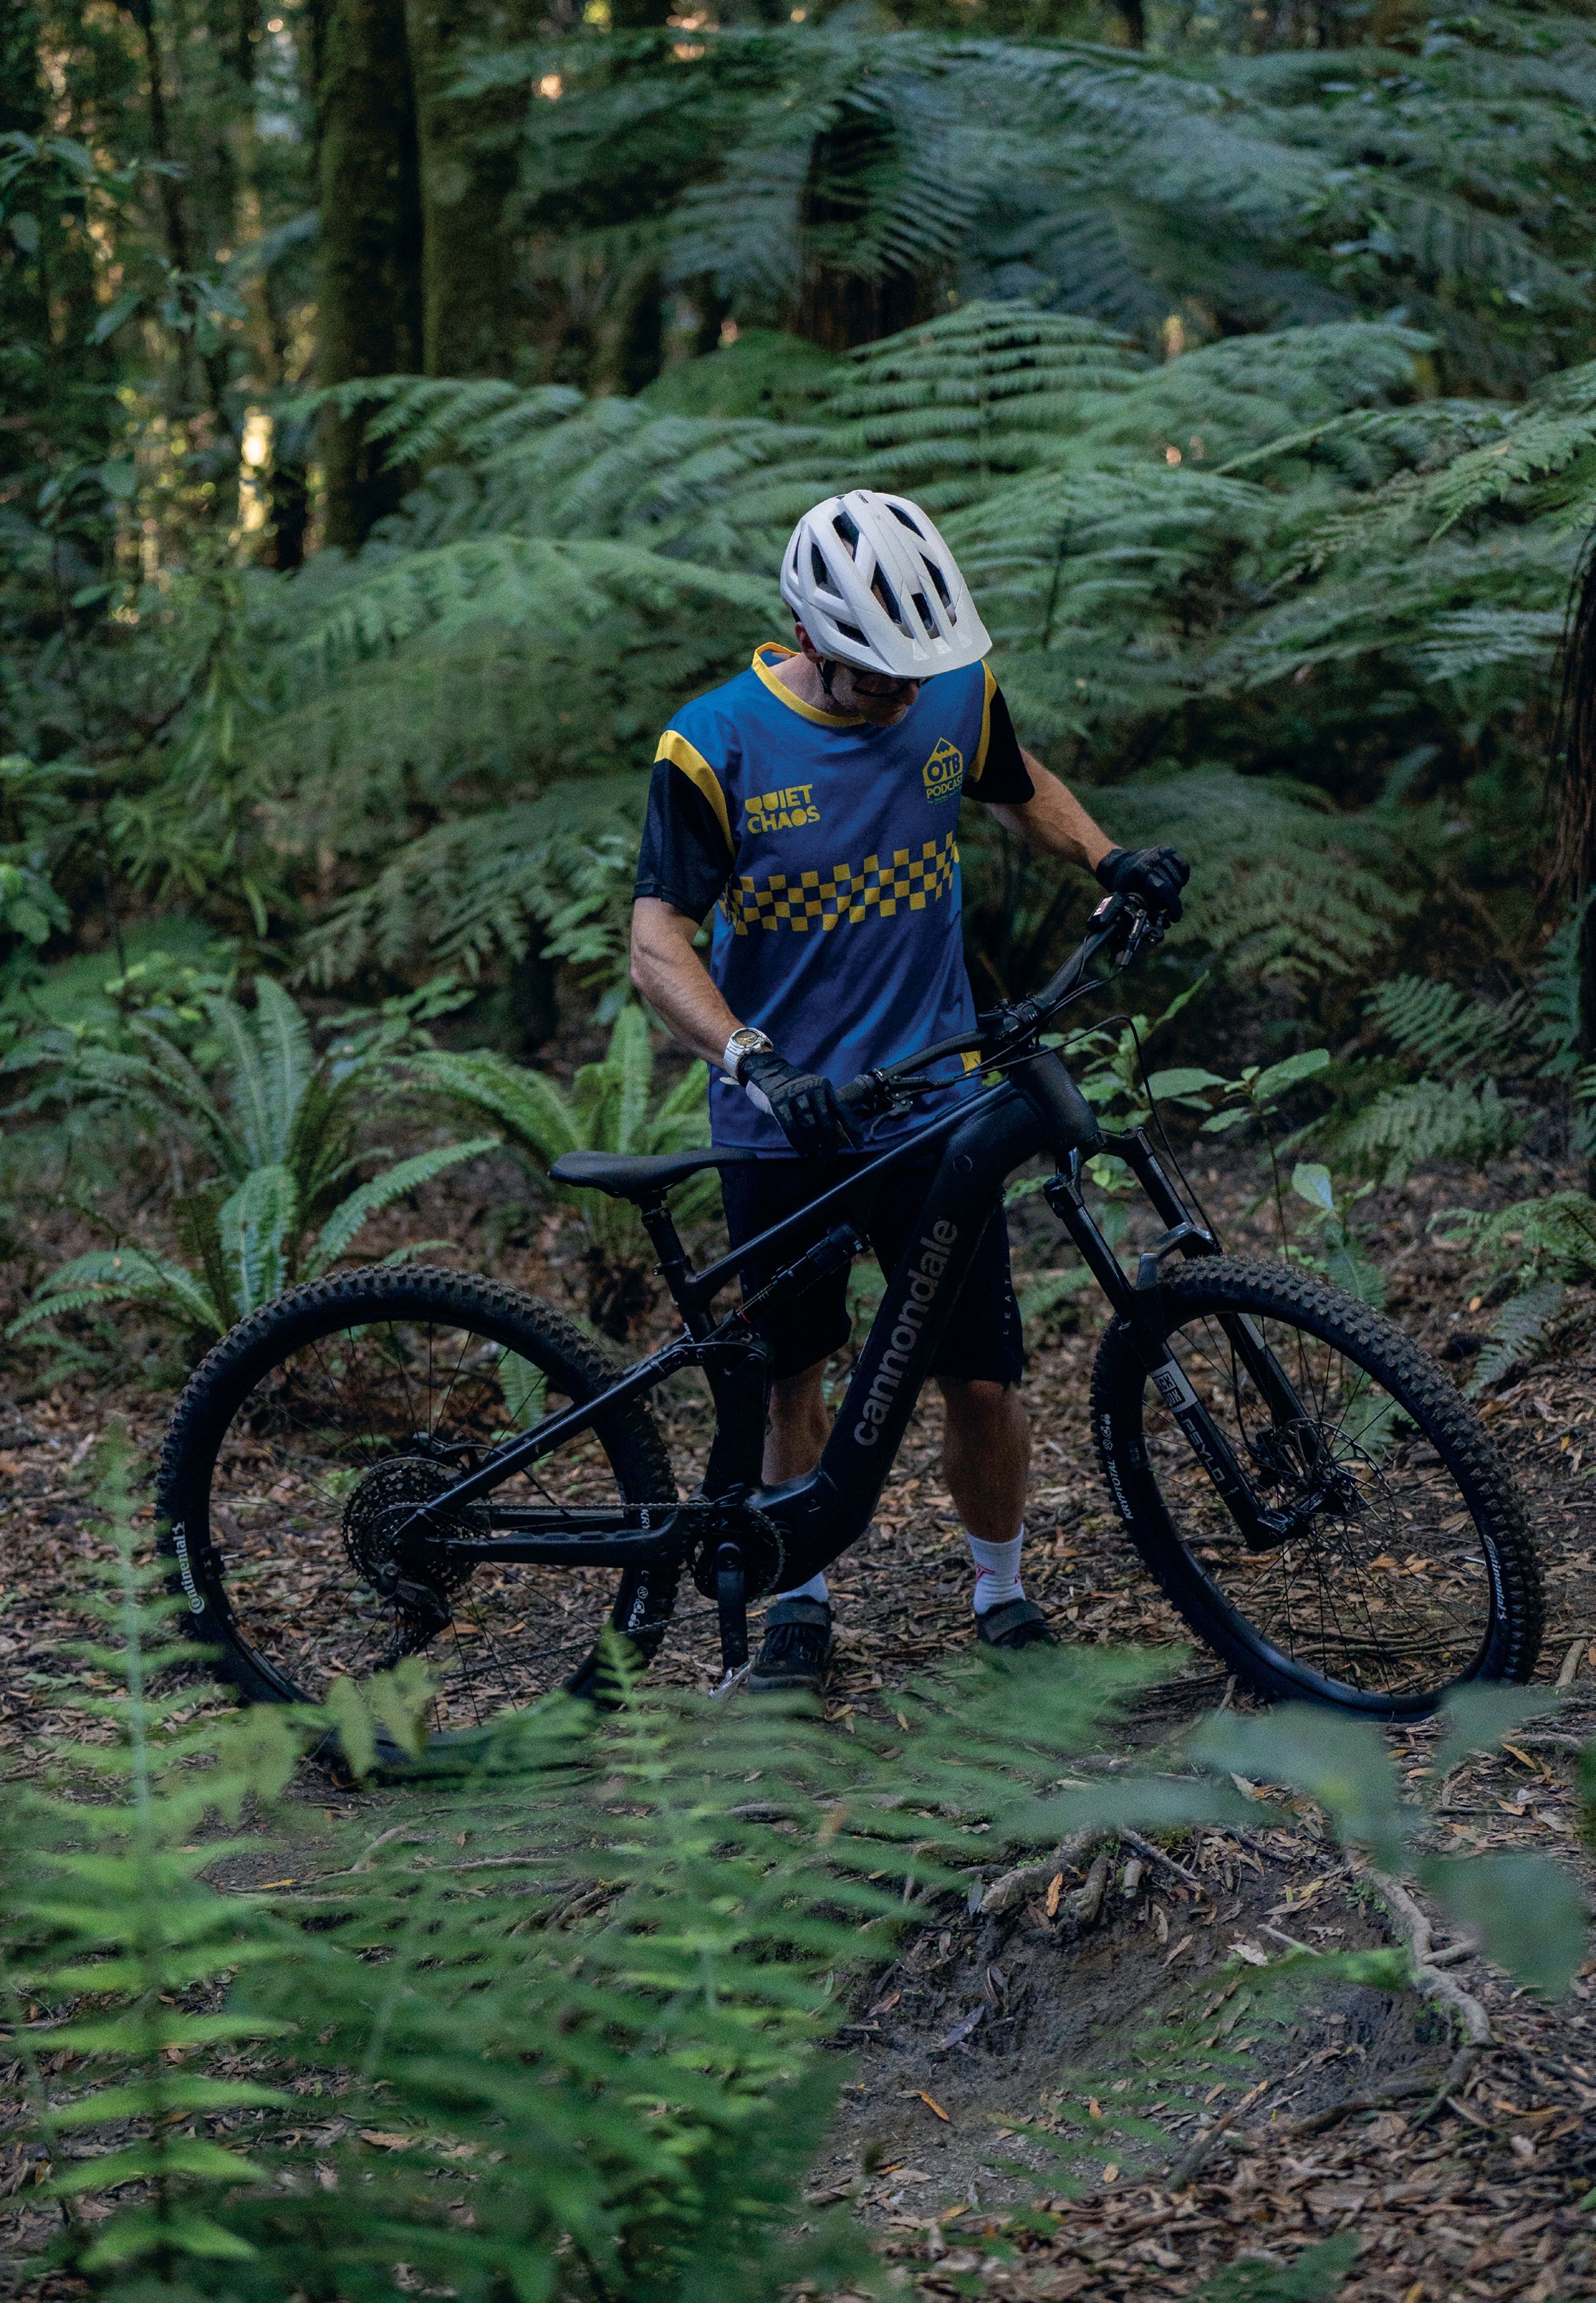
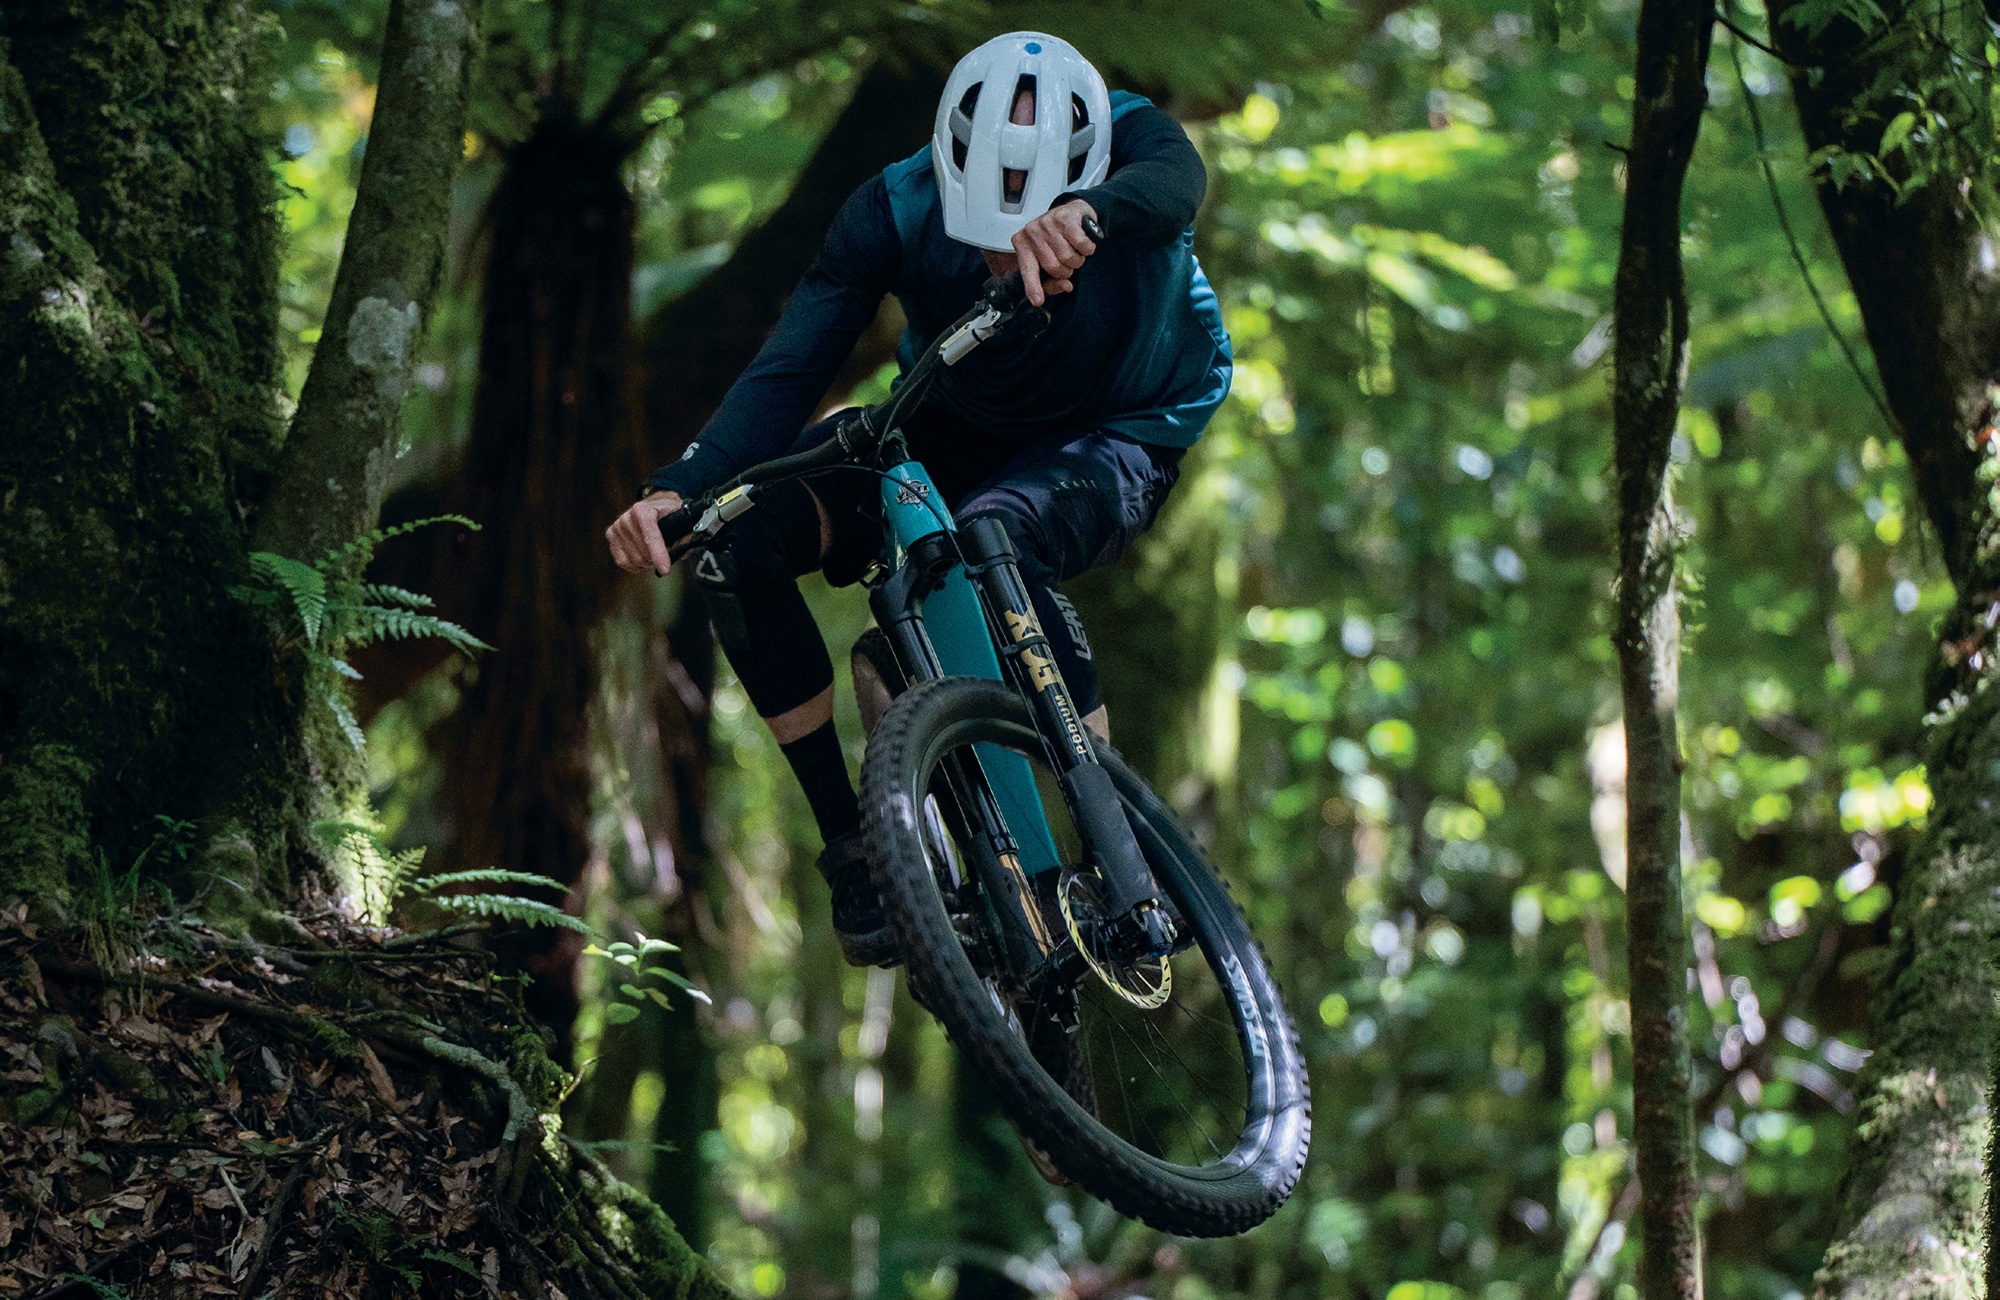
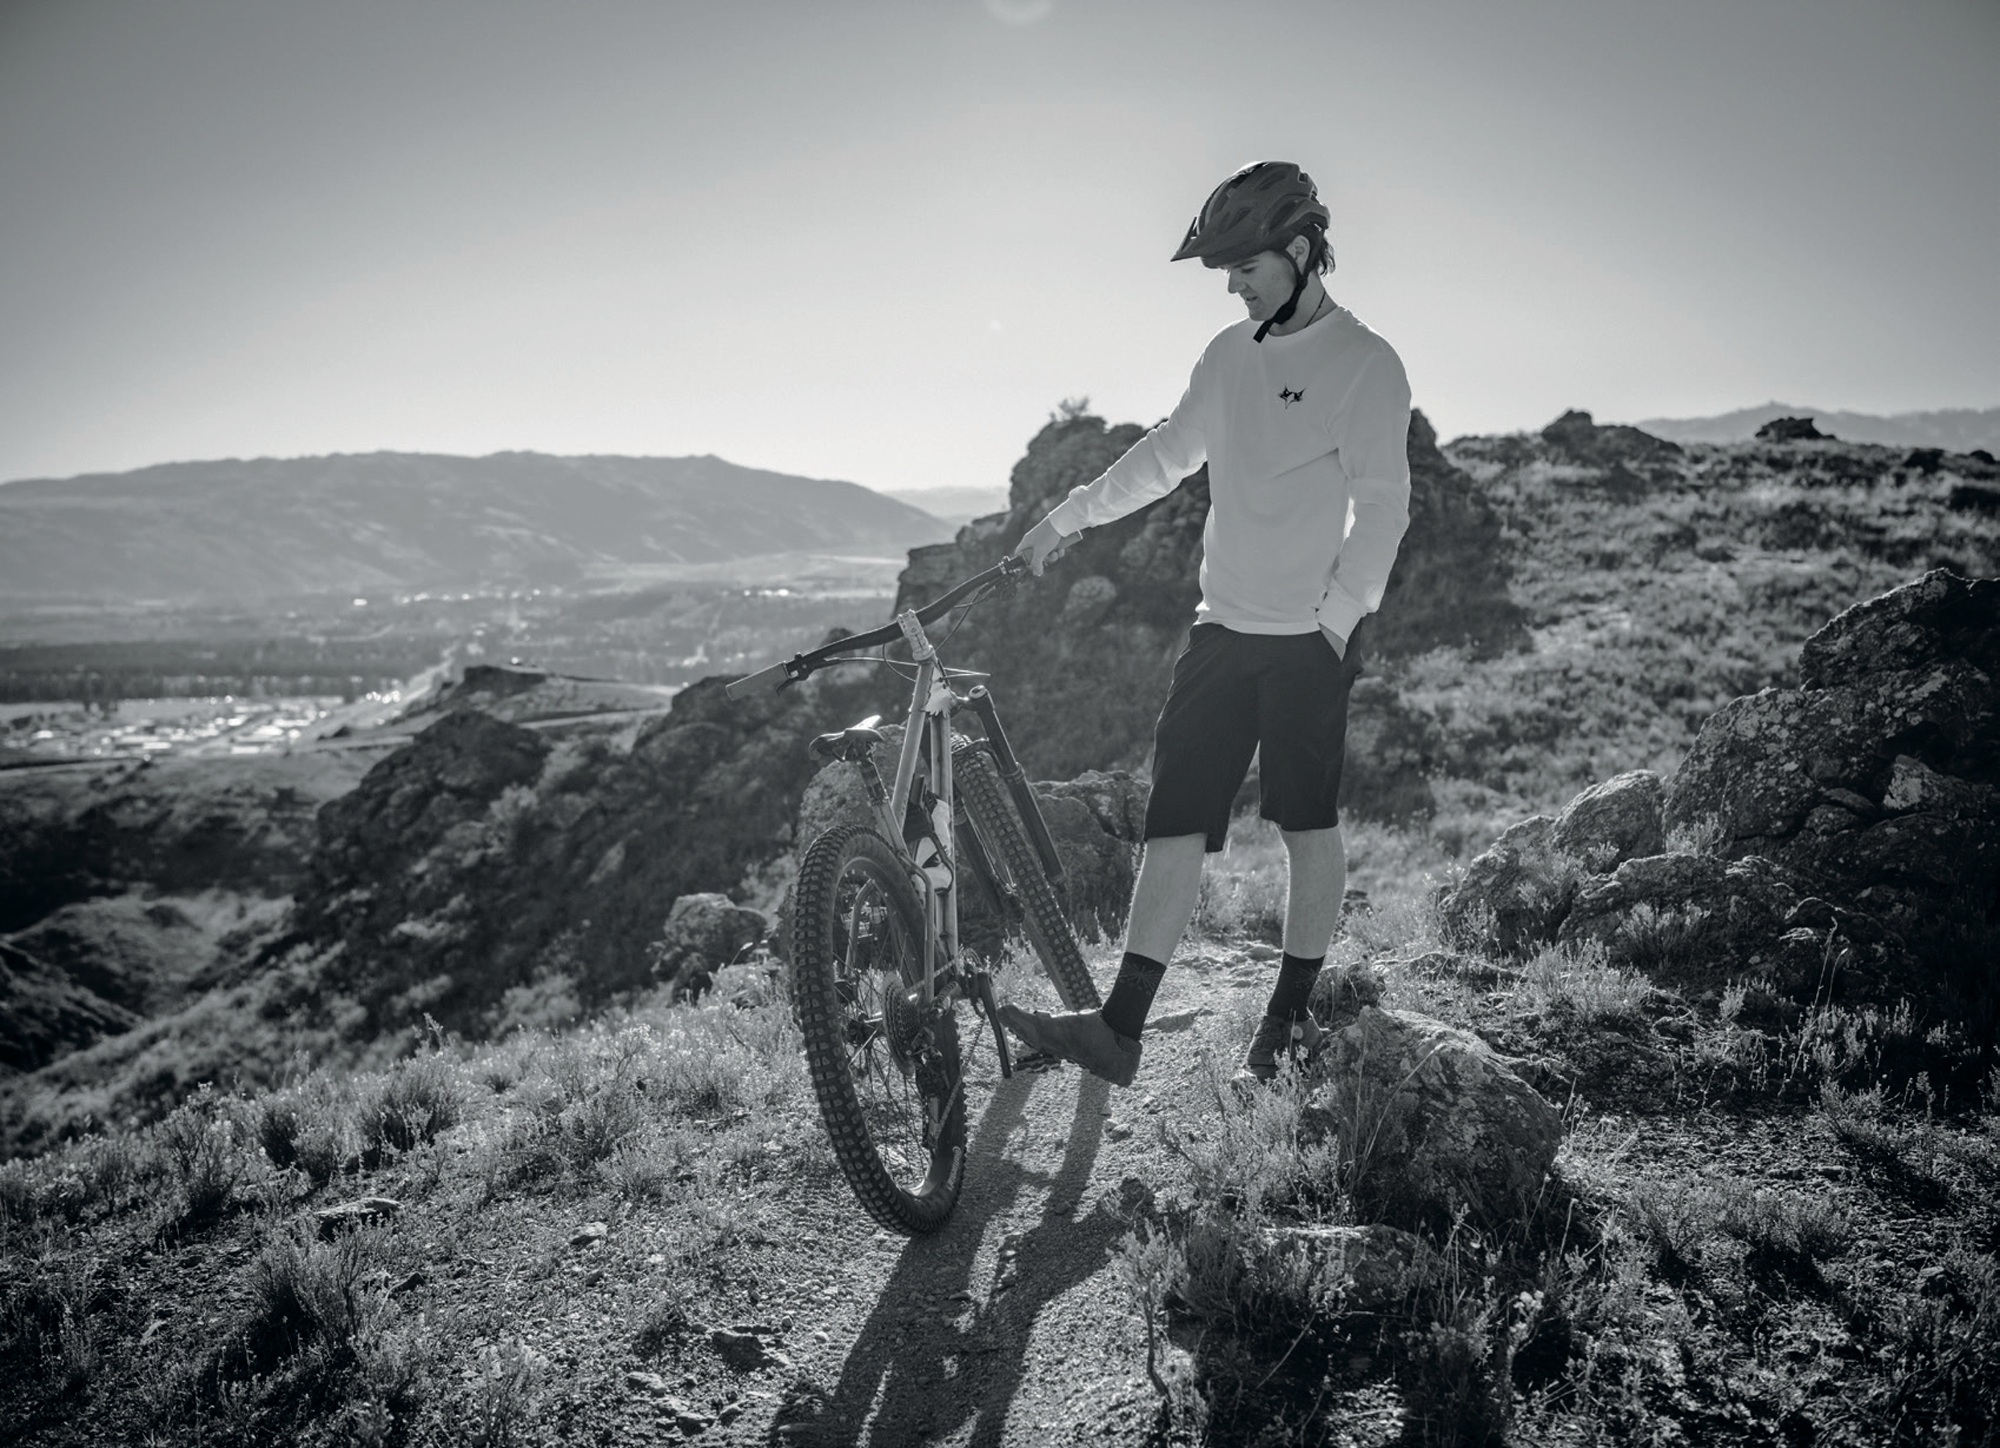
Cannondale Moterra 3
Words Lester Perry
Images Thomas Falconer
RRP $8999
Distributor Worralls
Although I’ve never owned one of their bikes, secretly, I’m a Cannondale fanboy. Cannondale has a deep, storied history as a true innovator in cycling. Particularly in their earlier years, they led the way with computer-aided design (CAD), and their unconventional suspension forks, the Headshock and the Lefty, which we still see today.
From the distinctive Flying ‘V’ frames of the early ‘90s to their short-lived motorbike division, they’ve stood out in a sea of vanilla designs. Let’s not forget NZ’s own Kashi Leuchs flew the NZ flag on a Cannondale during his glory years, across various cross-country World Cup and Olympic seasons.
The Moterra officially launched back in 2016, and although it caused a stir, that was as much due to its unique “only a mother could love” looks as anything else. It’s evolved incrementally over the years, but fortunately, this latest iteration has broken free of the lines inherited from that original beast, and we now find a far less polarising Moterra. The downside is that, from a distance, it looks somewhat like ‘just another eMTB’.
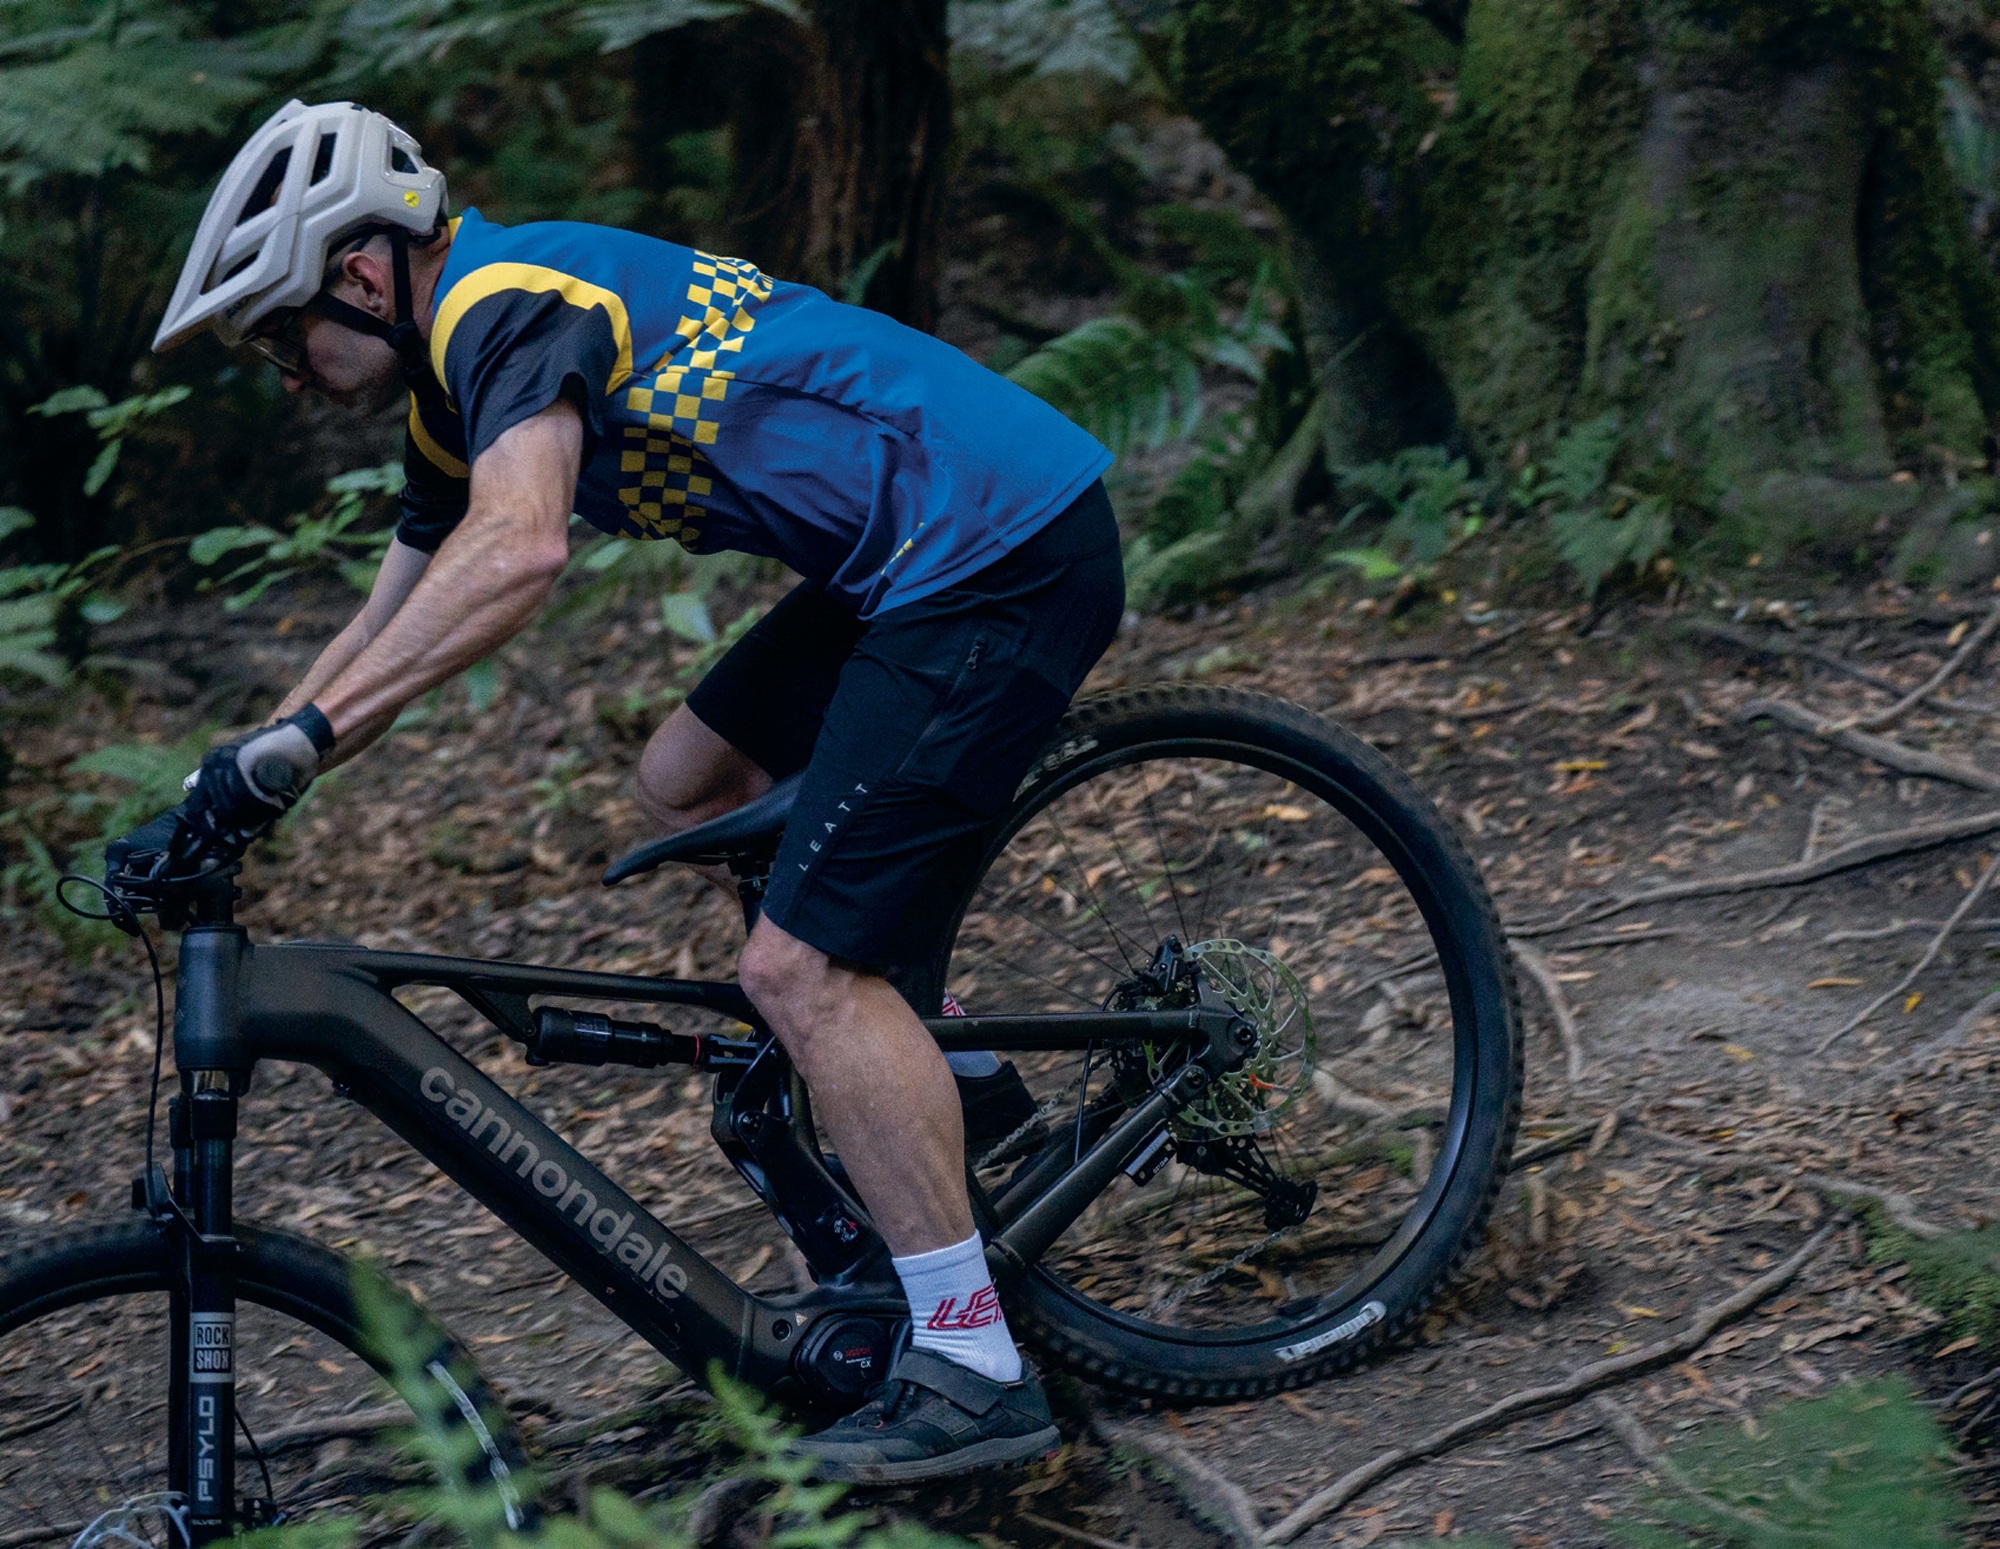
The Moterra 3 is a full 29er-wheeled bike with 150mm travel Horst-link-driven rear suspension and 160mm up front. The frame is entirely crafted from Cannondale’s SmartForm C1 Alloy with tidily finished welds and large tube shapes. There’s a gigantor-sized head tube allowing for cable routing internally through the headset.
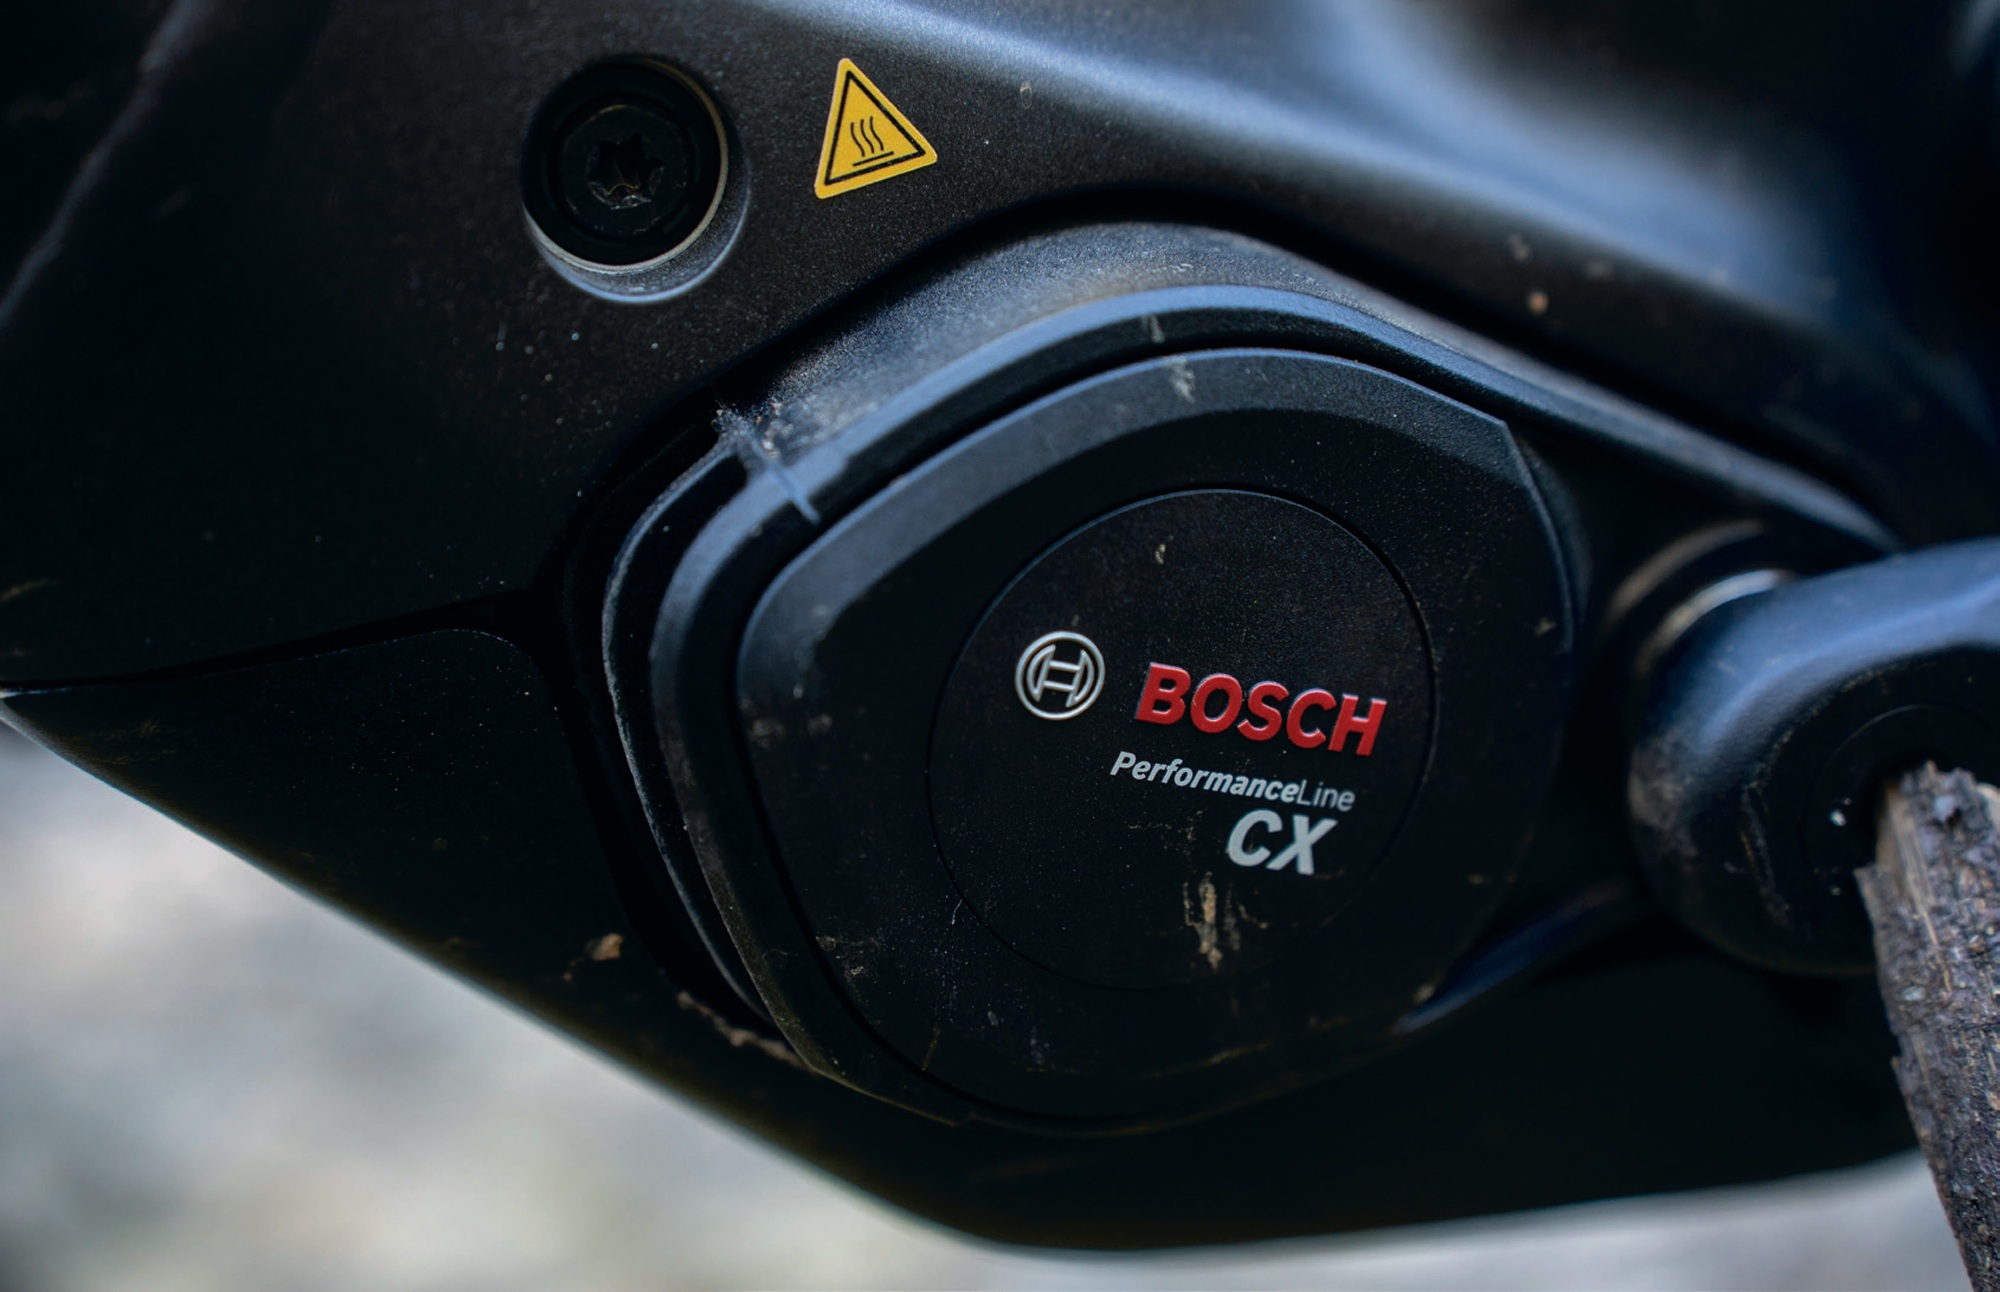
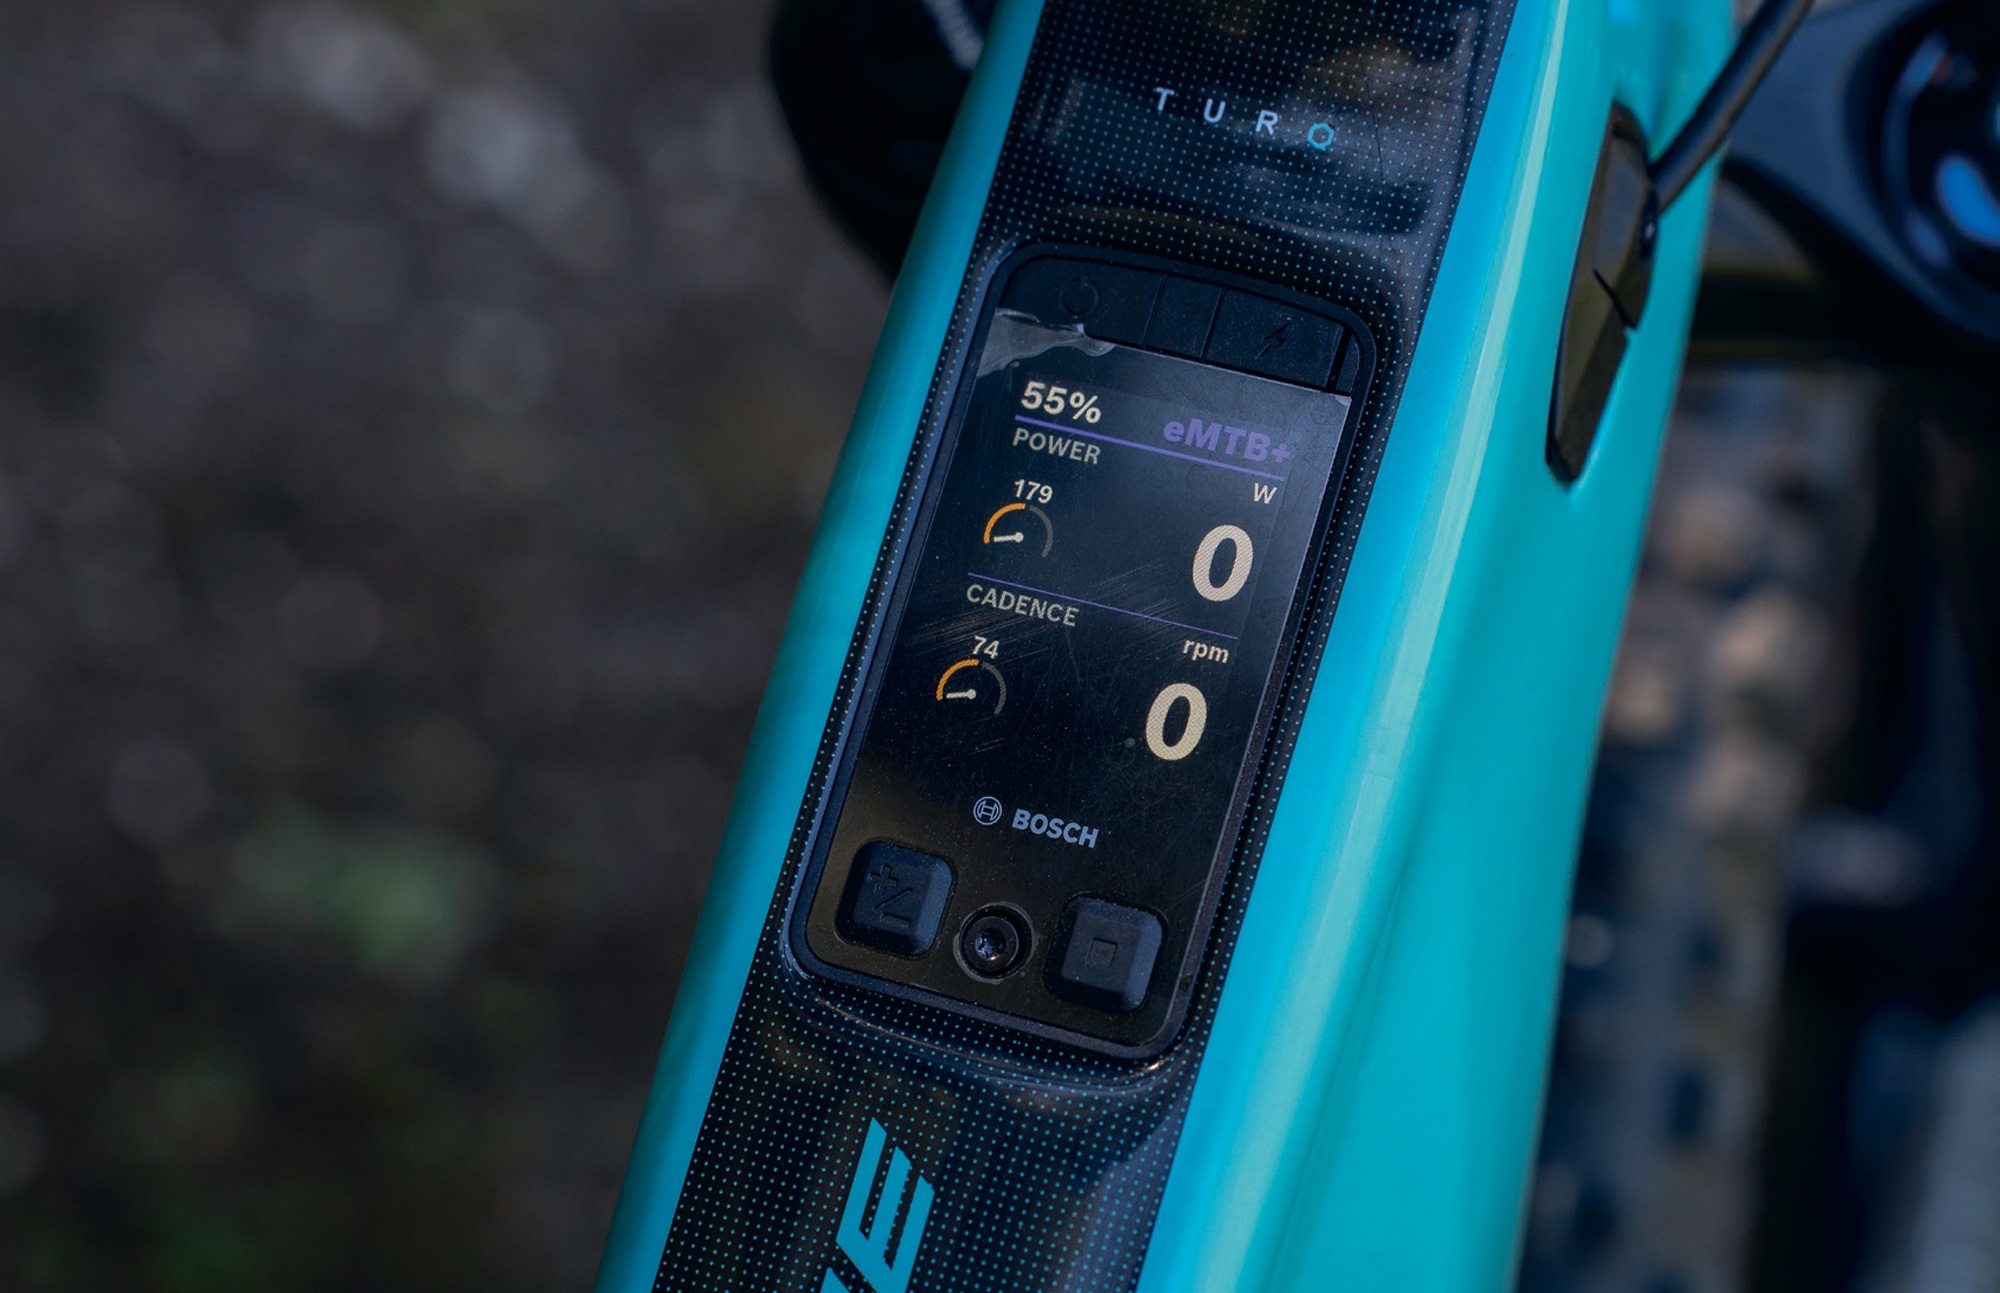
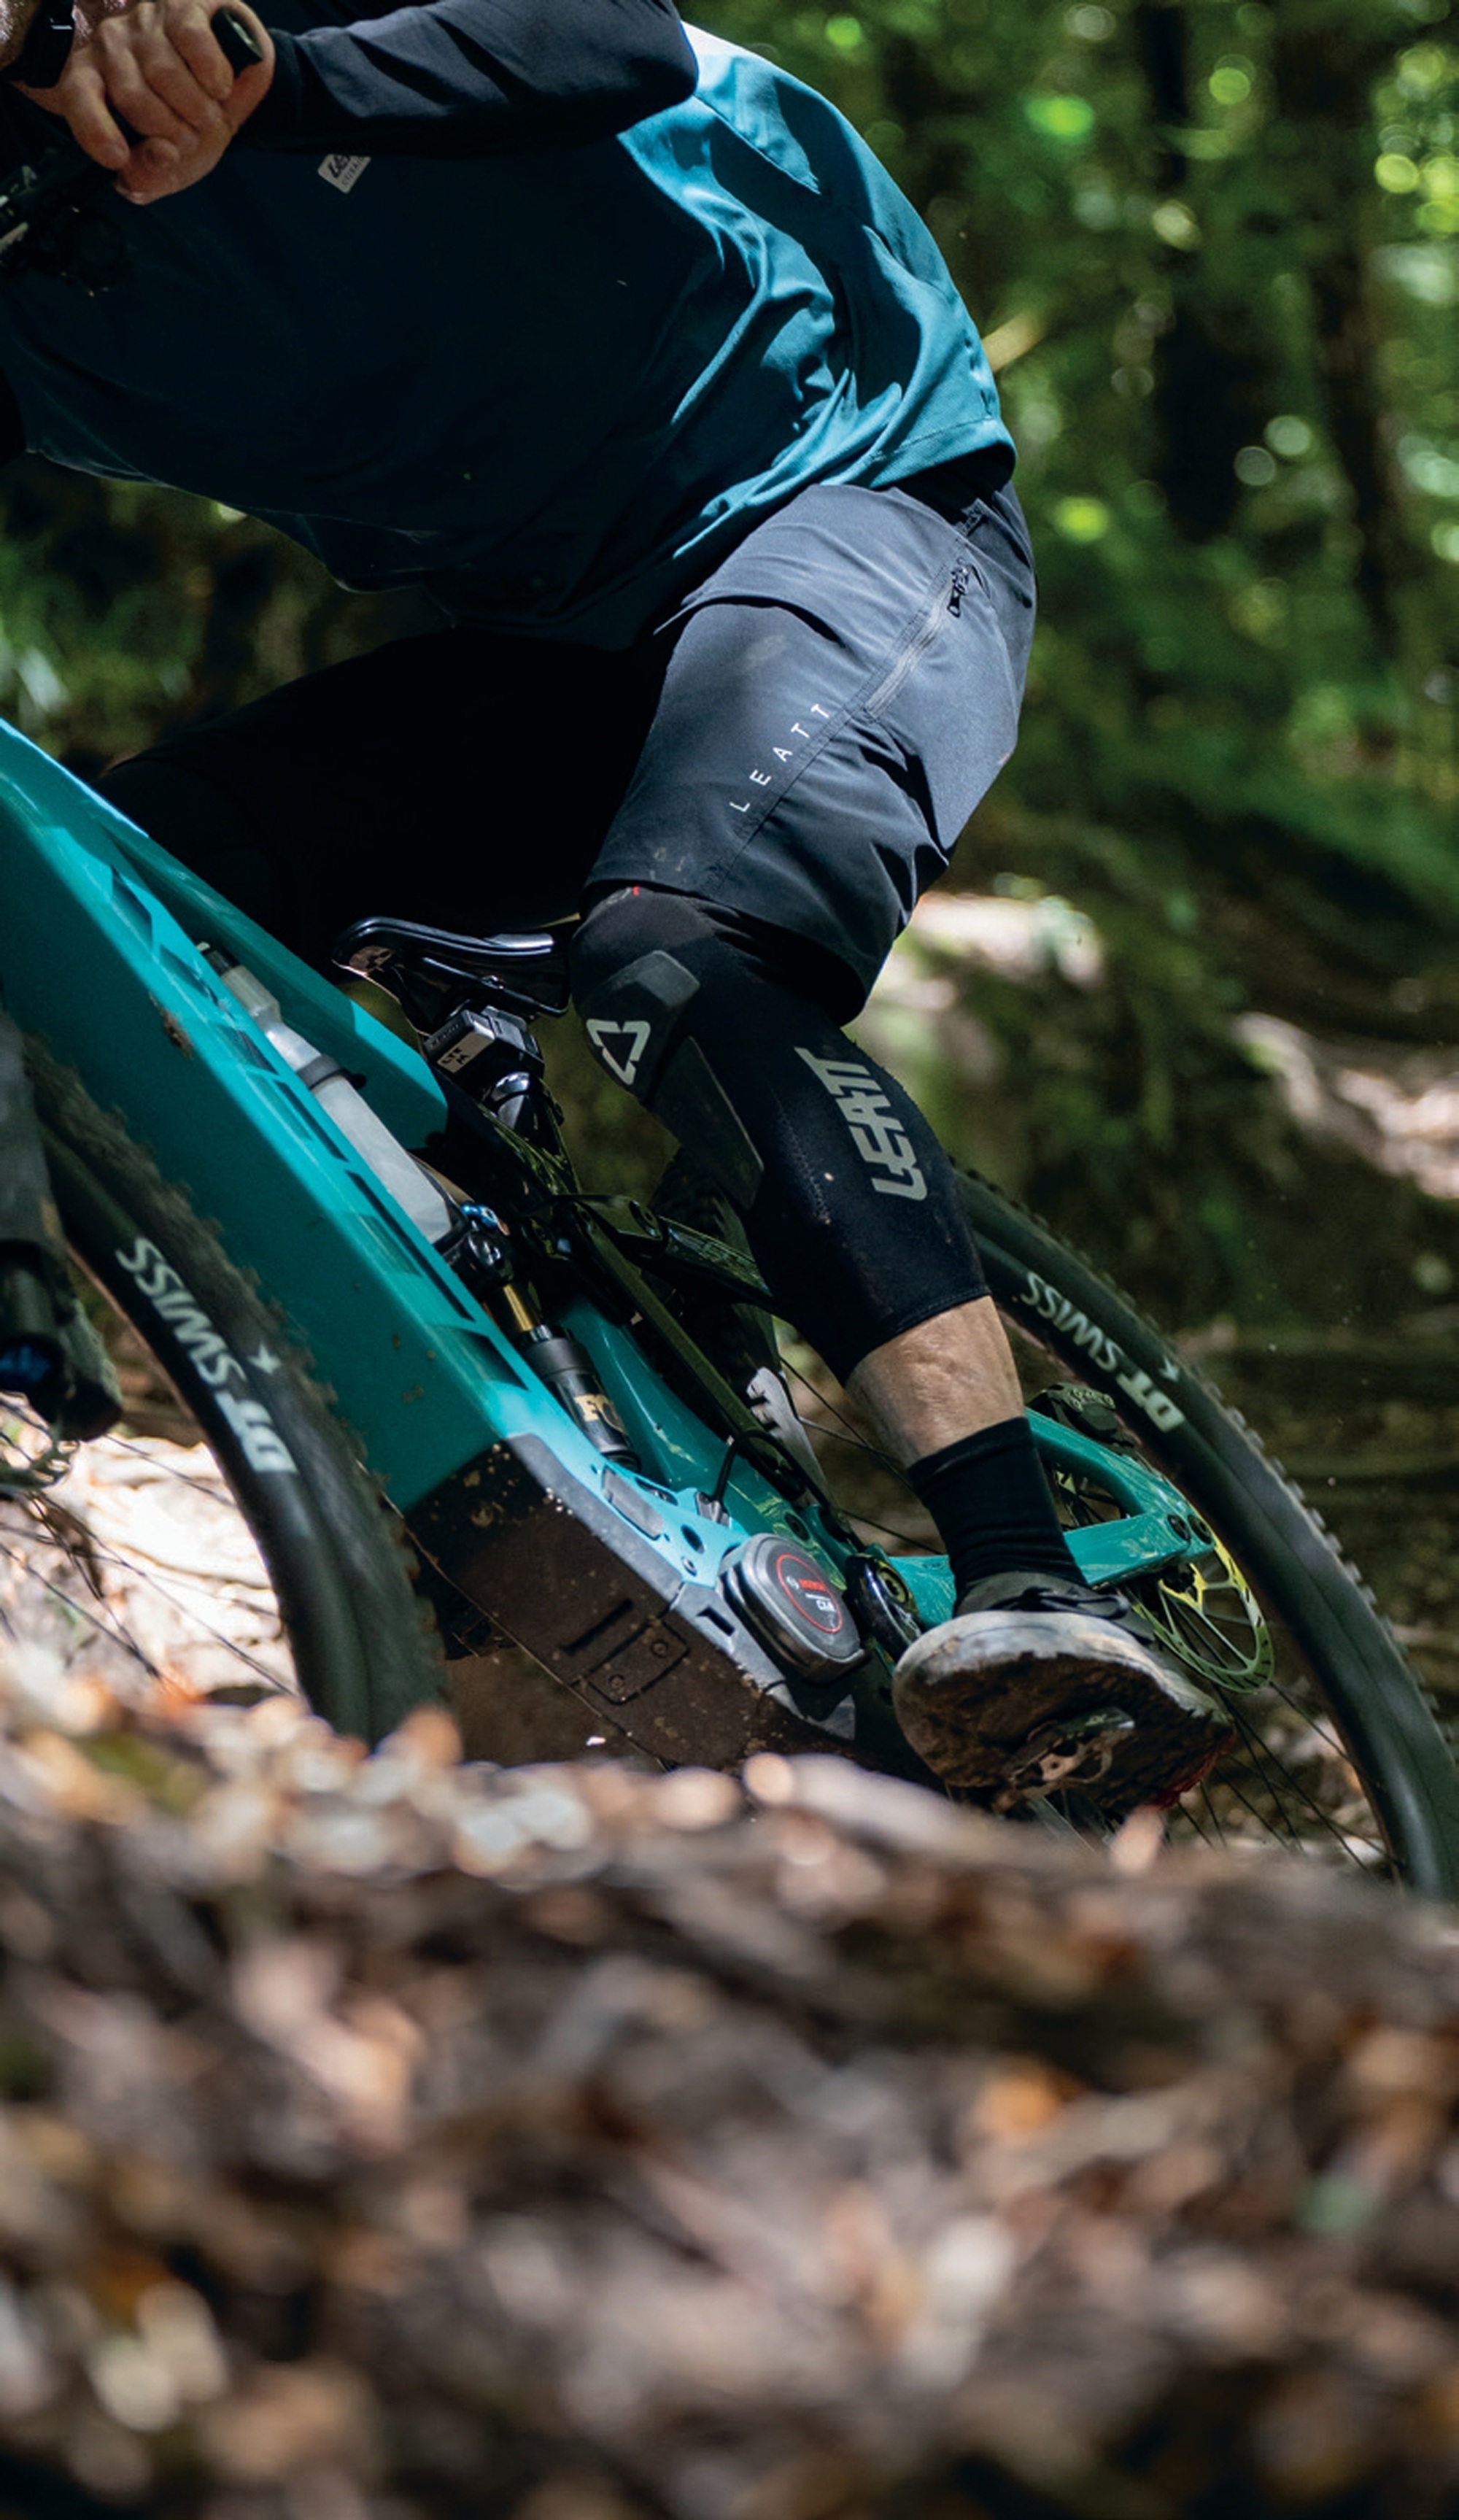
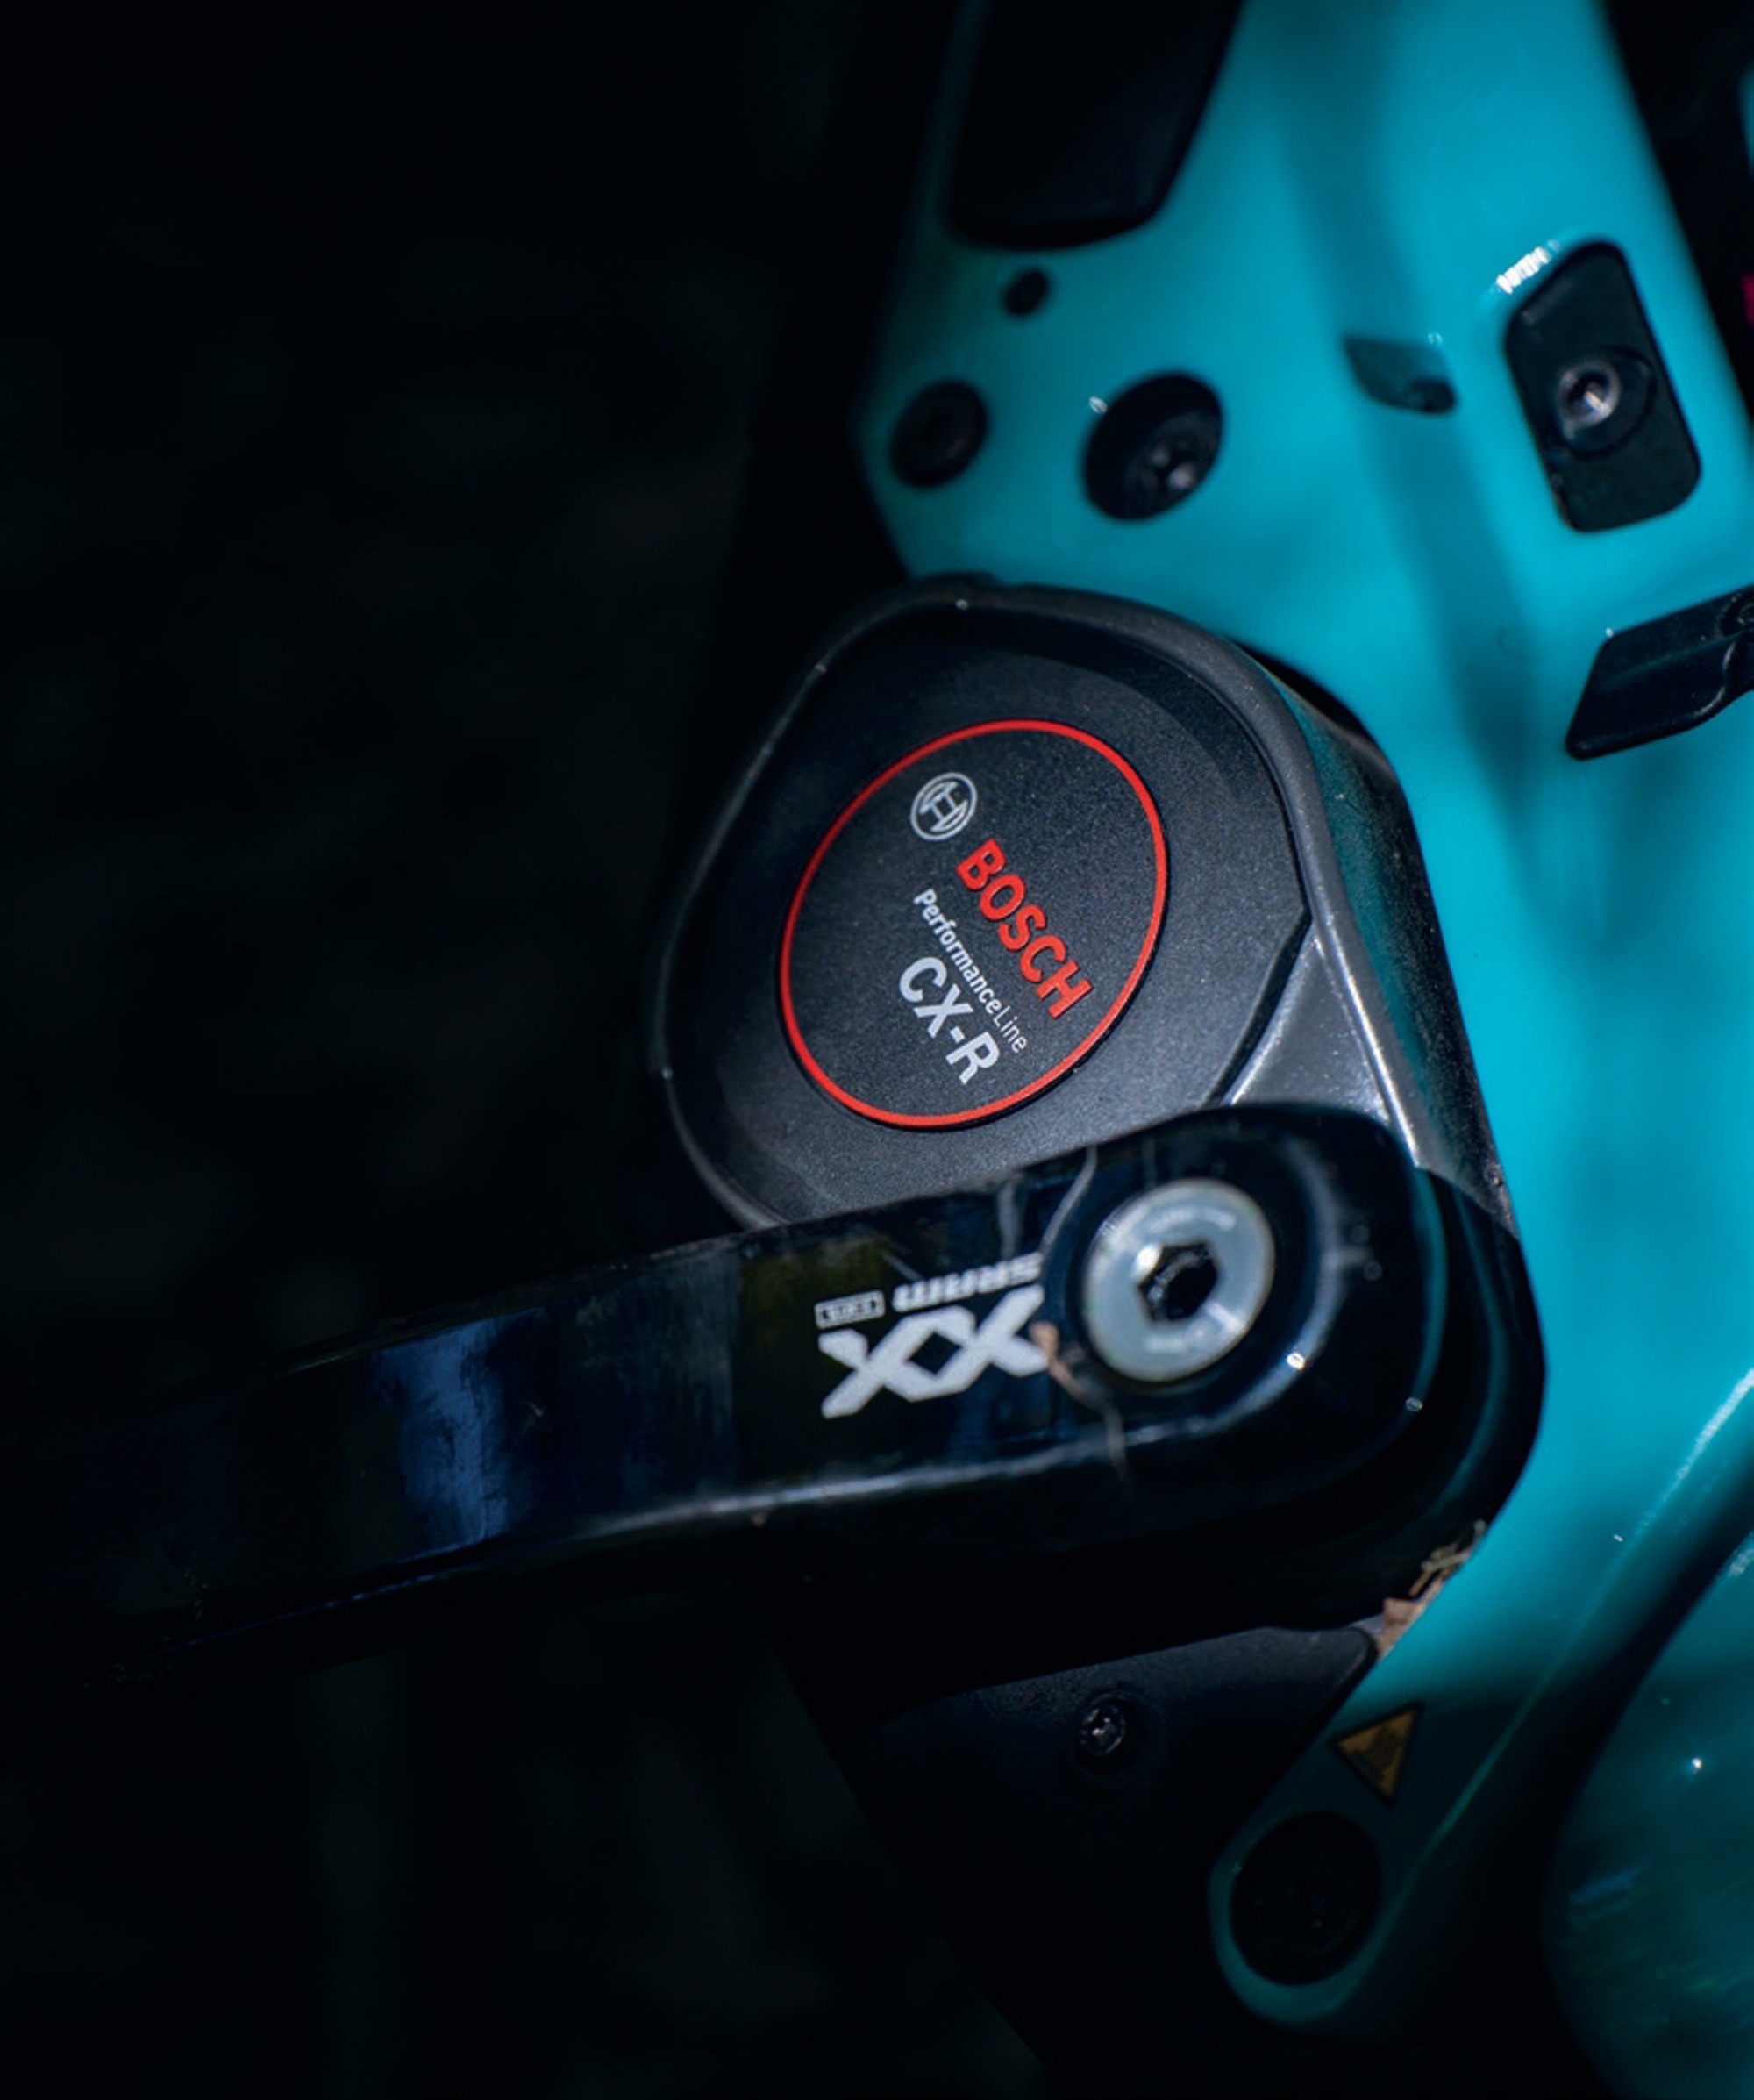
Drive is taken care of by Bosch’s Performance Line CX motor powered by an 800Wh Powertube battery. Bosch’s Purion 200 display controls the whole setup neatly from the left-hand side of the handlebar. There’s a tidy alloy skid plate protecting the motor, and even a removable kickstand mount on the non-drive chainstay – very handy while parked up on the cycle trails.
The battery is easily removable from the bottom side of the downtube. The outer cover is removed with a simple twist of a thumbscrew at the top end, then the battery can be unclipped and removed. It’s a simple task but still requires the use of the battery locking key. Thanks to this ease of battery removal, two-battery (or more) rides are a reality. For those just wanting a bit more range, a 250Wh PowerMore range extender can be added to the main drink bottle mount, for an additional 30% when added to the standard 800Wh battery.
Geometry
Key geometry figures across the Moterra don’t stray far from the norm for this type of bike:
Chainstay length
455mm to accommodate the 29” rear wheel.
Head tube angle
64.8°, perhaps a hair steeper than some similar bikes, but this helps keep handling snappy and the front wheel under you while climbing.
Seat tube angle
72.5° actual and 78.2° effective. The effective seat tube angle is steep enough, although if you run an exceptionally high seat height this will be slacker, so it’s worth sitting on the bike to see where things line up for each individual.
Reach
A 45.9cm reach is a tad shorter than some more “progressive” bikes, but again fine for this level of rig.
Stack
64.1cm. The Moterra stack is on the higher side for sure. That’s not a negative thing, though, as it means handlebars can be set lower towards the headset, with no need to have a stack of spacers or super-high-rise bars to get the cockpit set up correctly. The only downside I can see is that an increased stack generally brings with it a higher front end of the top tube and, consequently, lower standover clearance.
Drive Unit
I was pleasantly surprised at how controlled and consistent the power was. Overall it maintained traction exceptionally well. One of my test loops has a long clay climb, which, even with the slightest bit of moisture, is a challenge to clear. In damp conditions, I managed to all but clear the climb, the eMTB mode tempering the drive at the wheel to maintain a surprising level of traction. Although it still took some finesse, it was significantly easier than some other eMTBs that I’ve tackled the same climb on in equivalent conditions.
Components
Overall, the component selection on the Moterra 3 suits its price point and the riders it’s targeting. No frills here, just solid parts that should have some longevity.
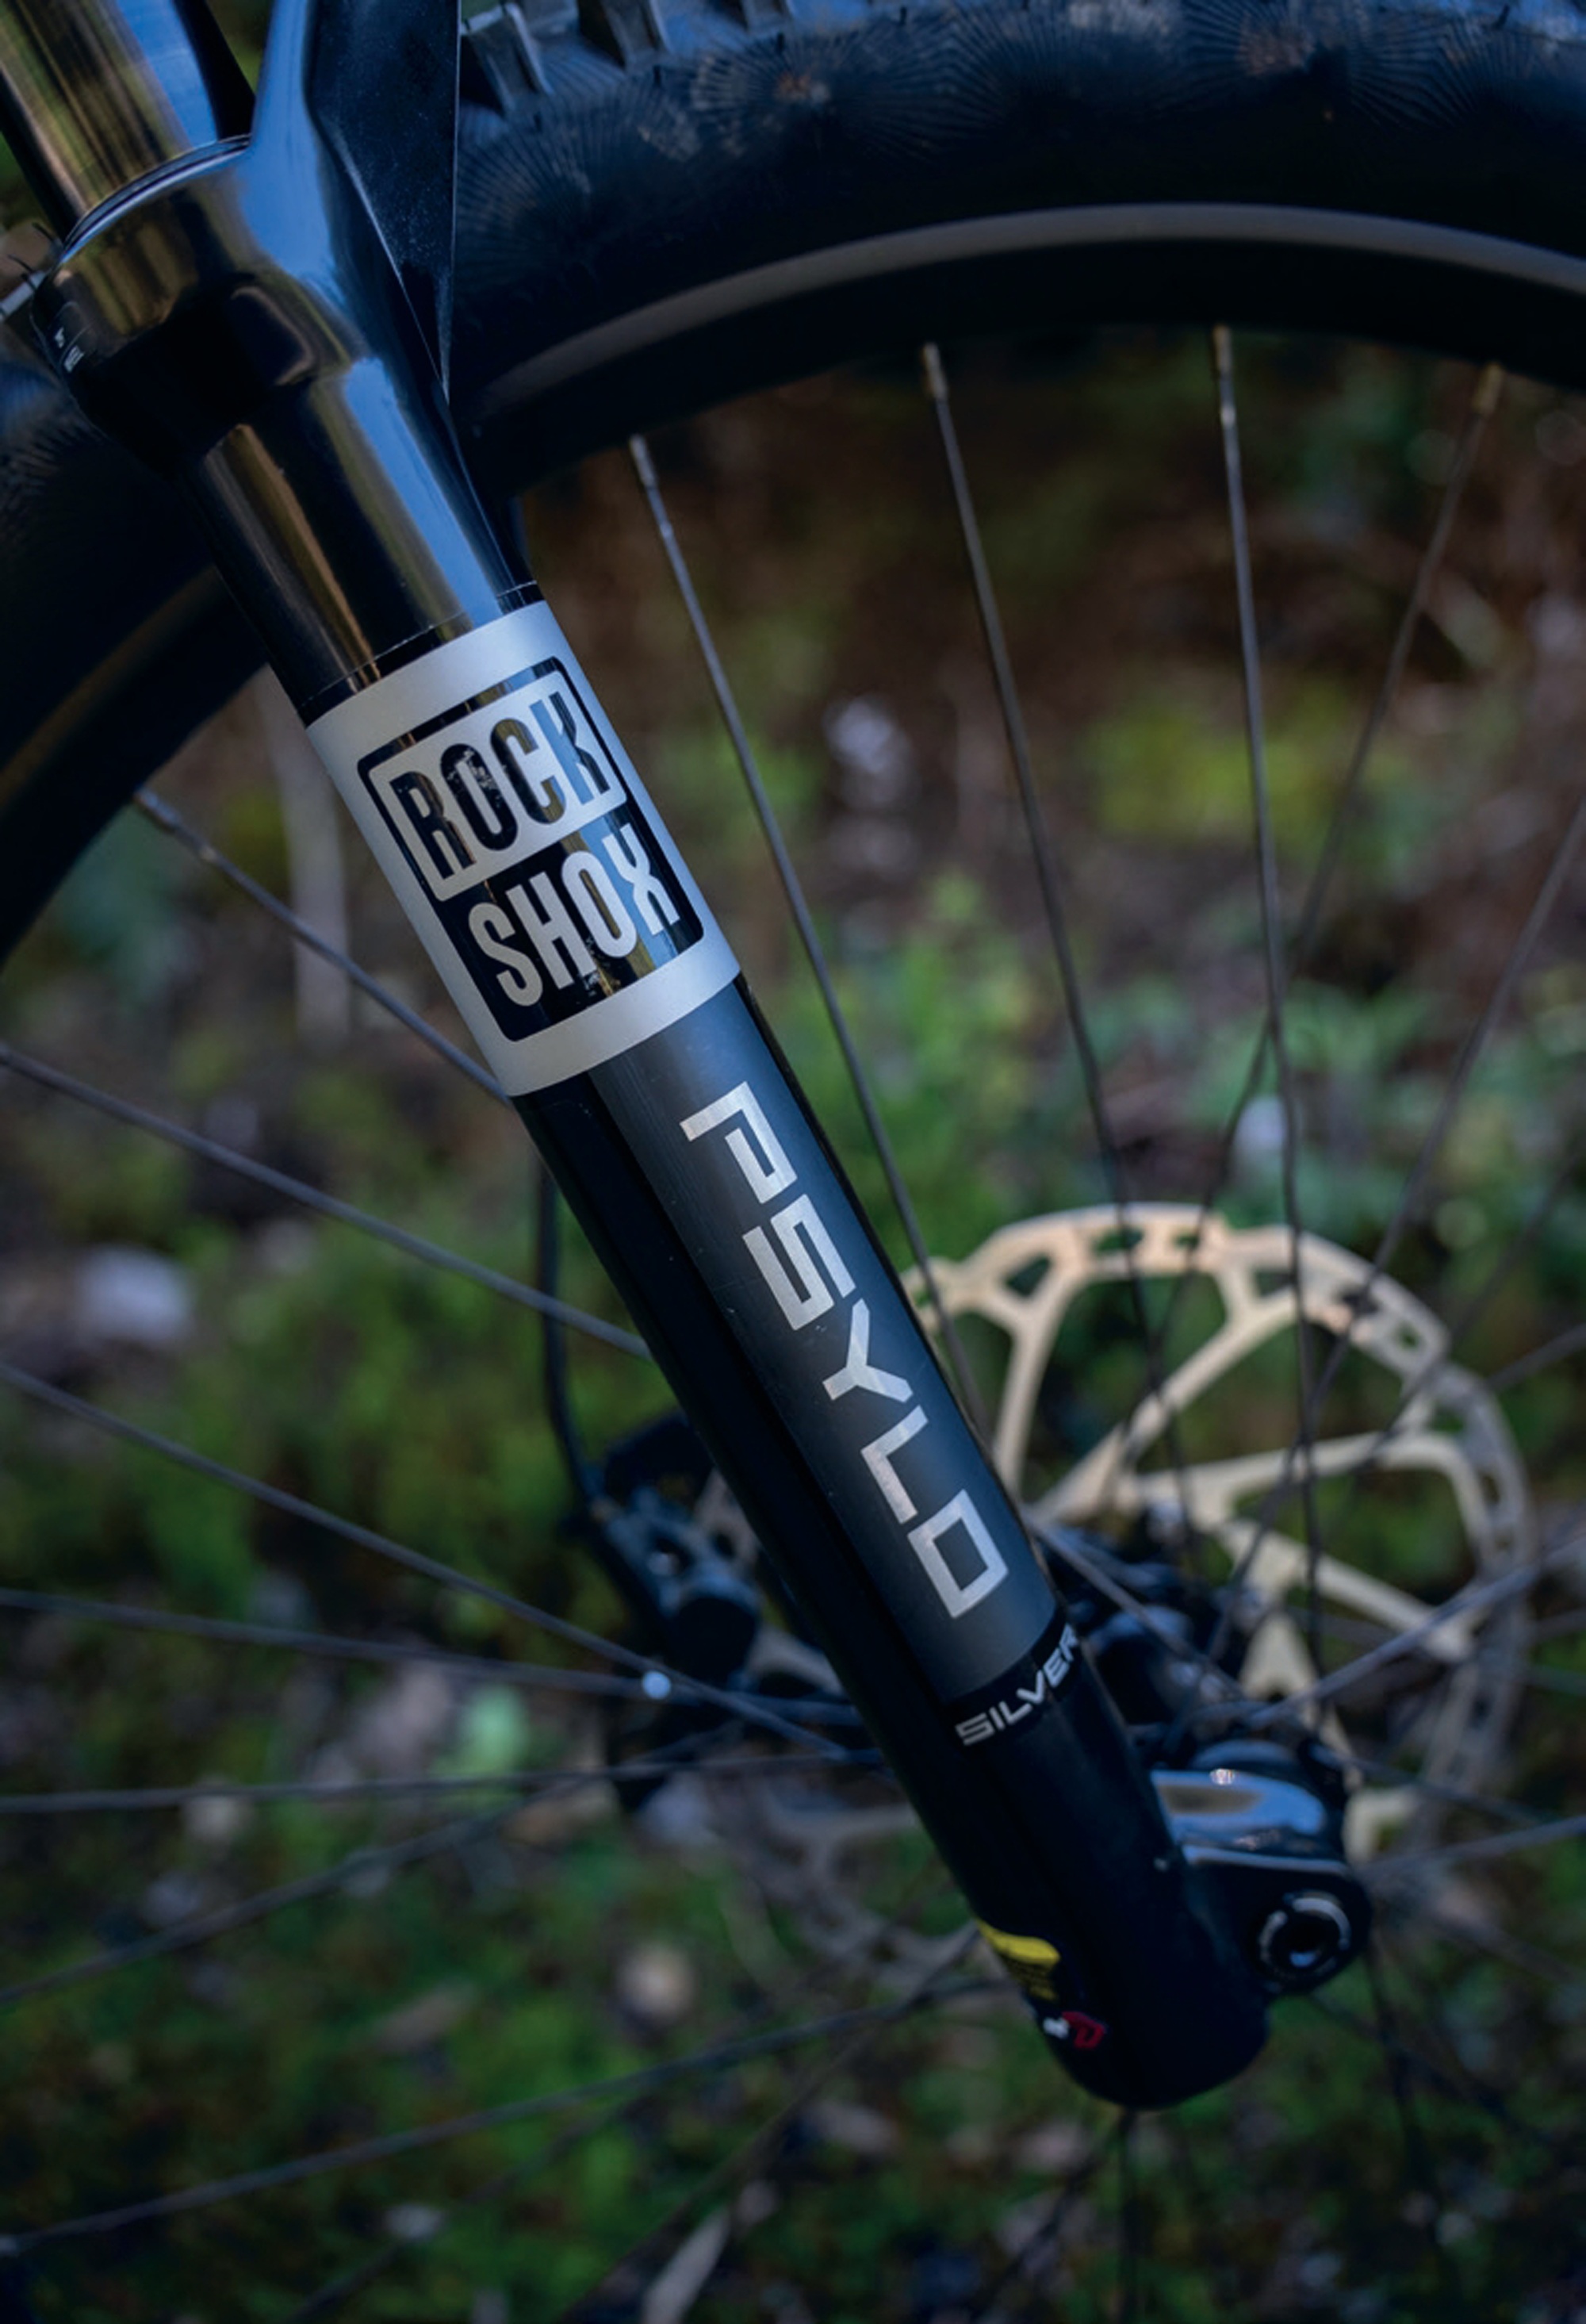
It’s been some years since RockShox ditched the Psylo fork, but it’s back! Anyone who was riding the Psylo back in the early 2000s won’t find much resemblance to this new version other than the name (probably a good thing). The Psylo range supersedes several of the lower- end RockShox forks, including the Revelation, Yari, and 35, with different Psylo models.
The Psylo Silver RC fork on the Moterra has 160mm travel and slides on 35mm stanchions. A revised motion control damper is fitted and features a simple dial for low-speed compression adjustment. RockShox claim the damper is tuned to mimic their higher-level Charger dampers. Although I wasn’t able to quantify RockShox’s claims that it felt similar to a Charger, the overall performance of the fork was better than I expected from this lower-mid-tier offering. It was plenty plush and tracked really well.
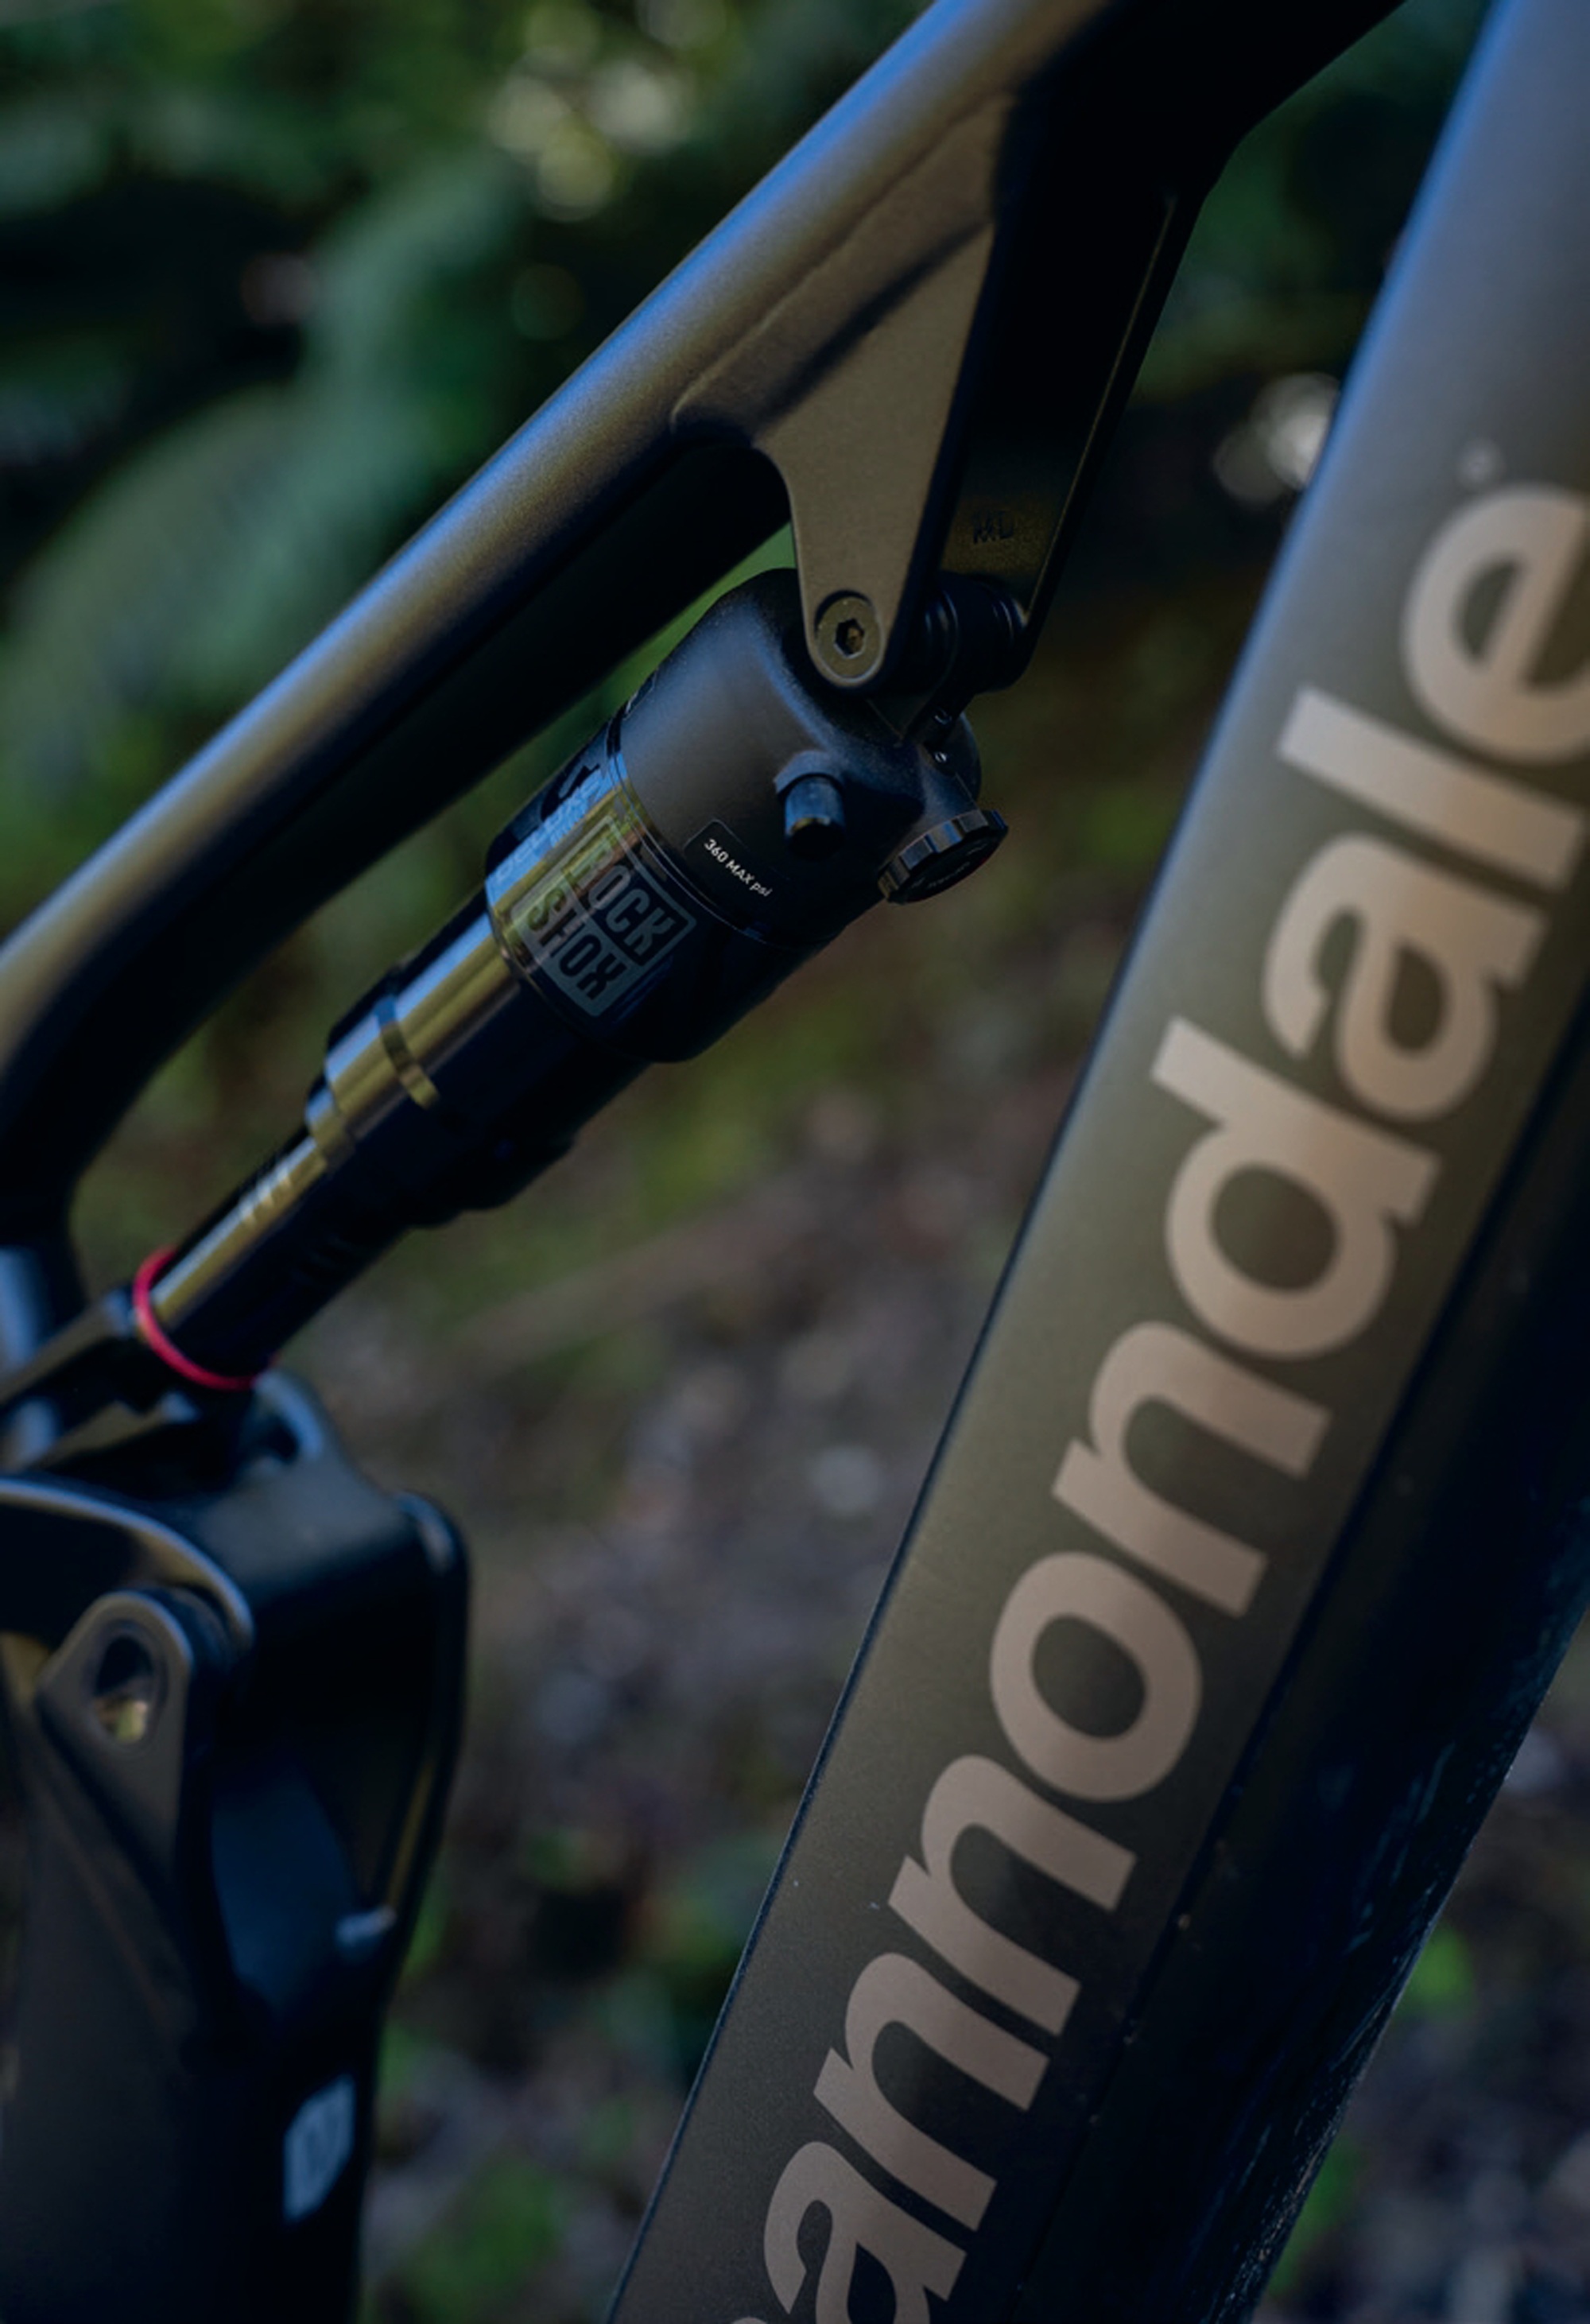
The low-speed compression knob worked fine, although I ran it more or less open at all times, and there’s plenty of rebound damping available. Again, somewhat surprisingly, the fork punched above its weight in the stiffness department; the long 35mm stanchions are obviously helped out by the stiffness of the beefy lower legs. The fork is certainly not as stiff as the larger 38mm-stanchioned Zeb, but I’d wager that it’s not dissimilar to a Lyrik when it comes to stiffness. It’s sure heavier though, around 700g depending on the level of Lyrik it’s compared to! The RockShox Deluxe Select air shock handles damping duties out back. It’s a simple shock with solely a rebound adjuster. RockShox claim the shock performs similarly to many of their higher-end units thanks to shared damper tunes. This unit just gets less adjustment and is heavier than the upper-end ones. The back end is nice and supple. It’s got a plush, linear feel and ramps up quickly at the end of the travel. There were times it would have been nice to have a bit more support to push against, and moments under heavy compression when there was a bit of uneasiness as it prepared to rebound. For most riding, though, this shock is adequate for the bike, and if a buyer wanted some extra performance, an upgraded shock could be a good place to start.
The Shimano MT501 brakes with 203mm rotors front and rear are decent. They’re not the most powerful brakes out there, but they’re cost- effective and offer ample stopping power, considering they’re a base-model brake.
The bike rolls on a WTB i30 wheelset. It’s nothing flashy, but if other WTB wheelsets I’ve used long term are anything to go by, they’re pretty durable. They won’t love being cased onto rocks, but neither do a set of $3000 carbon hoops!
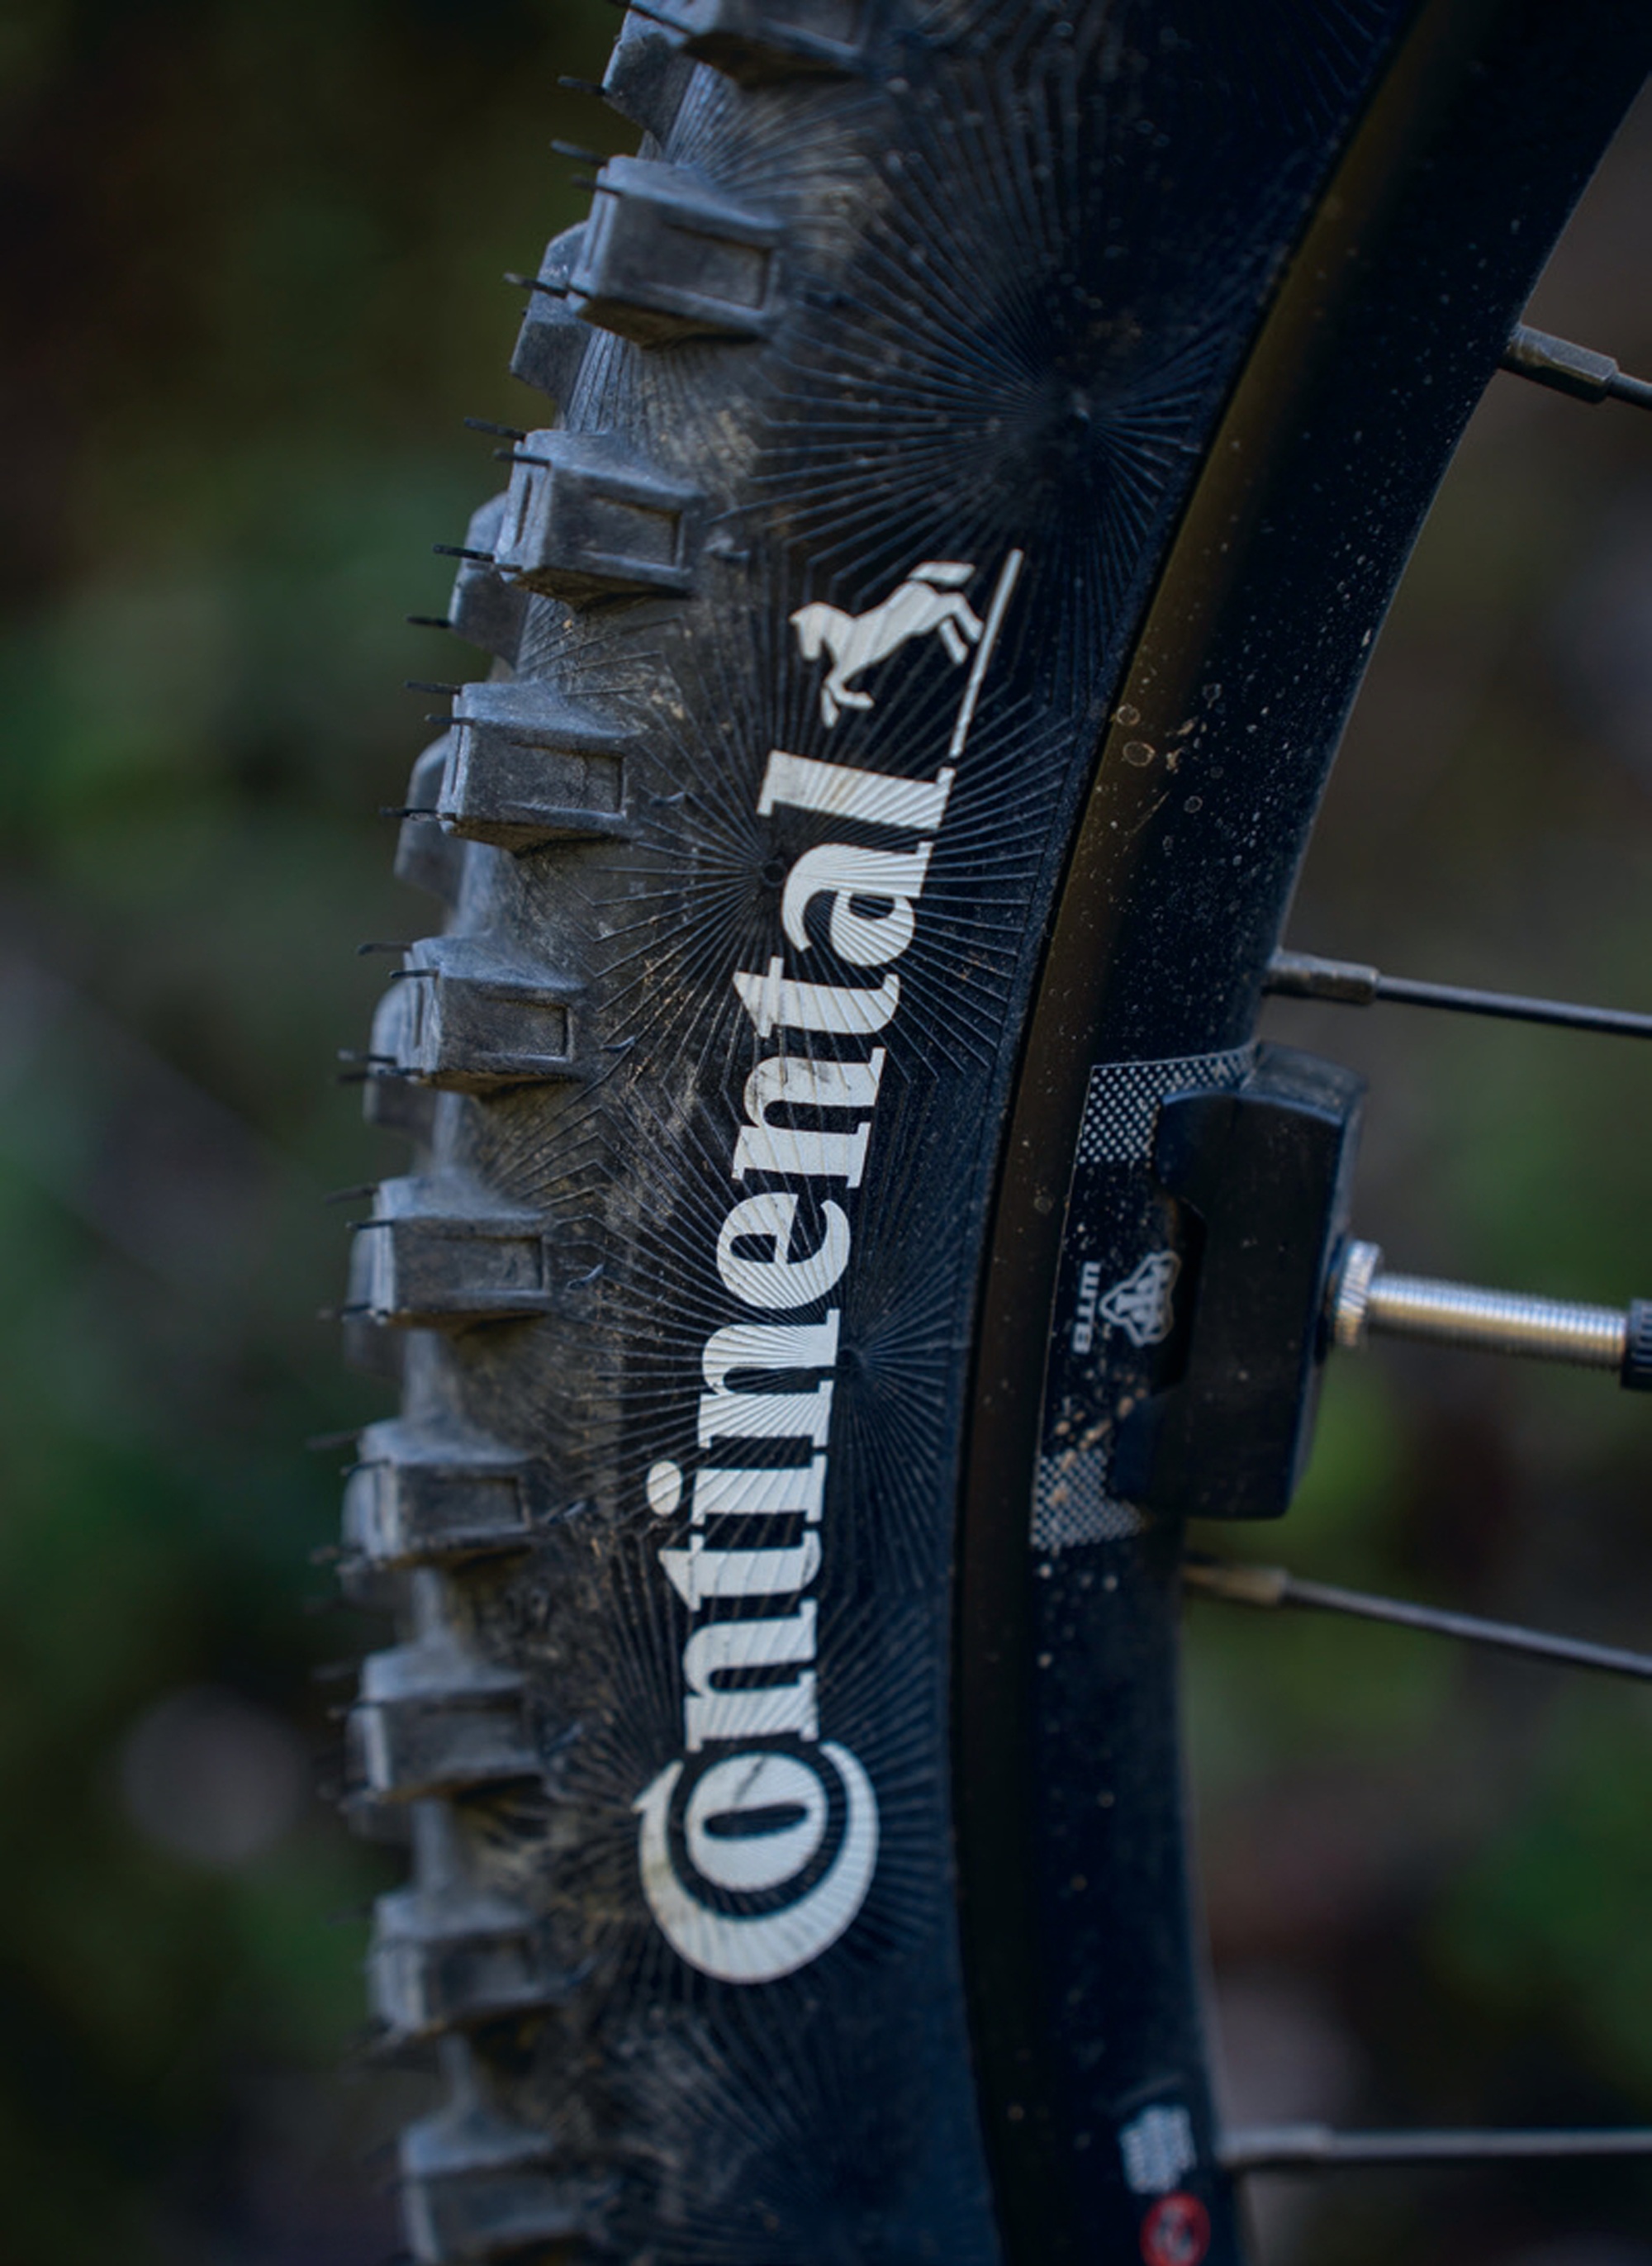
Continental Kryptotal tyres are featured front and rear in a 29” x 2.4” size. The Enduro casing offers protection against punctures and a level of support against being too squirmy underneath while railing turns or g-outs. The soft compound rubber rolls surprisingly well, and from what I’ve heard from friends, wears exceptionally compared to other soft compounds in the market. Traction was awesome across the board, although something with more spaced knobs may be preferred in really soft, wet conditions. The Enduro casings were okay, but I think long term, once these treads were worn, a move to some gravity casing tyres of the same model would offer more support, and even better puncture resistance.
The cranks are a nice short pair of FSA brand 160mm length with a 34t chainring. Nothing to sniff at here, I’m a big fan of 160mm cranks on an eMTB.
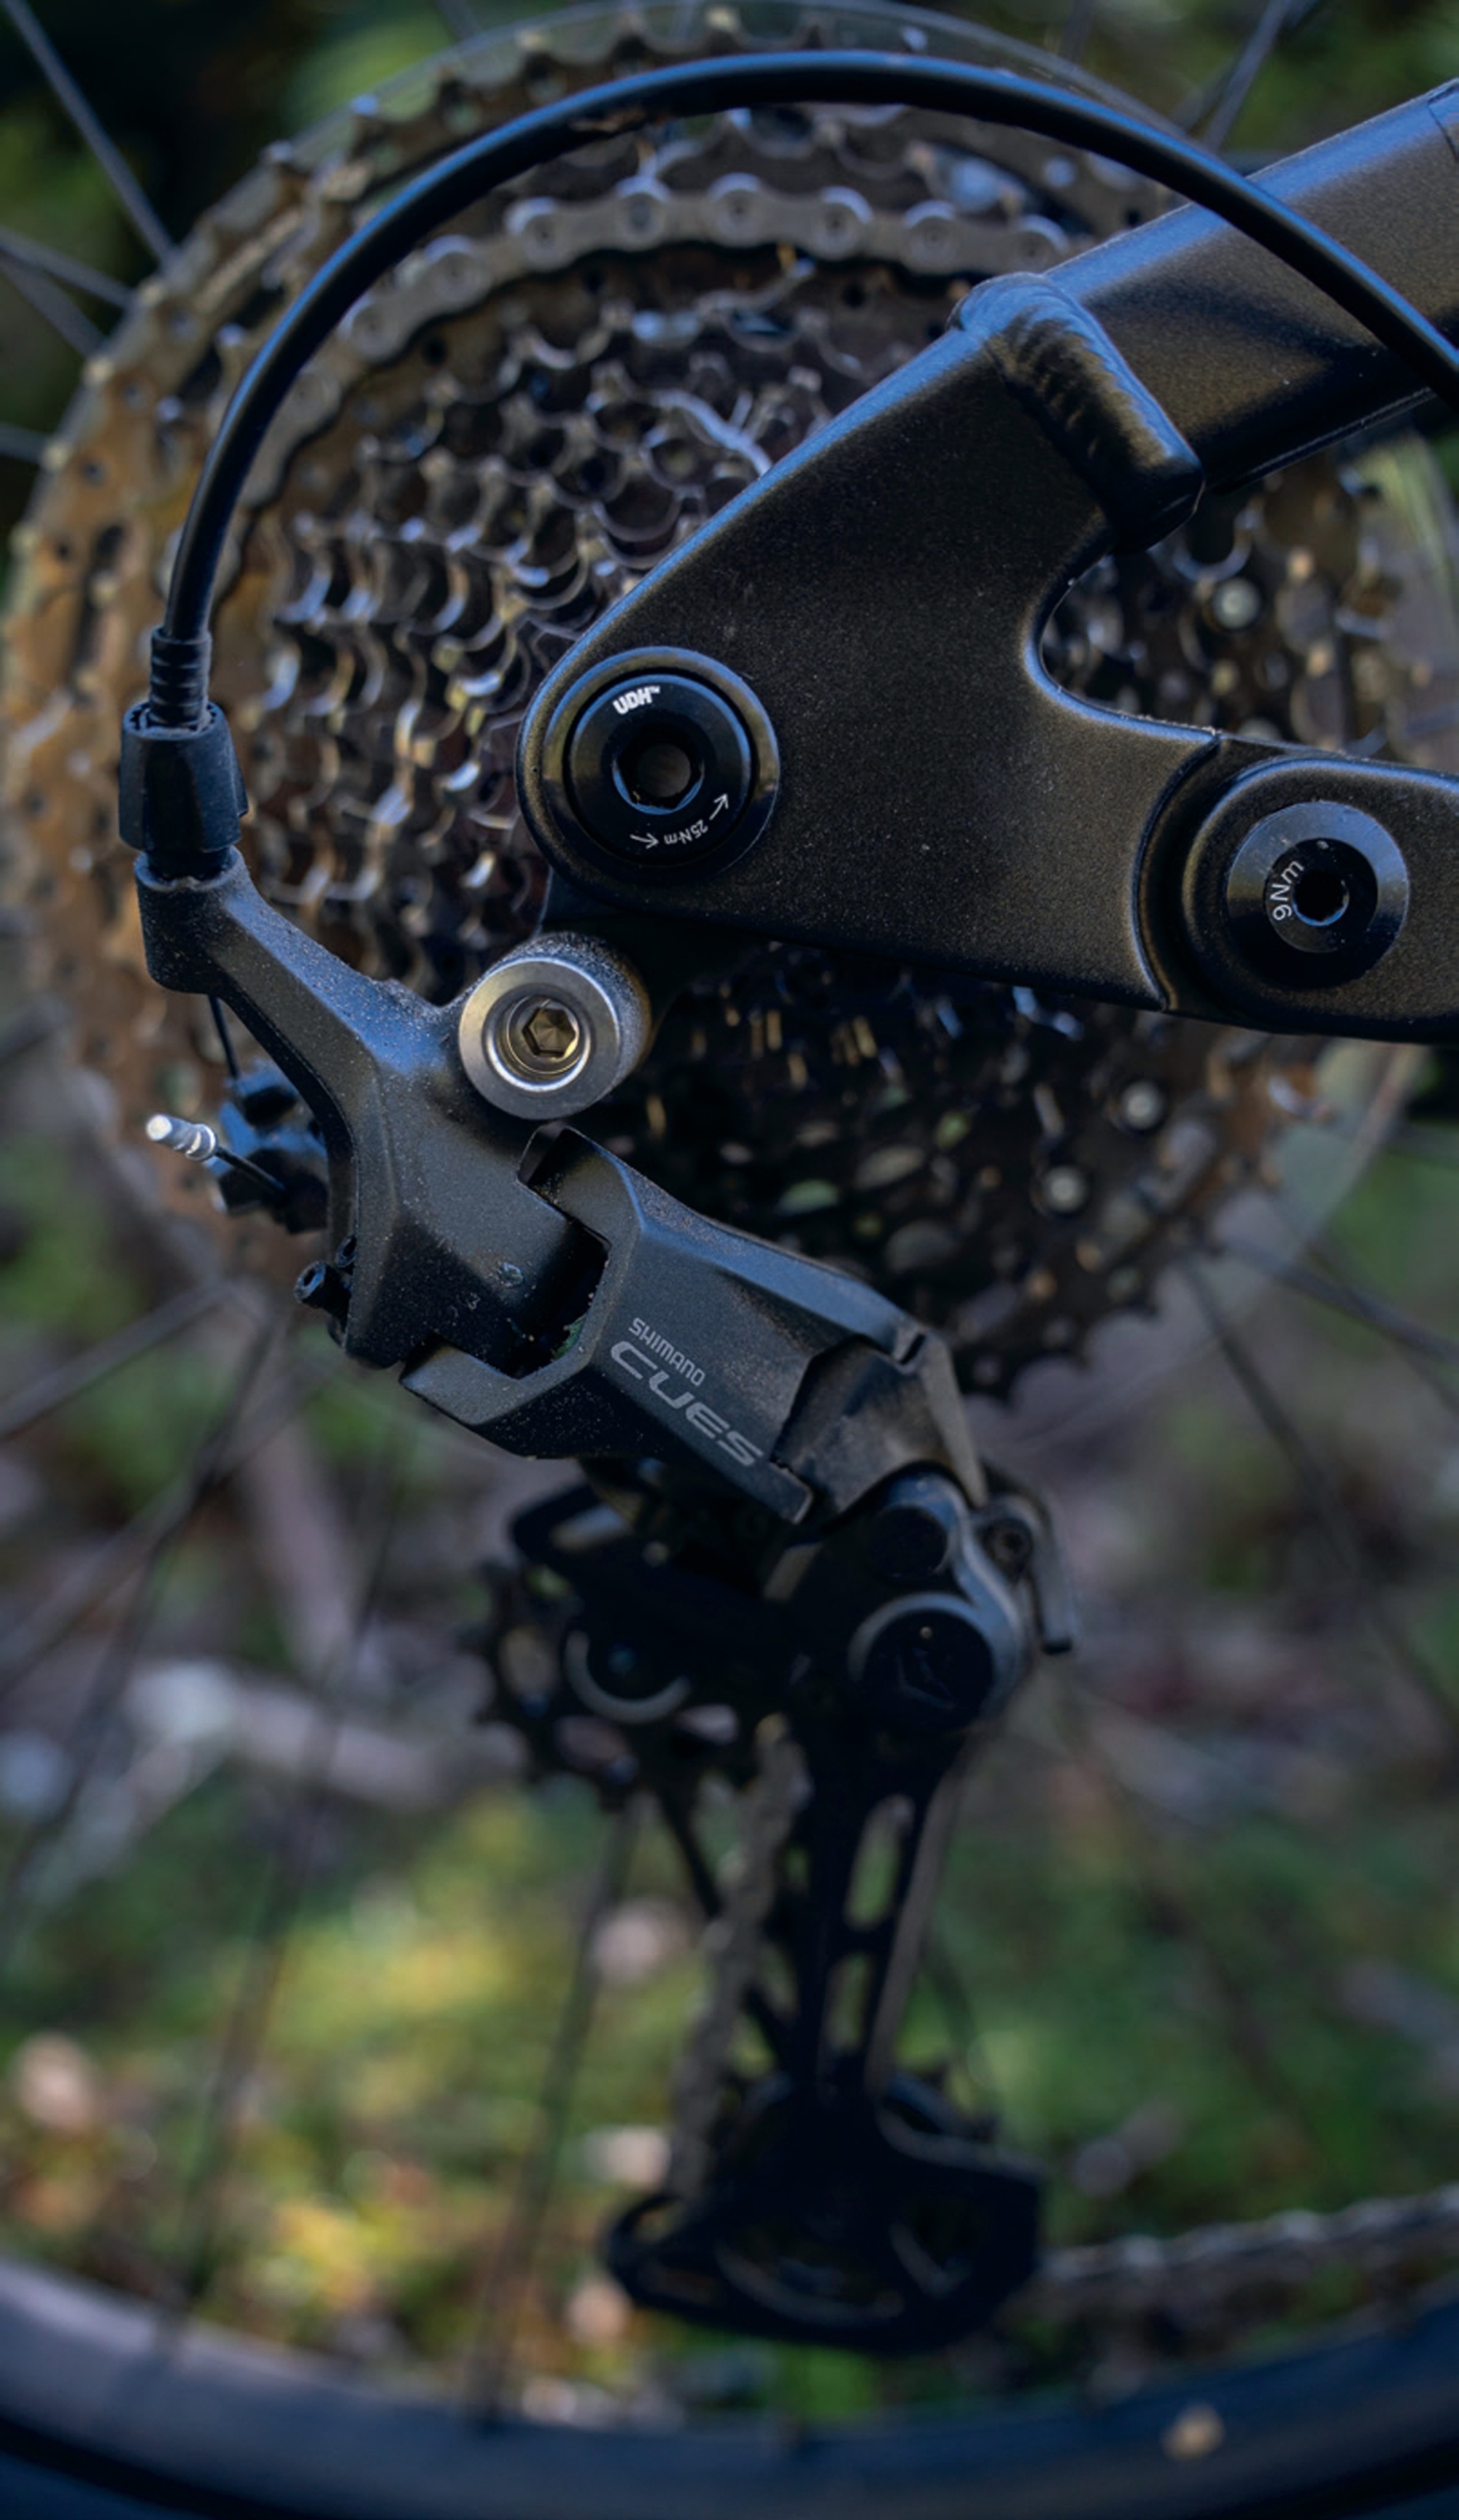
The drivetrain features a mechanical 11-speed Shimano CUES U6000, LinkGlide derailleur and shifter, coupled with an LG500, LinkGlide chain and Shimano CUES LG400, LinkGlide, 11-50 cassette. It’s got an almost yawn-inducing level of personality to it, but it’s been admirable to say the least, and the shift quality over my test period has been great. LinkGlide is claimed to last really well on eBikes. Like the rest of the bike, this drivetrain isn’t light, and again, it’s a place for easy long-term upgrades.
The finishing kit is from Cannondale’s in- house brands, with a WTB saddle. A pretty bog-standard 35mm handlebar and stem help keep you pointed in the right direction, and the dropper post is aptly long at 170mm drop on the medium bike. As usual, a longer after-market drop could be found, but as an original unit goes, this suits the bike well and works a charm.
On the trail
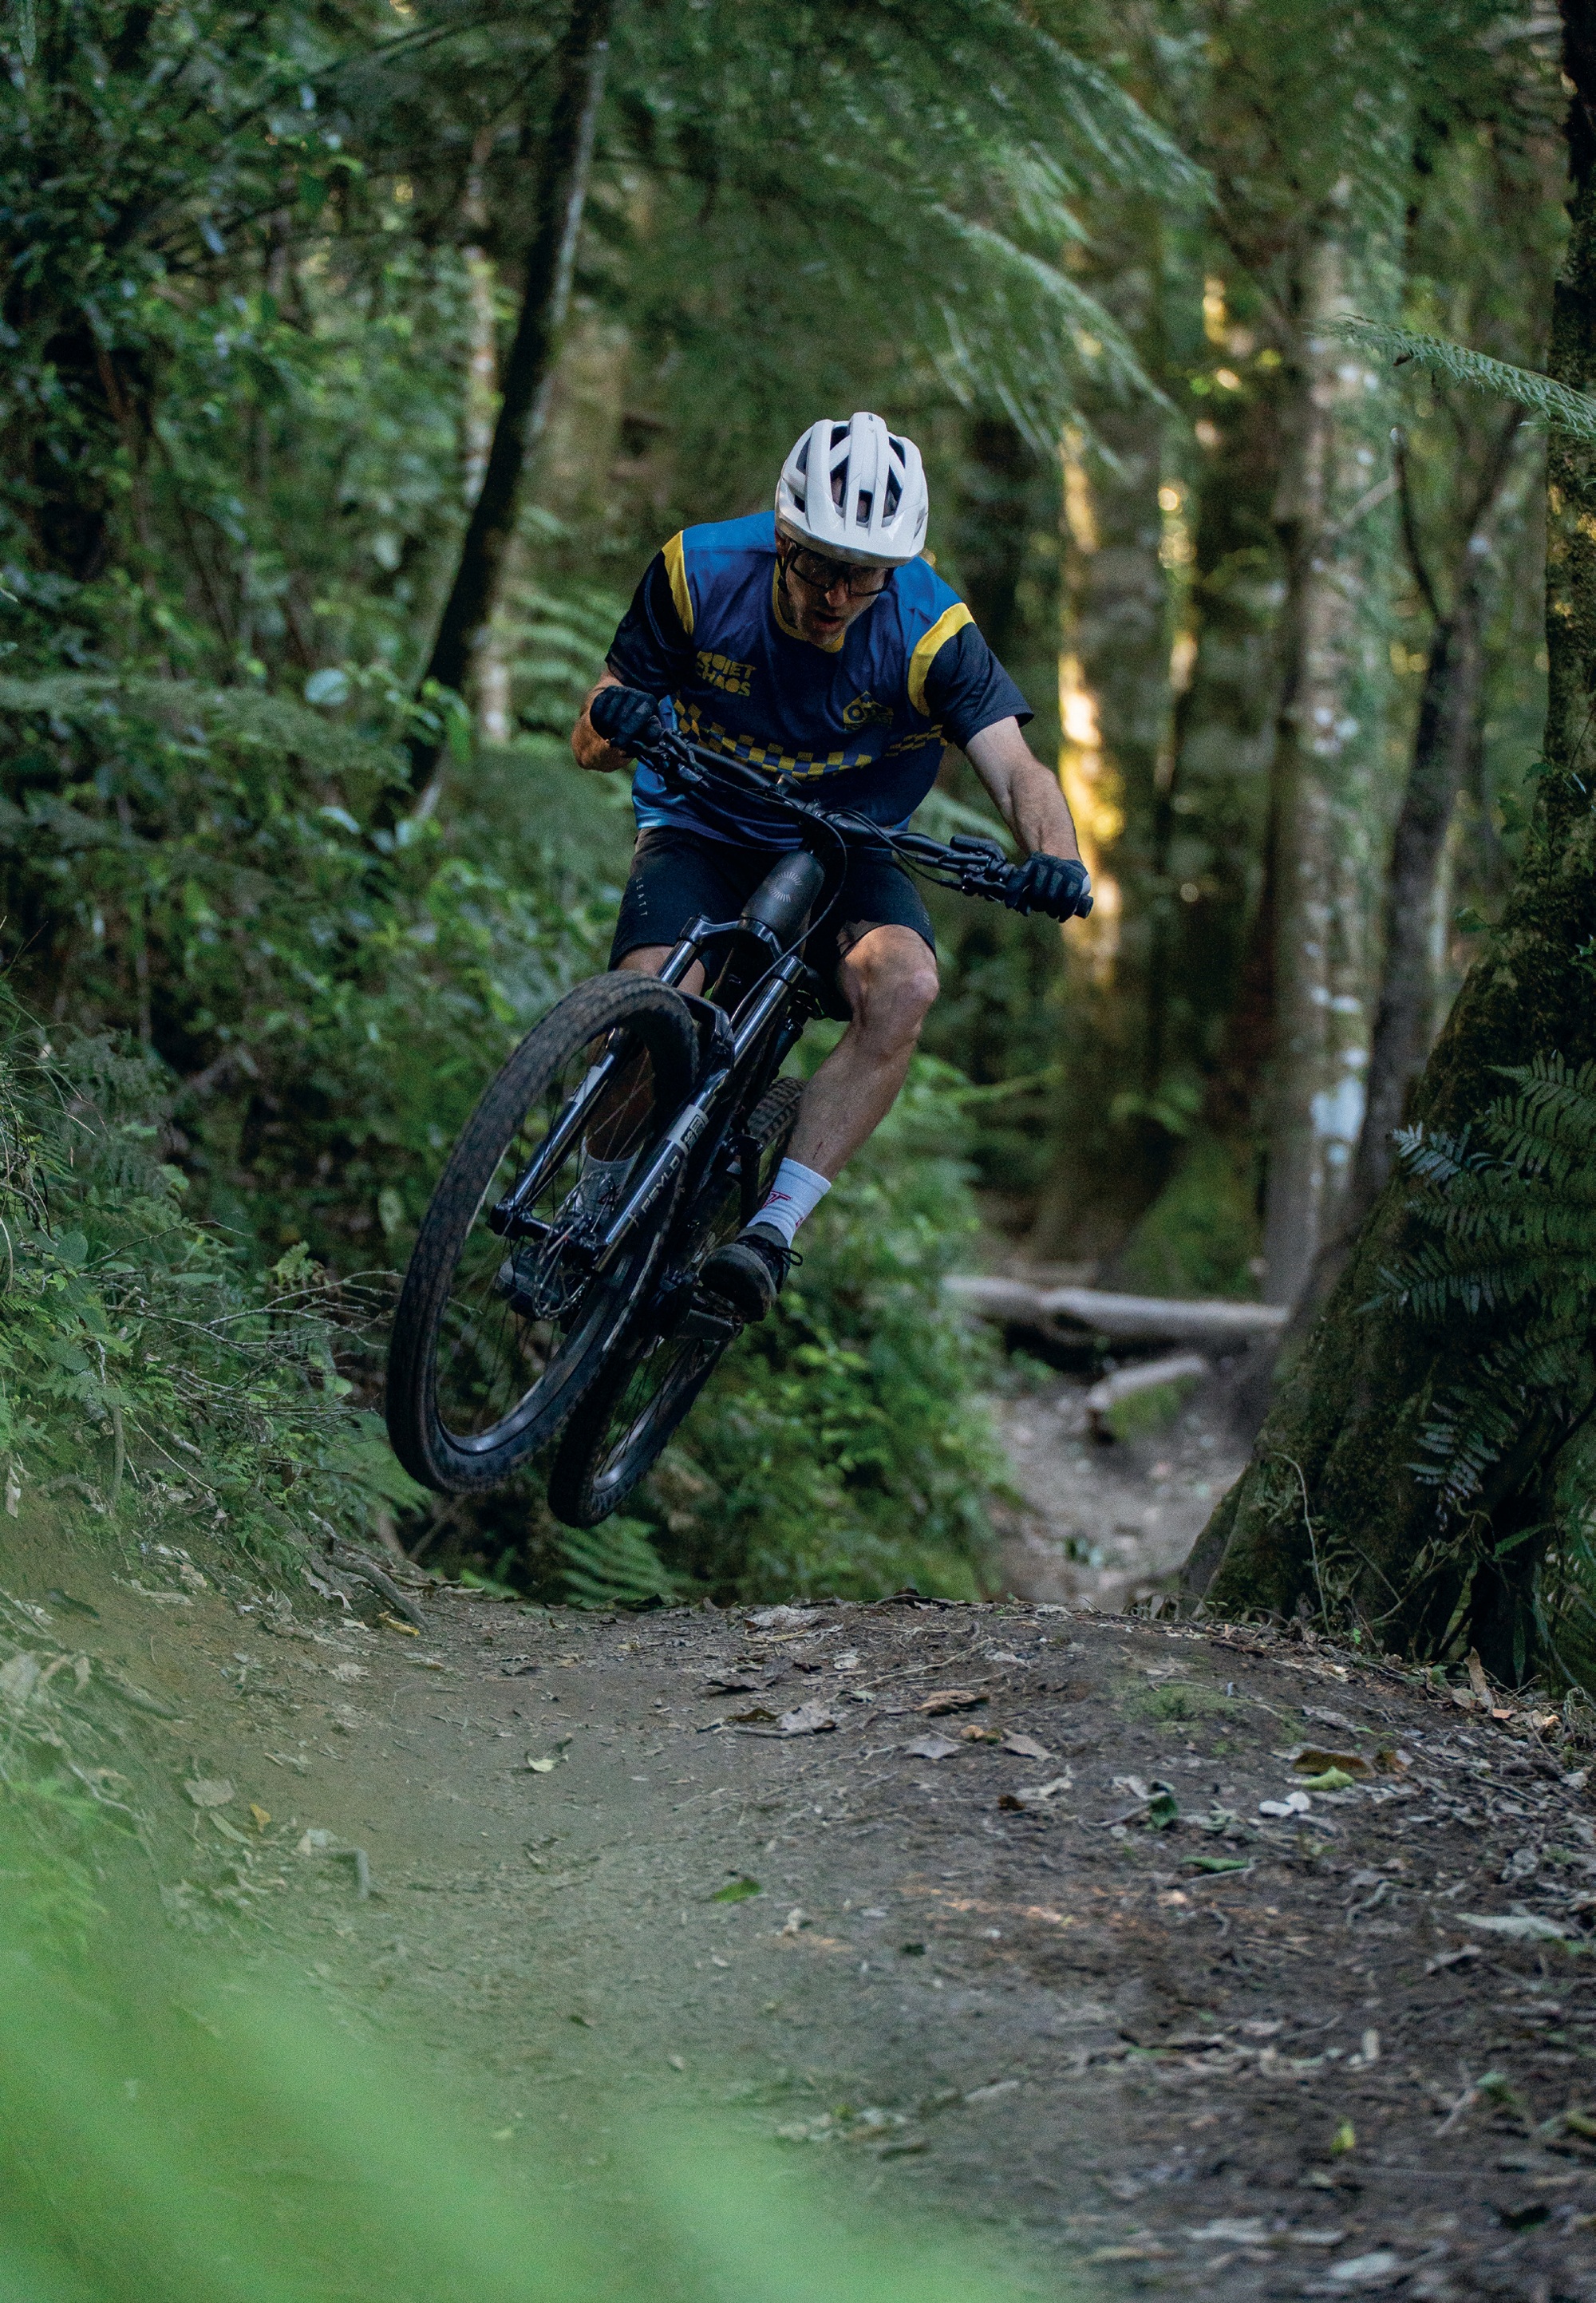
The Moterra 3 is an interesting beast. Its geometry and suspension travel lean it towards hard-charging riding. And charge it can, to a point. For a bike of this ilk, with full 29er wheels and a hefty overall weight, it hooks into turns surprisingly well, though it sometimes needs a conscious effort to weight the front wheel to maintain traction and go right where you want it to. Successive, fast corners, requiring quick changes in direction demand extra body language and strength due to the bike’s heft. As I mentioned earlier in this piece, the Moterra is a mountain goat. I put this down to a combination of the CX motor applying power smoothly and consistently, and the traction of the fresh Kryptotal tyres. A less tempered, higher power would likely break traction a lot easier. On climbs where the front end needs lifting up, and over steps or trail features, the heft of the bike is noticeable, but thankfully, the assistance from the motor helps wheelie the front end up. When hopping the rear wheel up a step, the weight of the bike is noticeable. Thankfully, even when the wheel doesn’t completely clear an obstacle, the motor overrun helps drive it up and over the feature.
With the Moterra’s travel and geometry numbers, this bike is plenty comfy on the downhills. The suspension package performs well most of the time, and even on steep and technical trails, it does the job it should. But when really pushed at speed through chunder, as mentioned previously, better dampers would be welcome. It may be a case of some further tuning with volume spacers or custom valve tunes or even upgraded suspension units to help keep the wheels tracking and bring a sense of calm to the ride when pushing hard.
Overall thoughts
The Moterra 3 (size medium) tips the scales at 27.4kg. With that in mind, I’ve found myself asking, “At what point does the overall weight of an eMTB heavily detract from its overall ride quality?” When ridden just on mellow trails, it’s great and offers no dramas, but where speeds are high and rapid changes of direction are needed, or it’s necessary to unweight over a rough section or even bunny hop, there’s a fair amount of strength required, and much more effort to stay ‘light’ on the bike than those at the lighter end of the eMTB spectrum. The weight requires a decent amount of strength to manhandle, and if you’re heading off-line or get skewed off a jump, getting the bike back in the precise direction you want to go is that bit harder. I’d imagine for inexperienced riders this would be exacerbated if they’re trying to ride progressively.
The recent software upgrade to more power output and torque, although welcome on paper, does leave me wondering if it’s really necessary for most riders (including myself). More power equals more battery drain and shorter runtime from a charged battery. I think there’s a case for smaller, 600Wh batteries on bikes like this, even with motors detuned for less power and torque. This may actually (total speculation) allow for similar range rides, and an overall lower weight of the bike, so more spritely handling. Possibly a net gain? I guess we’ll never know?!
I’d also question whether a bike of this level warrants having cables routed internally through the headset. They look tidy on the shop floor, but to get my stem height correct, as low as I’d prefer, they are in the way and get squashed down by the stem. With cables for mechanical gears, a Bosch remote controller, a seat post, and a rear brake all needing to squeeze in there, there’s a lot that could go wrong, and a lot of possible headaches if a headset bearing needs replacement. “Everything is possible given enough time and money.” A very accurate saying when dealing with internal headset routed cables.
So, who’s the Moterra 3 for then? For someone who’s looking to do a broad mix of mountain biking, commuting and more ‘bike path’ type endeavours, without the urge for too much airtime or aggressive riding, this bike, at this price, is more than ideal.

YETI LTe T4
Words Lester Perry
Images Thomas Falconer
RRP $24,900
Distributor Yeti NZ
The e-EDR World Cup is dead (eMTB Enduro Racing), but the bikes developed by teams trying to win these races sped up the development of eMTBs, and their learnings have helped manufacturers create some of the current crop of top-performing eBikes.
One such bike is the Yeti LTe which was developed alongside the heavy-hitting, diverse riders from the Yeti Factory team, including 2024 e-EDR World Cup overall winner Ryan Gilchrist and 2025 e-EDR World Champion (and multi-time Enduro World Cup winner), Richie Rude. Yeti’s race-winning pedigree runs deep, and their years of experience across all genres of MTB racing mean the brand is exceptionally well qualified to create some of the best bikes in the business.
The Yeti LTe is essentially a heavily updated version of its predecessor, the Yeti 160e – Yeti’s first race-focused eMTB. Geometry and suspension both saw significant updates; however, the biggest news upon launch was the switch from a Shimano drive unit to a fresh, much more capable Bosch CX-R drive unit.
The eMTB market has become something of an arms race recently, with buyers selecting bikes purely on the numbers associated with a given drive unit rather than the combined experience of the drive unit, frame and components. A drive unit alone cannot dictate how much fun or capable a bike will be, but it sure helps to have both the best drive unit and the best frameset.
There’s no denying that Yeti’s bikes target the high-end consumer looking for high performance. Even their most basic build options sit out of reach for most mountain bikers, but for those who either have ample funds or choose to spend what funds they do have on top-performing bikes, Yeti’s range is hard to look past. The LTe retails for $24,900 in New Zealand.
Usually, I’d hesitate to think that any bike priced this high could be exponentially better, or offer a much better ride experience than one that’s $10,000 less. However, I’ve been surprised to find that the performance – and all-out, grin-inducing fun – the LTe offers when ridden hard is, at least in part, worth the step up to its premium price tag.
Drive unit
In July 2025, Bosch launched a significant performance upgrade for the new Performance Line CX drive unit. This upgrade brought existing drive units up to date, more in line with the latest competition, raising max torque to 100Nm and power to a possible 750W (depending on the bike), as well as support multipliers going from 340% to 400% assistance. As part of the performance upgrade, we now find an eMTB+ assistance mode and associated Dynamic Control functionality. We’ll get to those features in a bit. Where fitted with the new Performance Line CX, most 2026 model bikes will ship with standard software, but users can adapt the performance upgrade wirelessly via the Bosch eBike Flow App.
Alongside performance upgrades, Bosch released the all-new CX-R drive unit and Kiox 400C display. The Performance Line CX-R drive unit is designed to win races and slots in as Bosch’s top-tier offering. It’s lighter weight, coming in at 2.7kg, and more powerful, coming stock with 100Nm torque, 750W max power, and 400% rider support.
The weight savings primarily come from the use of a magnesium housing, titanium crank spindle, and ceramic bearings, which are designed to handle the higher torques that come with racing and consistent use of aggressive assist modes.
The Kiox 400C display and wireless “mini-remote” were released alongside the CX-R drive unit. With these two gadgets, it feels like Bosch has finally caught up with the competition. The Kiox 400c is a fully integrated display that tucks snugly and almost seamlessly into the bike’s top tube just behind the headset. It’s large, measuring 2 inches diagonally, it’s bright, it’s high resolution, and it’s full colour, almost a mini-iPhone mounted in the bike! Unfortunately, unlike an iPhone, it’s not touchscreen. The mini-remote lets you shuffle between info screens or scroll between assistance levels. It’s ergonomically ideal, sitting where most remotes do, just beside the left handlebar grip, the buttons have a noticeable click to them, and their rubberised finish means even the sweatiest of fingers don’t slip.
If you’ve set up navigation in Bosch’s eBike Flow app and have a destination programmed, the Kiox 400C will display directions as if it’s your phone, even with handy sounds to notify you of upcoming turns.
There’s a host of information that can be displayed while riding, from heart rate (if you’re using a HR strap or other device), rider power, cadence, and even shifting suggestions. Ideal if you’re one to just throw it in top gear and grind around the trails – the unit will suggest shifting to a more optimal gear ratio. What’s displayed on the screen is entirely up to the user and can be configured in the eBike Flow app on your phone. Speaking of phones – there’s even a handy USB-C port at the top of the display for phone or light charging.
I found the Kiox 400C a considerable step up from previous, more basic, Bosch display options. The screen is a great size, and with the bright, easy-to-read display, I found myself taking a quick glance down to see what speed I was doing, or even what power I was pushing, all while navigating technical trail.
There’s a new assistance mode thrown in the mix, too. eMTB+ mode features Dynamic Control, which essentially switches between aggressive and more subdued output, automatically adjusting between the two based on rider inputs such as cadence and torque, as well as internal sensors that measure gradient and detect loss of traction.
Sampling 1000 times a second, the system seamlessly adjusts to terrain, helping maintain traction regardless of conditions or rider inputs. I found this mode to be the most natural and it felt like riding a regular non-assist bike. Although, when I put the power down, I was able to take advantage of the full 400% support and pull up and over whatever was in my path. The eMTB+ mode is not dissimilar to the standard eMTB mode in terms of how it works but it does offer the higher top-end power availability of the Race mode at 400% assistance vs the 340% of eMTB which doesn’t have the Dynamic Control feature.
We’re now presented with four assistance modes: Race, eMTB+, eMTB, and Tour+. As it says on the tin, Race mode is for just that: racing. Only offered in the CX-R drive unit, it provides 400% support (so 4x rider input). It takes some skill to make the most of this level, and it will rinse a battery quick-smart if not used sparingly. I found this level ideal for uphill sections where I knew maximum attack was the only way over or through them. It’s a load of fun but does require some caution, as more than once I nearly got spat off the back as the bike almost looped out.
eMTB mode, as we’ve known it previously, is like having the bike on automatic, offering less support than eMTB+ mode, up to 340% assistance. The Race and two eMTB modes have “extended-boost”. When stopping pedalling, the motor continues to drive for a short time, helping to maintain speed between pedal strokes or over technical crux moves where a pause in pedalling is needed to navigate a feature. Tour+ offers similar assistance to the eMTB mode at up to 340%, but loses the extended boost and prioritises battery conservation over all-out performance.
Users can tune riding modes to their liking in the eBike Flow app, so if you want more or less power or torque, you’ll find your nirvana with some digital fine-tuning.
It’s worth mentioning the Walk Mode. Hold the ‘down’ button on the mini-remote, and the drive unit moves the bike forward, helping push it back uphill. I used this each lap back up Kataore trail in Rotorua while we were shooting photos for this review. Without this function, getting back up the hill each time would have been significantly more difficult!
The whole drive system on the LTe is powered by a Bosch 800Wh battery. There’s also a range extender that gives an additional 250Wh for those big days lapping the hills! It would be nice to have an easy-to-swap main battery. Unfortunately, it’s not a quick trailside task. While I never needed to remove the battery, according to the bike’s manual (which is quite impressive, I should add), it doesn’t seem like something you’d want to do unless it’s really necessary. Sorry, team, no double-battery rides on this one, by the looks of it.
Frame details
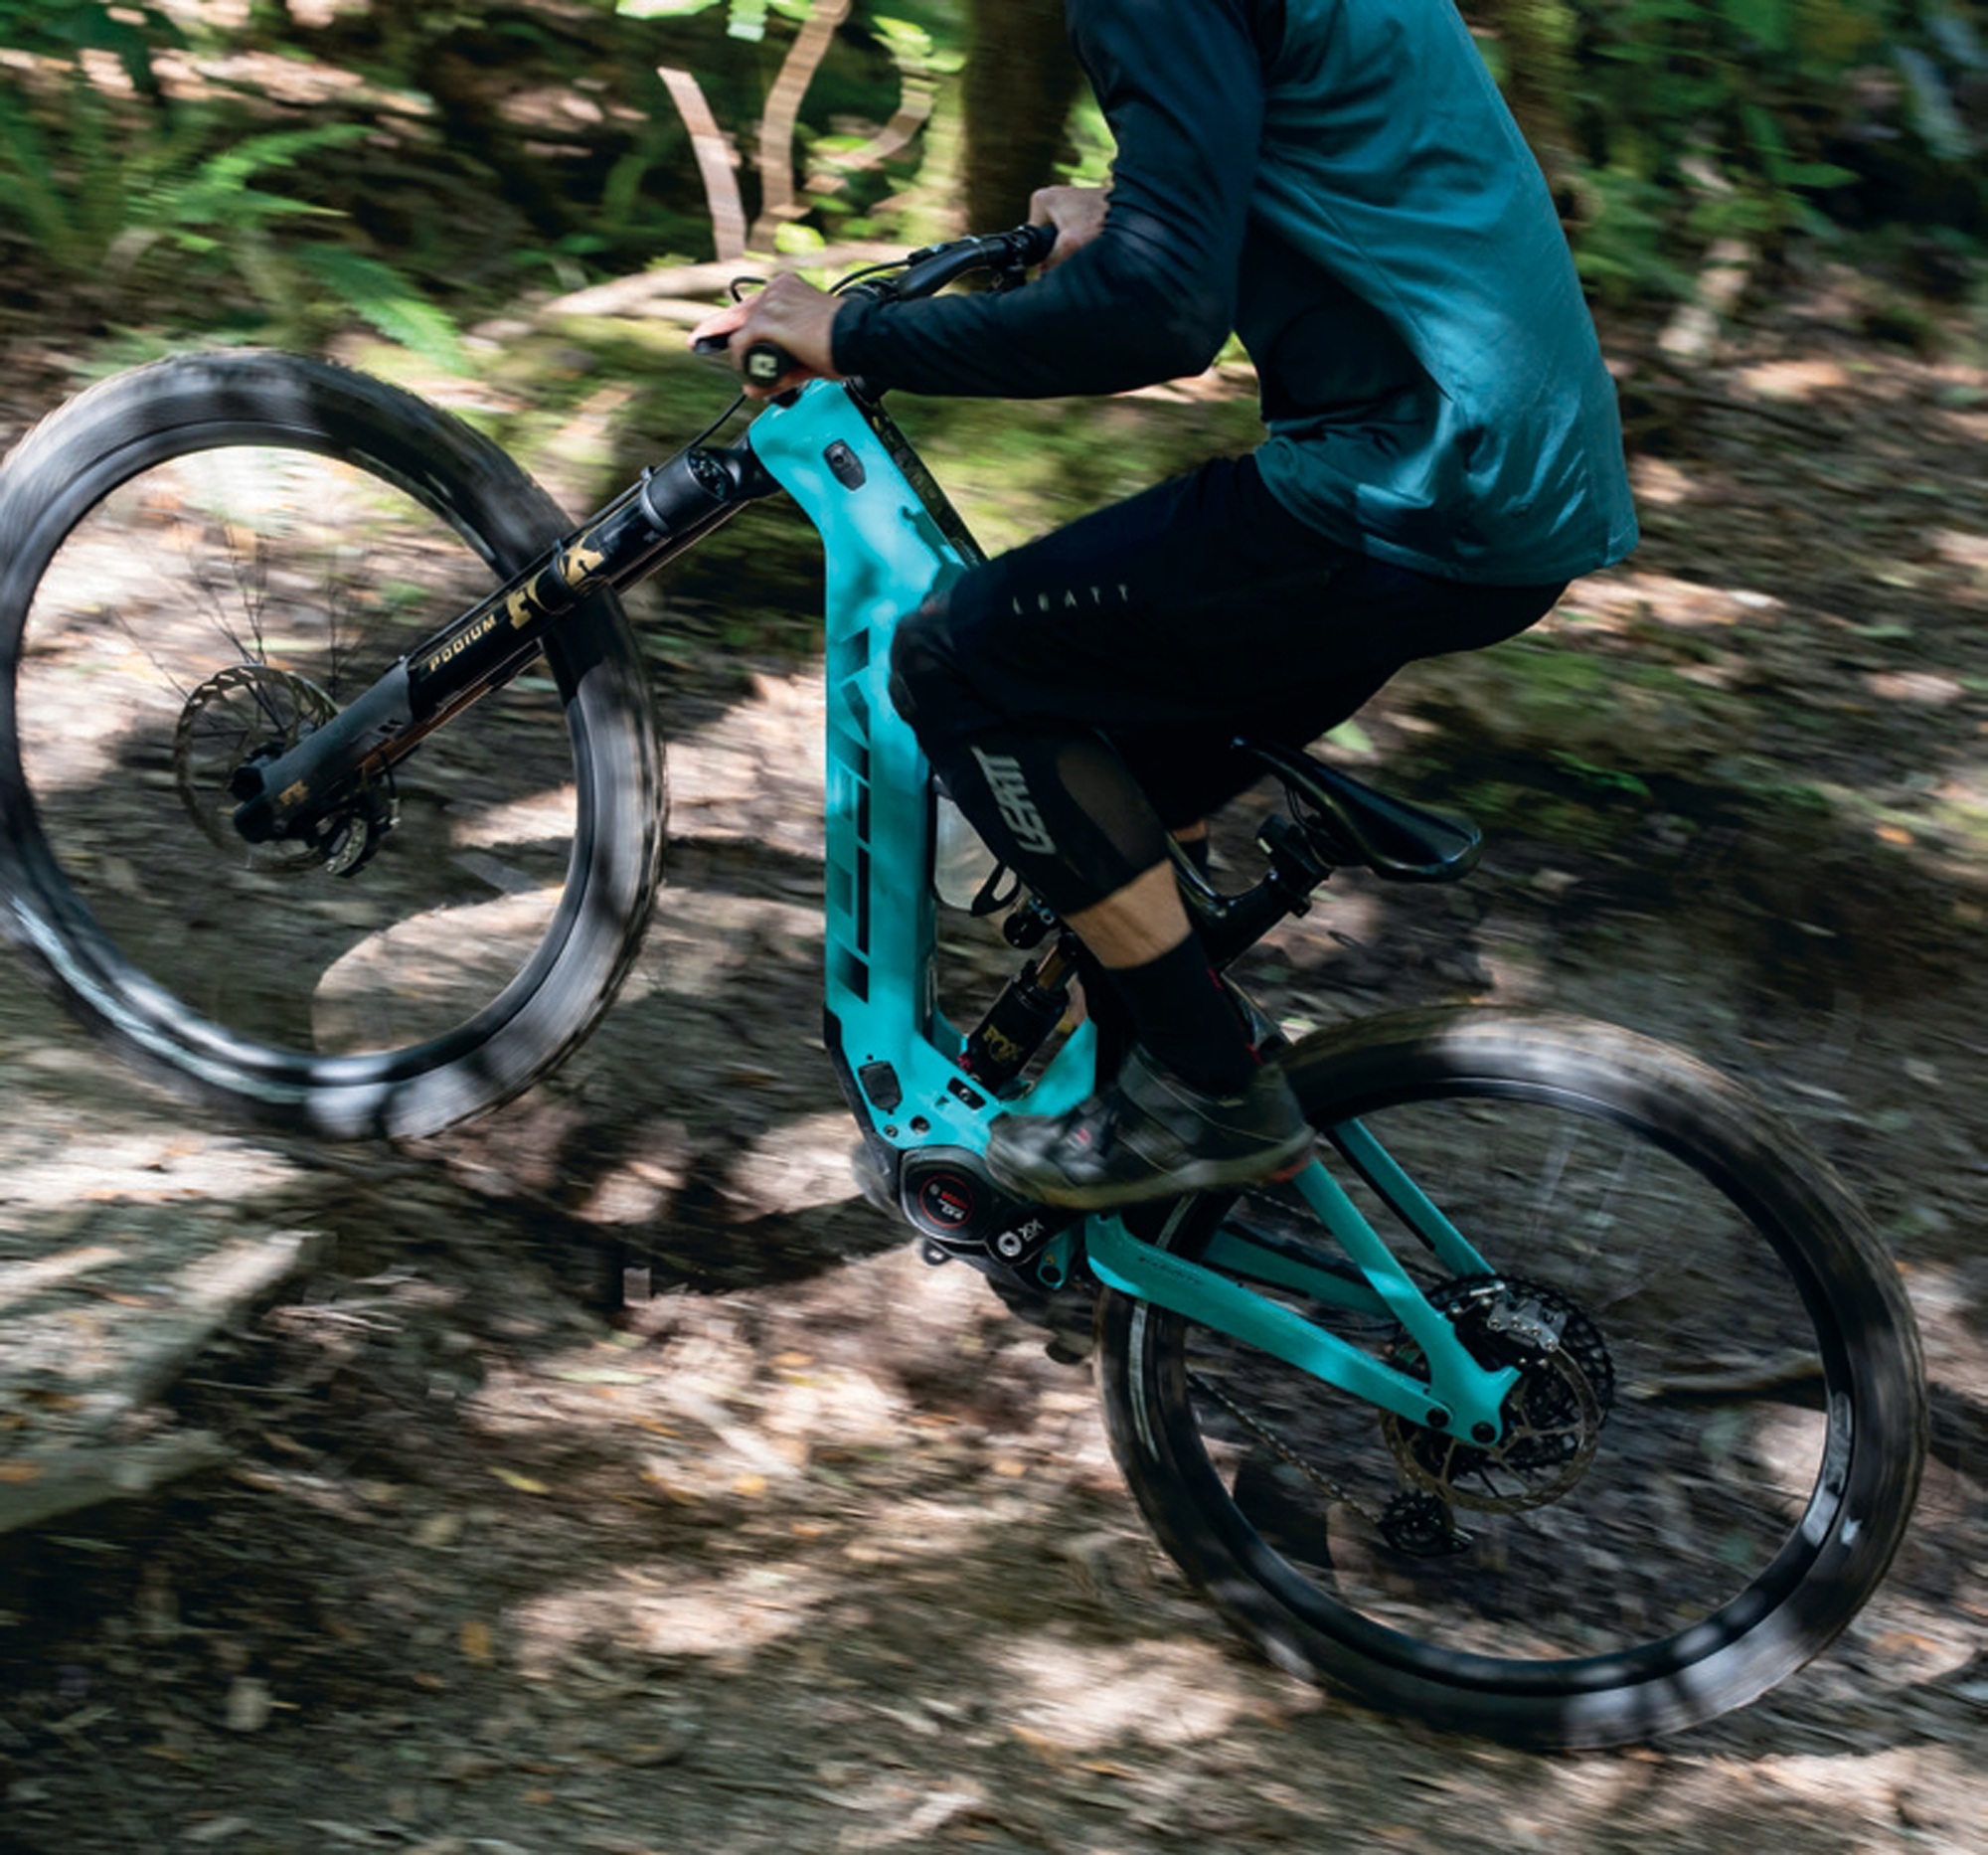
The Yeti LTe is a 160mm (r) / 170mm (f) travel bike bred with an e-EDR focus. It’s crafted from Yeti’s signature TURQ carbon fibre, reinforced with Vectran (similar to Kevlar) to deliver downhill-bike-level strength. The complete chassis (minus suspension linkages) is top- shelf, lightweight carbon fibre. Using carbon not only helps keep the overall weight down but also allows Yeti to tune the ride feel.
The Sixfinity suspension is a unique six-bar design in which all six linkages contribute to controlling the wheel path. It offers higher anti-squat focused around the sag point, keeping a solid and efficient platform for pedalling or pumping. As the bike progresses further into its travel, where pedalling is unlikely, the Switch link drops and anti-squat falls away quickly, offering confidence and stability for downhill-bike-like descending.
As one would expect from a top-tier bike, all the small details are taken care of. Cable routing is tidy (at least externally), and key areas have guards and bumpers to protect the frame and drive unit from rock strikes and debris, or chain slap, all of which helps keep the ride experience nice and quiet and the frame crisp.
I tried to find something on the frame to highlight as a negative, or perhaps not quite right, but all I could come up with is that the ‘loam shelf’ on the lower suspension link behind the motor sits right in the path of mud, slop, and, of course, loam. Most rides, I’d finish with a little pile of debris in this area. No biggie when it’s dry, but I guess long-term over a winter of riding it may negatively affect the lower linkage bearings as they’ll be constantly sprayed with slop from the rear wheel.
On the subject of bearings, by my count there are 16 bearings involved in the Sixfinity linkage, which is not an insignificant number to keep serviced or to replace when necessary. I guess that’s the cost of having all the advantages the Sixfinity brings to the bike: can’t have one without the other.
Adjustable rear suspension leverage rate can be achieved via a swap out of the lower shock mounting chip, allowing for three levels of suspension progressivity tuning: 25%, 30% and 35%. This gives the ability to set it up precisely for where and how it’s to be ridden. I ran this in the stock ‘middle’ 30% progression setting. I found it ideal for my local North Island trails, with shorter, not highly technical climbs and descents featuring a wide variety of features, from drops and g-outs to short chundery steeps and high-speed flow with jumps.
The 30% was plenty supportive and balanced enough to keep the bike playful and poppy, but linear enough to give me the confidence and control for max attack. I didn’t test either of the alternate settings, but for true mountainous descents the lower, 25% setting may be an advantage, offering a more linear suspension rate. The inverse 35% rate should be more relevant for sustained steep, technical climbs and flat riding with its higher progression making the bike ramp up quicker while maintaining the buttery early stroke. These options also open the door to swapping out the air shock for a coil while still maintaining a consistent feel.
The higher torque of an eBike compared to a non-assisted bike means that if the anti-squat is not dialled in, it will be very noticeable, as there won’t be any consistency in how the bike feels under pedalling. Pedalling the LTe was predictable and natural. Regardless of my cadence or how hard I pushed the pedals, the suspension appeared to be unnoticeably active. If I can’t notice something, that’s a green tick from me, as it must be doing an admirable job: just turn the pedals and let the bike do the rest.
Those who want a bit more clearance over the tyre or more ‘flickability’ can switch to a 27.5” rear wheel via flip-chips in the upper seat stays, and thanks to the aforementioned shock mount adjustments, the bike will ride equally as well as it does in the stock, full 29er option.
The overall system weight of the LTe is a fraction over 23kg – pretty light for an eMTB in this e-enduro category. While that Podium fork adds 300+ g over a FOX 38, the weight still feels balanced on the bike, not significantly front-heavy. I’d love to throw a leg over one of the lower-specced LTe bikes with a lighter fork for comparison, to see if a substantially lower price tag really provides a less enjoyable ride experience.
Geometry
The LTe geometry is comfortably balanced. With a 64° head angle, it’s slack enough to be confidently ripped around any terrain and just steep enough to retain a level of playfulness and keep it nimble and quick through turns, even while climbing. A 78° seat tube angle brings the rider forward into a reasonably forward position for comfortable climbing and ensures the front end doesn’t need any overly pronounced effort to keep down while climbing. A 449mm chainstay, 465 reach (medium frame) and an 808mm front centre measurement put the rider in a nice central position within the reasonably long 1257mm wheelbase.
Component highlights
As you’d hope for on a bike with this price tag, the component selection on the LTe is nothing but top-shelf. I’ve picked out a few highlights below:
Fork – FOX Factory Podium 170mm
A new-to-market fork from the boffins at FOX, oh, and it’s upside down! They seem to have solved all the issues that previously stopped upside-down forks from succeeding, and this fork seriously impressed me. Although it’s not the lightest, some 300g+ heavier than an equivalent FOX 38 fork, the weight is well worth the extra performance. The fork changes direction from compression to extension and vice versa with less effort or delay than a regular fork, in part thanks to its lower unsprung weight and constant lubrication from the fork oil sitting atop the main external seals. Buttery is not a word I thought I’d use to describe this fork, but it is just that. The early stroke is phenomenally supple and even deeper into the travel, it’s evident this is very active and smooth, the wheel sticking to the ground, no chattering, jarring or feeling like the fork is overwhelmed, just a precise, controlled feel.
With much larger bushing overlap than a standard fork, which keeps the legs stiff and parallel to each other, there’s less binding as the fork legs compress, helping maintain the smooth action. Even under heavy braking down rough, steep sections of trail, there was not once when I even began to explore the limit of the fork.
There’s ample adjustment on offer on the Podium, with the GRIP X2 damper. You’ll find high and low speed compression and rebound adjustments, as well as the ability to add volume spacers. There’s a tonne of tunability available. On most bikes, I use manufacturer-recommended settings as a baseline, then tweak settings from there. On the LTe, to my surprise, I found that Yeti’s suspension setup calculator gave me ideal settings for everything, right down to tyre pressure, so I didn’t see any need to go outside these.
The only downside to the Podium at this stage, if I’m getting picky, is wheel installation. When the axle is removed, the lower fork legs can rotate, making it more difficult to reinstall the wheel and axle than with a traditional fork. Once again, a small price to pay for the performance this design offers. If, like me, you’re often unloading the bike from a vehicle after taking the wheels off, and in a hurry to get going, lining the dropouts up with the axle and wheel can take a few deep breaths!
SRAM Selections
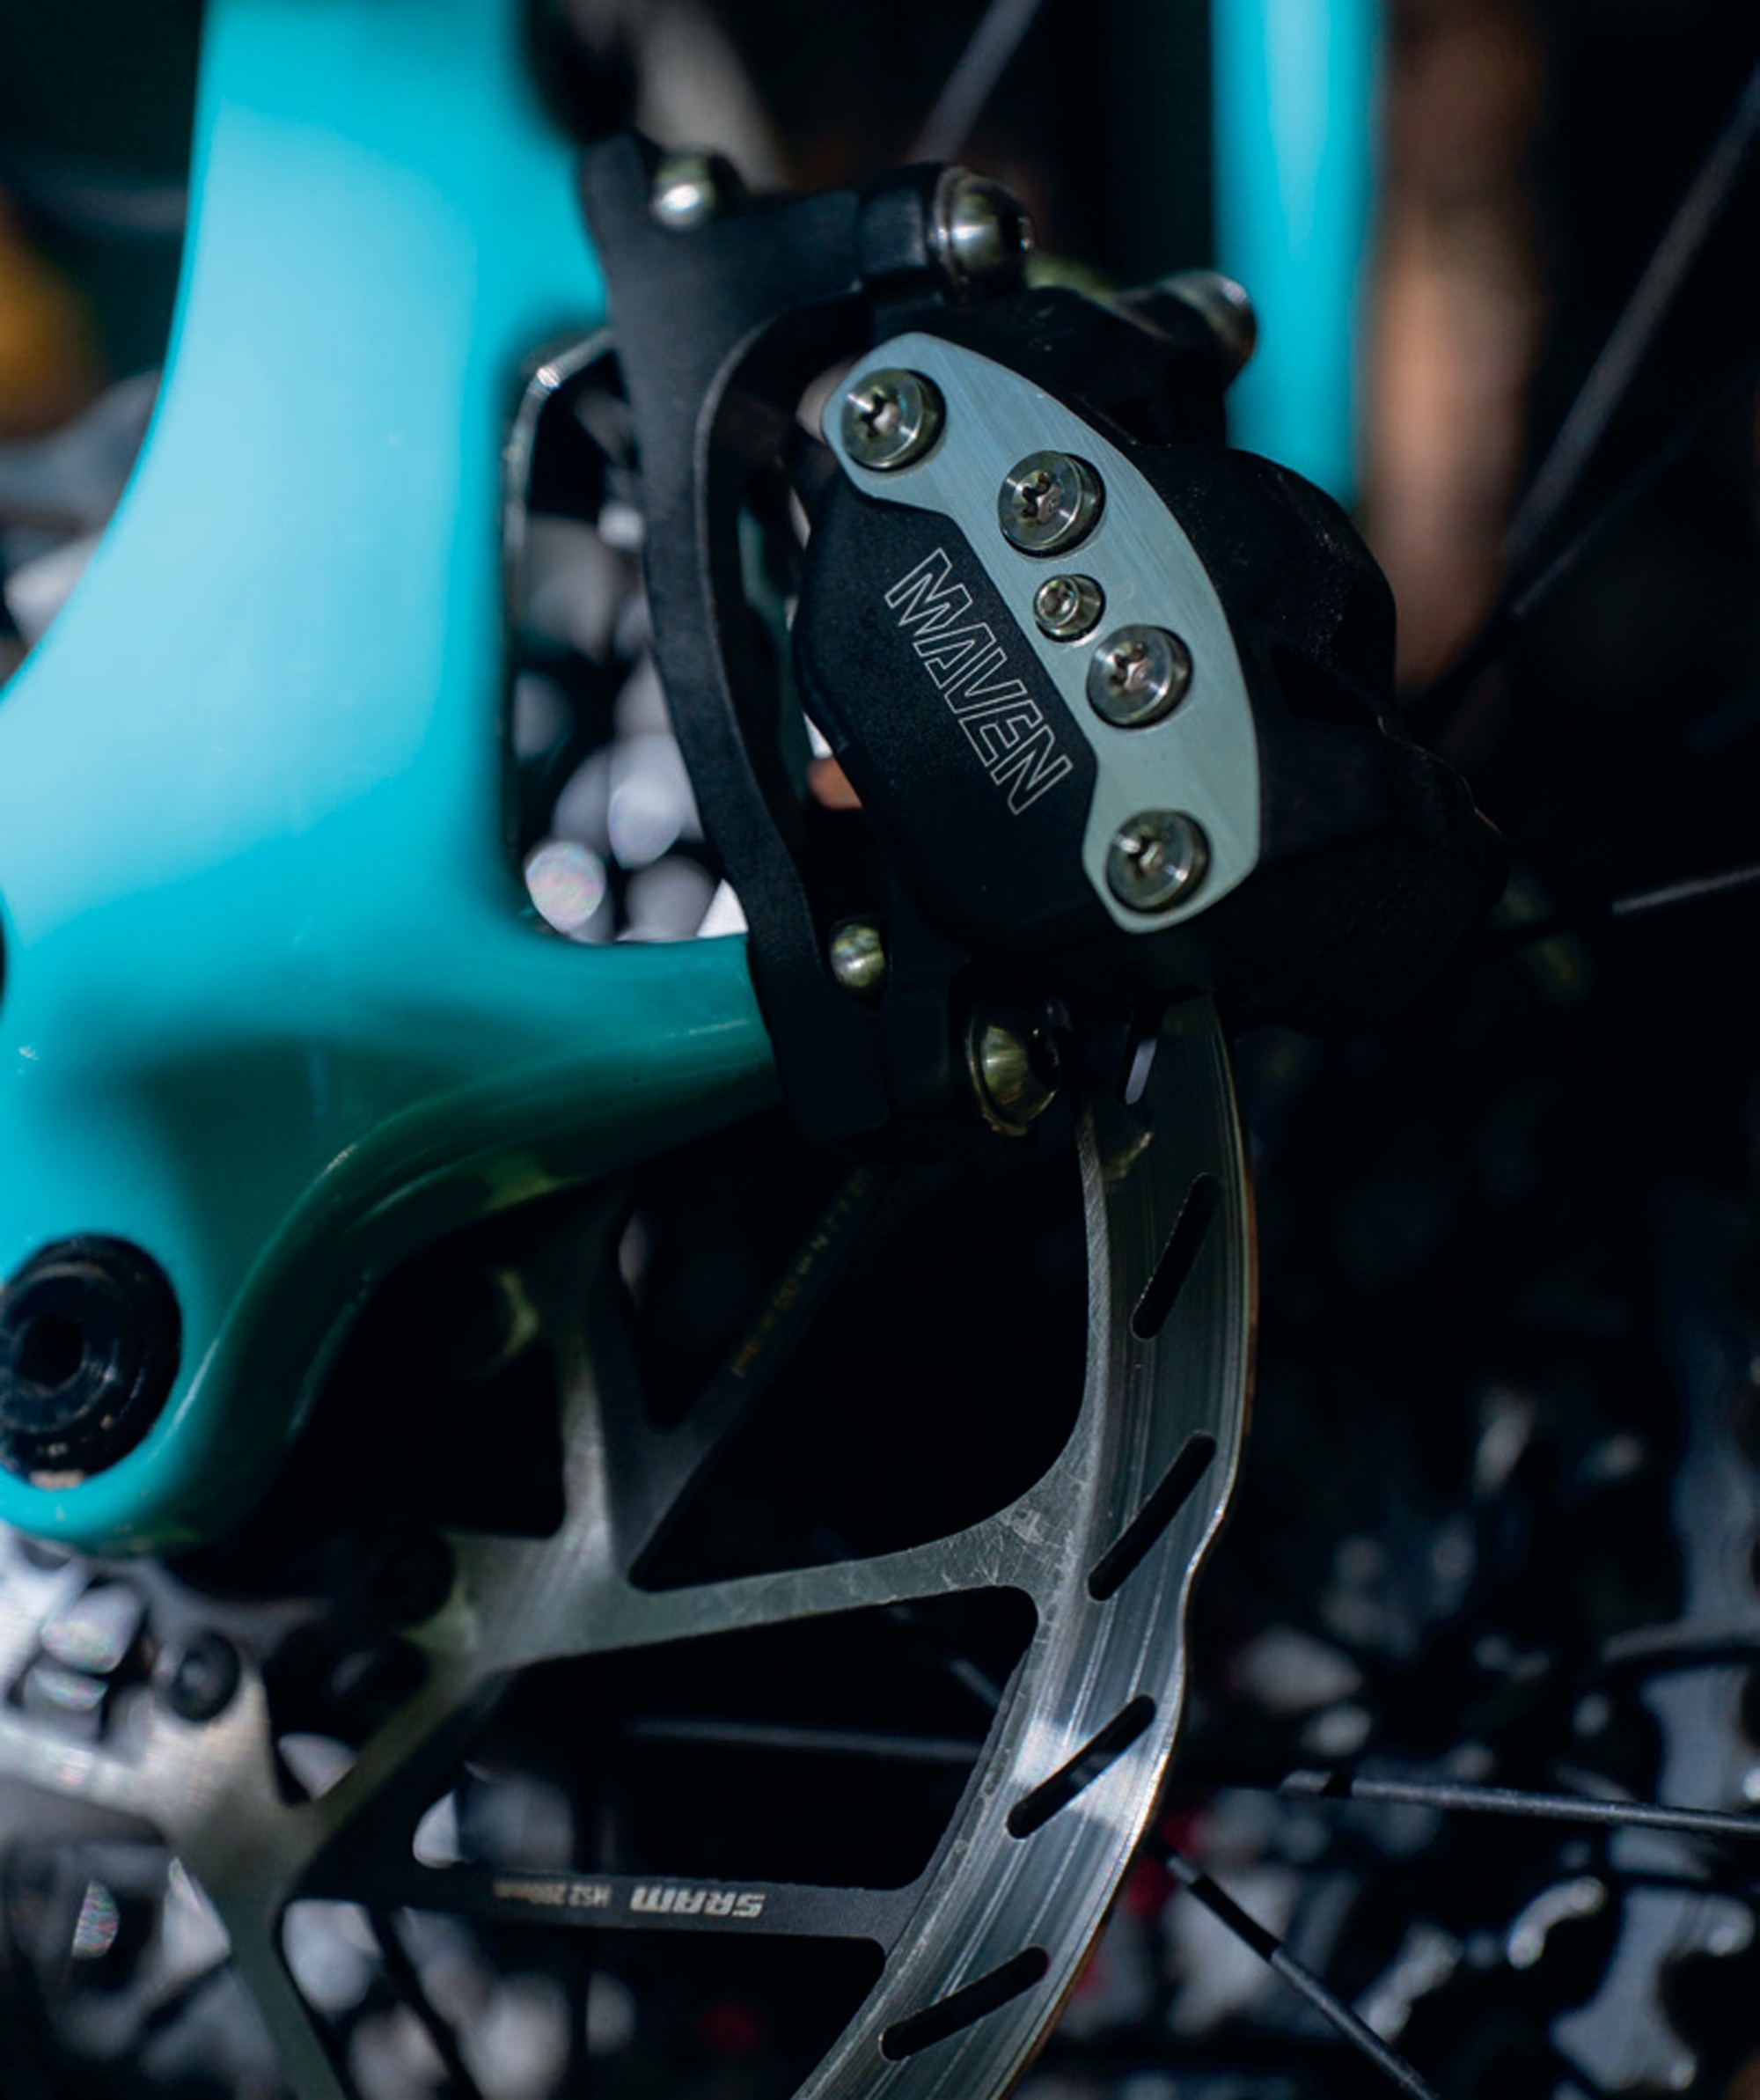
With a SRAM XX drivetrain and 165mm cranks, you can’t go wrong. Although a 160mm crank would have been better, it’s not available at the XX level. This t-type Transmission is at home on an eMTB, and when combined with SRAM’s Maven Ultimate brakes, it’s the perfect combo for speeding up and slowing down. Dropper post duties are handled by a RockShox Reverb AXS 175mm post on the medium bike, while large and XL bikes use a 200mm post, and the Small frames use a 150mm post. Another great spec, but I still find it hard to accept the bulbous battery and control unit on this post – unsightly at best. Thankfully, it works like a dream!
Tyres – Schwalbe
The best suspension and bike setup can be let down by bad tyre choice or wrong tyre pressures. I found the Schwalbe Magic Mary Trail Pro 2.5 Radial Ultra Soft on the front, coupled with the Schwalbe Albert Gravity Pro 2.5 Radial Soft, to be wise spec choices by the product managers. Having never ridden radial tyres before, I wasn’t sure what to expect. Once inflated to the recommended 29psi rear and 28psi front, much higher than my normal pressures, I discovered why people have been singing about these tyres: supple, fast and grippy all sum up the radials.
With a lighter trail casing and ultra-soft rubber up front, and a heavier Gravity casing and sturdier rubber out back, there was no need for concern on any terrain I put them on. There was enough support and traction to keep the bike well under control, although on rocky, high-speed trails, a Gravity casing up front may be preferred. I didn’t get to test them on a super-wet ride, so I’d be interested to see how they perform in those conditions. Judging by the height of the tyre knobs, I doubt there would have been a need to use anything else.
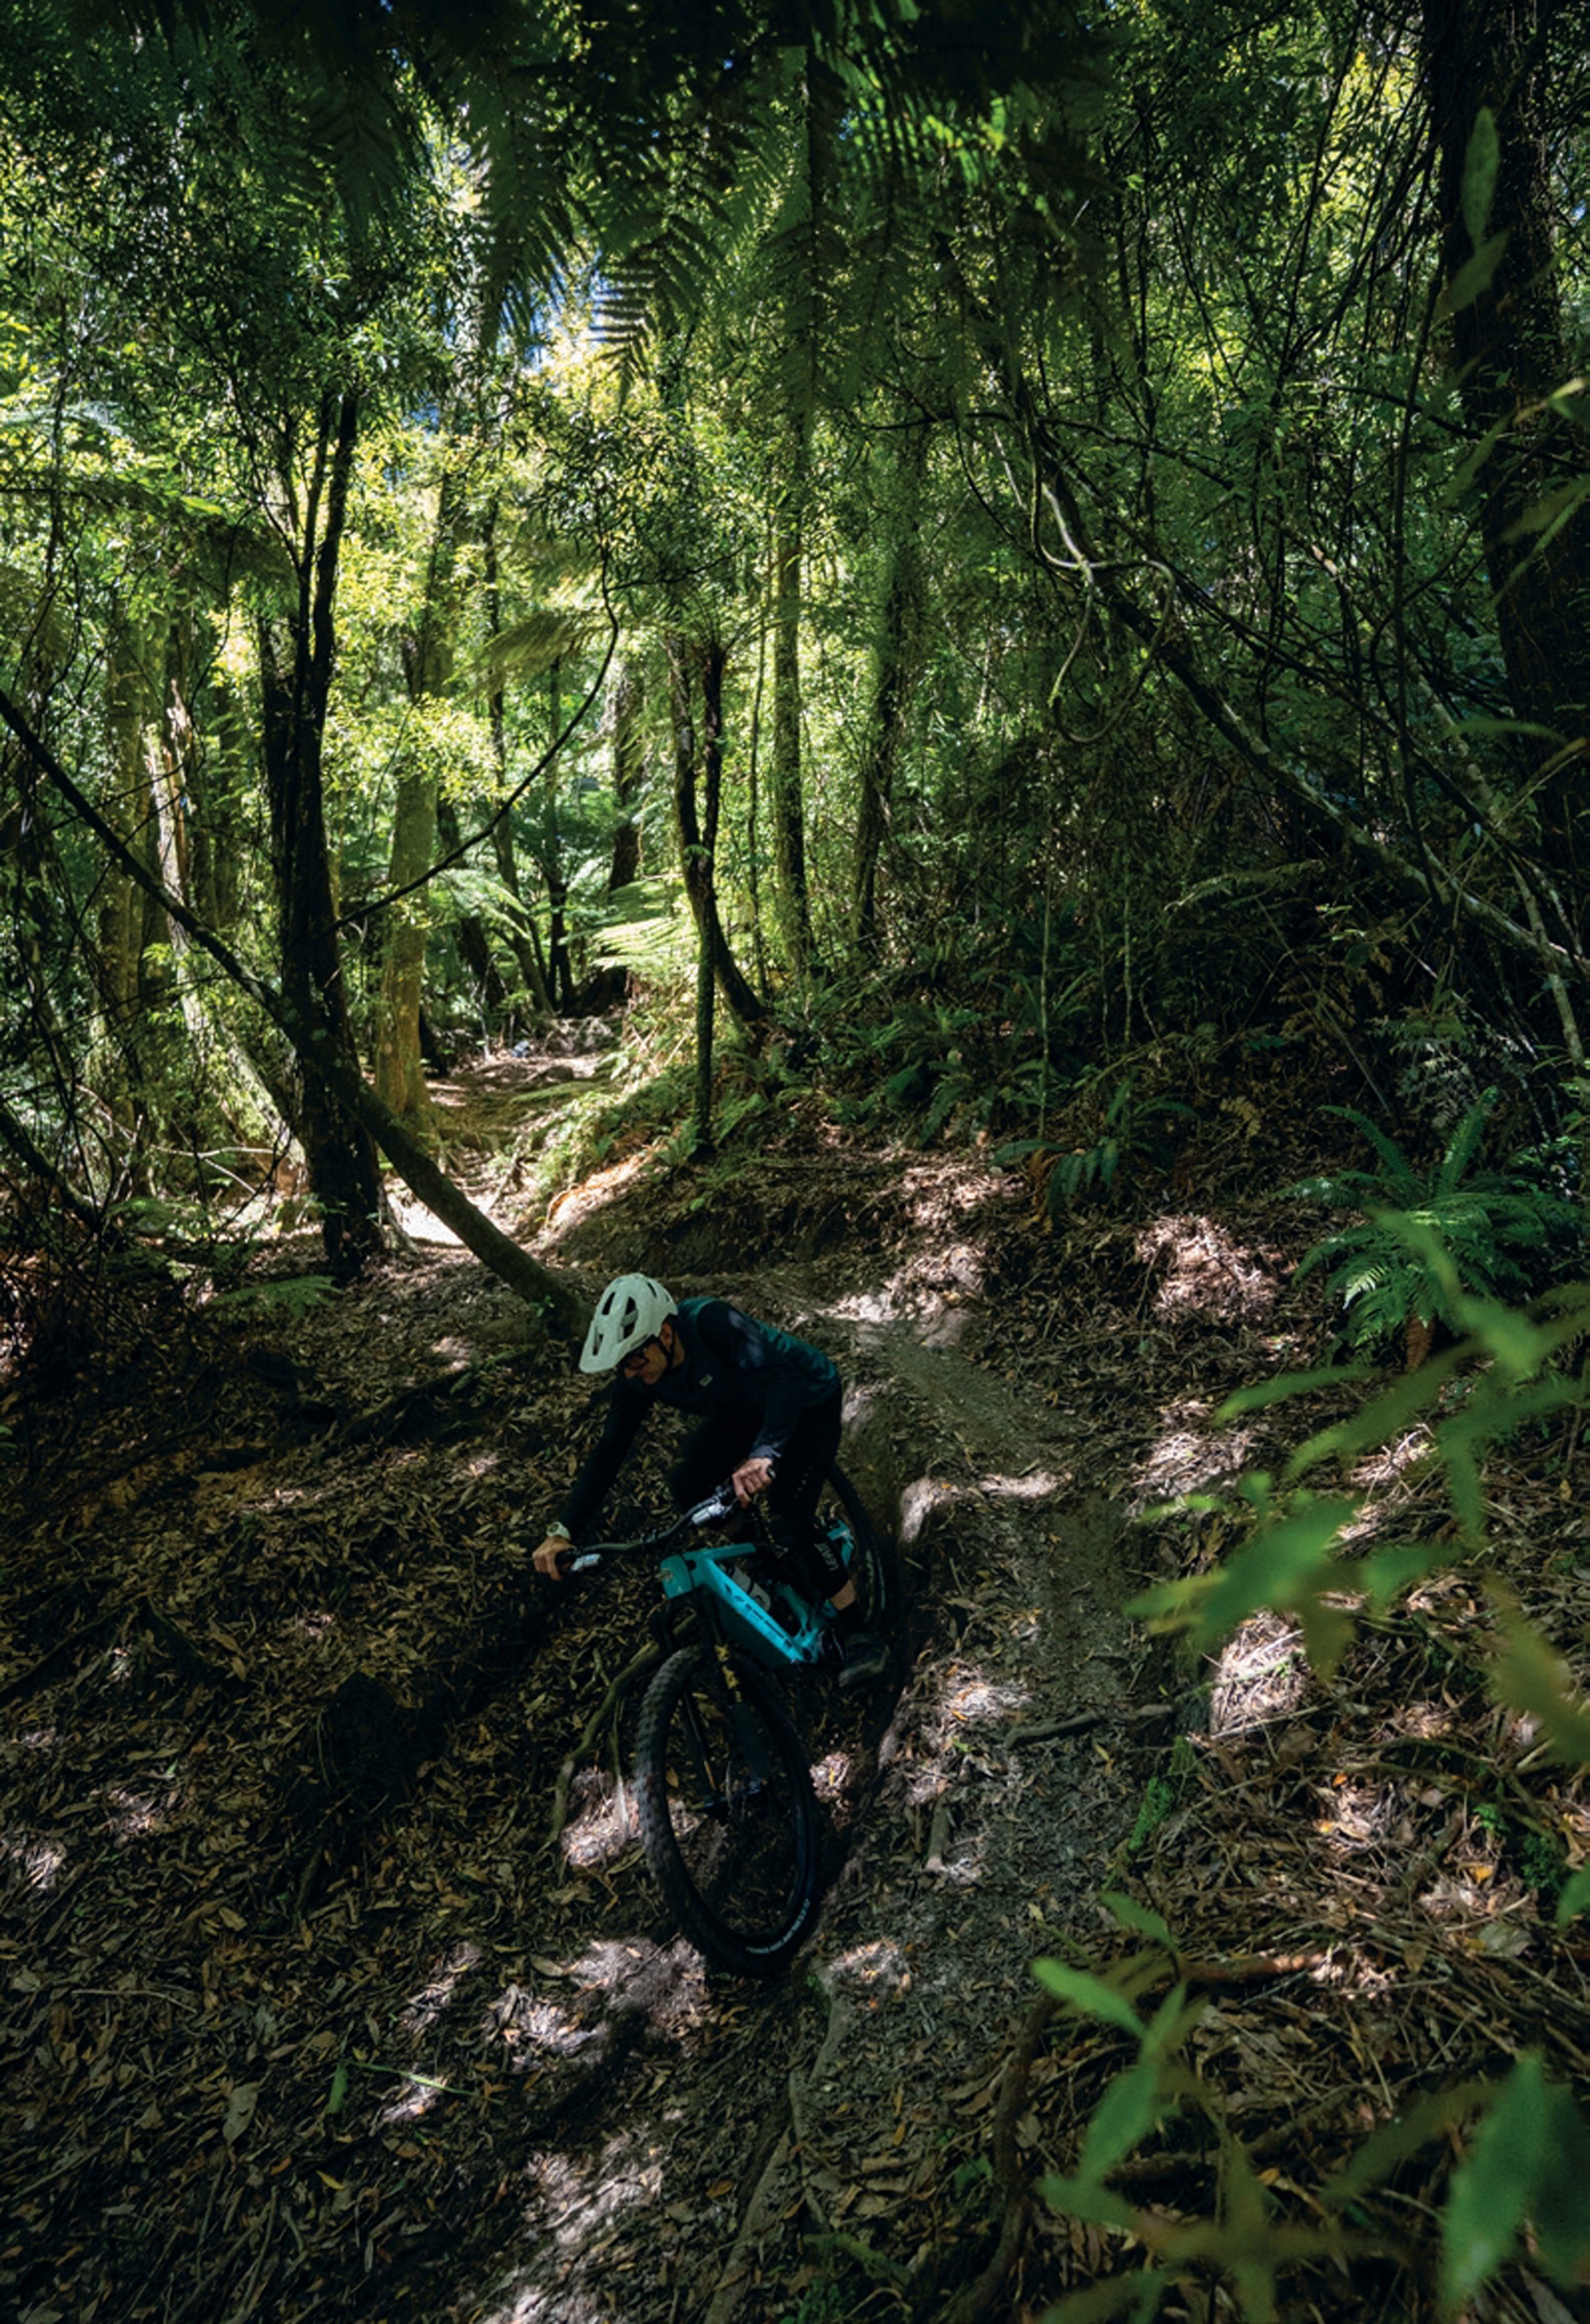
Riding the LTe
The LTe is the best eBike I’ve ridden, and potentially the best overall bike I’ve ridden, full-stop, end of story. Set up was effortless thanks to Yeti’s suspension setup web app. I found no reason to change anything from their recommended settings after some initial pressure adjustment and dial twiddling. The medium bike was perfect for my 176cm height, and everything felt in the right place, even down to the handlebar width. I’ve reviewed other high-priced carbon eMTBs with similar drive systems, and I couldn’t get the setup to feel great, even with a reasonable amount of setup time and head- scratching, so it was nice to just hop on and go.
The LTe is designed with a downhill focus, and that’s where it really shines, although climbing is also excellent. Manoeuvring up and through technical climbs was on par with other high-end eMTBs I’ve ridden. Nothing really puts it head- and-shoulders above, and in some ways, the excess weight of the fork makes it marginally more challenging to pull up over obstacles. Fortunately, that Bosch CX-R drive unit has enough torque on tap to pull me up anything.
Generally, I blasted around in eMTB+ mode, the Dynamic Control aiding traction when the terrain was loose or slippery. Race mode was reserved for sections of climb that I wasn’t really sure I could get through, releasing all the power of Race mode in the hope it would pull me through. The Race level of assistance was more than I needed most of the time and often required more man-handling, and thought about how best to apply power to the pedals. This bike needs to be ridden hard to get the most out of it and really see where it shines. Descending is where the LTe really comes into its own, largely thanks to that Sixfinity linkage and the top-shelf suspension, but also the brilliant selection of components. For example, sub-par brakes would totally kill the vibe on this bike, regardless of how good the suspension platform is.
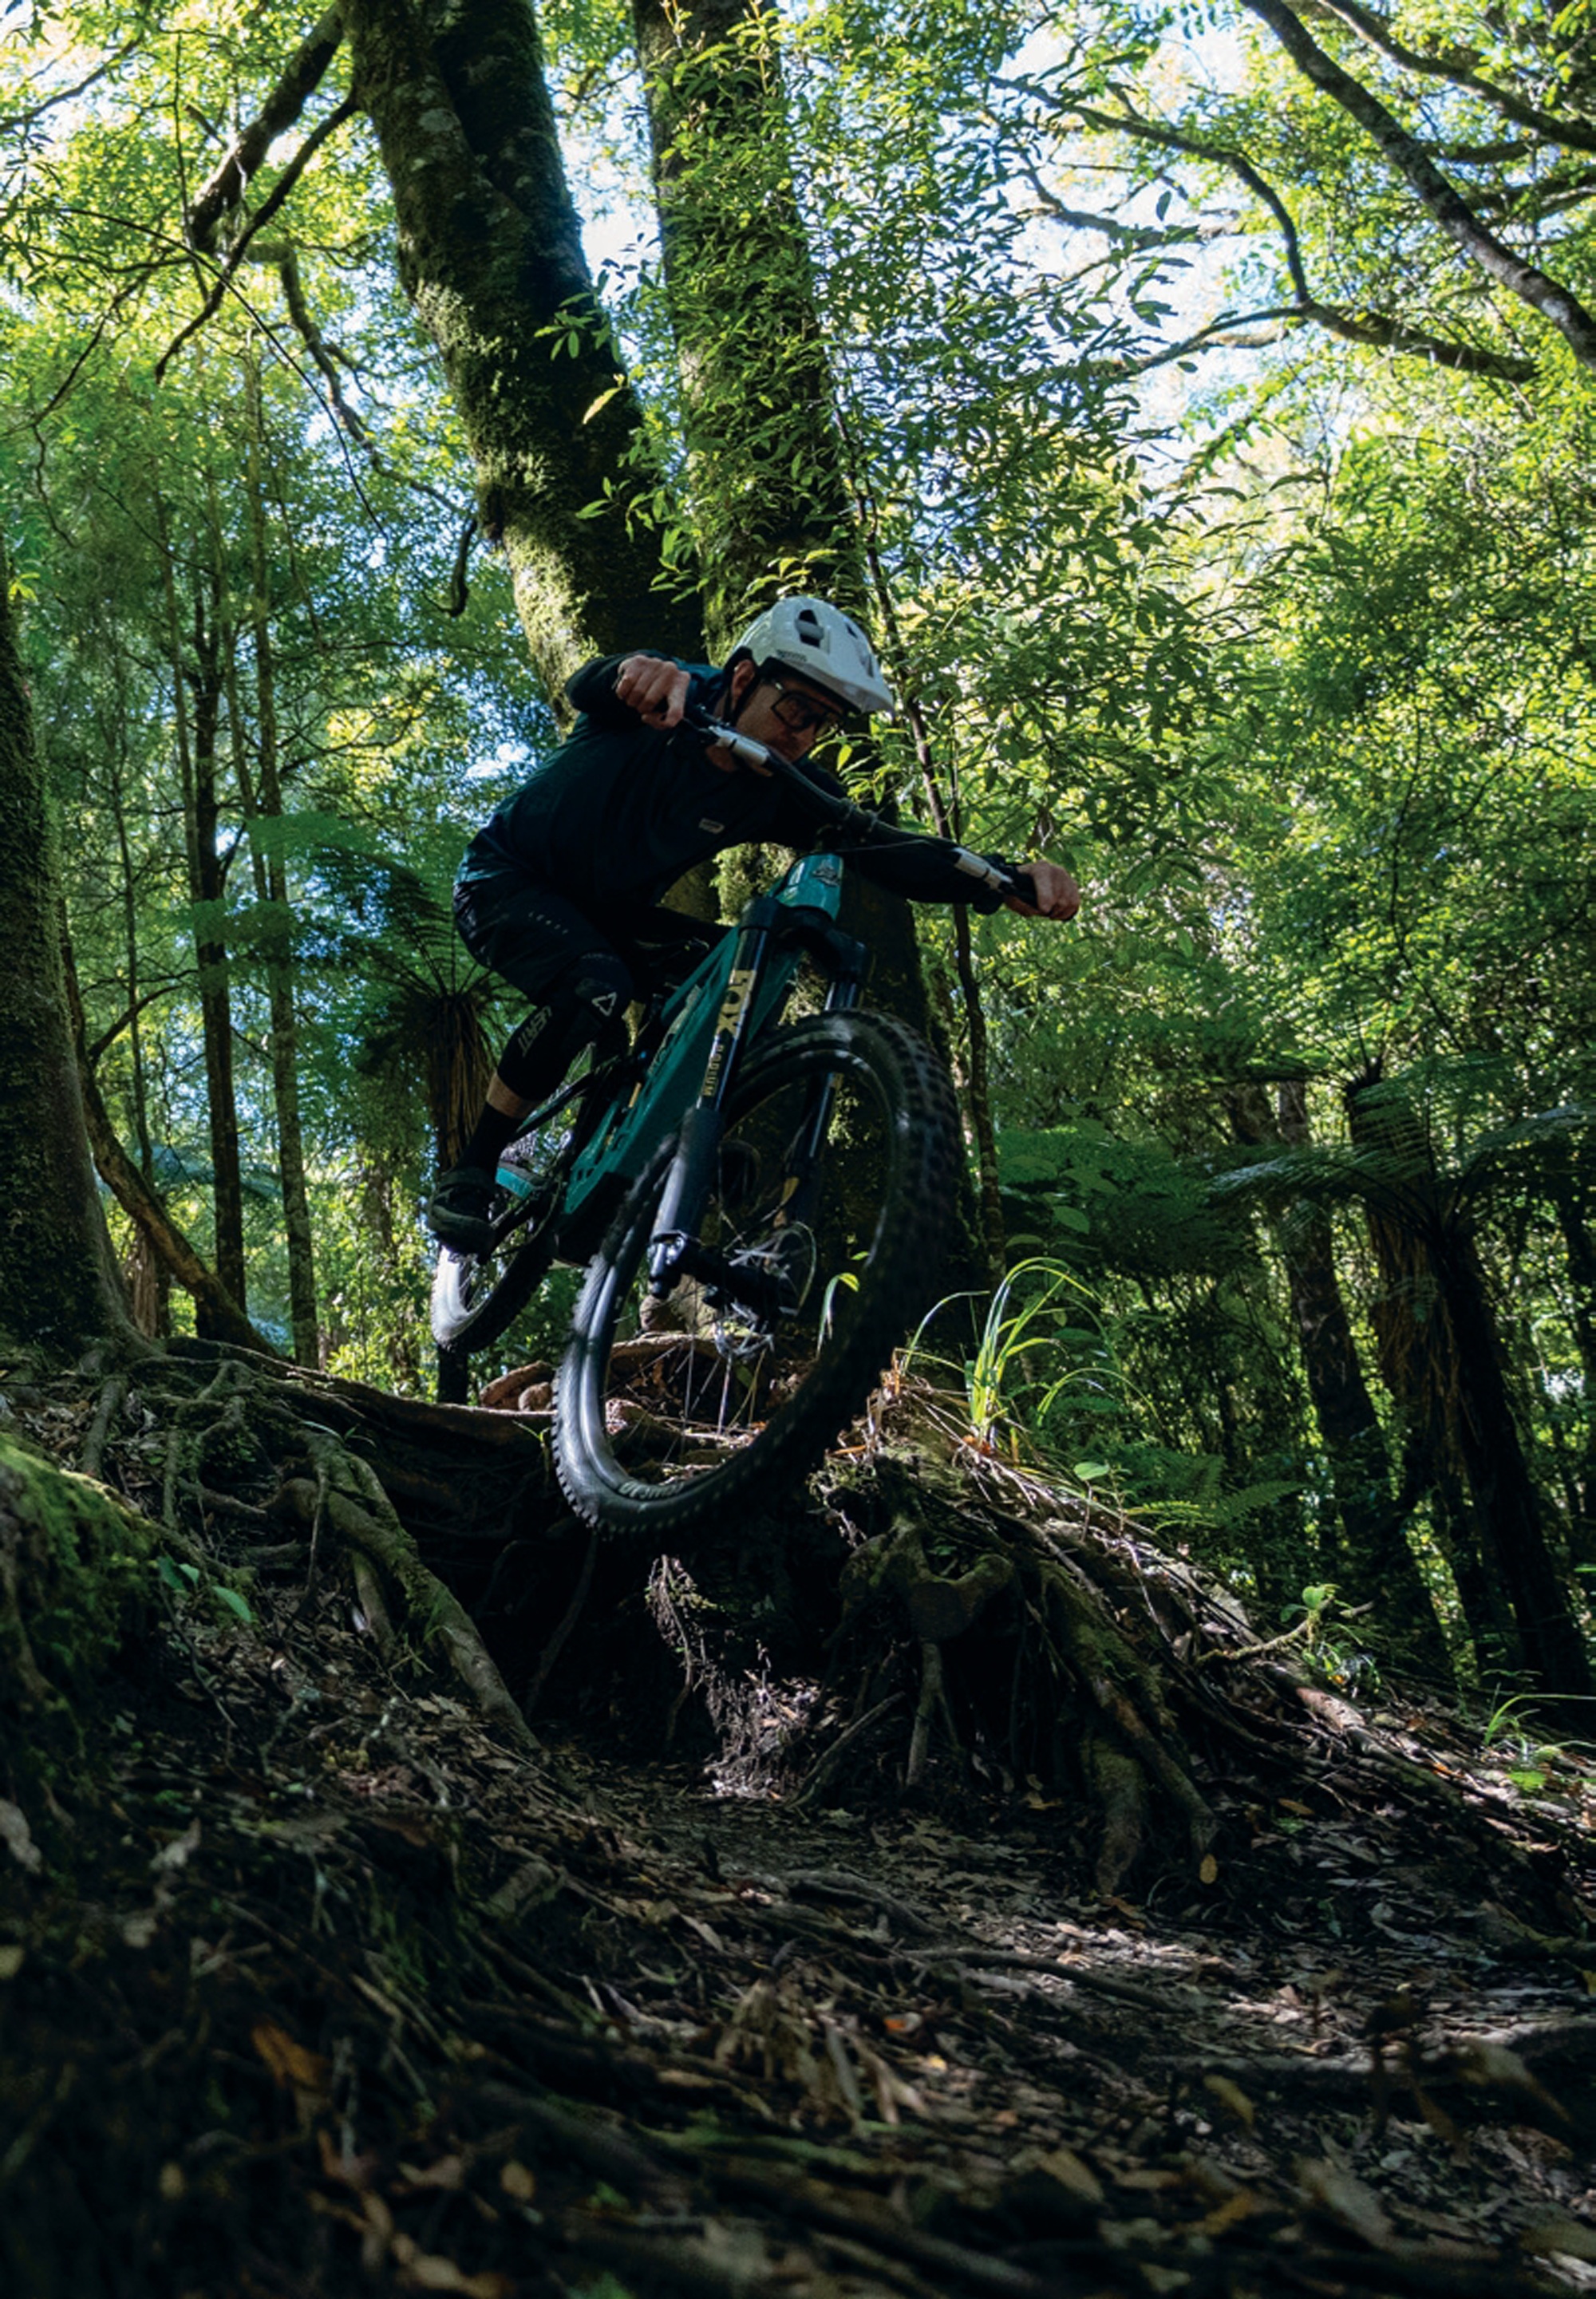
When throwing the LTe down a reasonably technical trail, I got the feeling the bike was just asking for more. The only limiting factors to how fast it could go were my skills and my level of self-preservation. The bike could handle much, much more than I was prepared to give it. Some laps through Rotorua’s Tuhoto Ariki and Kataore native bush trails really shone a light on how good the bike is as a whole.
Swooping turns, both bermed and flat, with roots, were no bother. Even with a reasonably long wheelbase, the LTe was easy to change direction in turns and held a line exceptionally well. At slower speeds, the weight of the fork was evident, but once I opened the taps into some of the faster sections of trail strewn with steps, roots, and heavy hits, I forgot that weight altogether.
The LTe’s suspension rewards speed and aggression, and once at a decent cruising speed, the trail seemed magically smoother. Even under heavy compressions, the bike was calm and predictable, and there were no “wow that was close” squirrely moments. I’ve certainly had moments on other eMTBs where the bike squirms underneath me, feeling like a wound spring as it’s nearing the end of its travel, and as it rebounds it’s a bit like releasing a wild dog to chase a rabbit: I’m not sure what to expect, but sure it’s going to end in carnage!
Although there’s a feeling the bike is like a plough smoothing out the trail, it’s still quite spritely. There’s enough support in the suspension, and the overall light weight of the bike means it’s able to be bunny-hopped and unweighted over trail features, and popping off bumps or jumps doesn’t require excess effort.
On the steep, while braking heavily, the LTe maintained a high level of composure. The balanced geometry and buttery suspension ensured the tyres tracked the terrain, keeping as much traction as possible. I felt comfortably centred within the bike, no feelings of the front end diving and that I’d be pitched out the front. Equally, I didn’t feel like I was a passenger needing to push off the back too far while dropping down near-vert faces, just a level of composure I haven’t found on an eMTB before.
Rough off-cambered sections or getting to the highest of high lines into turns were both areas where the bike shone; again, the suspension, tyres and geometry worked together for pinpoint precision. See a line you want to get to? Go there. No questions asked. It took me a couple of rides to really unlock the confidence to go pretty well wherever I wanted on the trail. As I mentioned earlier in this piece, my skills and self-preservation were the limiting factors. Still, the bike gave me confidence to push both of these further than I’d be comfortable with on many other bikes.
To sum up, the Yeti LTe not only meets the mark for a high performer but surpasses it. It’s an all-around exceptionally fun and capable bike to ride, and the fact that it’s an eBike just opens up more possibilities for how many after-work downhill laps could be ridden and how much steeper and sustained the climbs it could go up, versus an ‘acoustic’ bike. Ultimately, I think the LTe rider’s cheesy grin will be just that bit bigger thanks to the pedalling assistance on offer over a non-eBike equivalent.
While I was testing the LTe, I also had a couple of lower-specced, alloy-framed eMTBs in the stable. Jumping between this $25k beauty and a $9k alloy bike, the difference between the two couldn’t be more pronounced. On every level, the more expensive bike was better – maybe not $15,900 better – but the two ride experiences couldn’t be further apart. In isolation, either bike was capable and fun in its own right. But once ridden back-to-back, the differing experiences showed me that between the high-end and let’s call it low-end of the eMTB spectrum, the experiences are so different they almost can’t be compared, a little like a Formula One car vs. a Honda Civic. They both have a frame, motor, and wheels, and both can be super fun to drive, but from a high- performance aspect, when piloted by a driver (rider) who can feel the nuanced differences between the two, there’s a vast chasm between
Produced in partnership with Bosch eBike Systems
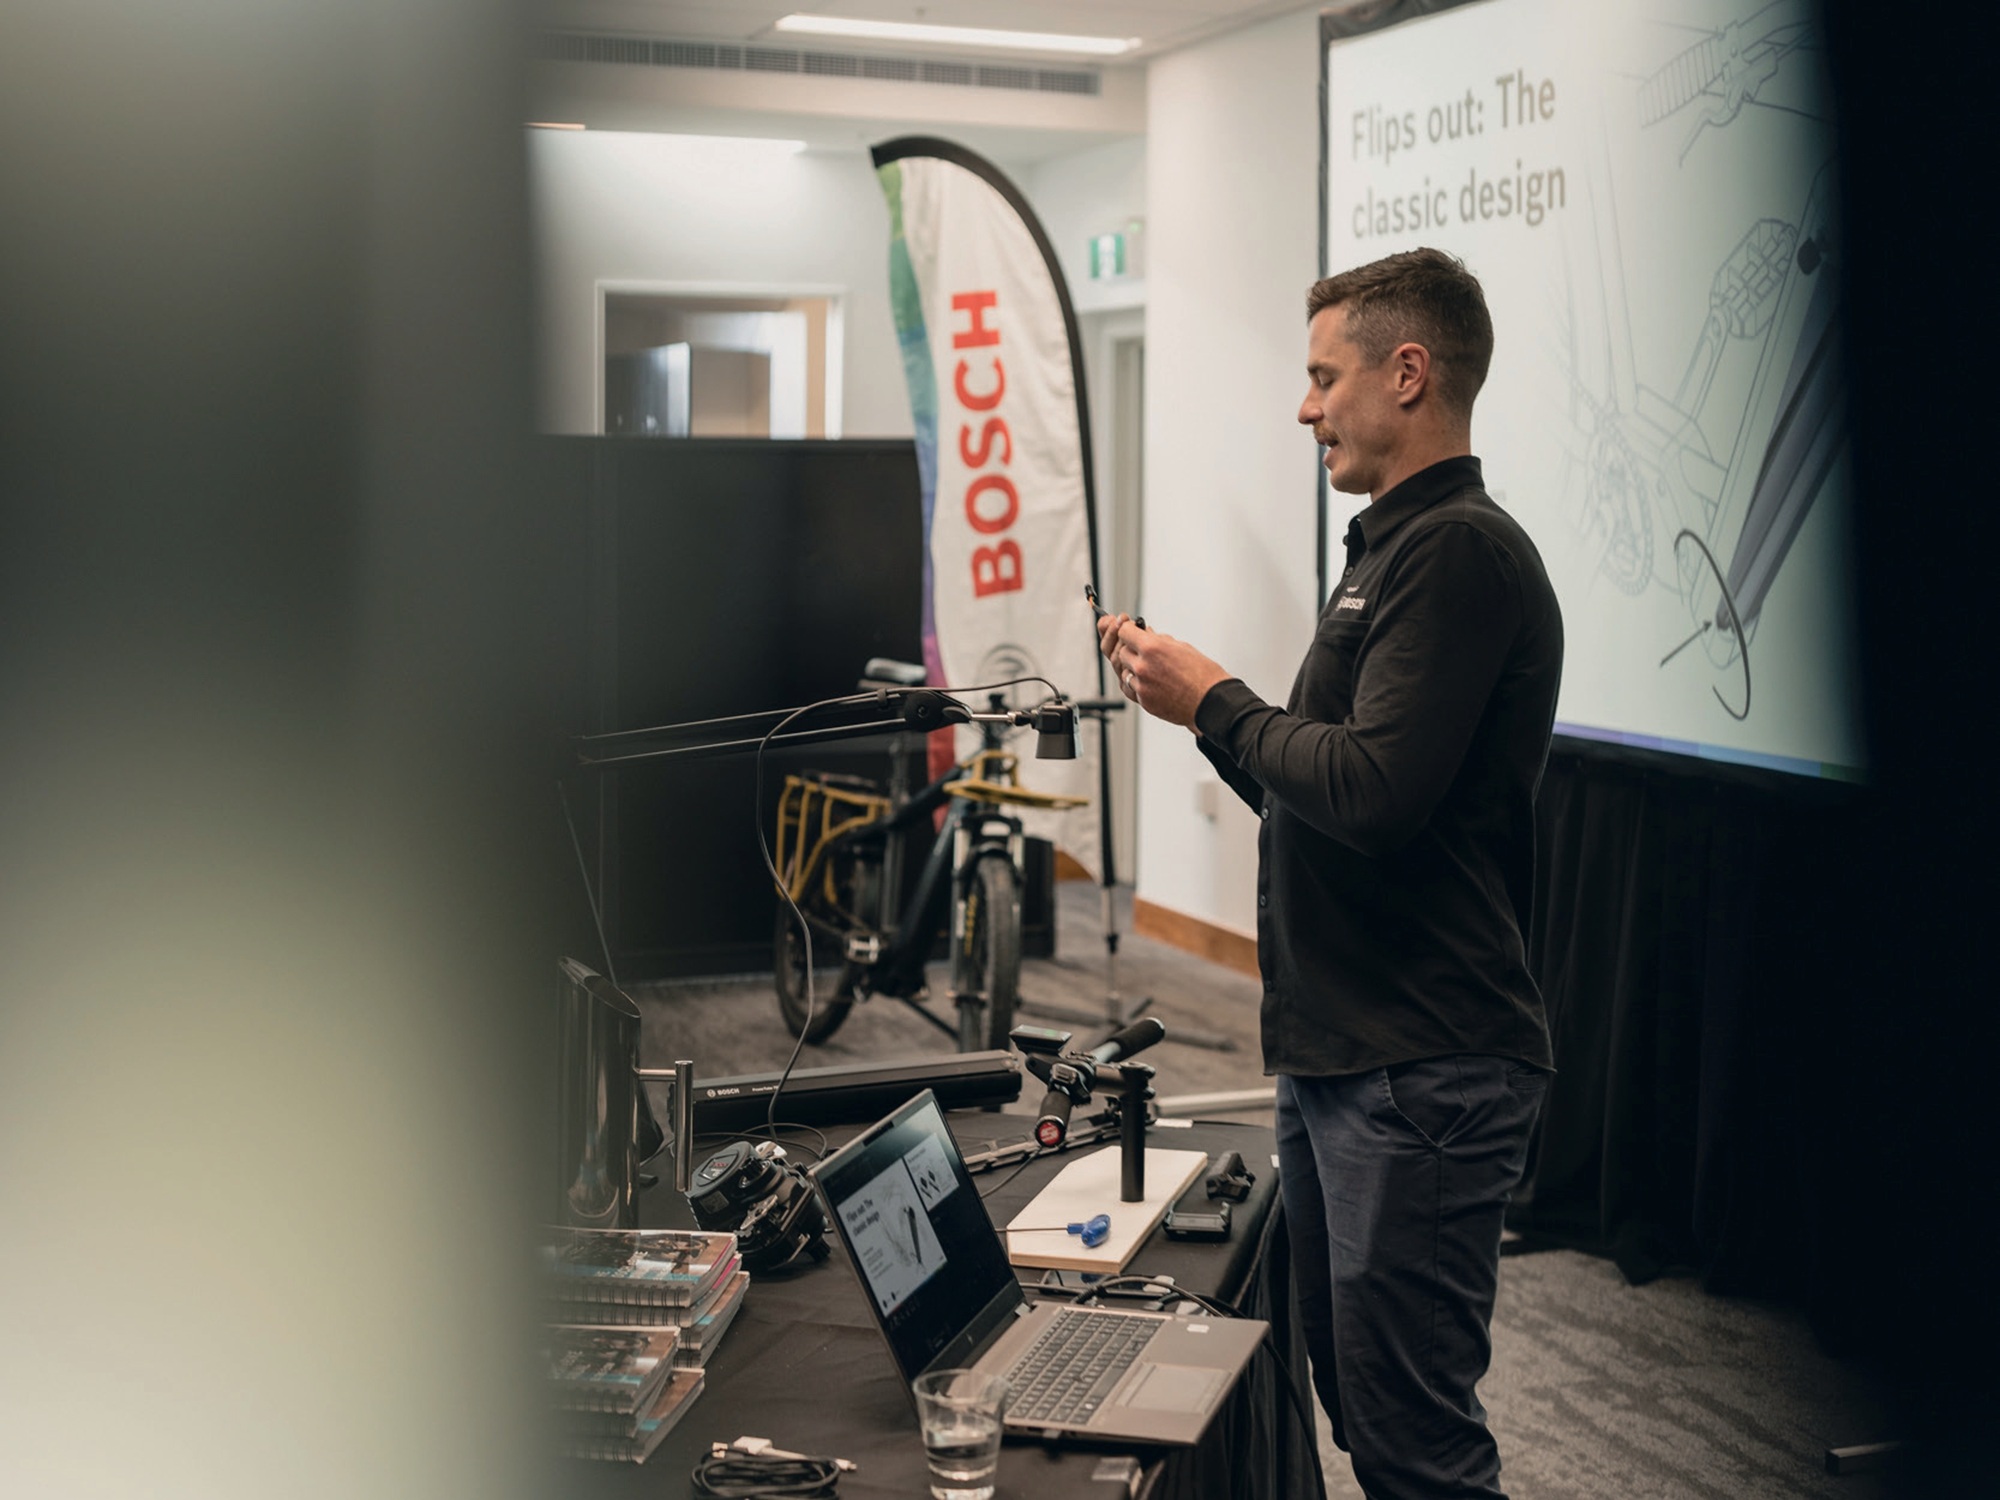
Bosch’s eBike tech meets Kiwi know-how
Words Liam Friary
Images Cameron Mackenzie
Bikes have changed a lot over recent years, with one of the most significant shifts being the integration of pedal-assist motors.
Of course, along with the excitement and freedom a motor brings, it also introduces a level of technology we – as home mechanics – likely aren’t equipped to handle. Even in the bike industry, the widespread adoption of eBikes has meant brands and wholesalers have needed to move quickly to handle after- sales service and support, and bike mechanics have needed to rapidly upskill to diagnose and repair these new electrical machines.
Bosch has been quick to adapt, launching local support efforts more than six years ago. As Bosch established itself in NZ, it partnered with Marleen Wholesalers to provide service and after-sales support. It hired Kieran Bennett as its Regional Technical Manager, the key technical link between Bosch and the New Zealand market.
Kieran explains that Bosch draws on learnings from its time in the automotive industry and applies them to the bike world, with a fresh outlook on how they should deliver service. “A lot of our processes and things that we do come from years and years of automotive experience – especially on the service side: when it comes to how service should be handled, how quickly replacements should be done, and how warranties should work – that’s carried over from the automotive side of Bosch. We haven’t followed a traditional bike industry model in that aspect because we didn’t come from the bike industry. Bosch has always been very service-first focused across all divisions.
“That’s why we have the likes of myself here, and the team in Australia, because without service a component can be as great as you want and, put out as much power as you like, it can do all this fancy stuff on paper, but if the consumer has a problem with that component and they can’t get a replacement, what good is it to have to wait weeks or even months to get a replacement motor or controller? It’s just not good for them.”
Although he has a wealth of technical knowledge to draw on to answer any questions a retail store or Marleen’s may have, it’s the frontline retail staff who are front and centre when a rider has an issue, so part of Kieran’s role is training shop staff and mechanics nationwide, ensuring they’re up to speed with the latest Bosch tech and systems. Each year, he holds six face-to-face training courses around the country, three in the North Island and three in the South Island, and has trained staff from over 300 New Zealand bike stores. This year alone, over 140 staff have attended the Bosch training in person, and many more are supported through online modules.
“These courses are basically an open invitation to all stores that are dealing with Bosch or maybe want to deal with Bosch in the future. We do product training, including hands-on troubleshooting and that sort of thing, for the dealers. We get them, front and centre, with any new product. Sometimes, we’ll run them through scenarios with problem components to problem- solve and find issues with components. It’s quite a full experience in that aspect. With the number of brands we have in the market now, we deal with just about every store in the country on some level. There aren’t many stores that don’t have at least some sort of Bosch-powered bike in there.”

Training sessions are tailored to the NZ market and bring together the big-picture Bosch brand and history, combined with Kieran’s first-hand experiences as a rider and technical whizz. Kieran covers everything from new features and functions to how components and controllers interact with a rider, and the mechanics of how the systems work together. There’s subtle yet important information where he delves into design choices, like the how and why of the materials chosen specifically for their vibration-damping properties in a drive unit.
Kieran explains that he has a wide range of students turn up to the training; some guys who’ve been through his sessions since their inception over six years ago, bringing their own experiences and insights. There are fresh faces just starting their time in the bike industry who gain so much from the training itself, as well as from the experience of those with years of on-the-job experience.
When a consumer has an issue, be it an error code showing up on their system or something more significant, the structure in place to support the dealer is there to get the customer sorted and back riding ASAP. First and foremost, a bike mechanic will use the Bosch diagnostic tool to identify any errors. If there are no apparent errors at play, they may undertake a process of cross- swapping components to narrow down whether a damaged cable or component is the issue.
“Sometimes it’s as simple as diagnosing it on the diagnostic tool or doing some cross-swapping, say swapping in a battery out of another bike to rule out an issue there, or swapping out a cable or controller. Once they have isolated the error, they will then create a service case with us. That service case then goes into our service queue, which Marleen wholesalers handle. From there, they basically take it on. If it’s something odd or needs escalation for some reason, that’s where I’d come in and provide support from the Bosch side with Marleen’s. And then, essentially, it’s just a turnaround of, hey, it’s this particular issue, maybe this is something we know is a problem. We’ll send a replacement component out, or sometimes it’s the case that a motor will come back, and they can do testing at Marleen Wholesalers on it, so they can identify if it may be a motor issue. They’ll even put it in other test bikes sometimes to see whether that error is still happening; there’s a lot that can go into diagnosing a problem.
“From there, if something needs a replacement, the new part goes back to the store. All this is with the aim to get the customer back on the bike as soon as possible.”
Kieran doesn’t just talk the talk, he can walk the walk too; in fact, you’ll likely have seen him on the very pages of this magazine at some point. An avid mountain biker, ‘KB’ as he’s known, has raced downhill since he was young, competing at a high level locally and around the globe. This experience has given him a unique understanding not only of bikes and their technical aspects, but also of how they ride and the people who ride them. More recently, his focus has shifted from the gravity-focused end of the sport to some more endurance-based marathon MTB and gravel riding. eBikes are now also an integral part of his cycling experience. Days begin with dropping his two boys off at school on an e-cargo bike. After a few hours mahi, he’ll jump on his eMTB for a quick lunchtime lap of his local hill, then he’ll return in the evening with one of his kids in tow; the eBike helping get them to the top of the hill before a descent down to dinner. Kieran is excited to see what the future holds for eBikes, but admits we’re in a great place with them already. “People want more power and lighter bikes, but it’s got to be one or the other, really. More power equals more weight. I think, particularly where a lot of the e-mountain bike market is settling at the moment, it is quite good in the way bikes are getting to a low 20kg range for a full-powered bike. It still makes for a fun ride and has plenty of power. To me, eBikes are fantastic for accessibility. Getting out to stuff that you normally wouldn’t get to, because you can ride further, you can get up more hills or tow the kids. When you’re time poor, you can now go and do that local loop with lots of climbing, far quicker than on a normal bike.
“There are massive positives for eBikes for sure.”
Produced in partnership with Bosch eBike Systems
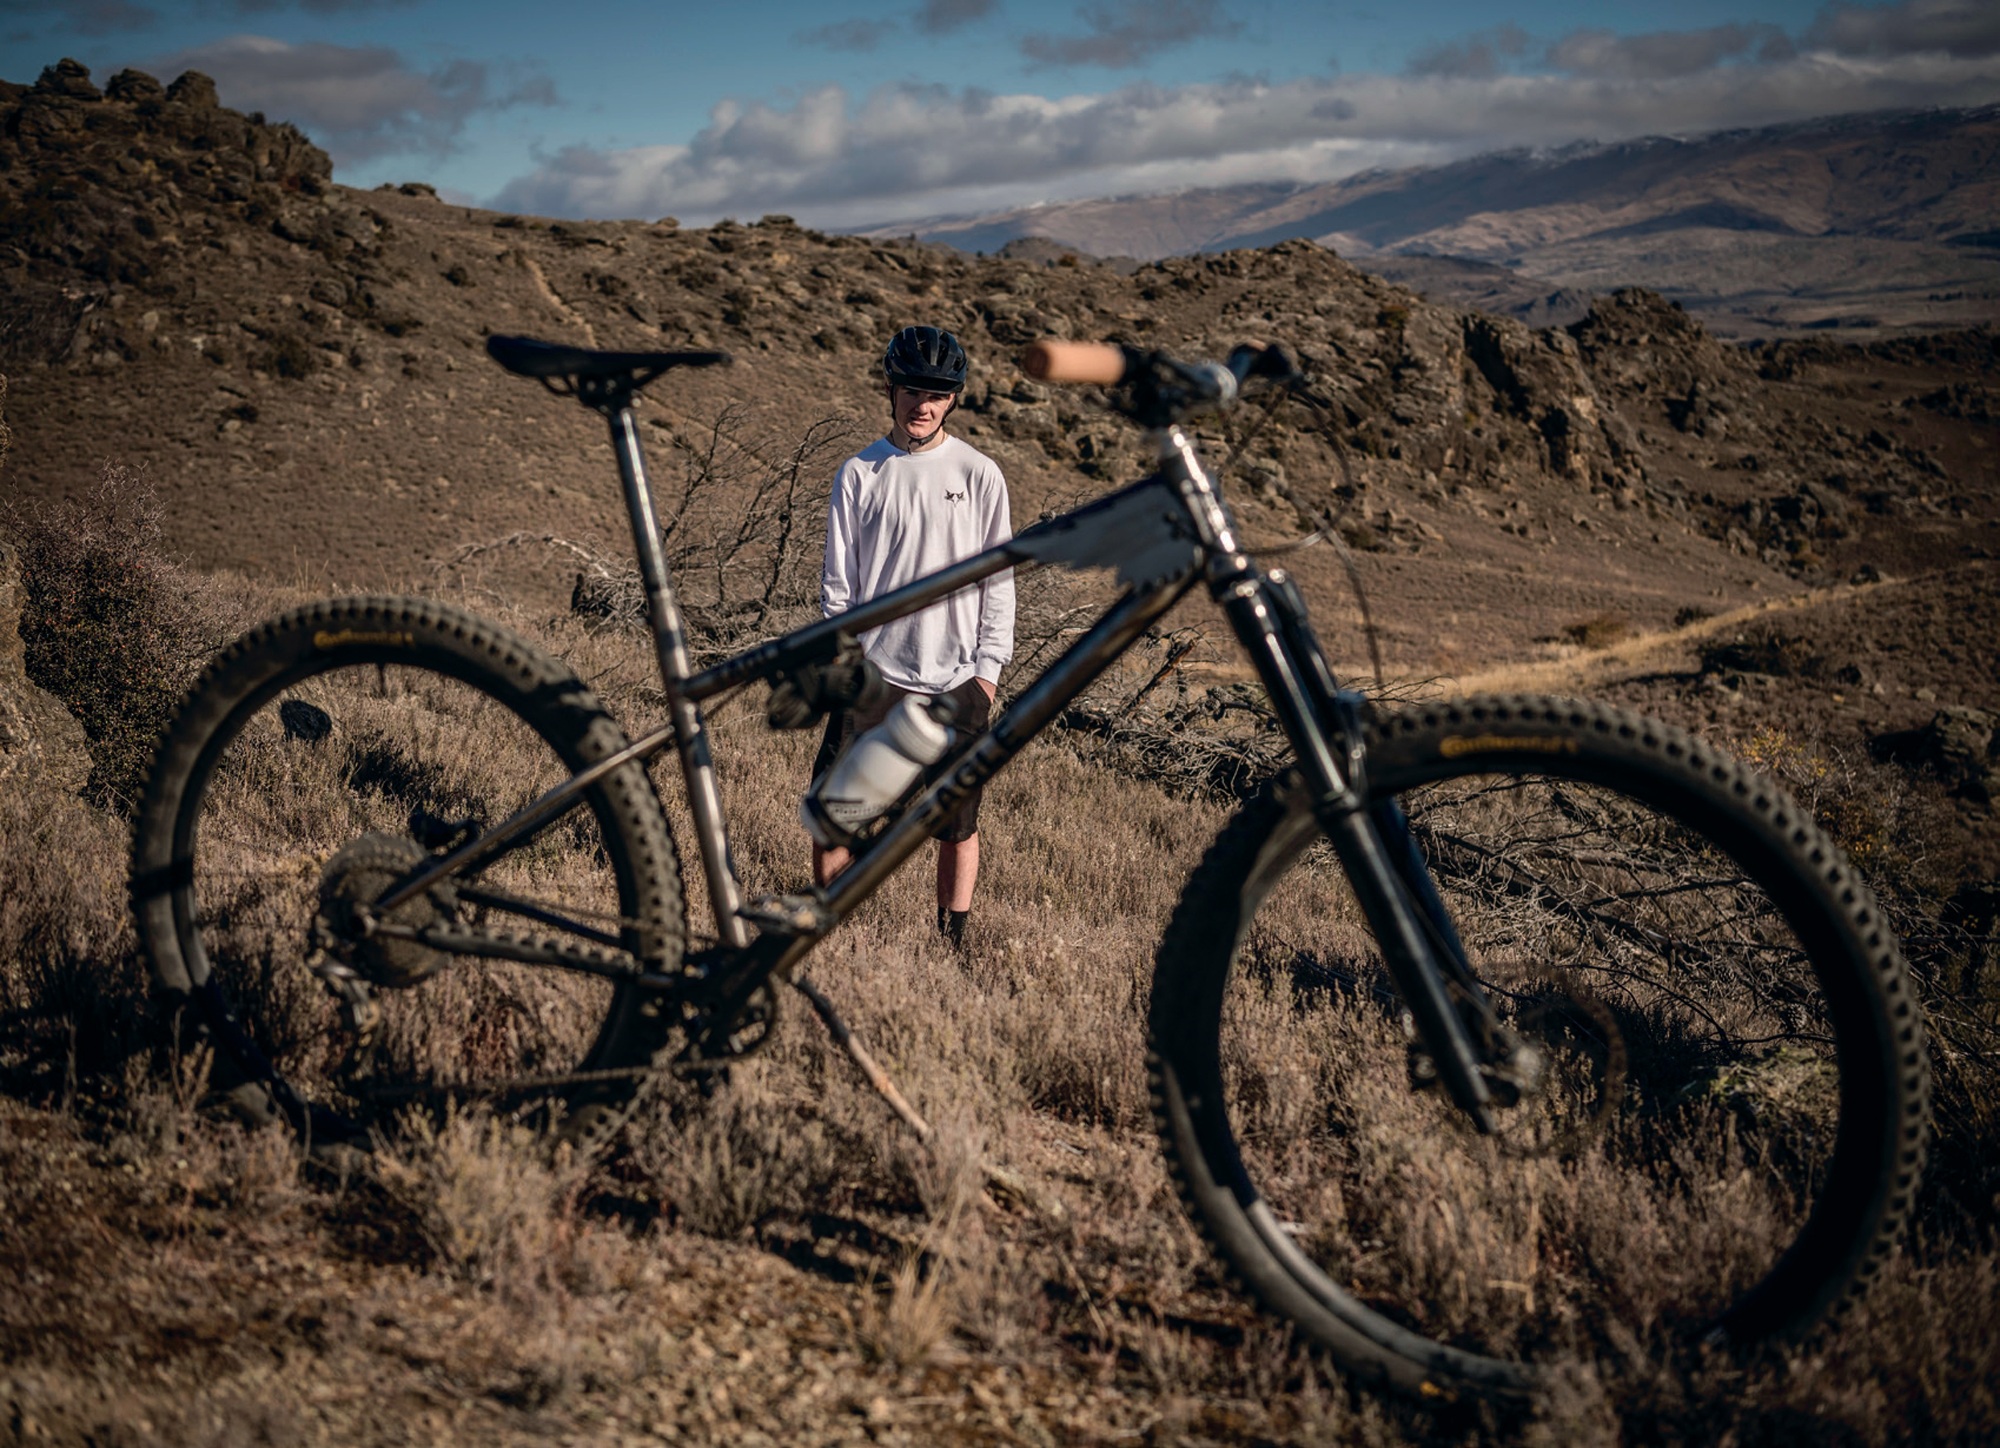
The Eagle: Handmade Hardtail
Words Eddie Adams
Images Simon Williams & Eddie Adams
I started the trail so softly, not wanting to break or damage what had taken me over two years to complete. The bike handled the first rock sections so perfectly that I immediately trusted my work. From then on, I just let her do her thing – and she absolutely ripped.
This was my first experience riding my homemade hand-built hardtail on singletrack and, of course, it was a race. This is a story about how, as a mountain bike- obsessed teen at high school, I made a functioning mountain bike that was different from anything purchasable on the market.
It all started on YouTube, when GMBN released the video of Blake Samson building his own hardtail in his garage during lockdown. This got my brain ticking – could I build my own bike? Man, that would be cool; how hard can it be? The subject selection for the following year of school rolled around and I was moving into year 11 (level 1 NCEA). I had most subjects chosen but needed one more to fill my timetable. This year a new subject was going to be introduced, called PBL (project-based learning). Instantly, it clicked. This would be so much better than any other class at school, and I could use it as an excuse to build my own bike and then get credits for it; it was a win-win-win situation.
I knew straight away that it had to be a mountain bike (because that’s way cooler), a hardtail (for simplicity), and different from anything already out there. Not to make a hard project harder, but because I am one of those people who doesn’t like to do things the same way as everyone else and I don’t see the point in making something that’s already been made. I had zero prior knowledge or experience in designing or building a functioning mountain bike but I had the passion, and an obsession with making it work. It quite literally took over my brain.
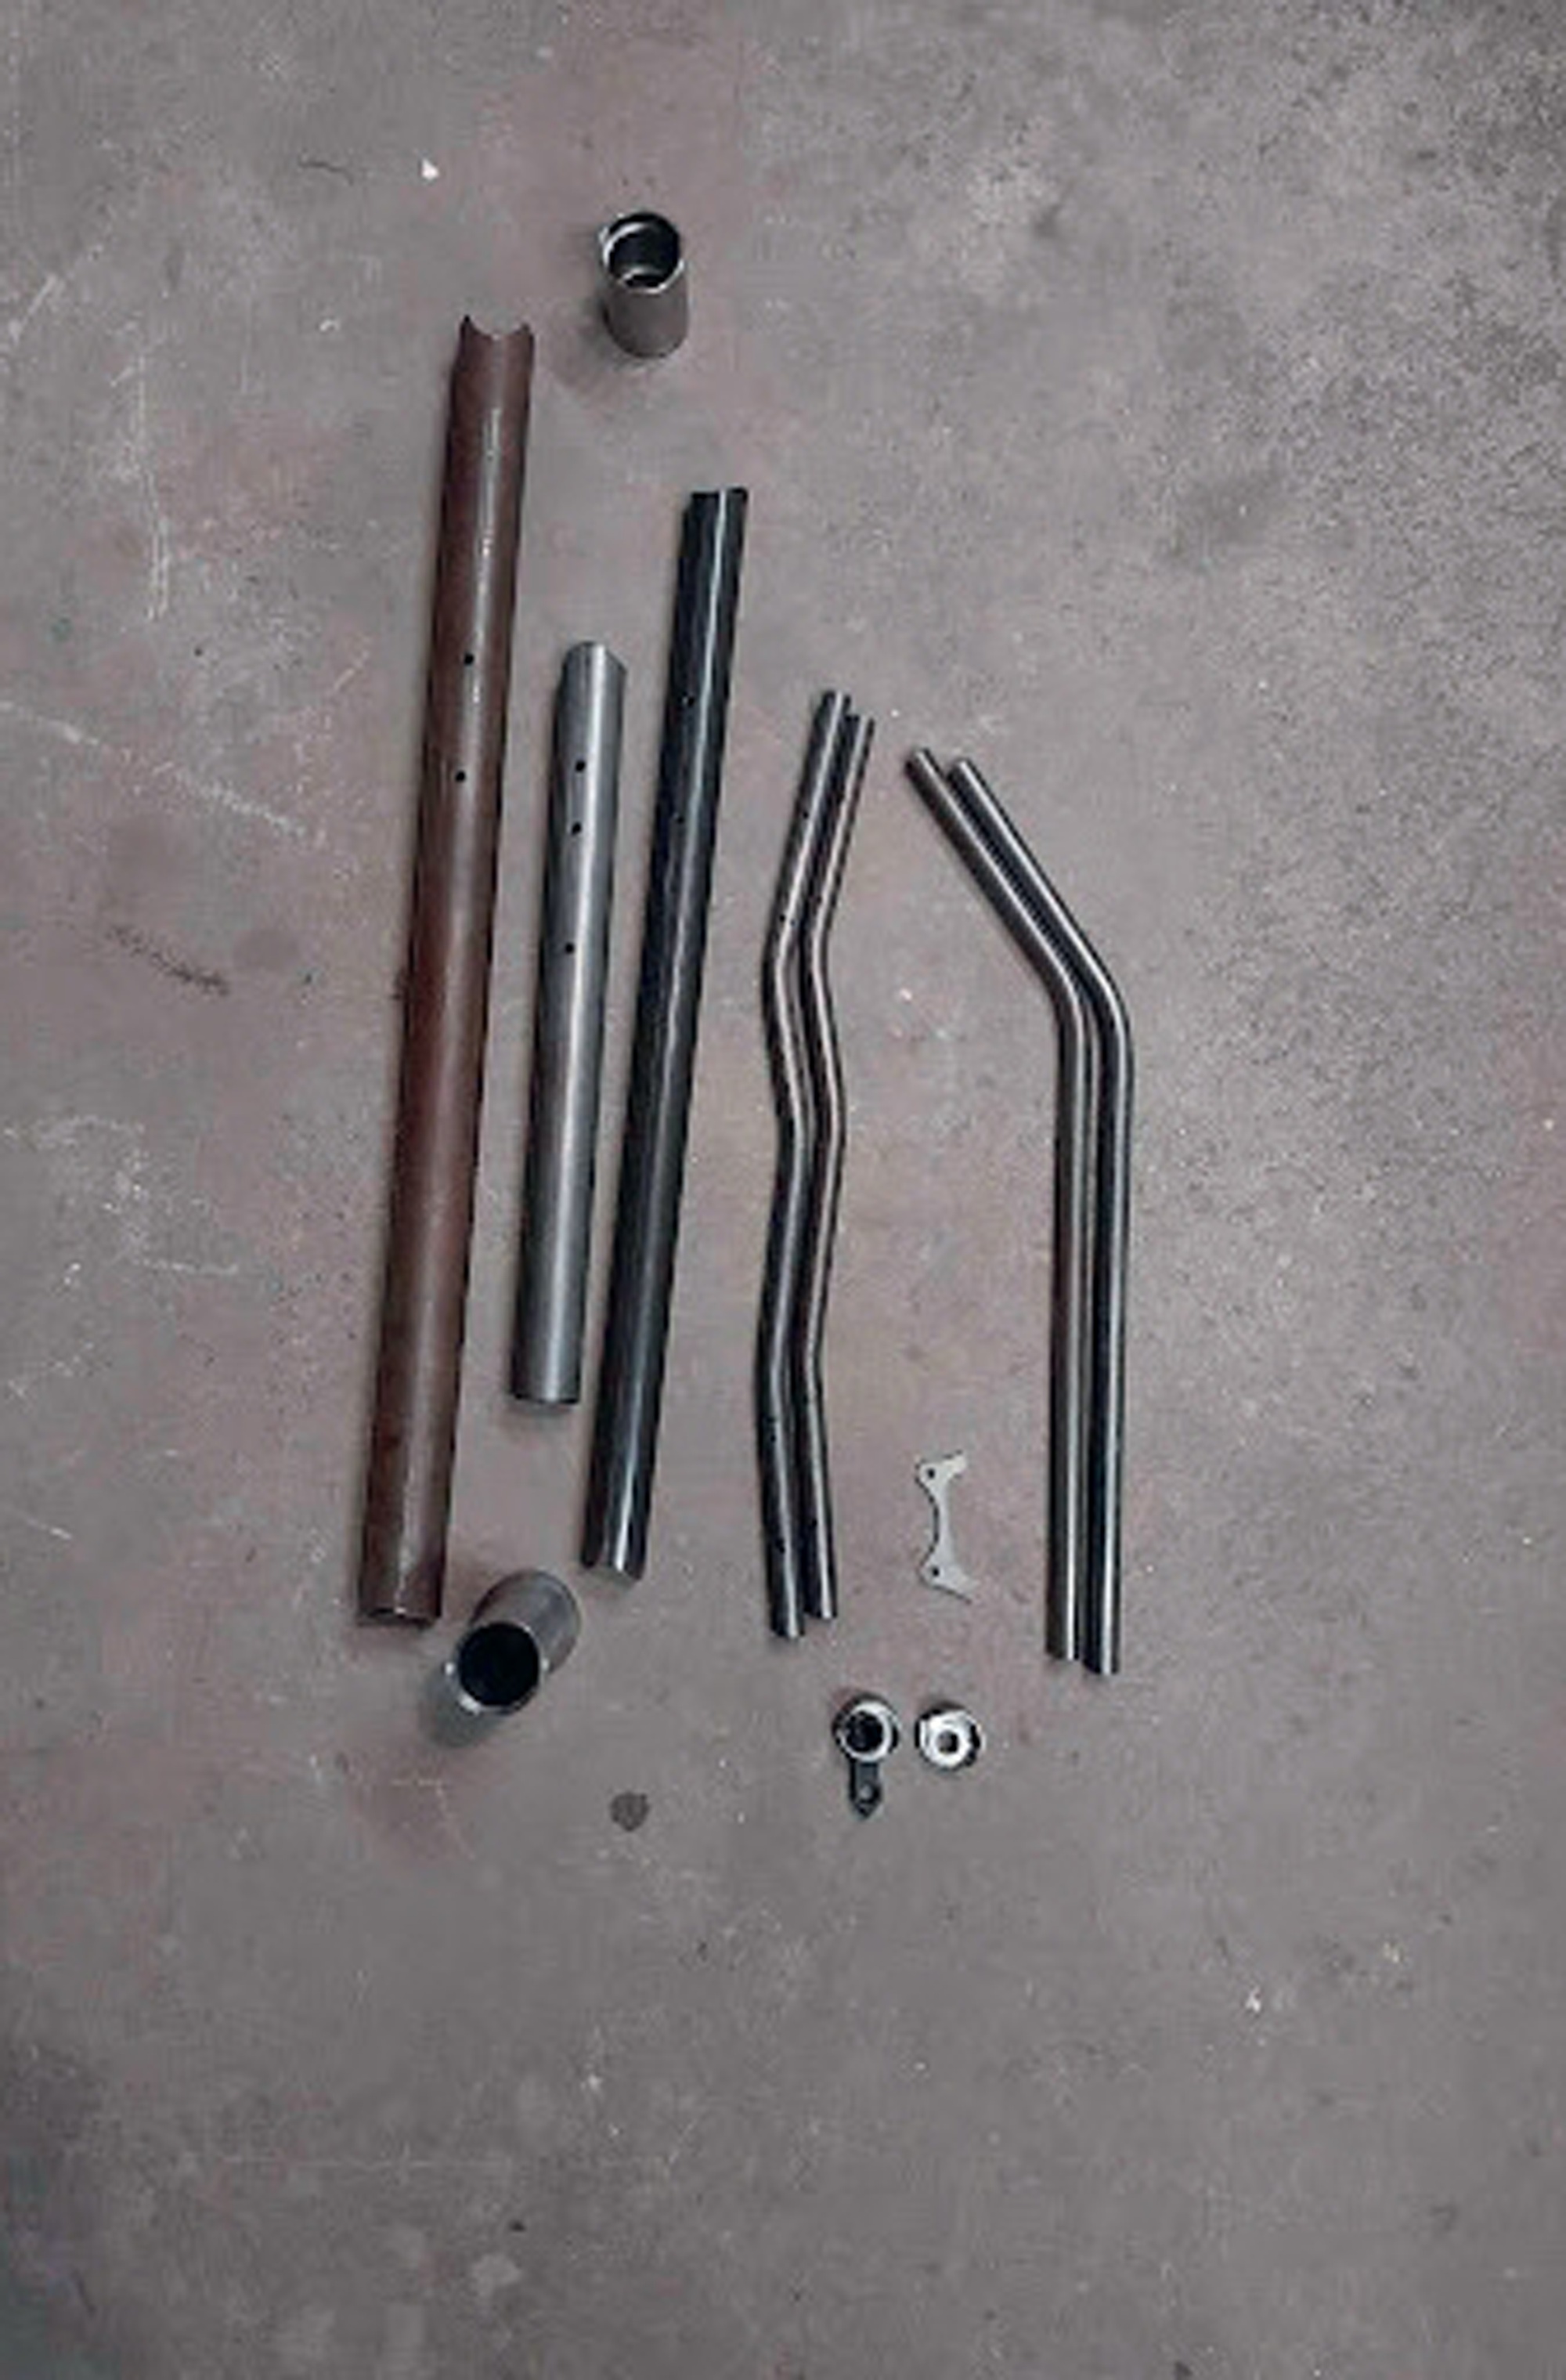
The first step was research. Firstly, what did I want my bike to be like and, more than that, how was I going to make it? I compared the geometry of other aggressive hardtails and quickly decided on my final geometry to make the bike unique and ride how I wanted; stable but playful. Now the main problem was: how would I actually build it? I watched every YouTube video on hand-built bikes, read blogs and even had phone calls with frame builders to get their take on how I could tackle it. The more research I did, the harder it seemed, so I found myself going back to GMBN to remind myself it would work. The main thing I took away from this research, was that it was going to be made from 4130 Chromoly steel, TIG welded and I was going to need some sort of a jig (which I didn’t have) to hold things in place while they were welded.

I had decided on my geometry, now I had to see if it would actually work and how it would look. While researching about building the bike, I found out about the BikeCAD programme created by Canadian, Brent Curry, specifically for designing and hand building bikes. After explaining my situation to him, he was super happy to help me out with a subscription to his program. Honestly, this was probably the biggest help for the project; without it, things would have been a whole lot harder – as you’ll find out. With the program, I found it super easy and fun to put in my decided geometry and customise how the frame would look, then figure out if it would work. From here I found that my chain and seat stays were going to need bends and also how much material I was going to need. From this 2D CAD model, I used the dimensions to create a 3D scale model in Fusion 360 which I then went on to 3D print as small-scale models of the frame. BikeCAD also allowed me to get a file of the frame design printed in 1 to 1 scale which came in handy when building.
Early on, I decided that the bike was going to be made from 4130 chromoly steel as it is much easier to deal with than aluminium; cheaper and also widely used in bike manufacturing but reasonably easily attainable. For the main frame tubes, I was able to source from a New Zealand company reasonably easily and cheaply. Note, this was not bike-specific tubing, the company it was from is more focused on roll cages and plane builds, so it’s much thicker and heavier, but this wasn’t something that bothered me as it was keeping my self- funded budget down. There were specific parts I had to order from America, e.g. headtube, BB shell, dropouts and brake mounts. These were not cheap but made the whole process a lot easier for me and they were good quality so it was well worth it.
I mentioned earlier, the biggest challenge to making the build successful was the fact that I didn’t have a frame jig to hold all the tubes in the right place at the right angle to be welded, so the bike wouldn’t turn out wonky and with the wrong geometry. Nothing I could find by research seemed realistic, doable or feasible for me, so I had to figure out my own. I went back to Fusion 360 and designed my own solution, a series of specifically designed 3D printed lugs that would hold the tubes where they needed to be. A few test and trial batches later – paired with some threaded rod and nuts – and I had a functioning ‘single-use’ jig. The jig was made up of two groups, the first was for the front triangle which is laid horizontally with the lugs holding the centre of the different- sized tubes at the same height as well as at the right angles. The second was for the rear triangle where the intact front triangle stood upright at the correct angle so the rear triangle could be precisely attached.
Preparing the tubing was very exciting for me – it was the first physical step in actually building the thing and it was made super easy thanks to BikeCAD and my cousin, Tom McKewon. From BikeCAD, I was able to print out paper templates of the profiles for each intersection in the tubing to get perfect fits along with thousands of very specific and accurate measurements I couldn’t imagine having to calculate on my own. The tricky part of preparation was bending the chain and seat stays to the correct angles, in the right place and on the same plane so that they matched each other perfectly; this took a lot of thought and care to get right. Thanks to our ‘extremely calculated’ swings on the bending bar and Tom’s very accurate “eye-ometer” we ended up with two seat stays and chain stays looking very symmetrical. After a full, long day of measuring, cutting, shaping and double checking we had tubes that looked ready to make a bike!
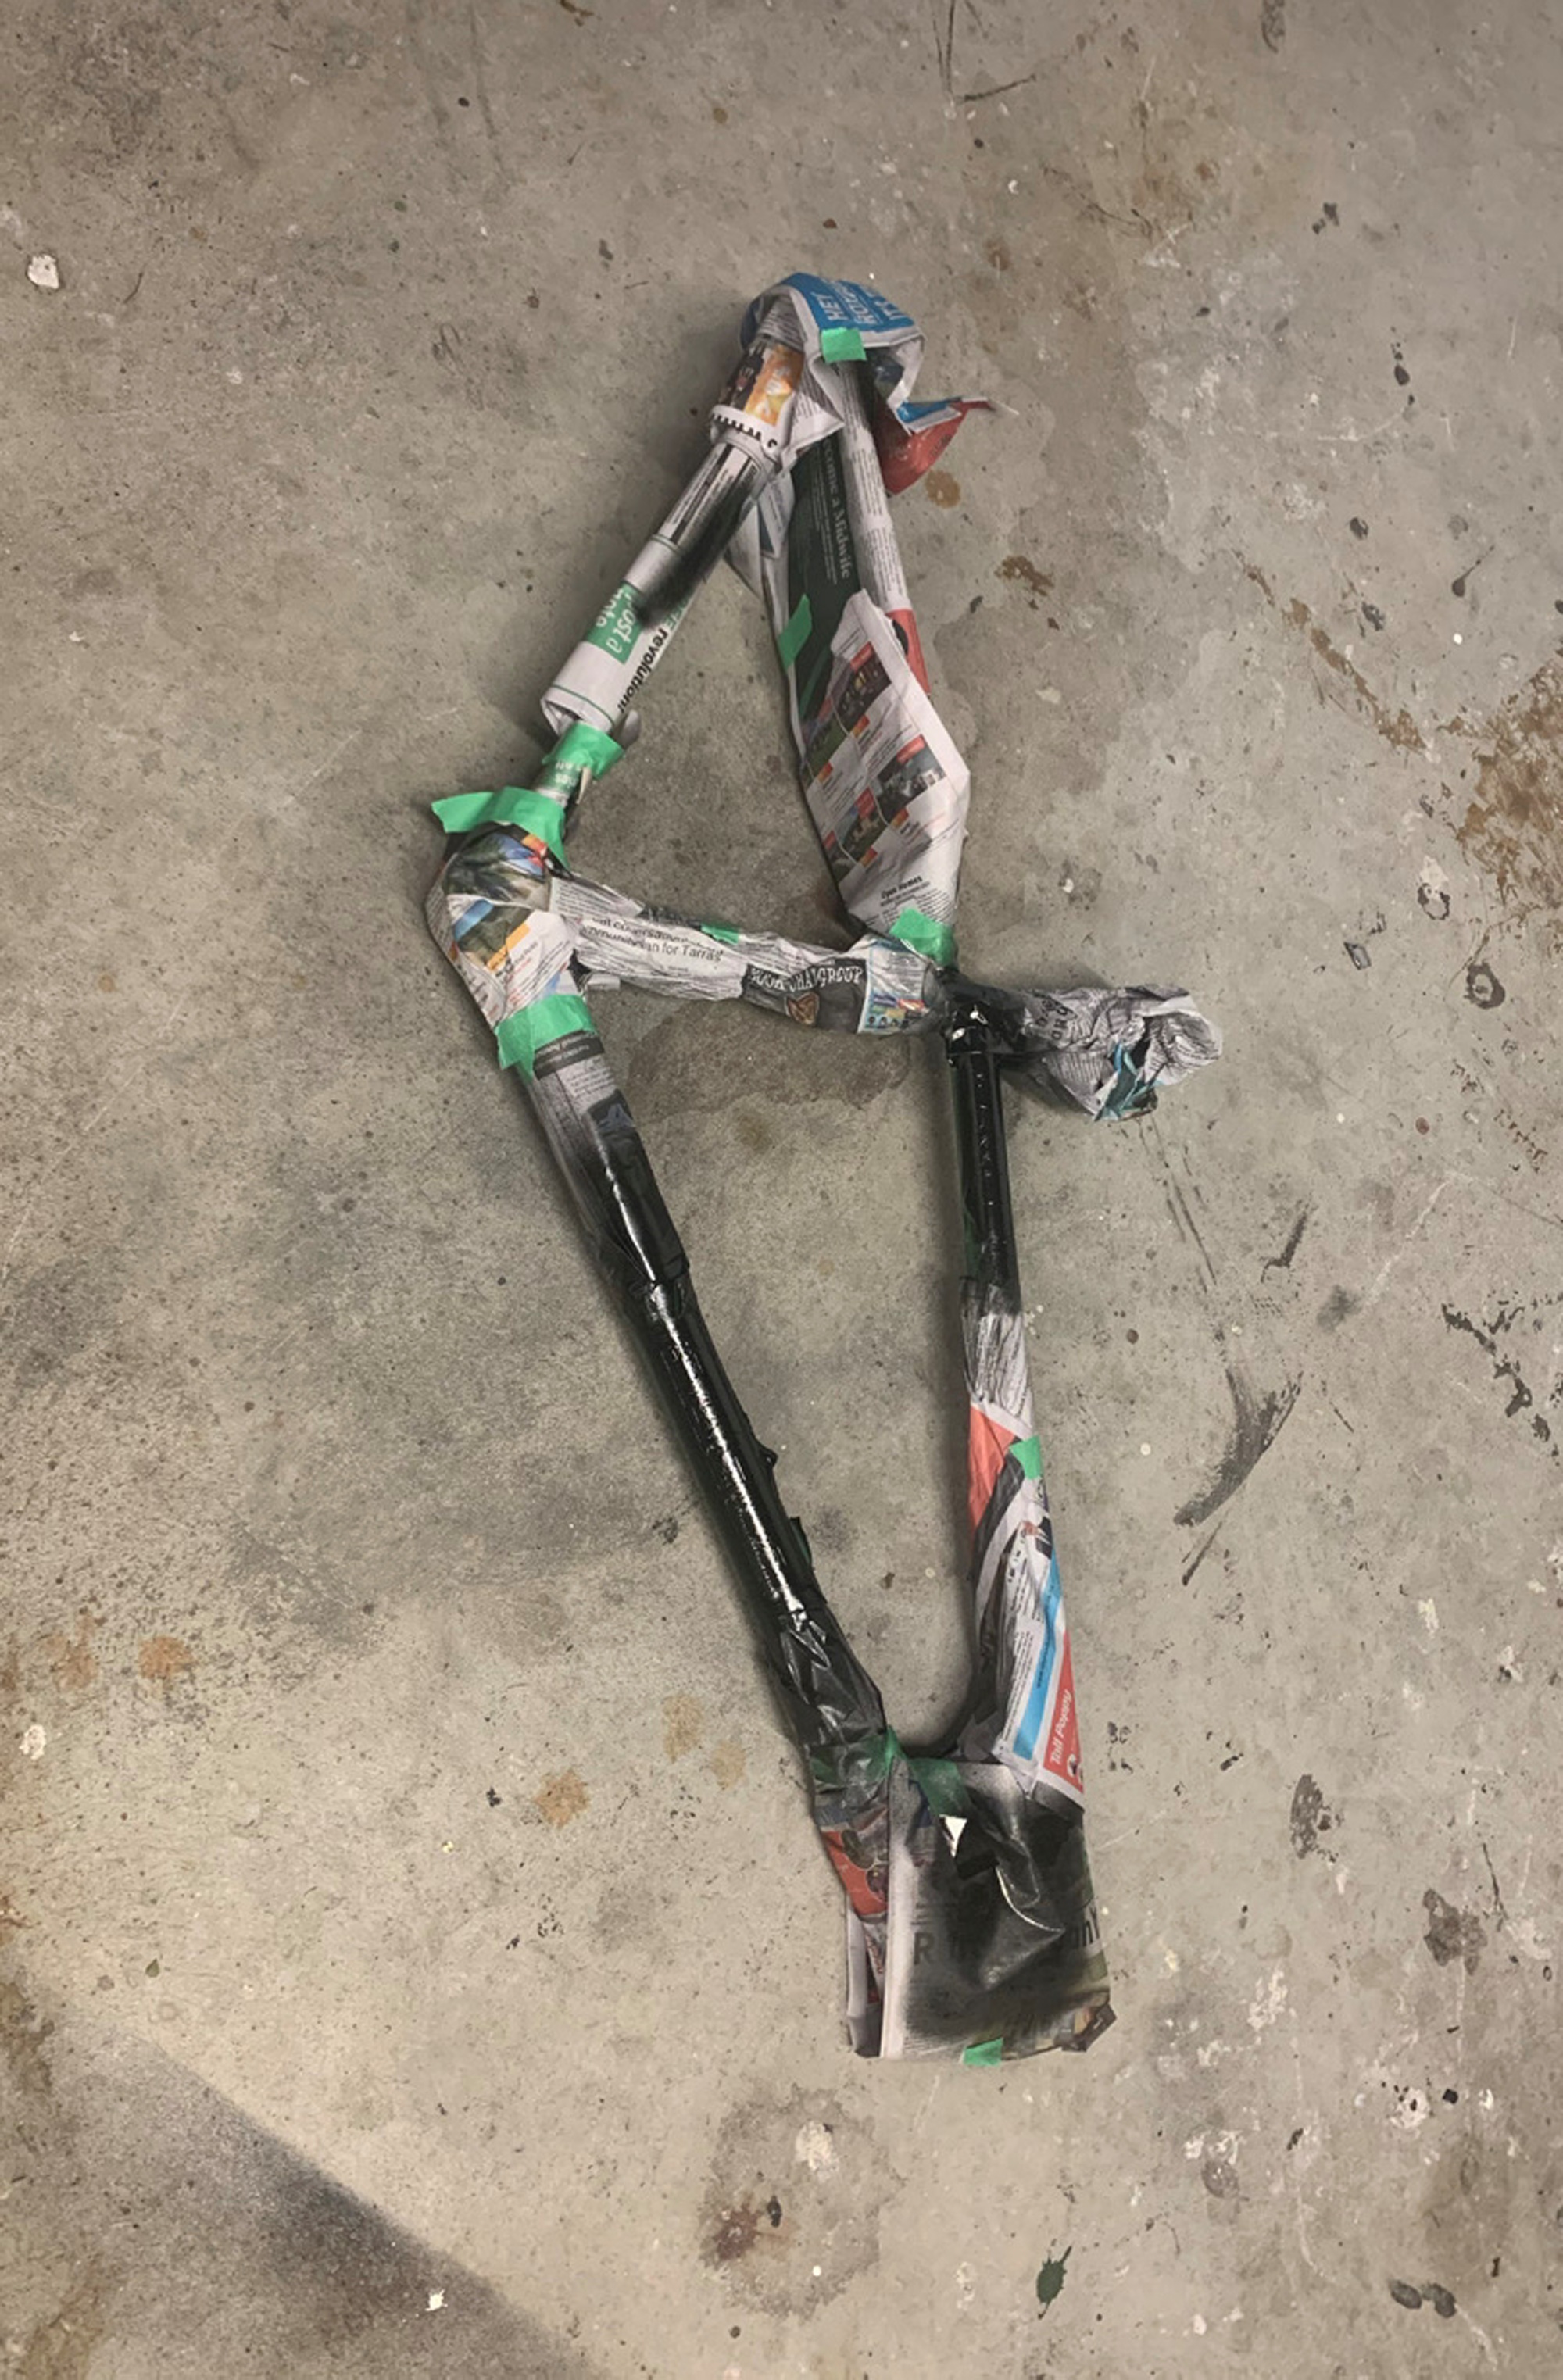
After months stalled by racing and final exams, we finally found time to weld the frame. I’d originally planned to do the entire build myself, but with no welding experience – and wanting the bike to be both rideable and reliable – I turned to CenEng, a local engineering shop. They stepped in for a day and welded the frame at a discounted rate. This was the moment of truth: would all my prep work pay off? Had I measured and metered the tubes accurately, and would my homemade jig hold up? Thankfully, the results were promising. The tubes slotted together with tight, clean joins and the front triangle came together smoothly in the jig. It held firm for tackwelds before we removed it for full welding. The rear triangle was more complex. The jig, made from plastic, began to melt under the heat. Plastic softens at around 300°C, while steel welds at close to 3000°C, hence it being single-use. The dummy axle, in particular, warped slightly, which made the rear wheel spacing a bit tight. We added bottle bosses and repurposed, drilled-out M5 nuts as cable guides. By the end of the day, we had a frame that actually looked like a frame. After more than a year of planning and building, it was a surreal and satisfying milestone.
Now that most of the frame was together, only a few final pieces remained to be welded on. But once again, summer racing commitments put things on hold. At the time, I was juggling a packed schedule; racing XC across New Zealand and Australia including wins at the U19 National Champs, The Prospector Stage Race, and the Australian National Series. I was also racing on the road, standing on podiums in both countries, and mixing in some enduro, gravel and cyclocross for good measure – often with solid results. These days, I’m still racing nationally and internationally, spending seasons in Europe and the U.S, chasing the long-term goal of going pro. So, between training during the week and racing most weekends, it was tough to find spare time to get back into the shed and finish the frame. However, a few months later I returned to Ashburton to “Mitre Tom,” where we finished the job.

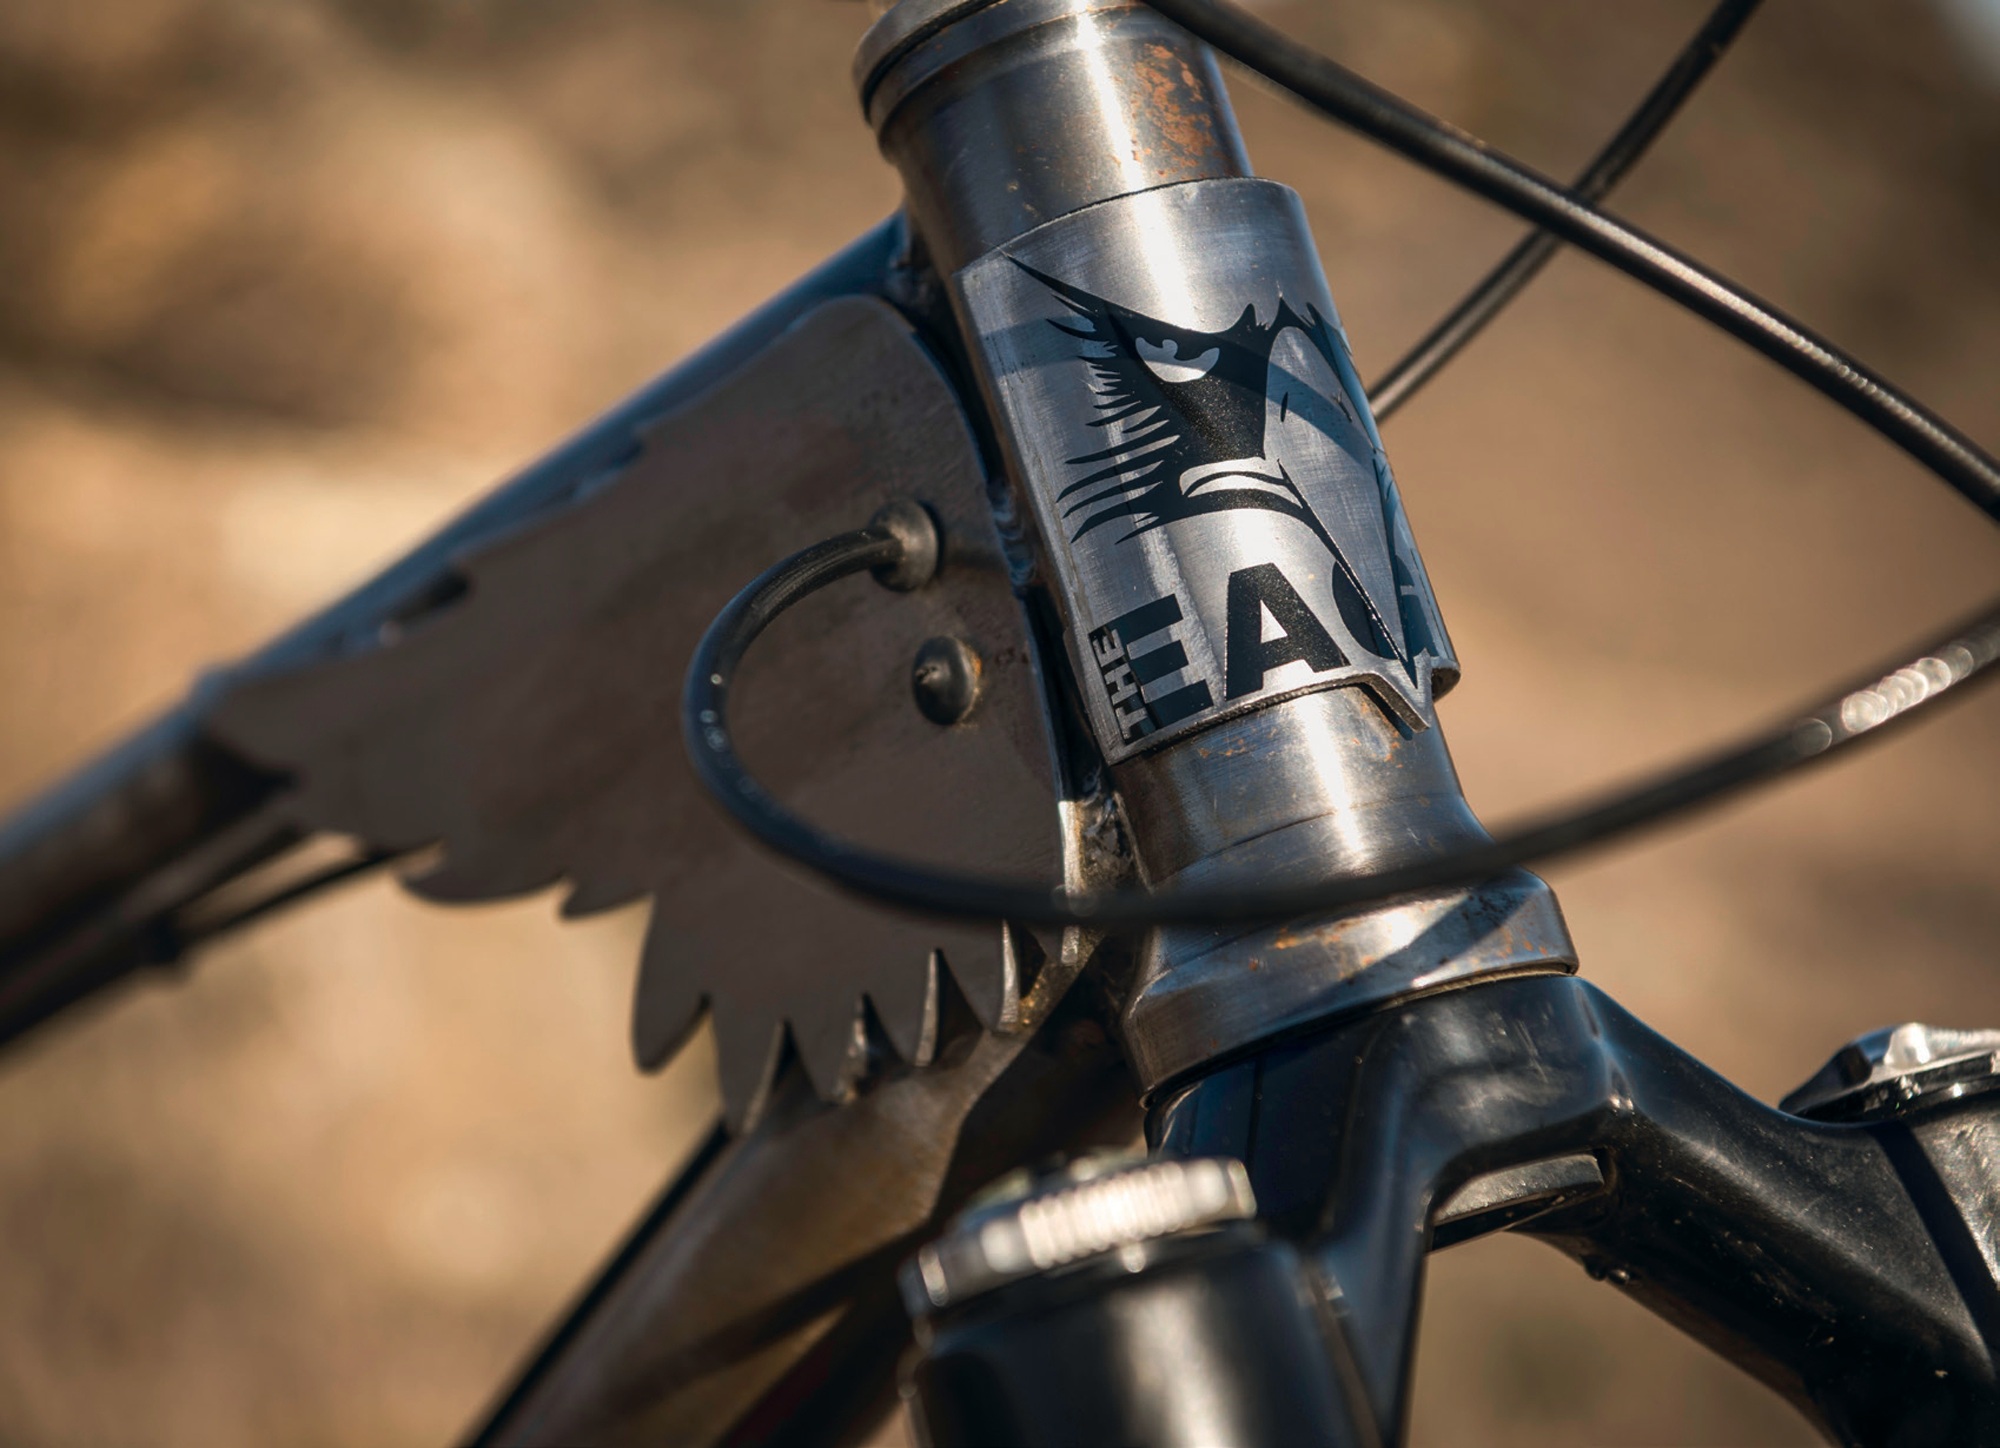
Among the final touches was the most recognisable part of the bike: its wings. From early on, I was told that with such a slack head angle, a gusset brace was strongly recommended. But it wasn’t until the frame had already been welded that the idea came to me to turn it into the wings of The Eagle. I sketched the shape onto a piece of steel donated by a local engineering firm, then spent hours carefully cutting them by hand with an angle grinder and sanding them smooth. Once welded in place, we quickly realised the sharp upper edges were a bit hazardous, perfect for catching or slicing body parts, so we bent the tips down over the top tube for safety and a more finished look.
With all the welding complete, a few key faces had warped slightly and needed precision work before components could be installed. The bottom bracket shell was the main issue – its threads had been badly affected by the heat, and with such specific dimensions, no one nearby had the right tap to clean them up. I wasn’t about to spend several hundred dollars on a new one, so I turned to the ‘frame builders’ Facebook group for advice. After weighing up suggestions, I decided to carefully grind down just the damaged sections, leaving the rest of the threads intact. It was a slow job, but in the end it worked perfectly.
Seeing the frame finally in its full shape, I was fired up to get it finished. I spent more late nights in the garage sanding the entire frame by hand to achieve a clean brushed-metal look. Alongside that, I designed decals and used my school’s vinyl cutter to create paint stencils. Several coats of clear finish followed, to protect the steel as much as possible while preserving its raw, bare-metal aesthetic. To match the frame’s silver tone, I also used drain cleaner to strip the anodising off a few coloured parts, e.g. fork dials, stem, spacers and top cap. After a bit of polishing, they gave the bike an even more unique, custom feel. Throughout the build, I’d been slowly sourcing parts to finish the bike. I had a rough idea of what I wanted, but keeping the budget low was the priority. Most of the components came from what I already had at home, some cheap Marketplace finds, a few AliExpress bargains, and just a handful of new parts. Like every other step of the project, I was super excited and, once the clearcoat had dried, I jumped straight into the build. By then, I had nearly everything I needed, and the assembly went surprisingly smoothly. The only missing piece was a crank set. After two years of hunting for a cheap second-hand option, I gave in and ordered a brand-new set of Shimano Cues cranks for around $60, still unsure if they’d even fit. Fortunately, they went on perfectly, which was a relief, because the very next day I was heading off on a multi-hundred-kilometre bikepacking trip, without a single test ride…
My first ride on The Eagle was nothing more than a lap up and down the driveway. Two years of work had led to that moment, and regardless of how it actually rode, it felt good just to be on it. There wasn’t much time to reflect, though, as I was leaving on a bikepacking trip the next morning. The bike had never done more than 50 metres, and now it was being loaded up with gear and heading into Central Otago’s backcountry for three days. A few people were understandably sceptical about taking a first- time, home-built frame out there without a proper test ride, but I had almost full confidence in my work. Over the trip, we clocked a couple hundred kilometres with some solid ups and downs. Most of the issues that cropped up were due to worn second-hand components, not the frame itself. That said, a couple of my own oversights did make an appearance. The first was the seat clamp. I’d only tightened it enough to hold my body weight because I didn’t want to over- torque it, but that wasn’t enough for a loaded saddle bag, so the seat kept slipping down. Some electrical tape got me through the first day until I found a wrench in Roxburgh. Then came the rain. We camped in a tent on the second night, and in the morning we woke to a lovely headwind and slightly orange frame. Clearly, the clear coat hadn’t completely sealed the steel. Not ideal, but it was just surface rust on chromoly – nothing structural – and I managed to convince myself it gave it more of the homemade look that I’d wanted.
Once I was back home, The Eagle became my go-to ride to school. It wasn’t the most expensive looking bike in the rack – especially in a town like Alexandra with a solid mountain biking scene – but I liked it. It stood out. But that didn’t stop someone from stealing it. I was pretty stressed when I realised it was gone. After everything I’d put into it, the idea that it could just disappear, or get trashed, was hard to take. I put a post up on Facebook with some photos and it didn’t take long to get a lead. Somebody had found it early in the morning outside the supermarket, not far from some damage to the building. It looked like it had been used in an attempted ram raid. Thankfully, they’d taken it straight to the police station and when I got there it wasn’t hard to describe. There aren’t many bikes with steel wings welded to the headtube. The police asked me to check it over for damage and, somehow, it was fine. Not even a bent derailleur. Honestly, I was surprised… but mostly relieved; my bike had survived being used as a battering ram and was stronger than a supermarket!
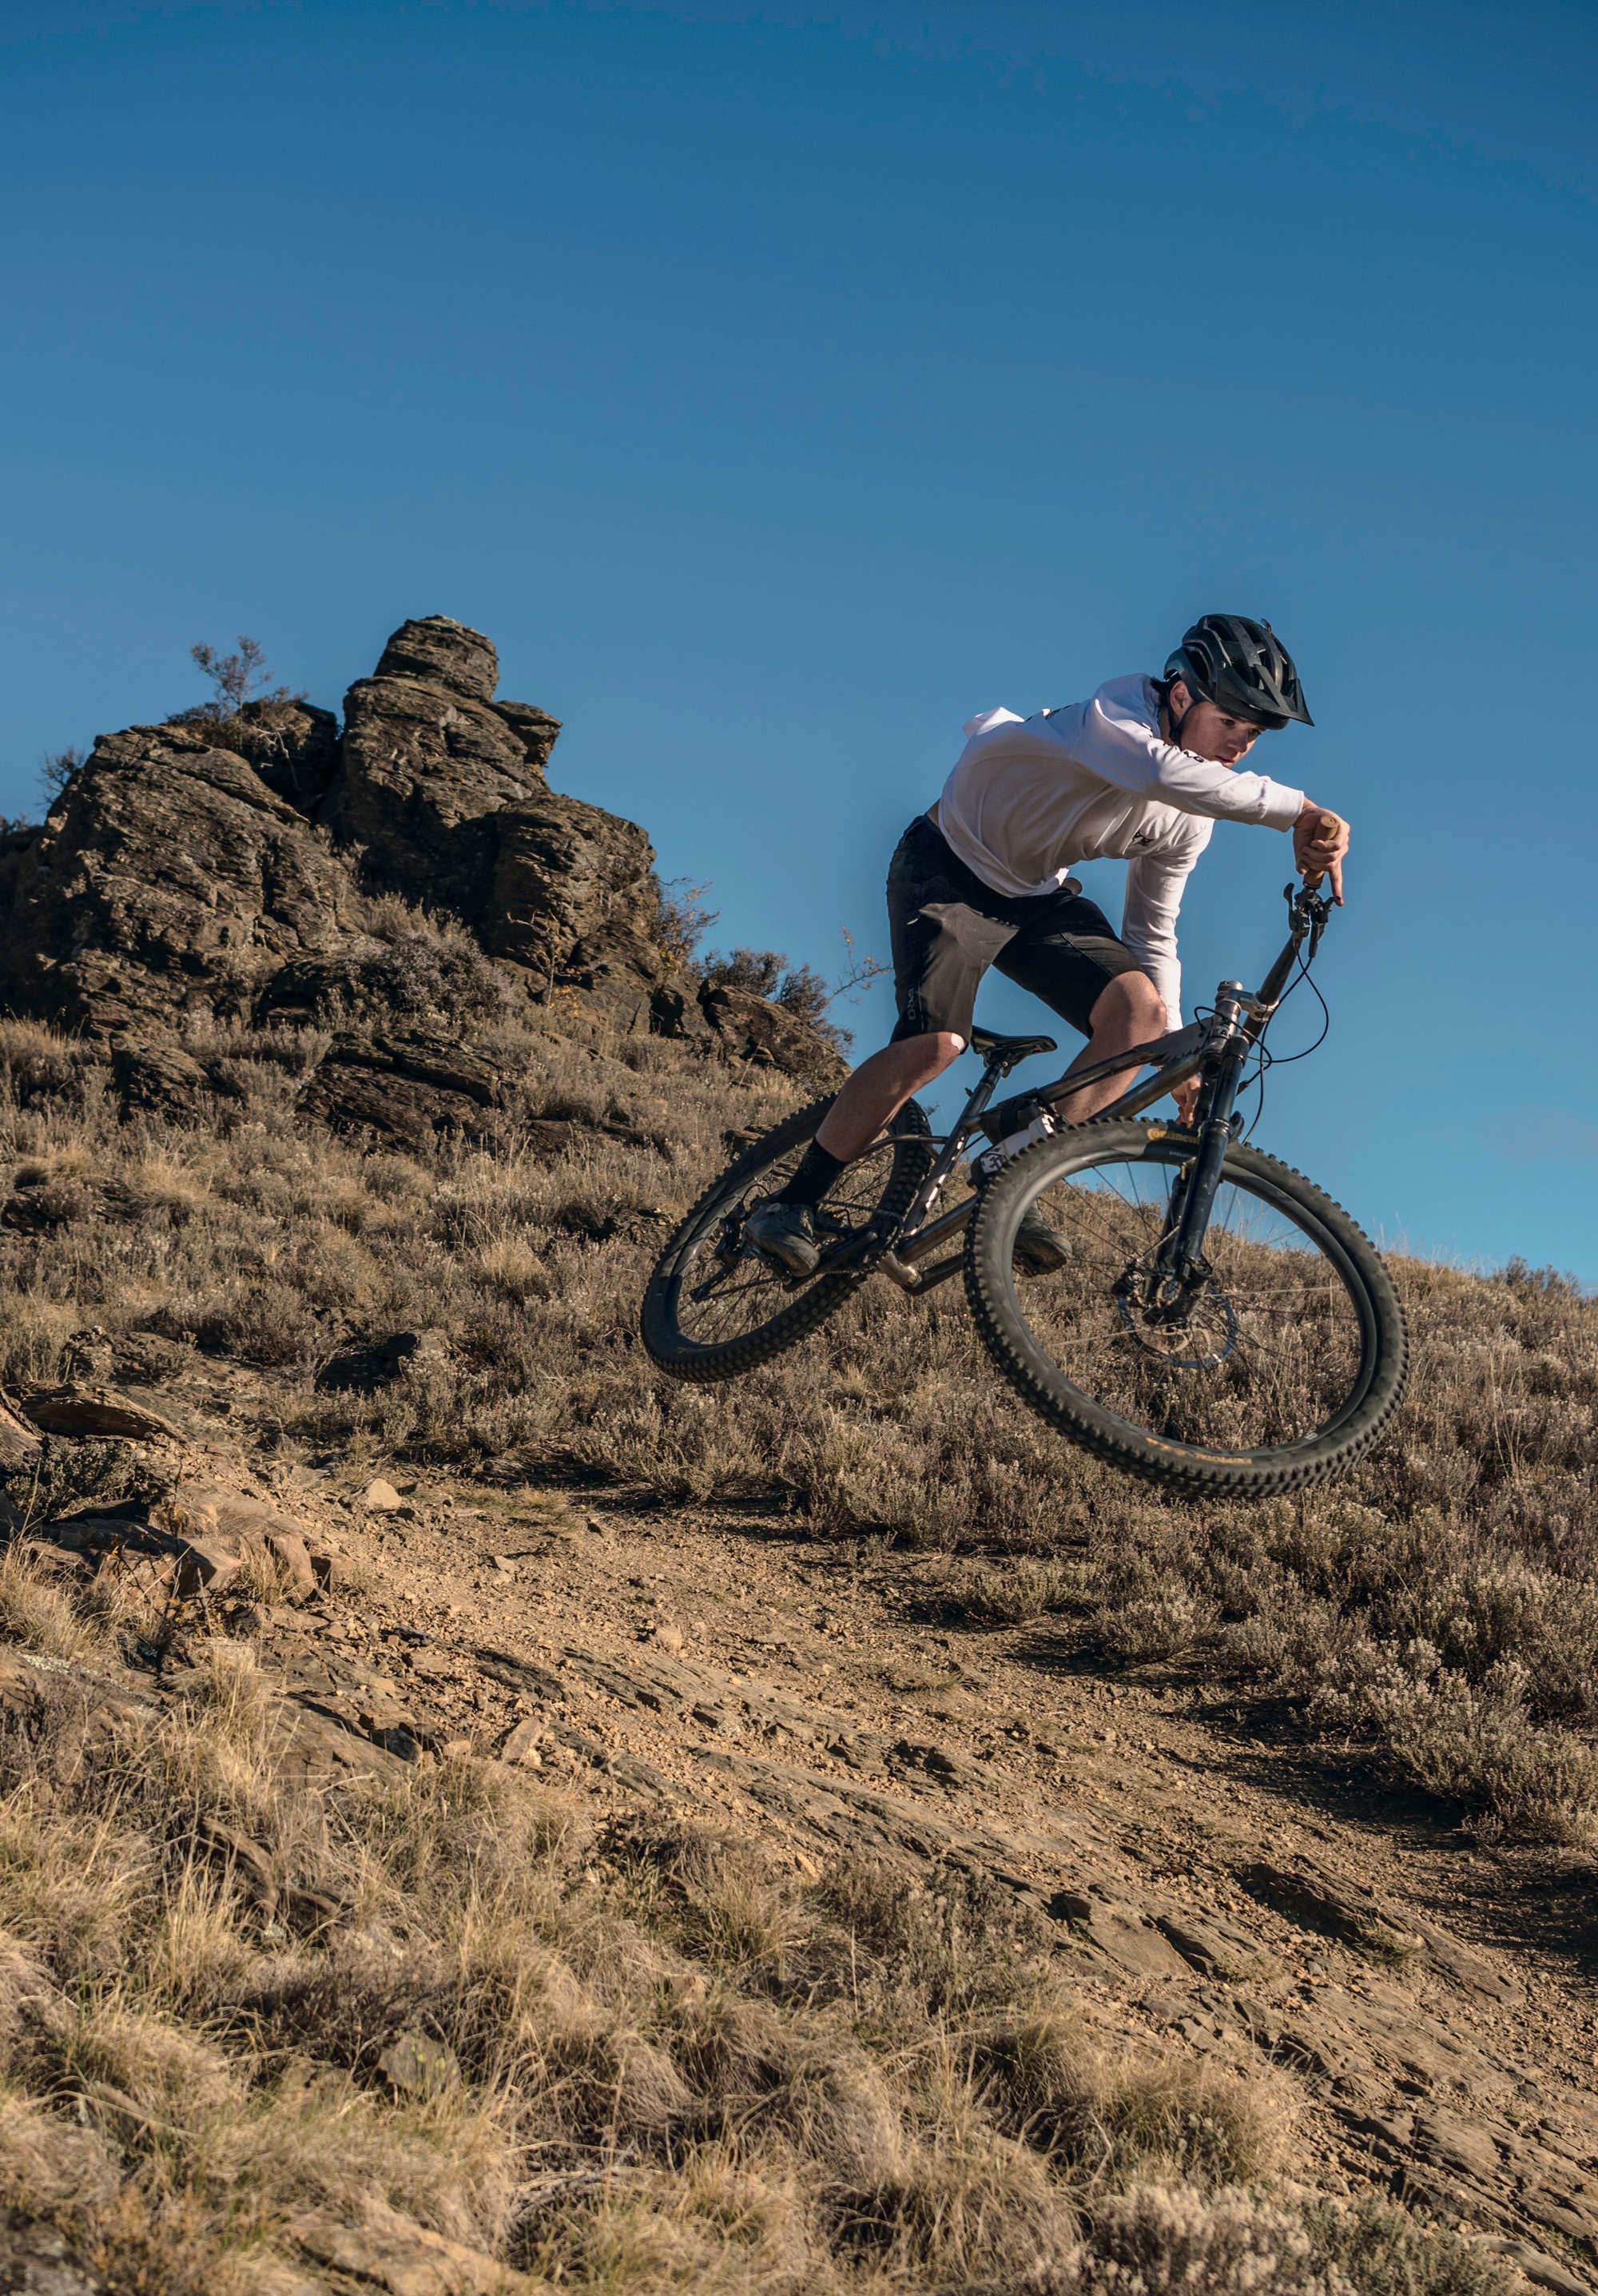
Later that summer, I finally got to race it at our local social enduro series, Local Laps. This had been the goal since the beginning: to race my hand-built hardtail in the local series. Obviously, I hadn’t gotten around to riding it on singletrack yet, so I wasn’t entirely sure how it would go. Part of me was still a bit nervous about the whole thing coming apart under the pressure and vibrations. At the top of the stage, people were curious and excited to finally see it in person after close to three years since starting it. There were plenty of jokes about whether it would make it to the bottom. I was wondering the same. I dropped in cautiously, expecting some sort of creak or flex, but it was silent. Solid. A few corners in, it was clear the frame could handle the rough stuff. I started to push harder, and it held up fine. No surprises, no issues, just a good ride. Whipping round corners, skipping and jumping to a P3 and first place homemade bike!
So how does the bike ride with its quite radical geometry? Well, obviously with the head angle the front wheel feels a really long way in front of you – which can look pretty weird – but it doesn’t feel like it takes away any playfulness from the bike. Paired with the really short rear end and a smaller wheel, the bike feels like it can still whip around corners even when they get tight. At slower speeds it’s not heavy to turn, but just feels a little awkward, and on mellow gentle terrain the geo is completely overkill – which you can feel. However, when the speed gets up the bike is extremely stable – especially when high speed cornering; the steeper the trail gets the more confident the bike gets, and it still feels to be very playful which was the idea behind the rear end. In terms of climbing, it’s definitely not the most efficient or nicest bike to climb (coming off an XC race bike) but the steep seat tube angle tries to keep some weight over the front wheel. I still have plenty of riding to do on it to really test out the geometry but, for now, it’s still one of a kind and not far from exactly what I wanted it to be.
Looking back on the build, there are definitely things I’d do differently – but that’s the nature of first attempts. You learn by doing, and the next time around (yes, there will be a next time) I’ll know exactly what to change. Maybe I’ll tackle a full suspension frame, or go completely overboard with carbon fibre. Only one thing is for sure: it won’t be something standard. What I do know is that I loved the process. For a long time, this bike was all I could think about. The most frustrating part wasn’t any of the technical stuff, it was waiting for the time to actually get on with it. Would I recommend building your own bike? Absolutely – if it’s something that genuinely interests you. Just be warned: it takes so much more time, effort and way more problem-solving than you might expect. You can’t half-commit to a project like this. If you’re not all in, it’s probably not for you. The budget? Like most serious builds, it ended up costing more than I’d hoped, but not wildly so. Could it be done cheaper? Safely, probably not. Spending a bit more, however, could make this an absolute dream. In the end, the total cost for everything came out to about the price of a brand-new Fox 36 fork. Not bad, considering I got this fork with an entire bike out of it.