

Sobering Experience
Words & Image Gaz Sullivan
There was probably some fatigue left over from the previous Saturday, for a start. I had taken on a lap of Lake Taupō for no good reason except that it was officially my 25th edition. Once again, I discovered that a year spent crawling up fire roads on a 50-tooth sprocket and free-wheeling down trails is no preparation for 100 miles on a road bike.
I should have figured that out by now, but the other thing I am slow to accept is that every year I make that mistake, I am a year older than I was the previous time. And as those years accumulate, each one has a bigger effect on everything to do with riding bikes than the one that preceded it.
On race day, I stayed alive by not even trying to keep up with anybody. But that makes the ride take a lot longer than once upon a time, and six-plus hours plugging along the road, mostly solo, makes a dent in the physical reserves that no amount of after-match cakes will replenish. Believe me, I tested that concept.
I got back on a bike a few days after the big road outing and was predictably lame. I was in a similar state a few days after that.
By the weekend, I figured I had eaten enough and been horizontal for long enough to have a reasonably full gas tank. It was a beautiful day, and I left the van with a plan: to crawl up some hills on a 50-tooth sprocket and free-wheel down some trails, repeating as long as possible.
After my second climb, I was more than likely ready to go home, but the native forest at the top of my local was calling me. I had not been up there in way too long. Just before embarking on the best part of the ascent (a singletrack climb – rare in these parts), I spotted a couple of people gazing at one of the spaghetti-like Rotorua trail maps that are guaranteed to confuse anybody.
I will use any excuse to stop pedalling uphill, so I went and asked them if they knew where they were going. They were a mother and daughter on eBikes, visiting from central California, with only a vague idea of where to go. I made some recommendations I thought were suitable and resumed my climb.
The women passed me about ten minutes later, not far from the top of the uphill trail. I don’t know what happened to them immediately after that, but they beetled past me again on the final humiliating grind that must be endured by riders before entering the native.
My plan had been to start going downhill from there, down the majestic Tihi-O-Tawa, and continue downhill until I was back at the vehicle. However, trying to explain the trail we call Tuhoto Ariki and its new addition was too hard for my sweaty brain, so I said, “Follow me”.
They were not fast, but they were having a lot of fun tackling the surprisingly wet and root- strewn trail. I am sure they have some great mountain biking back in sunny Cal, but it will not be much like the jungle we have at the top of the forest. There was a lot of laughter coming through the bush as I waited in various spots so we could regroup. We emerged from the jungle to a clearcut that happened last summer, and there is already a really nice climb to a drop-dead view at the top.
‘Drop-dead’ is probably a little too accurate, given my state by the time I got there. Firstly, because I had now completed two decent climbs beyond what I had bargained for, and secondly, because I had executed them at as much pace as I could manage while maintaining a straight face, given the whirring of eBike motors right behind me.
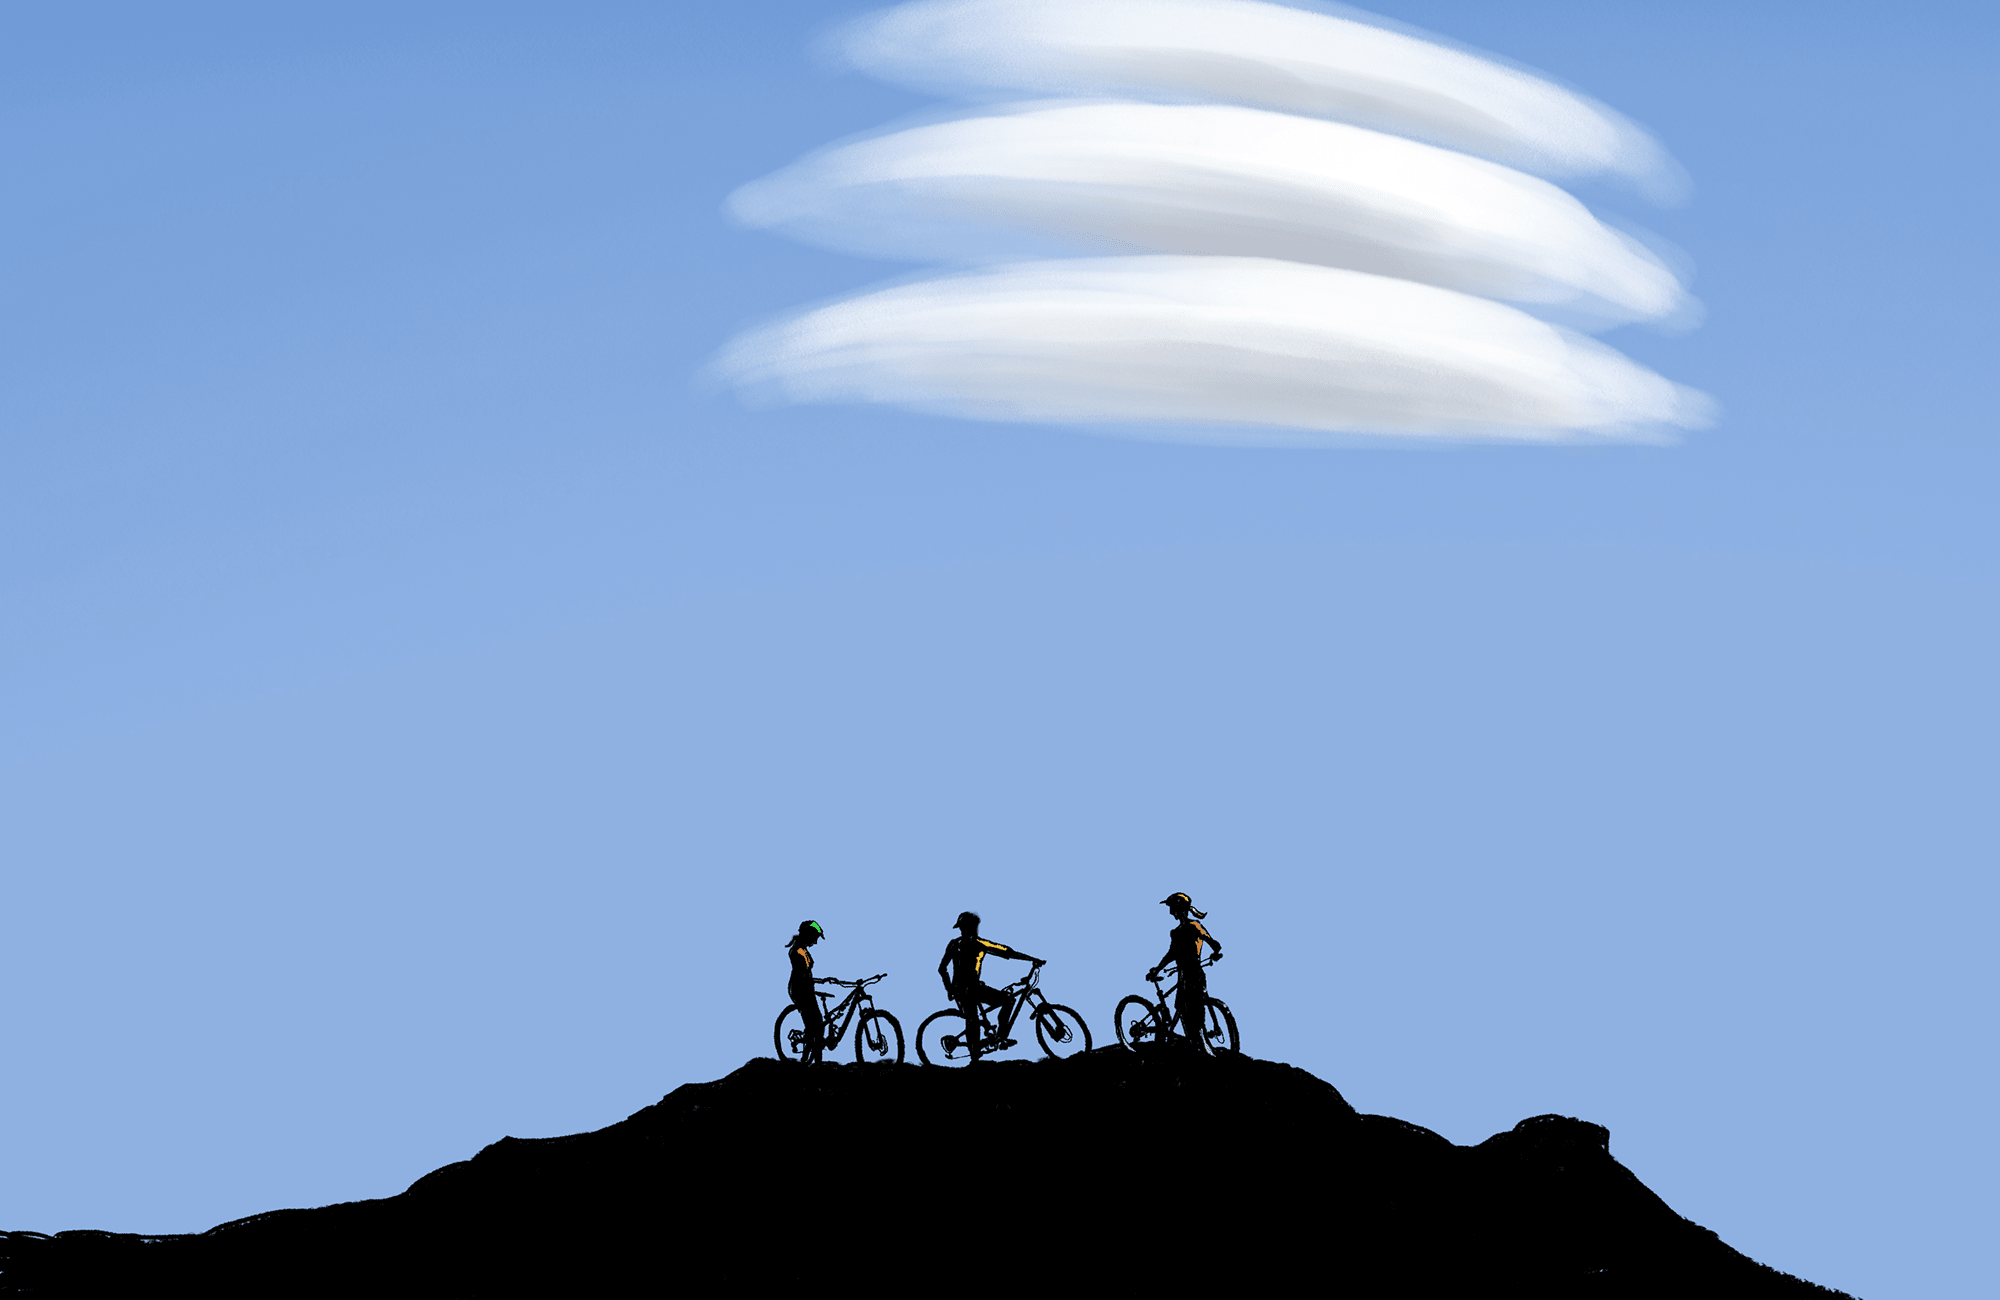
The views, the amazing stack of lenticular clouds coming off the central plateau, the potted history of the Tarawera eruption I trotted out once I could string three words together, even the howling wind that likely made my discourse inaudible, all these things were absorbed with gratitude by the women before we took off down the excellent trail that has been constructed to get off the ridge.
It is a real gem – narrow, tight turns, things to jump over if you are into that, but totally rollable if you are me. We got to the bottom and the first thing the daughter yelled was “Sick!” Hooting at her mother, who arrived in one piece and still grinning, she was very excited about the whole jungle to ridgeline to plunge, and it seemed selfish not to show them some more.
So, we dropped into Te Ahi Manawa. For my money, it is one of the best trails in the whole joint. There are more difficult trails, but I don’t ride them. My skillset lets me have fun on trails like this one, with little real risk of much going wrong. The way I do it (slowly), if things do go pear shaped, I’m able to meet the earth in a dignified manner and get up shaken but intact. So far anyway. There are several little sections that demand my full attention, and I can get through with something approaching panache, and to be honest doing that occasionally is maybe what gets me out in the woods on a bike.
As I suspected, Te Ahi hit the spot with the visitors. In fact, it registered “sick” again on the general coolness scale. But also, it was that stage of the day when my turkey timer was starting to rattle. We took another couple of low trails back to civilisation, at which point I could tell my day was well and truly done.
The girls were still in great shape and looking for some more trails. Big batteries in the downtube will do that. I gave them the best instructions I could manage and left them to it.
I got home and had a shower, some lunch and an unusually late coffee. Then I sat down to read my book. Legs were throbbing in that position, so I moved to the bed. Getting horizontal felt slightly better, but I immediately lost track of whatever the hell I was trying to read. Within fifteen minutes, I was asleep. That lasted a couple hours, and I was not much use for anything when I regained consciousness. We spent Sunday doing not much, especially in my case. We did walk down a flight of stairs to get to a beach, and the return climb hurt.
Five years ago, I decided the time had come to get an eBike so becoming a basket case after a moderately big day out would be less likely. I still haven’t got one, but I can feel it coming.

Once burned, twice shy
Words & Image Lester Perry
Thirty-two years later, the same lessons apply. When I was around 13, I was into making all sorts of things. I always had a project of some kind on the go; lots didn’t get completed, some did.
Some were bike-related, some weren’t. One non-bike-related project I got stuck into was a flying fox from the second-storey back deck of our house. I gathered supplies from the shed: a coil of blue and white rope, some off-cuts of wood and some nails that weren’t long enough.
First up, I had to assemble the flying fox itself – pretty much an upside-down capital ‘T’ to sit on. Picture a T bar on a ski field: this was where I’d be sitting when I zipped my way in a completely safe, controlled fashion down to the fence. I’d fashioned a wooden rectangle on the top of the ‘T’ where the rope would go; no need for a pulley – pine on rope should be plenty slippery.
The rope was tied off to the fence; I walked the other end up the back stairs to the deck, where I threaded the rope through the rectangular end of the ‘T’, looped it around the banister, pulled it as tight as I could and tied it off. Good to go.
Getting over the handrail and onto the flying fox proved difficult but, eventually, I managed to get myself over the railing with one hand holding the ‘T’ between my legs and one hand on the railing. I was ready to go. Dropping! Drop I did. The top of my wooden rectangle pulled free as soon as my weight was on it, and I fell to the ground, landing with a thud on my back and knocking the wind out of me bad enough that I was sure I was about to die of suffocation. I recall my dad walking out onto the deck to see what was happening, looking down at me on my back with my legs and arms flailing like a cockroach stuck on its back, and yelling to him that I’d broken my back.
Obviously, I didn’t die, and – miraculously – I didn’t break anything aside from my flying fox. I learned a lesson, though; even if something looks like it should be ok and safe to use, that doesn’t necessarily mean it is. I’ve lived by this motto for thirty-odd years, and it’s kept me mostly safe. From avoiding pinch points while riding in traffic and steering clear of erratic riders in a peloton, to staying away from parts that aren’t from reputable brands and even avoiding secondhand pieces that have a history or background I’m unsure of. Largely, I’ve played it safe throughout my cycling life, that is, until I made what could have been a costly mistake. Having sworn I’d never buy a bike part thats function, or lack thereof, could cause me serious injury, I’ve played it safe until recently, when my curiosity got the better of me.
A friend showed me his brand-new stem; it had the perfect combination of drop and length. I’d been hunting for something just like this for ages. He told me where I could get one too, for just $75, and sent me a link to the AliExpress website. I was dubious, but he’d been riding his for three months and knew others who had them too. The Ali reviews were glowing. Seems legit, I thought, maybe this stem is made in China, then shipped to Europe, where the brand sells it on the fact it’s made there? Must be the case.
This stem was destined for my cross-country race bike and, after a few rides, I was proper stoked – it did what it should and hadn’t broken. Yet. One morning, while in Rotorua, I dropped in to No Brains, the first trail of what was to be a big day on the bike. Down the first section, then up a small rise, up out of the saddle, I pulled on the bars a little and…. CRACK! Handlebars go loose, and I quickly put my feet down to stop.
The stem had cracked through the front, and although the handlebars were now completely loose, fortunately, it hadn’t completely ejected out the front or I would have ended up on my face with my hands still holding the grips. I’m thankful I was going uphill when the stem let go, and that I wasn’t under full compression off a drop or down a steep chute; the results could have been dire. Sure, this happened on a mountain bike, but it could have been any bike and, really, any bike part. If I had maimed myself, what comeback would I have had? None, I’d say. The manufacturer would continue to sell the stem and others may end up learning, or in my case, re-learning a hard lesson.
Sure, you can build a bike for super cheap. Sure, heaps of other people have done it and lived to tell the tale – but is it really worth the risk? I’ll happily buy random knick-knacks online, and even non-crucial bike parts are all fair game, but anything that puts me at risk? No dice.
The old adage that, “if something seems too good to be true, it probably is” really rings true. A stem that’s crazy light and has exactly the features and dimensions I need for just $75? Yep, too good to be true.
Be wary out there.
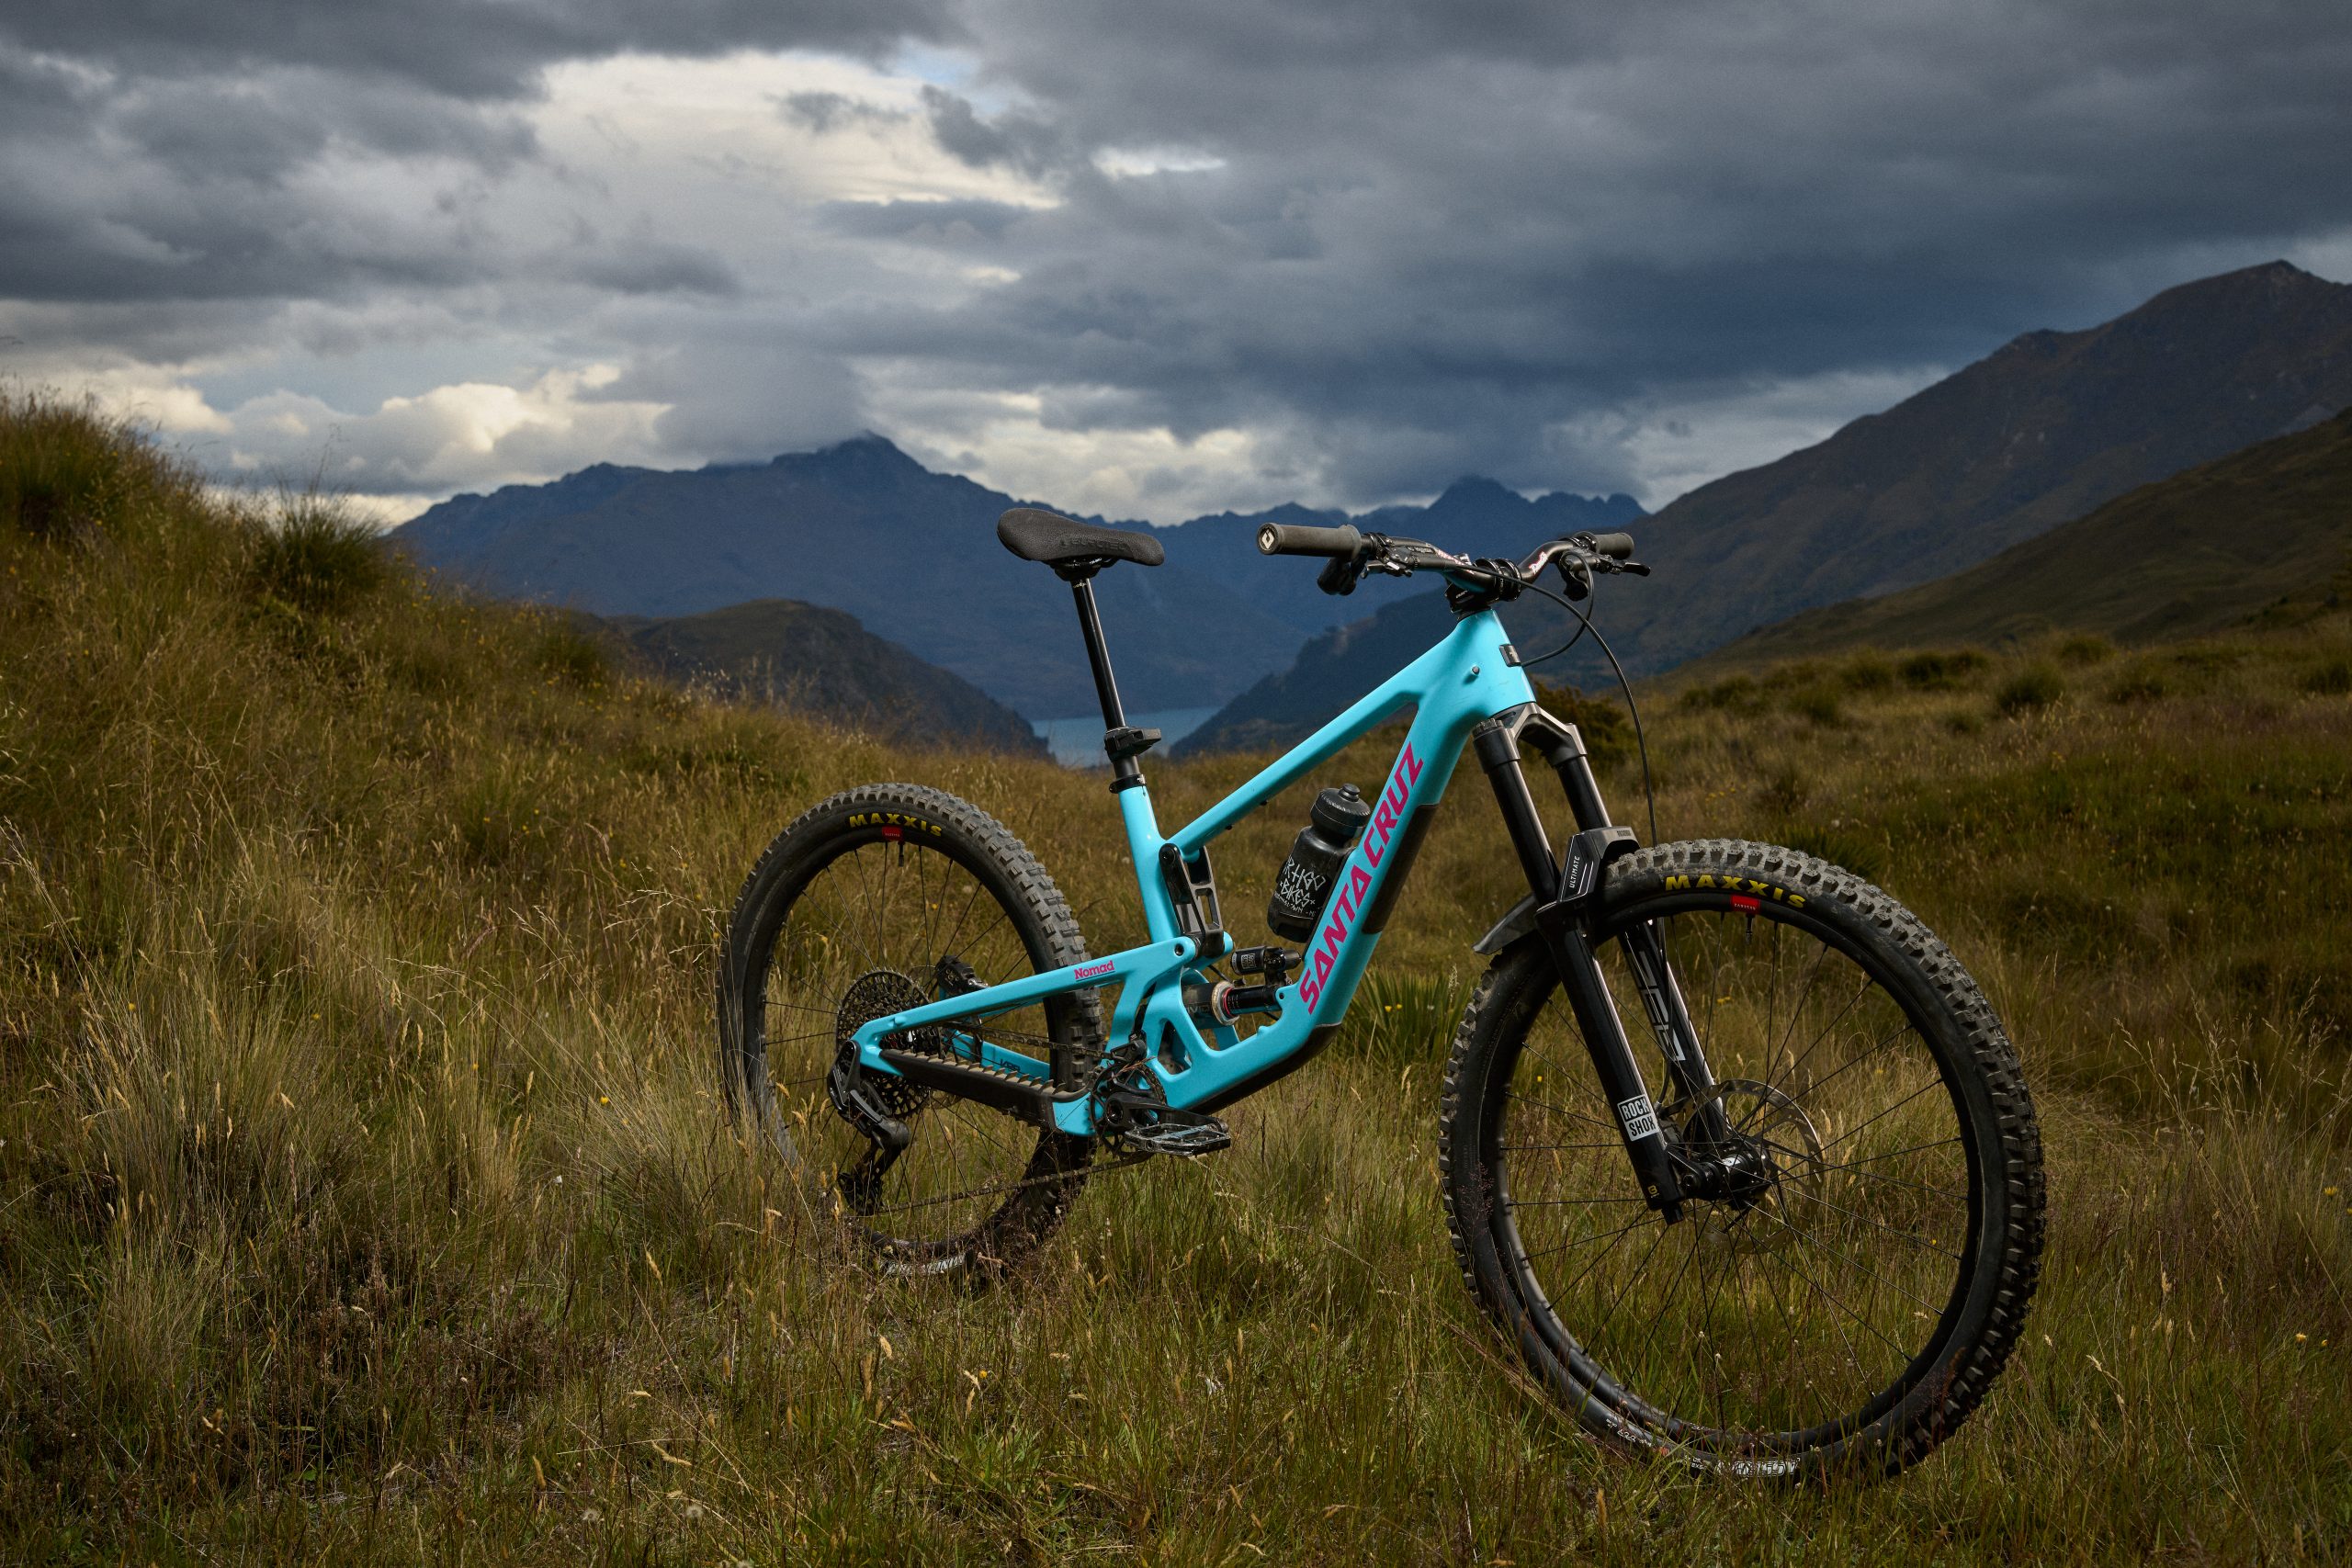
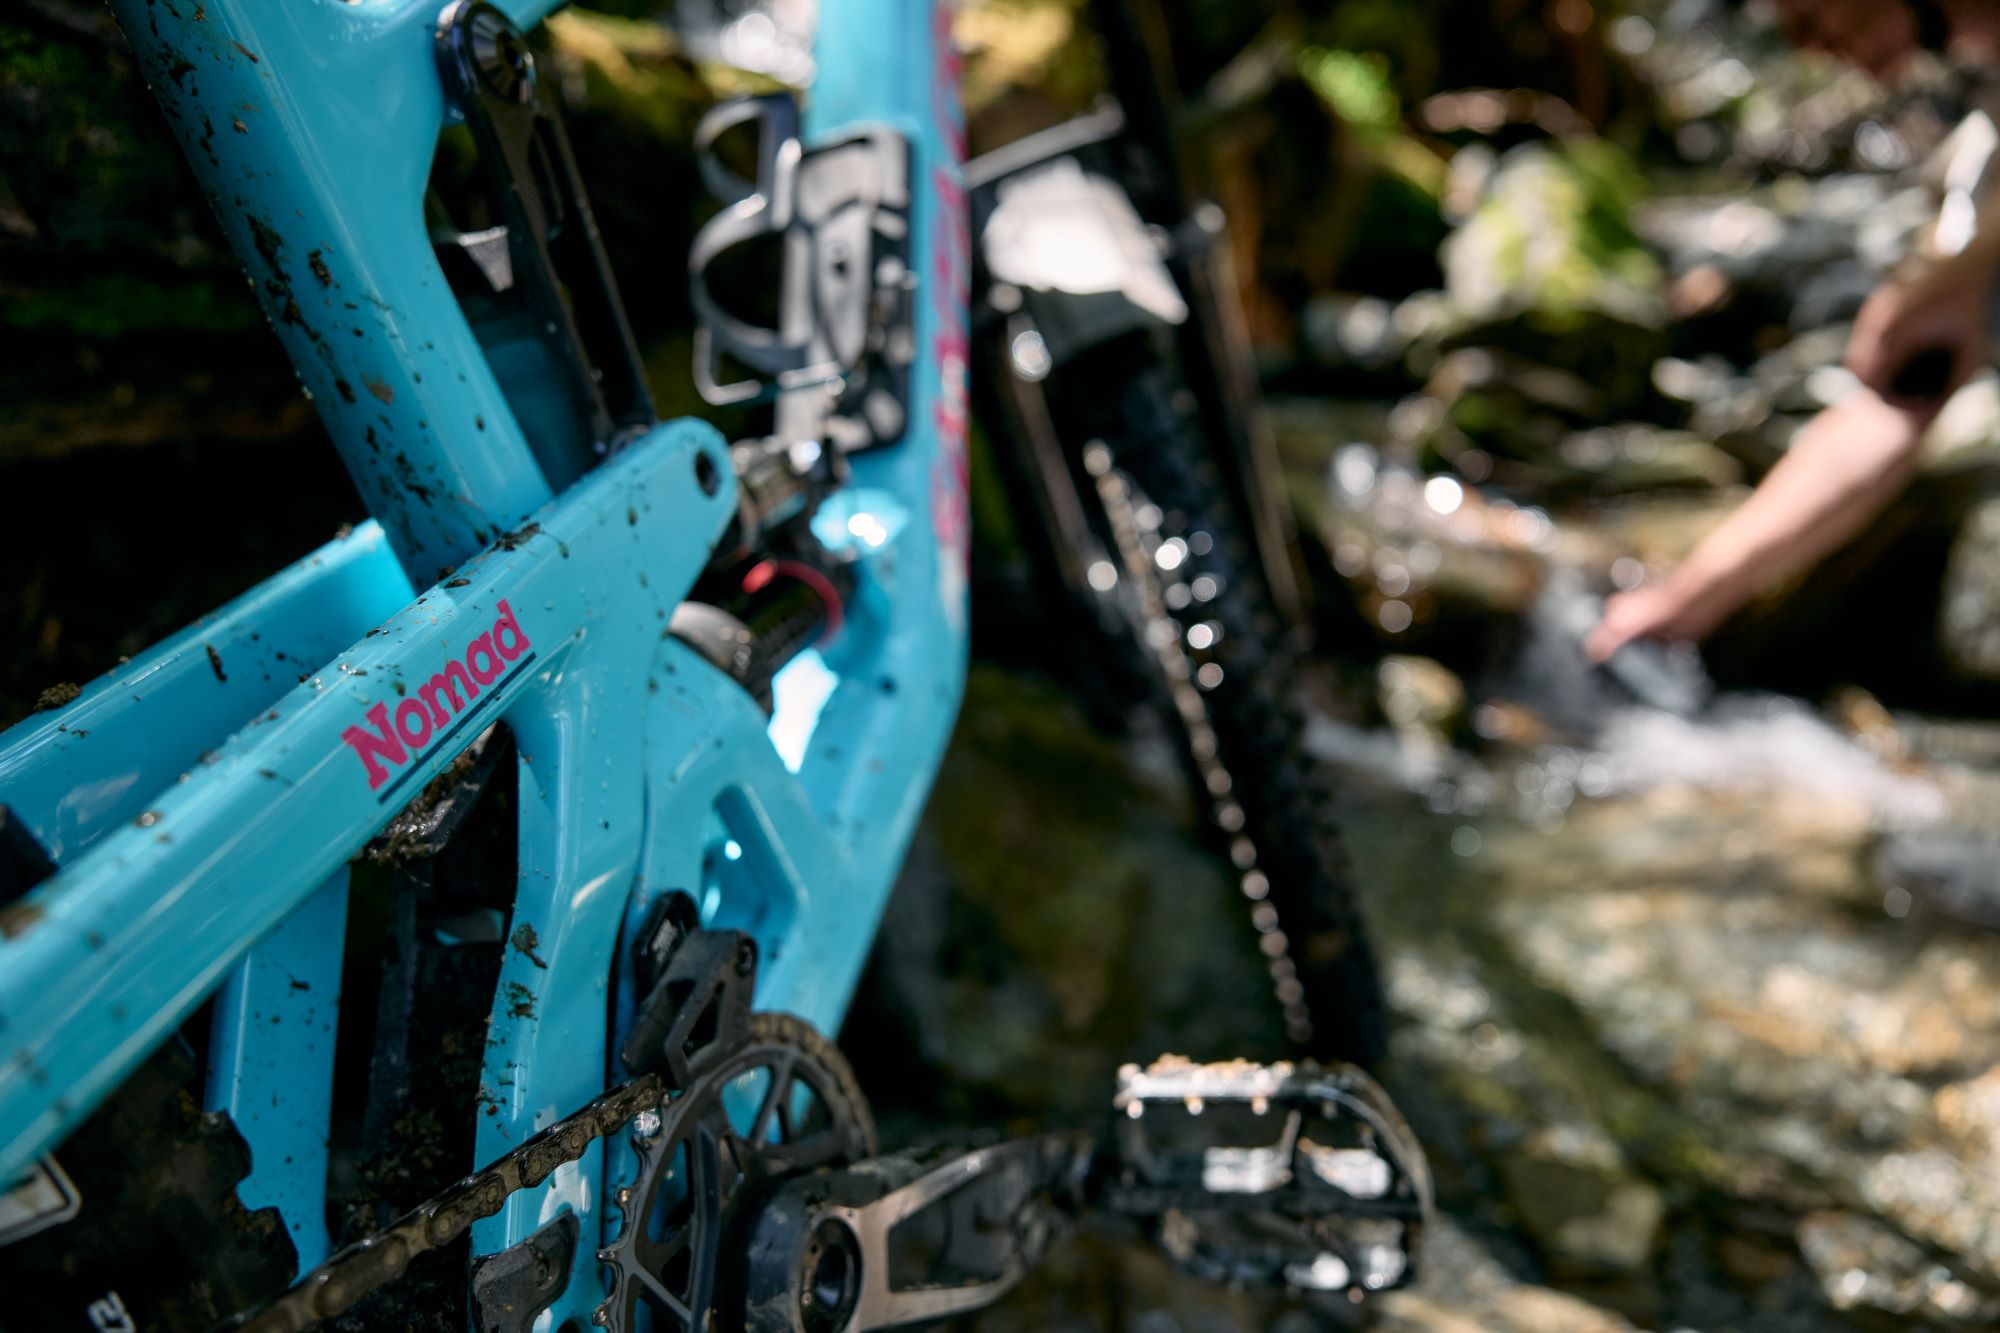
MY27 Santa Cruz Nomad 7 - First Look
Santa Cruz just refreshed one of their most popular and heavy-hitting models, the Nomad. For the uninitiated, the Nomad is a 170mm travel mixed wheel weapon. It’s not a classic Enduro race bike, although it sits under the ‘Enduro’ category on their website; it’s much more fun than a pure race bike, although I’m not sure I’d peg it as a freeride bike either. In my mind, it’s a mash-up of a few categories that, when melded together, create an exceptionally fun and fast result. Fast is fun, faster is funner (is that a thing?).
From the alloy framed early edition launched in 2005, to the unmissable green and pink colourway of the 2021 Nomad, now in its 7th generation, the intent remains the same; provide riders a downhill oriented platform worthy of hours winching themselves up long alpine climbs purely to shred the descent, no holds barred, don’t let the bike hold them back on a descent.
I’ve been stoked to get aboard the new Nomad 7 for a few rides before launch day. Here’s an overview of my experiences, just a few rides in. We’ll have a more in-depth review dropping in a few weeks.
What’s new?
This fresh Nomad is very familiar at a glance, although many small tweaks and iterative changes put this new Nomad a peg up on the outgoing generation. We’re still getting a 170mm, mullet-specific (29/27.5 wheeled) chassis, but this time it’s only available in the high-end, high-modulus Carbon ‘CC’ version.
The use of CC carbon lowers the weight a smidge, 86g over the ‘old’ CC frame, retaining the robustness while achieving improved ride quality. Better carbon also opened the door for a refined, smaller downtube, assisting in weight saving and helping give a more compliant ride. Interestingly, the downtube is barely larger than the Stigmata gravel bike, a drastic decrease in size from the Nomad 6.
Visually, the bike is very similar; the most obvious change is just above the bottom bracket junction. The bike now gets the more open, “shock tunnel” cutaway shape the Hightower and Bronson received during their most recent refreshes. The rear shock and lower suspension link are now far more accessible, something which was a headache on previous models.
A subtly redesigned Glove Box, the v2, fits tighter than before with no rattle or movement. The latch feels positive and sturdy. Thankfully, the smaller downtube still fits the same amount of gear as the previous, larger version.
The shock has a flip chip, offering riders a small amount of adjustability. Plus or minus 3mm of bottom bracket height and plus or minus 0.3 degrees head angle, not a lot, but there’s adjustment there. Under the toptube, an accessory mount adds options for riders who need quicker access to anything that they can’t cram in their downtube.
After the uproar in the Pinkbike comments when the 2025 Bronson CC frame launched without them, the purists amongst us will be glad to see internal routing for mechanical drivetrains included on this frame.
As has been customary with Santa Cruz’s bikes (outside of the Blur), there are grease ports on key pivot points. Good grease in, bad grease out, simple. When fresh grease doesn’t do the trick, like all Santa Cruz bikes, free bearings for the lifetime of the frame are available.
Santa Cruz raised some eyebrows (and more Pinkbike comments!) when their Vala e-bike launched with its 4-bar suspension layout. Although they considered using it, without the drive-unit in the way of the lower link, there was no need and their tried-and-true VPP linkage was still the best option to retain and build on the performance of the Nomad. Inspired by the changes to the suspension kinematics of Bronson and Vala, the Nomad suspension is tweaked to reduce pedal kickback and lower anti-squat, resulting in better climbing and increased performance through rough terrain and square-edge hits.
With a slightly slacker head angle (63.6/63.3) and a smidge steeper seat tube angle (77.4 in High setting), the geometry is nearly identical to the previous generation. The size large I’m riding is a 475mm reach, seemingly a pretty ‘normal’ reach for size Large bikes now across many brands.
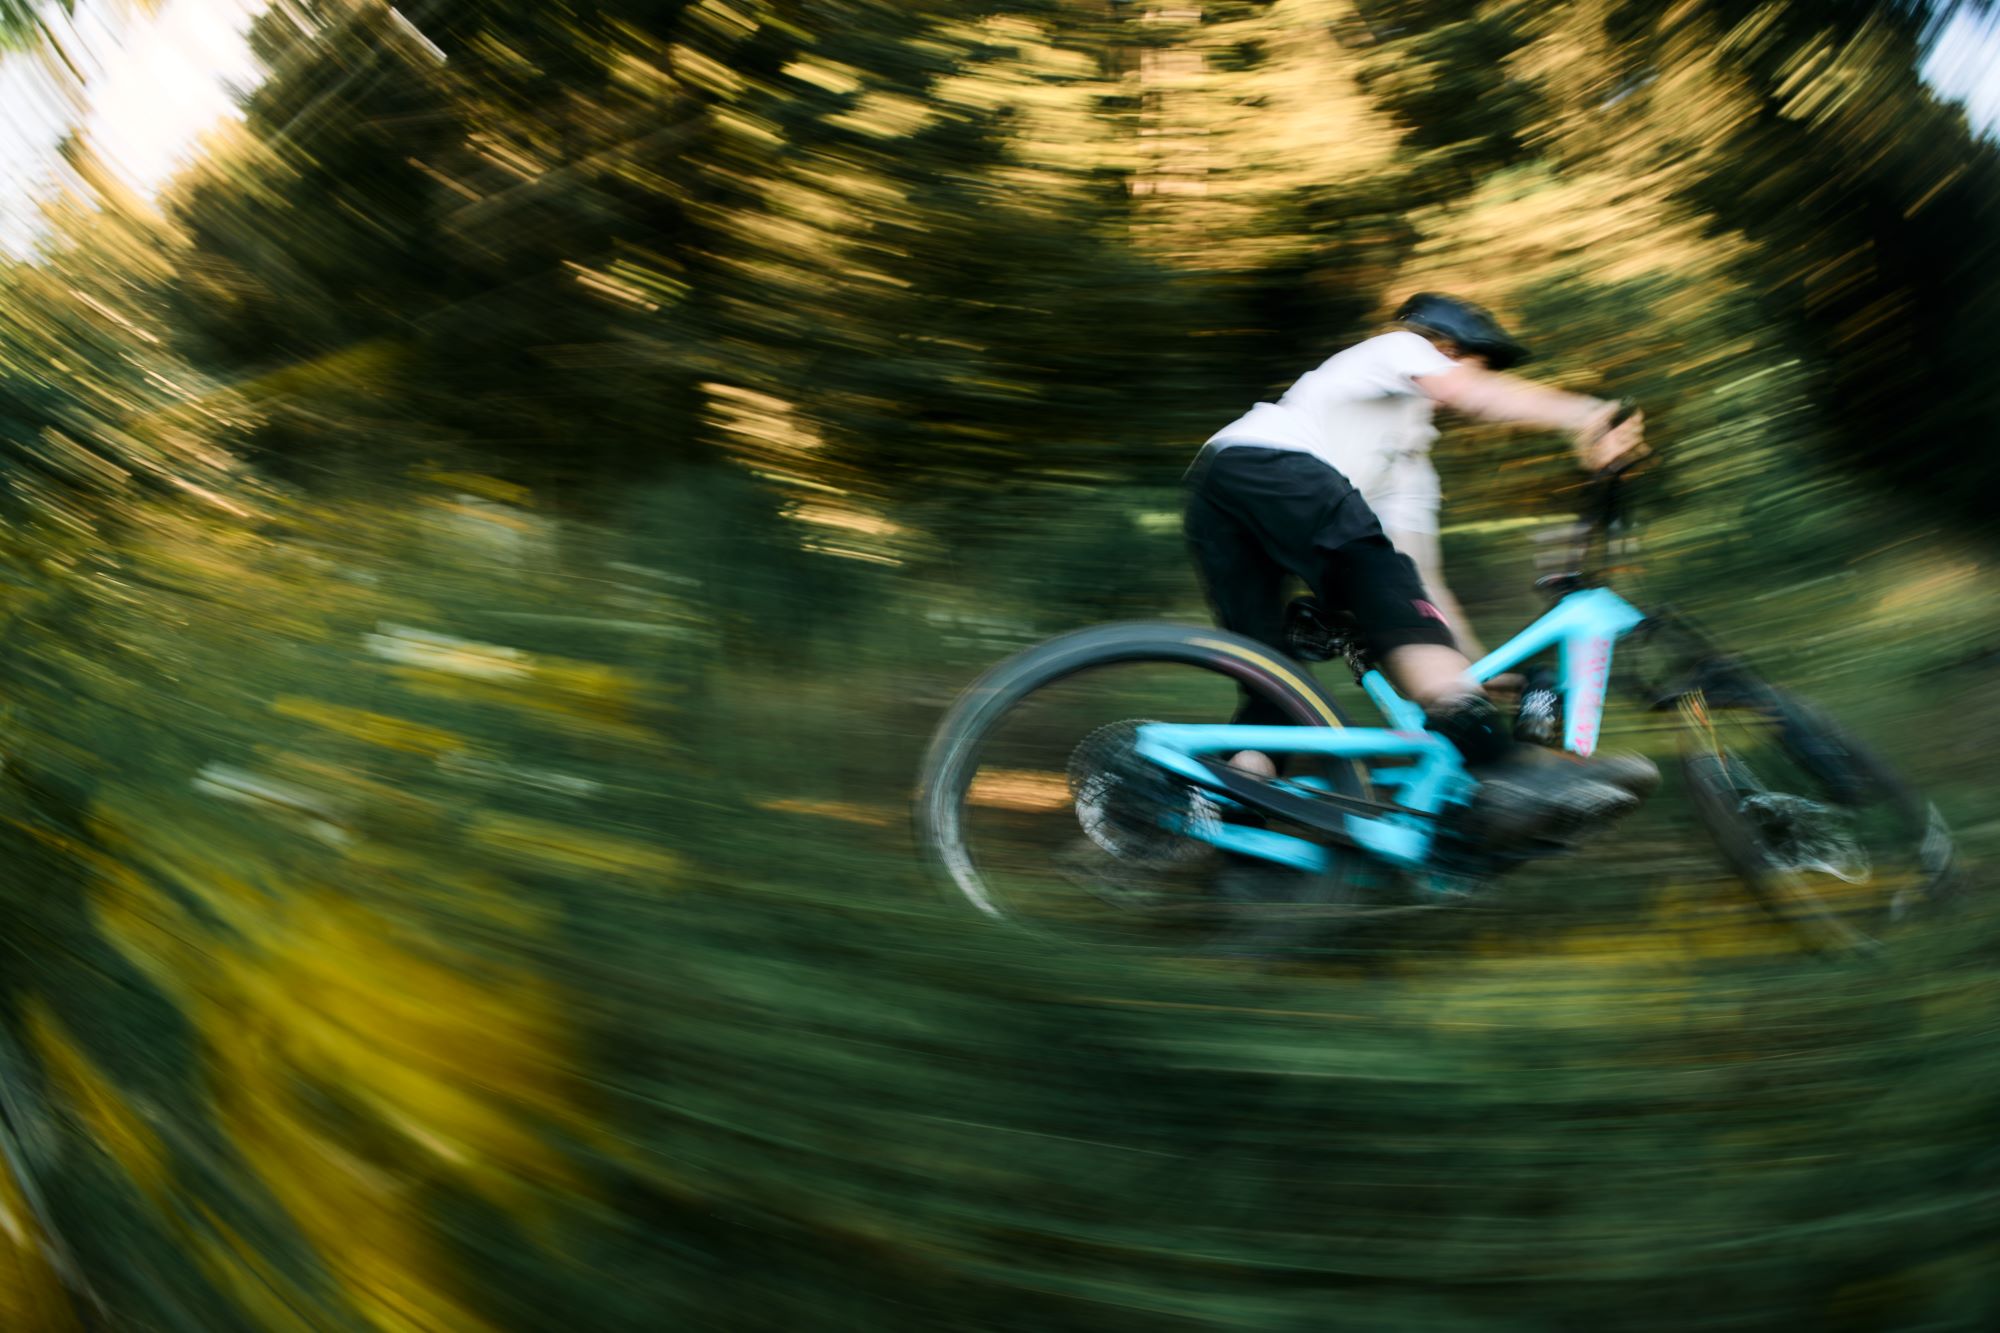
Ride Impressions
Cracking open the Nomad’s cardboard box, the first thing that struck me was the paint scheme, a definite nod to the 2015 Nomad and its Miami Vice, ‘Gloss Aqua Magenta’ colours. That paint was polarising then, and I’m sure it will be polarising now. Fortunately, if you dislike the 80’s throwback, a more subdued ‘Matte Metallic Earth’ is also available.
Before throwing a leg over the bike, I didn’t read any pre-launch info in an attempt to make my own impartial assumptions on how the rig rides and where it’s aimed. After having now spent some time in the launch docs, I’m glad to see many of my assumptions line up with Santa Cruz’s claims.
For clarity, the bike I’ve been riding is non-stock, built with a freshly launched Rock Shox ZEB Ultimate fork and Vivid Ultimate air shock, neither of which features on any of the stock Nomad builds. The stock FOX suspension will be more than up to par, though, the largest difference being the rear shock having a coil spring as opposed to the air on the model I rode – so perhaps even more buttery than the Vivid?
I haven’t been a huge fan of long travel bikes in recent years, heck, even smaller travel (150-160mm) bikes in some cases have been cumbersome, overweight behemoths that go great in a straight line, or down a decent gradient, but point them at a mellow trail, or a steep climb, and no bueno. Excess weight and overly slack geometry mean they perform in a narrow band of trails.
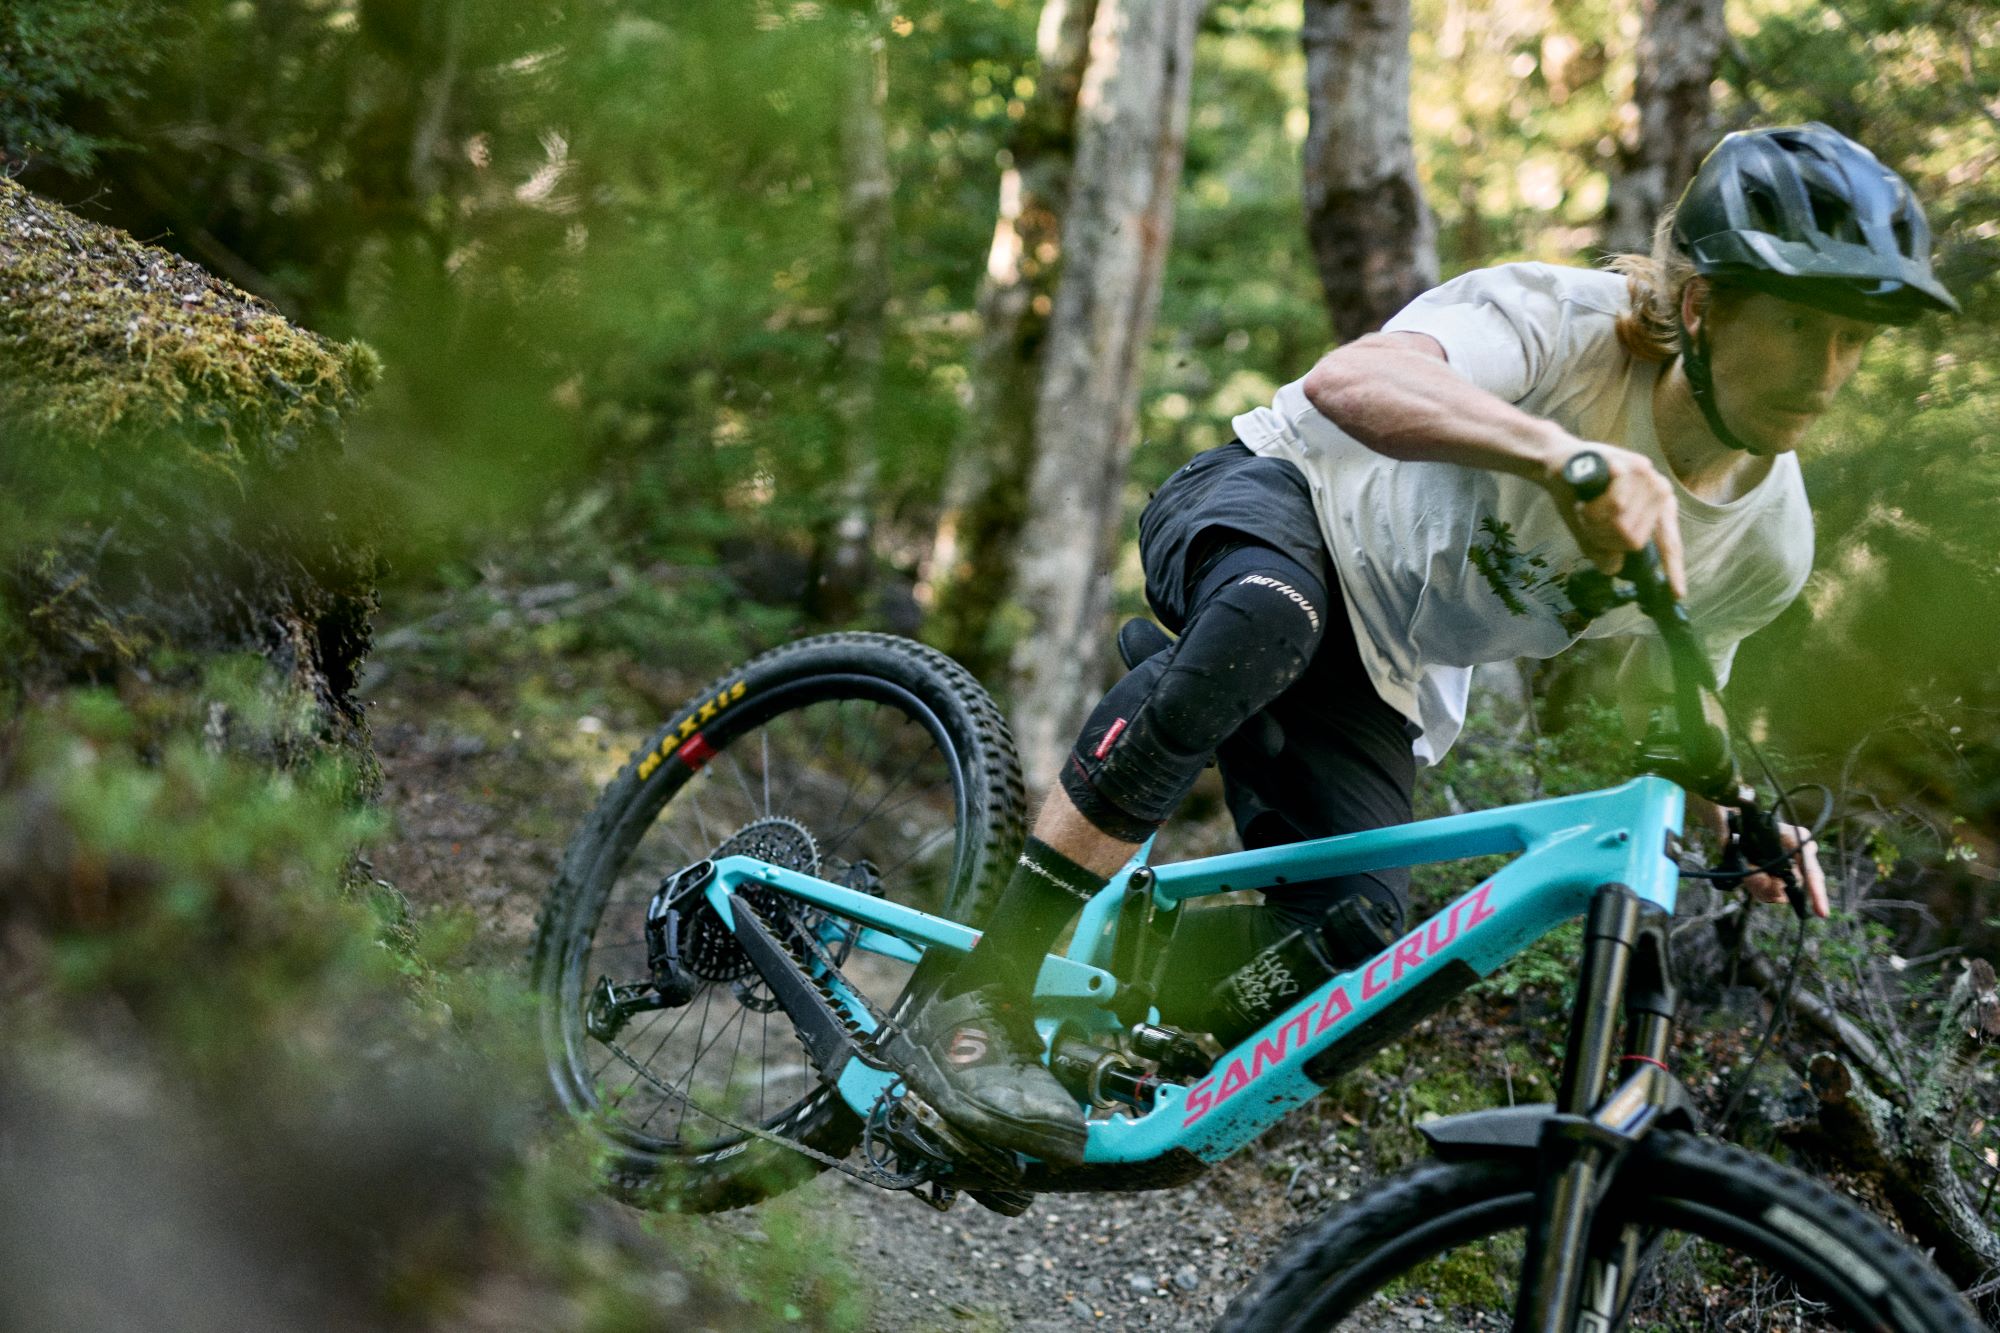
What was obvious from the first ride is that this new Nomad is a big travel that plays like a smaller bike, in all the best ways. Big bike advantages without being cumbersome and a burden on flatter trails or climbs.
Seated climbing is surprisingly spritely for a 170mm travel bike. The reduction in anti-squat means it climbs more efficiently than the previous model. I found myself resorting to the shock’s lockout lever less than many shorter-travel bikes. Even when the shock is fully open, sprinting up short pinches or across flat sections proves how well it pedals. I wouldn’t go as far as to call it “snappy”, but given its travel, it pedals exceptionally well. I’ve been perfectly happy repeatedly spinning my way up long climbs just to bomb down, some of this will be down to the overall light weight of the bike, and some due to that anti-squat.
Downhills are really what this rig is targeted at, and after seeing how good it climbs, I wondered if, when it was thrown down steep, rough trails, it might have some quirks. It doesn’t. It’s surefooted, balanced and predictable through the rough stuff. The VPP’s slightly rearward axle path and reduced anti-squat helps remove the ‘hung up’ feeling many 27.5 rear wheeled bikes get when the going gets rough – I haven’t had this feeling at all on the bike, and it has me questioning my “I’ll only ride full 29er” stance, having been put off some mixed wheel bikes with this feeling in the past.
This is a big bike, no doubt, and 170mm is a lot of travel to be dealing with, but the speed and lines it unlocks are bonkers and have taken some time to get used to. The suspension curve gives a buttery feel off the top, a reasonably linear feel through the middle, and a progressive ramp at the end to avoid harsh bottom outs. Even though it’s a long legged beauty, the Nomad doesn’t feel like it ever wallows in its travel, there’s always some support to push against and it doesn’t get bogged down over successive hits or deep g-outs that catch you off guard – it’s really predictable.
After ‘writing off’ big bikes and thinking they never suit my local trails, in my head, reserving them for proper mountains and chair lifts, the Nomad has been a breath of fresh air. I still need some time to really solidify my opinions, but so far, so good. What a weapon this bike is!
Watch this space for a full feature on the 2027 Nomad.
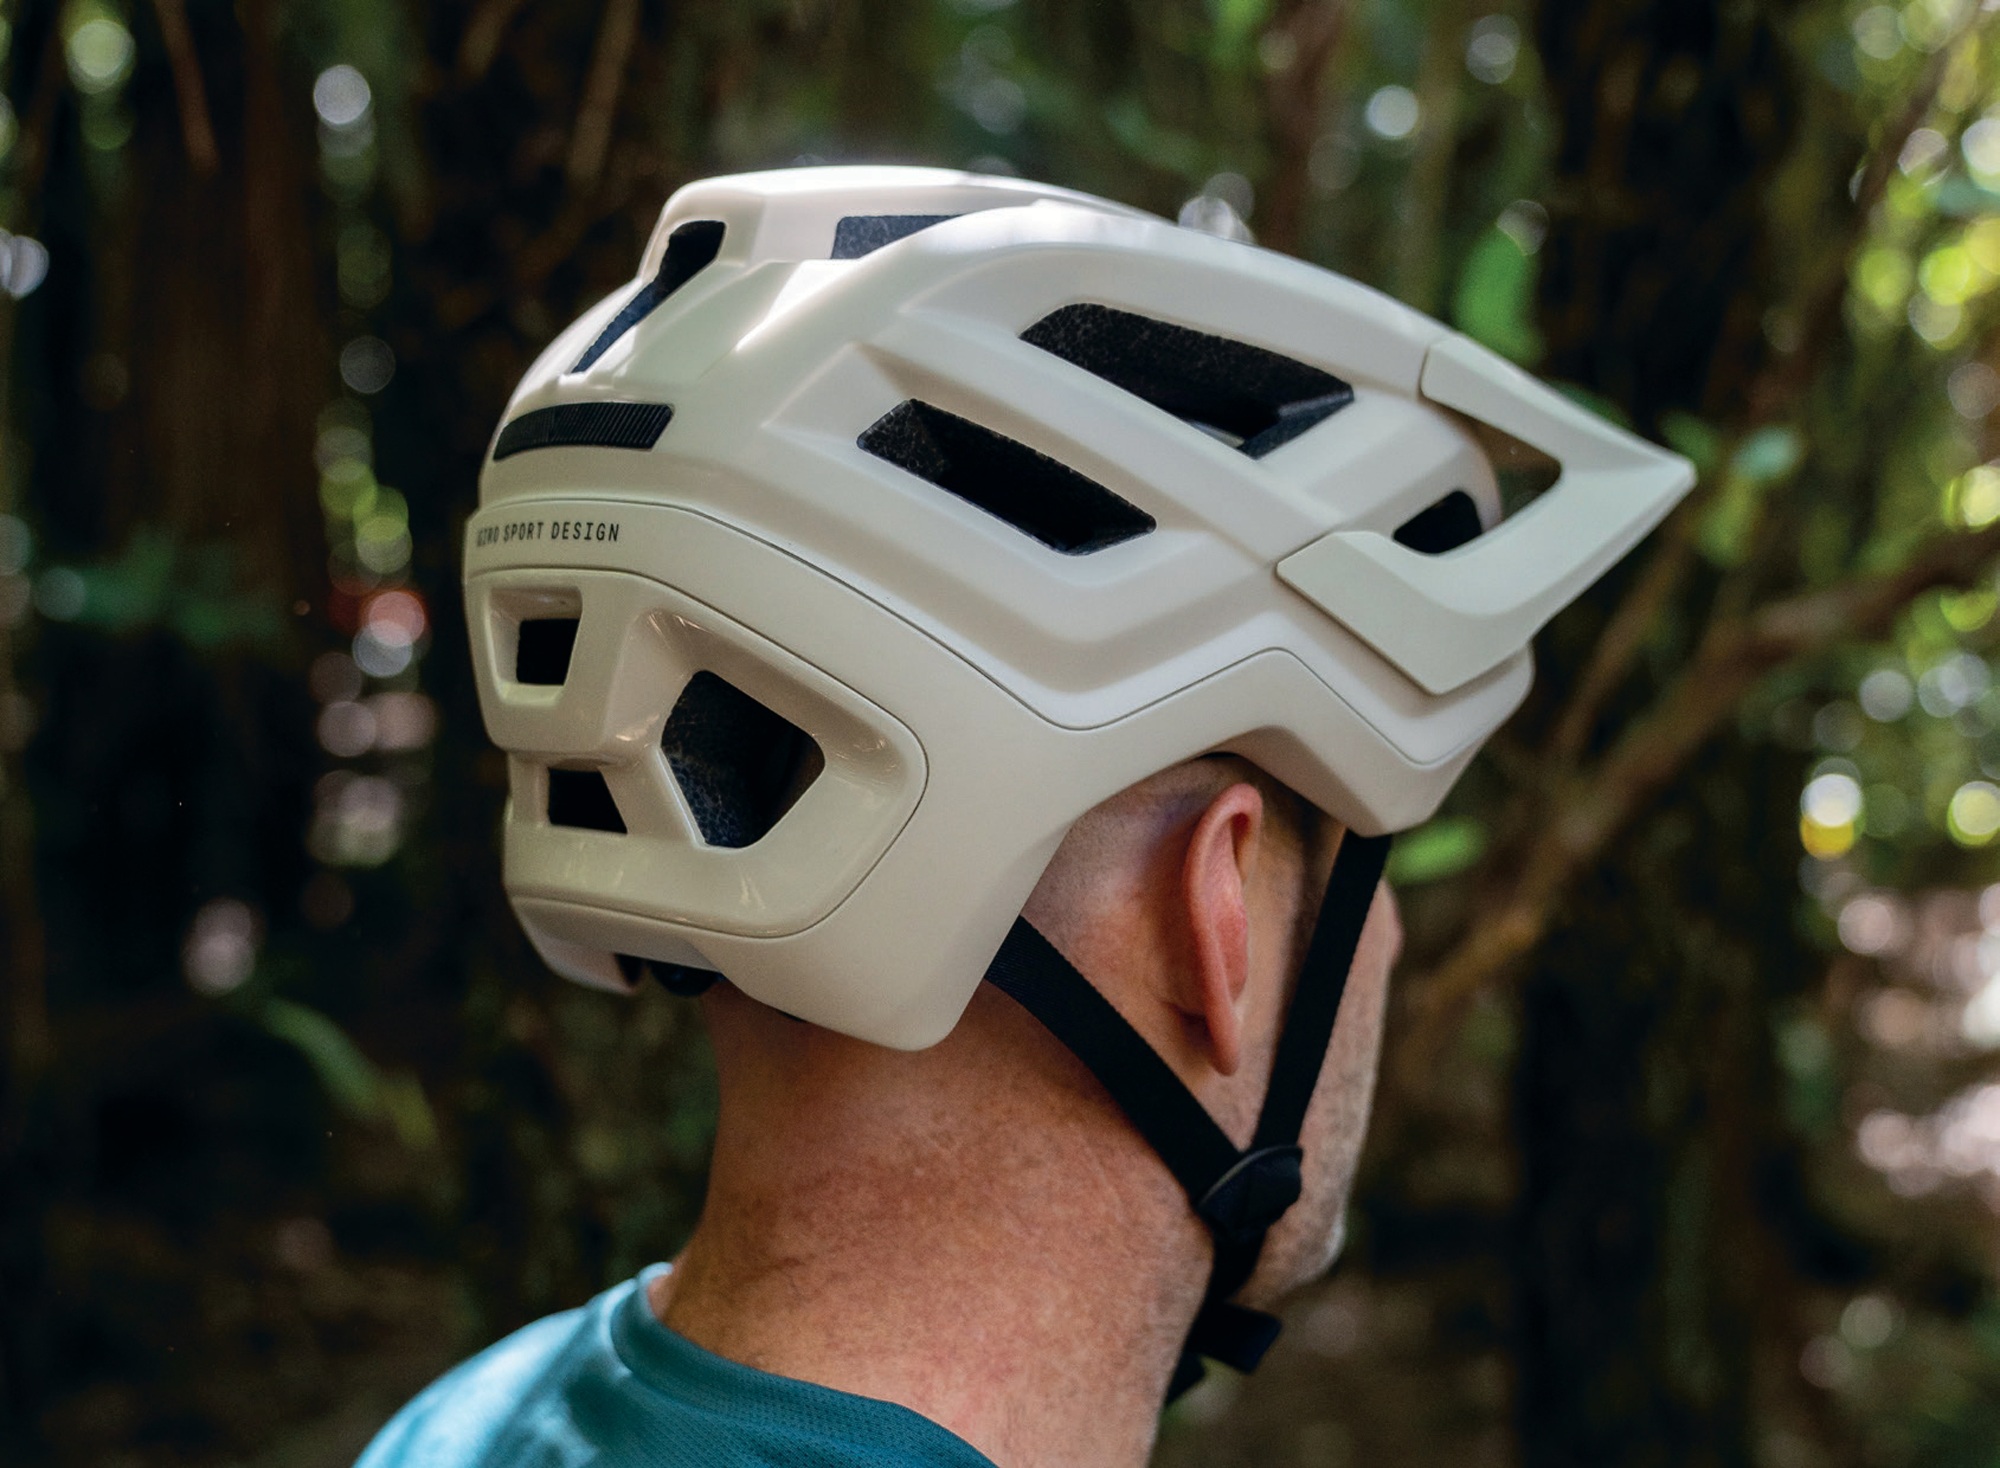
Giro Montaro III Mips
Words Lester Perry
Images Thomas Falconer
RRP $299
Distributor Worralls
I was excited to get my head into this new Giro Montaro III Mips helmet. Before receiving it, I’d seen some pics online and thought it looked pretty decent and ticked the necessary boxes for me to select a helmet.
The trail-focused Montaro III is almost a complete revision of the hugely popular, but ageing, previous edition, uniquely named the Montaro II. This new version certainly draws inspiration from other helmets in the Giro range and, dare I say it, from other brands. Although I poke fun, the result is a unique overall silhouette. I’m sure it won’t be for everyone, but when it comes to helmets, one seldom suits all.
There’s plenty of coverage on offer, and the helmet feels like your head goes some ways into it, meaning it comes relatively low towards the ears and back of the head. Internally, there’s a Mips Evolve Core, which is a refreshed version of the Mips slip plane liner. During an angled impact, the sliding action between the Mips layer and the impact-absorbing outer shell helps dampen rotational forces and, therefore, reduce neck and brain injuries (at least according to Mips). In the case of the Montaro III, the Mips shell doesn’t significantly affect breathability or airflow through the vents, unlike the earlier Mips liner system.
Giro’s Roc Loc tensioning system gives users a micro-adjustable fit via its dial tensioner and vertically adjustable tensioning cradle. The visor is vertically adjustable through two fixed positions. When in the highest position, there’s plenty of room for a pair of glasses to be holstered in the front vents. Most glasses will slide comfortably into the rear vents, too, so whichever place you prefer to stow them, you’ll find a solution on the Montaro. The helmet plays nicely with goggles, too. A rubberised section on the rear helps keep a goggle strap in place, and there’s ample room below the front of the helmet so goggles don’t get squeezed downwards on most faces. However, I do wonder if this may happen on smaller faces with large goggles – something to consider if you’re an open-face helmet goggle wearer.
Keeping the lid in place is a FIDLOCK V-BUCKLE, something I miss on helmets without it now. This magnetic wonder is a single-hand quick release and even securing it can be done with one hand with the proper technique and some practice.
On the trail
I find the fit of the Montaro is pretty good on my head – not the best I’ve worn, but one of the better. It seems the low-profile, sparse padding means it doesn’t feel as snug on the head as some, though the upside is it has minimal contact points on my head, which helps with cooling.
All the features of this helmet mean it tips the scales towards being one of the weightier trail helmets I’ve used. No doubt it offers plenty of protection thanks to its features, but theoretically, other lighter-weight helmets offer equivalent protection. There’s roughly a 75-gram difference between the Montaro and another recent review helmet with very similar features, including a rotational impact damper and FIDLOCK closure, so it’s not insignificant.
Weight aside, everything else with the Montaro is excellent; there’s a ton of airflow thanks to ample venting and substantial internal channelling. Even at slow speeds, the helmet didn’t feel stifling.
The outer hard shell wraps right around the bottom edge of the helmet, keeping that all-important inner foam safe from harm. Even while the helmet rolls around in a car boot between rides, it should still look pretty fresh, though results may vary!
It took me some fiddling to get the Roc Loc tensioner adjusted to the optimal position, but I got there in the end. At times, I still find the curvature of the tensioner on either side of the dial doesn’t quite suit my head perfectly, and occasionally, it’s caused me some annoyance. However, this could be a ‘me’ problem exacerbated by having no hair to give a little more padding.
With a $299 RRP, the Montaro III sits at the lower end of the price spectrum for a helmet with these features and coverage. All in all, it’s a solid helmet that offers a lot of protection for the dollars. Sure, there’s a bit of a weight penalty, but I’d wager that this extra weight comes in the form of more protection over some lighter-weight options in the market, so that’s got to be a positive.
RockShox Zeb Ultimate
Words: Liam Friary
Images: Sven Martin & Callum Wood
Distributor: Worralls
RRP: $2495
Components, suspension and bikes are always going through a process of constant refinement. Often it can seem a bit like a ploy to get us all to consume more, and that’s a valid perspective.
But the thing is, often the refinement stems from the sport’s progression and riders getting faster and hitting harder.
This drive is mainly through the competitive elements of the sport, such as downhill and enduro, but there’s still a strong case for the everyday trail rider. There’s also continued progression with trails, bike parks, and terrain, and this often means riders demand more of their bikes, suspension and products.
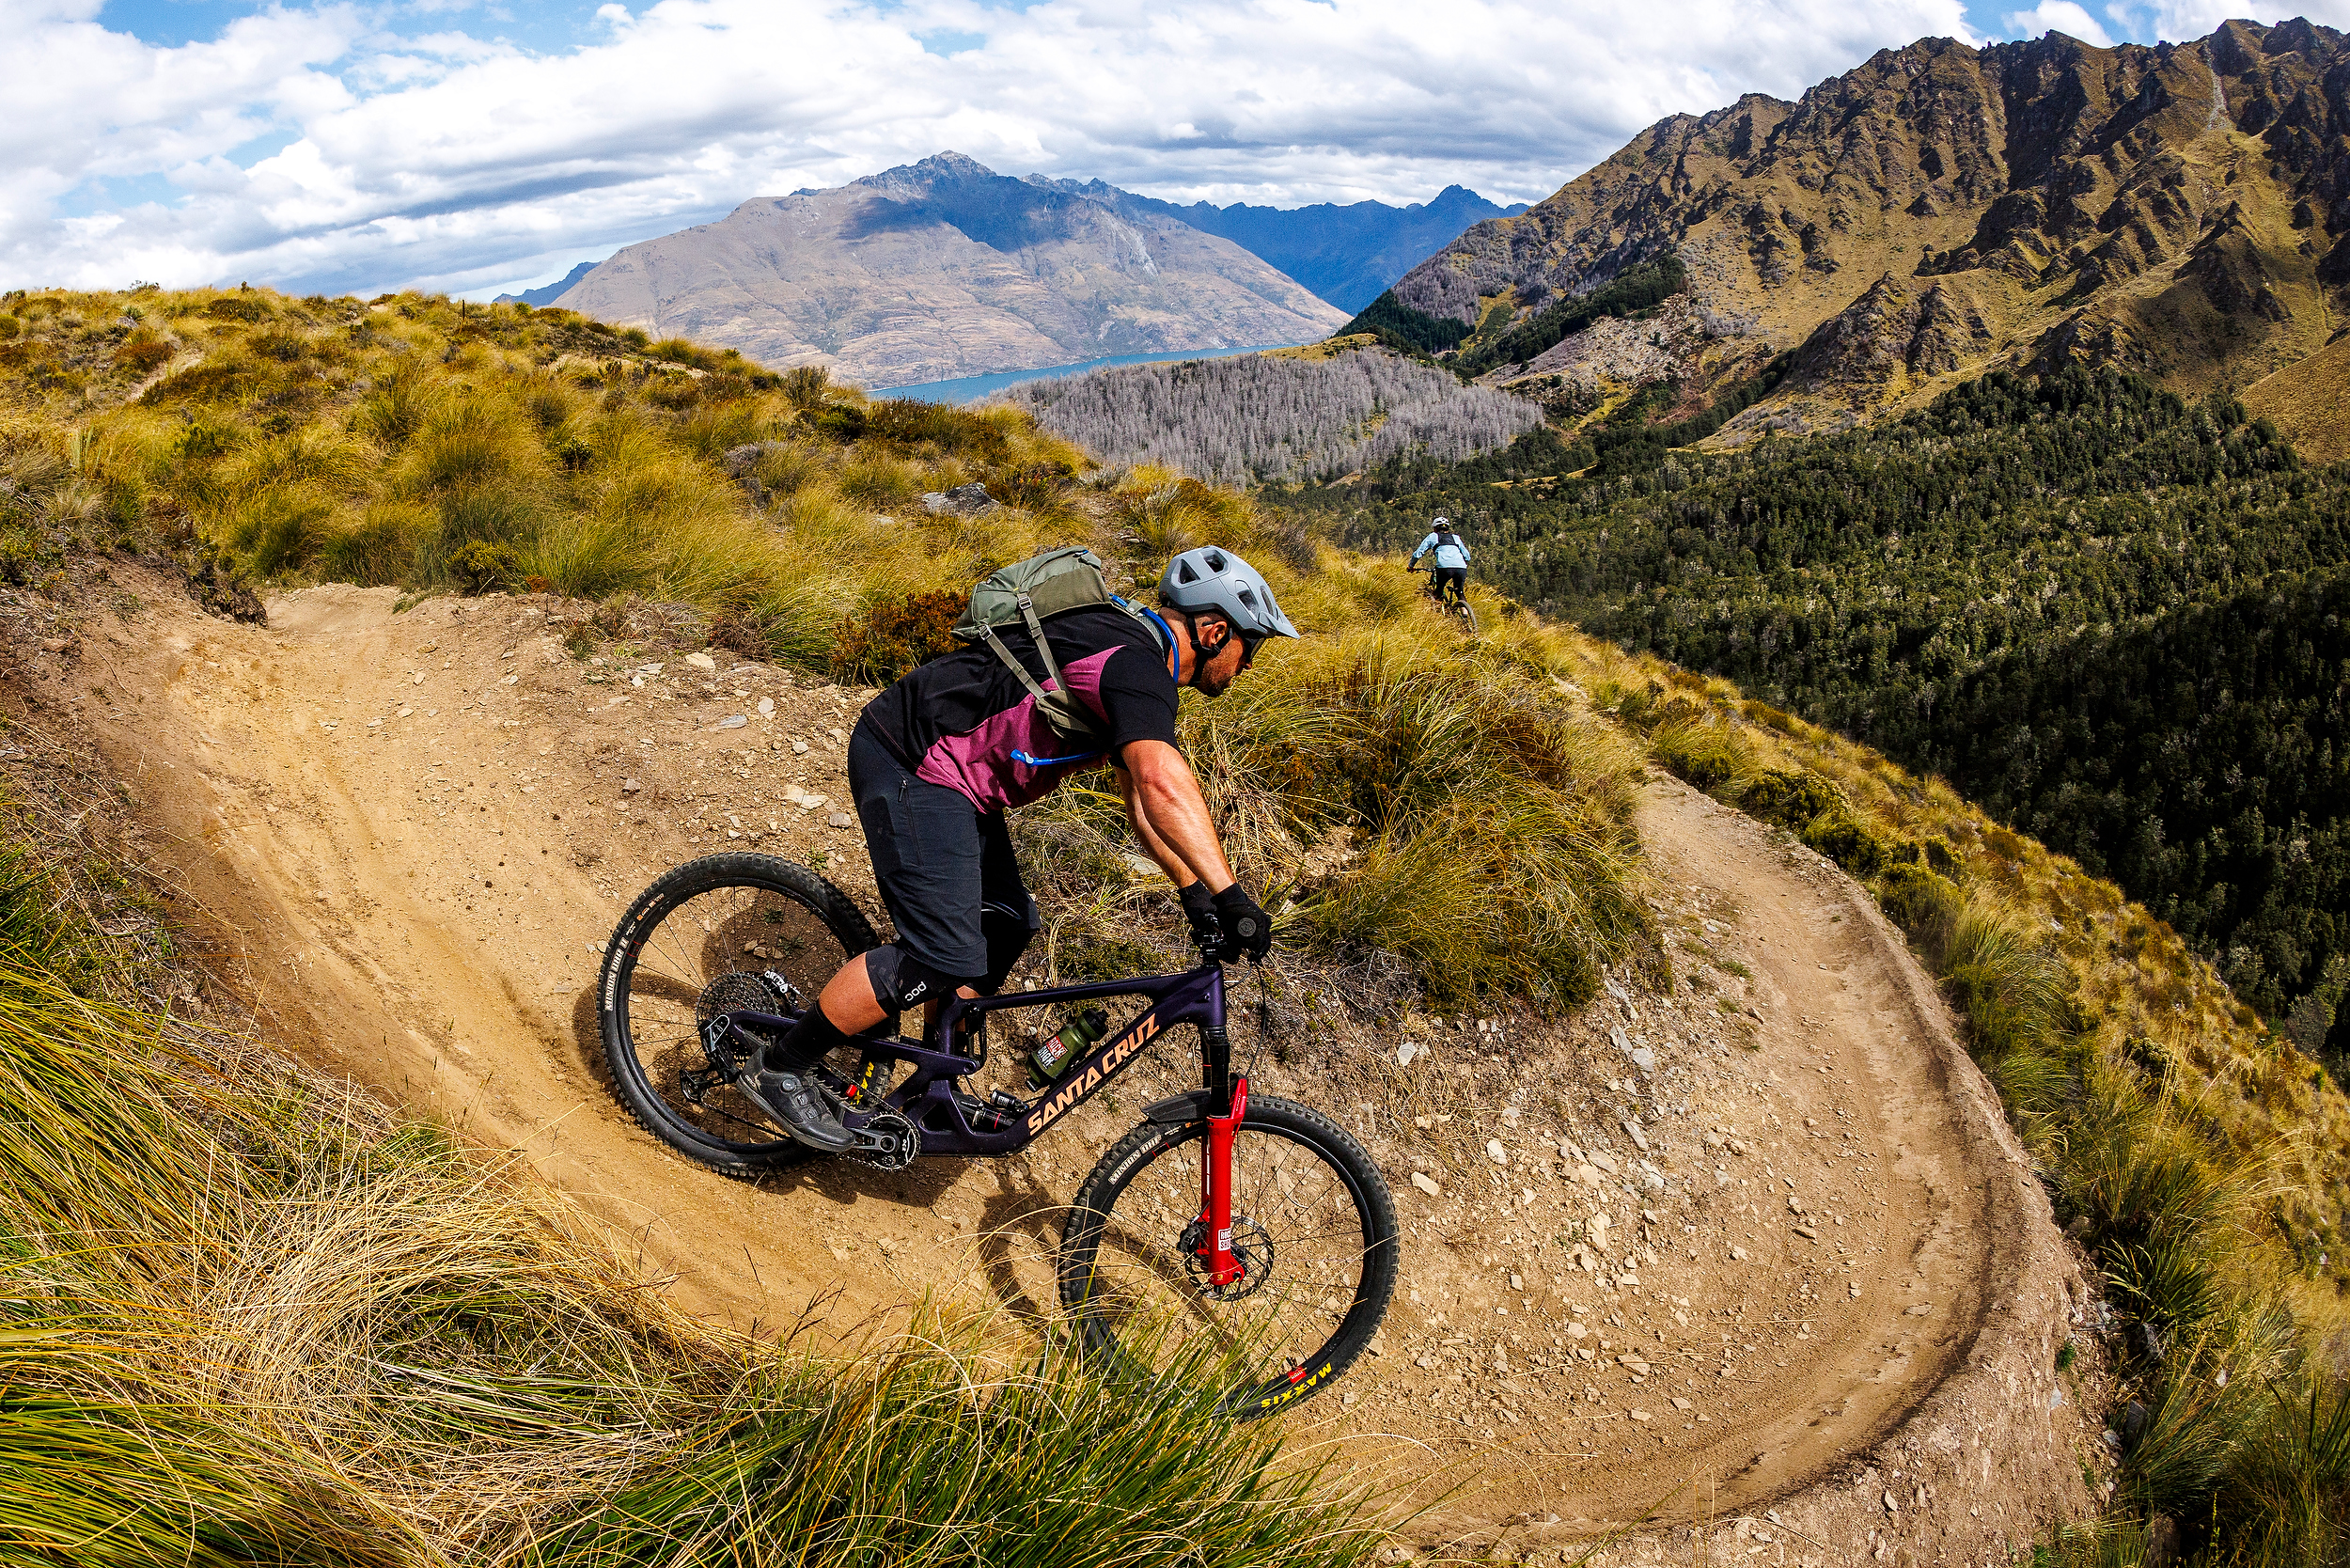
The newly updated, burly RockShox Zeb falls into the progression category and draws direct inspiration from the RockShox Boxxer. This development stems from the latest advancements in world cup downhill racing, which have driven the suspension updates across the RockShox Zeb Lyrik Vivid and Super Deluxe models. Across this issue, I’ve shared some insights from a press camp I attended in February. Queenstown hosted editors from global mountain bike media outlets who spent a week riding RockShox’s new downhill and trail suspension. I rode a Santa Cruz Hightower equipped with a RockShox Lyrik fork and a FOX Float X Factory shock. We tested our current setups for a few days before switching between them using an a-b-a testing method. This involved cycling back and forth between our old suspension, specifically the previous generation RockShox Lyrik, and the new RockShox Zeb. The launch event included six days of riding followed by another month of ride testing on more familiar local trails.
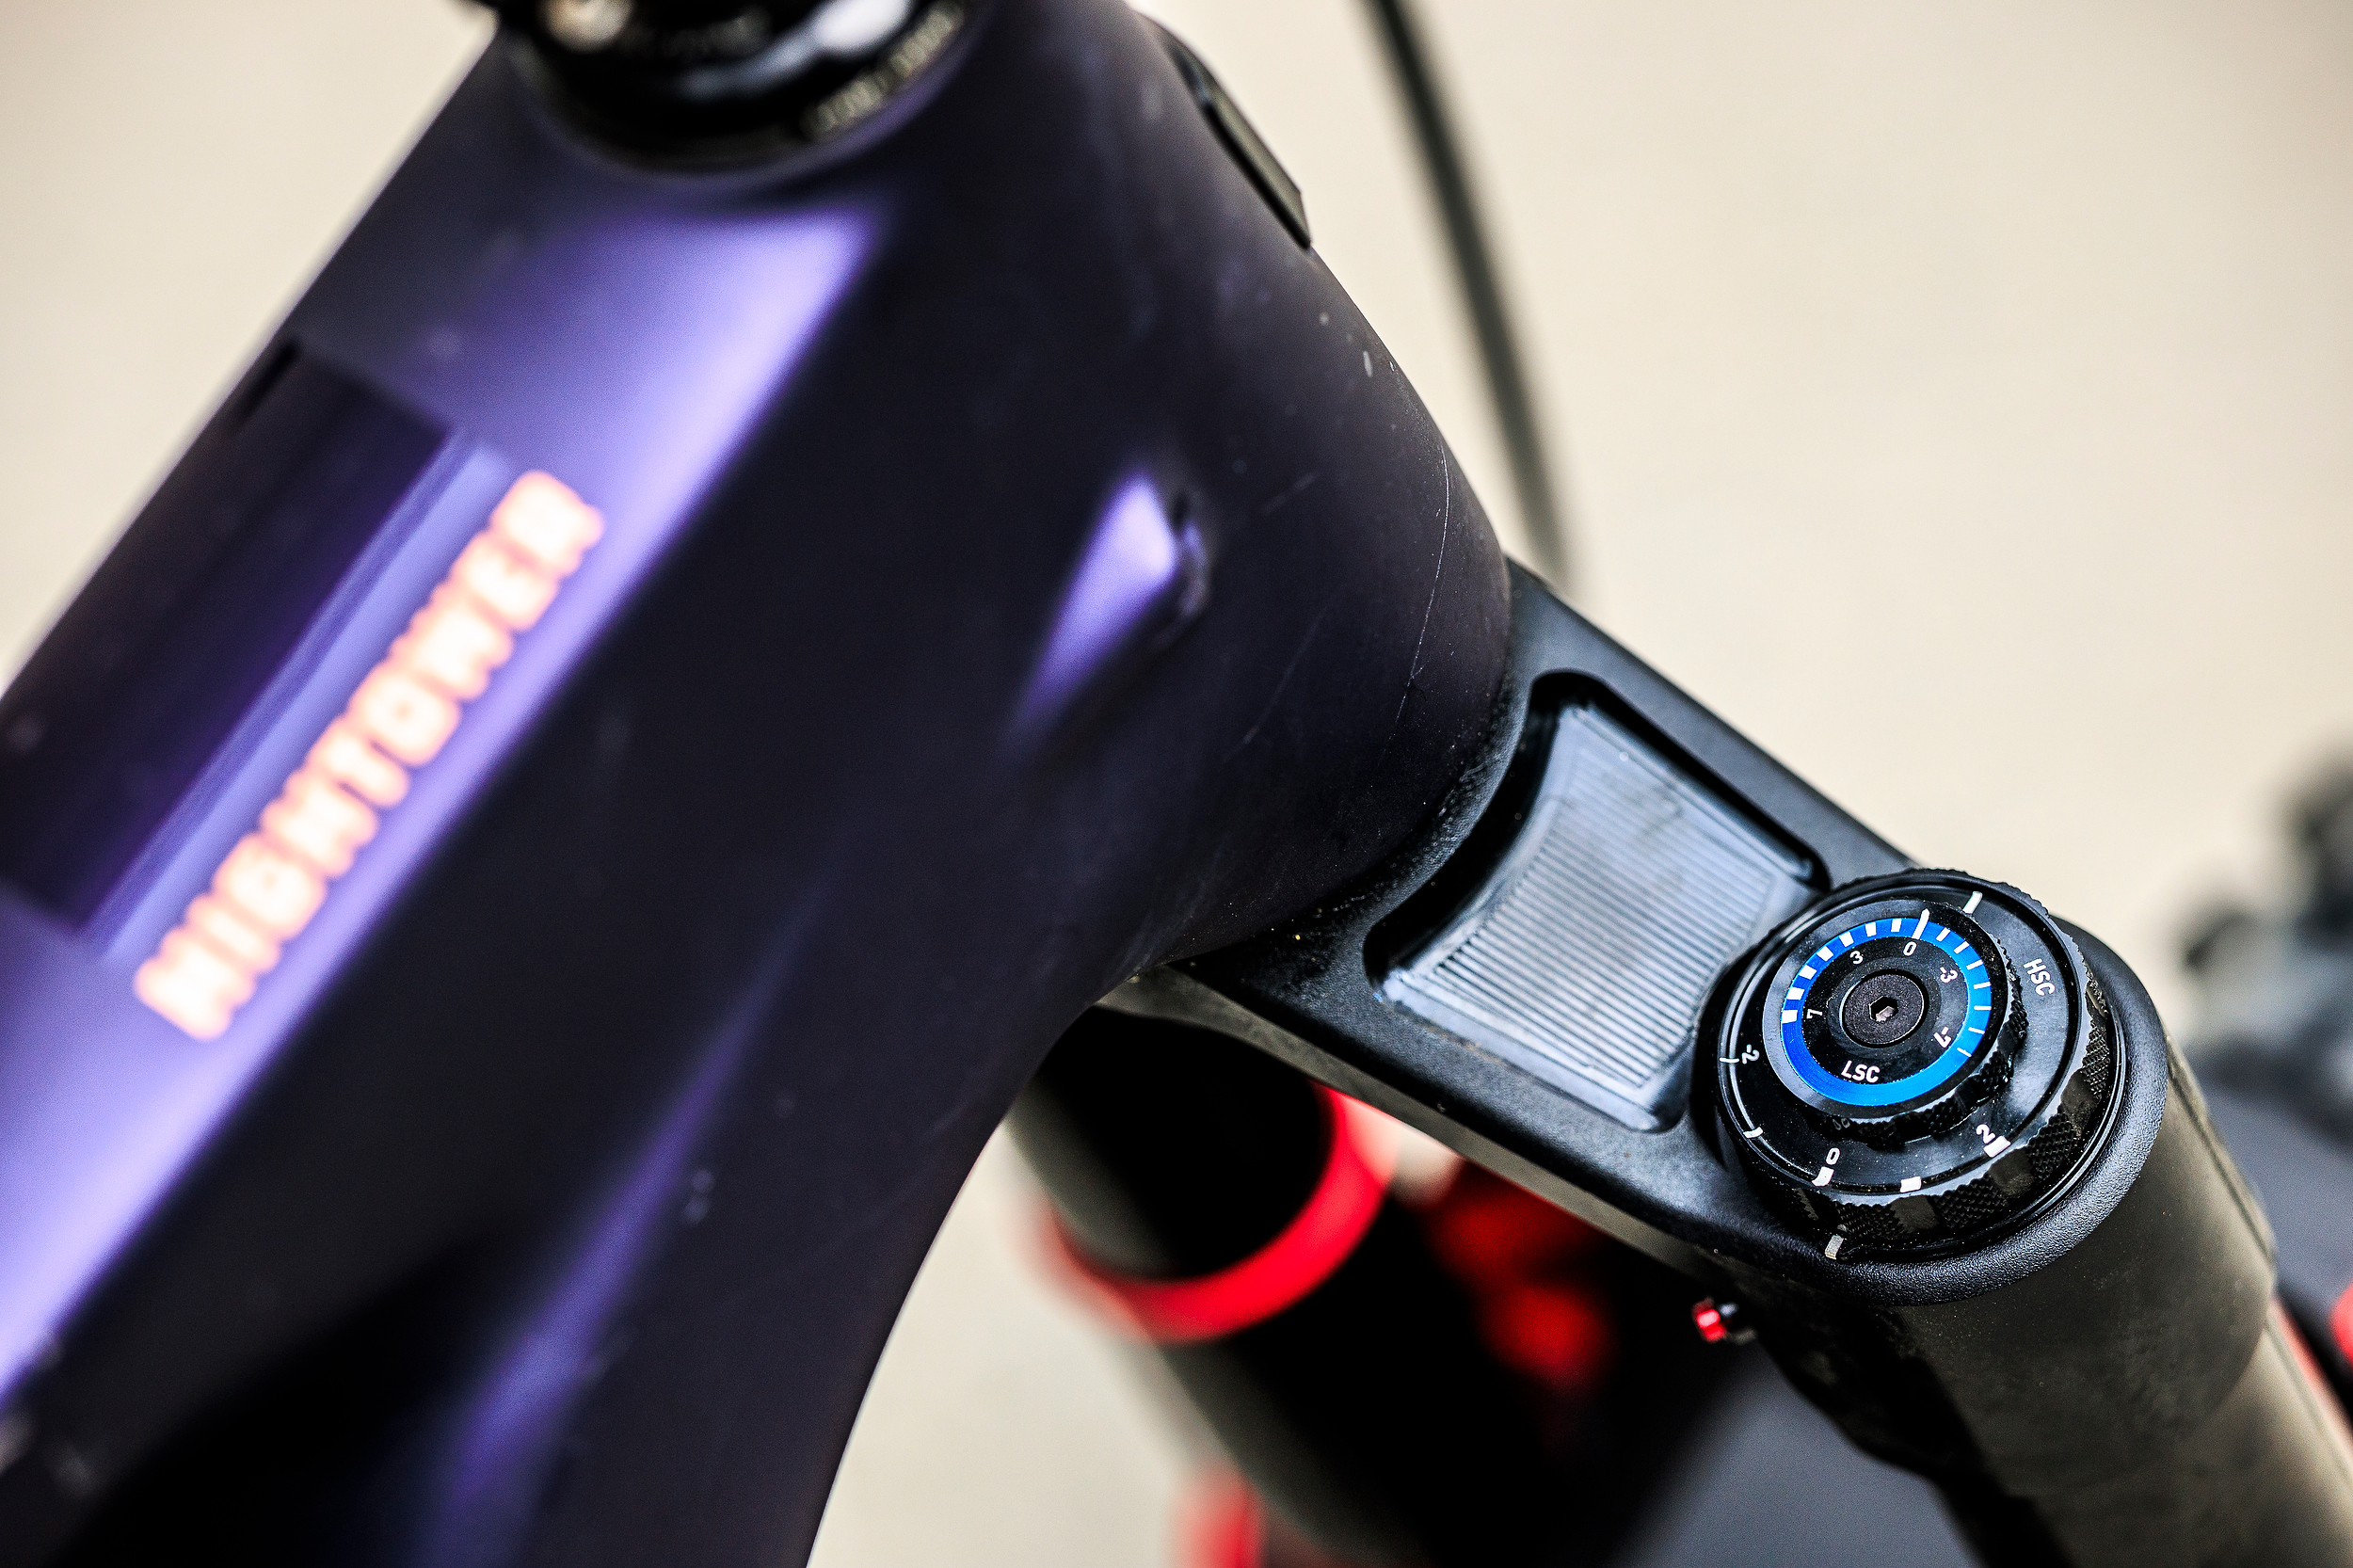
The centrepiece of the new Zeb update is the new Linear XL air spring, and it’s worth understanding what it does rather than letting it blur into the spec sheet. It’s not a marketing name. It describes a specific engineering approach that changes how the fork feels through its travel, and it’s the main reason the new Zeb rides differently to the old one.
Most air springs are progressive by nature. That’s not a flaw, it’s physics. As you compress an air chamber the pressure rises, which means the further you push into the travel the harder the spring pushes back. The result is a spring curve that ramps up toward the end of the stroke. This gives you bottom-out resistance without needing a separate mechanical bumper, but it also means the fork feels different at twenty percent of travel than it does at eighty percent. Predictable it is not. You get a supple initial response that stiffens noticeably mid-stroke and firms up hard near the end. Riders learn to work with this but they’re always adjusting for it, consciously or not. A linear spring does roughly the same thing throughout its travel. The fork feels the same at twenty percent as it does at sixty. What you set up is what you get.
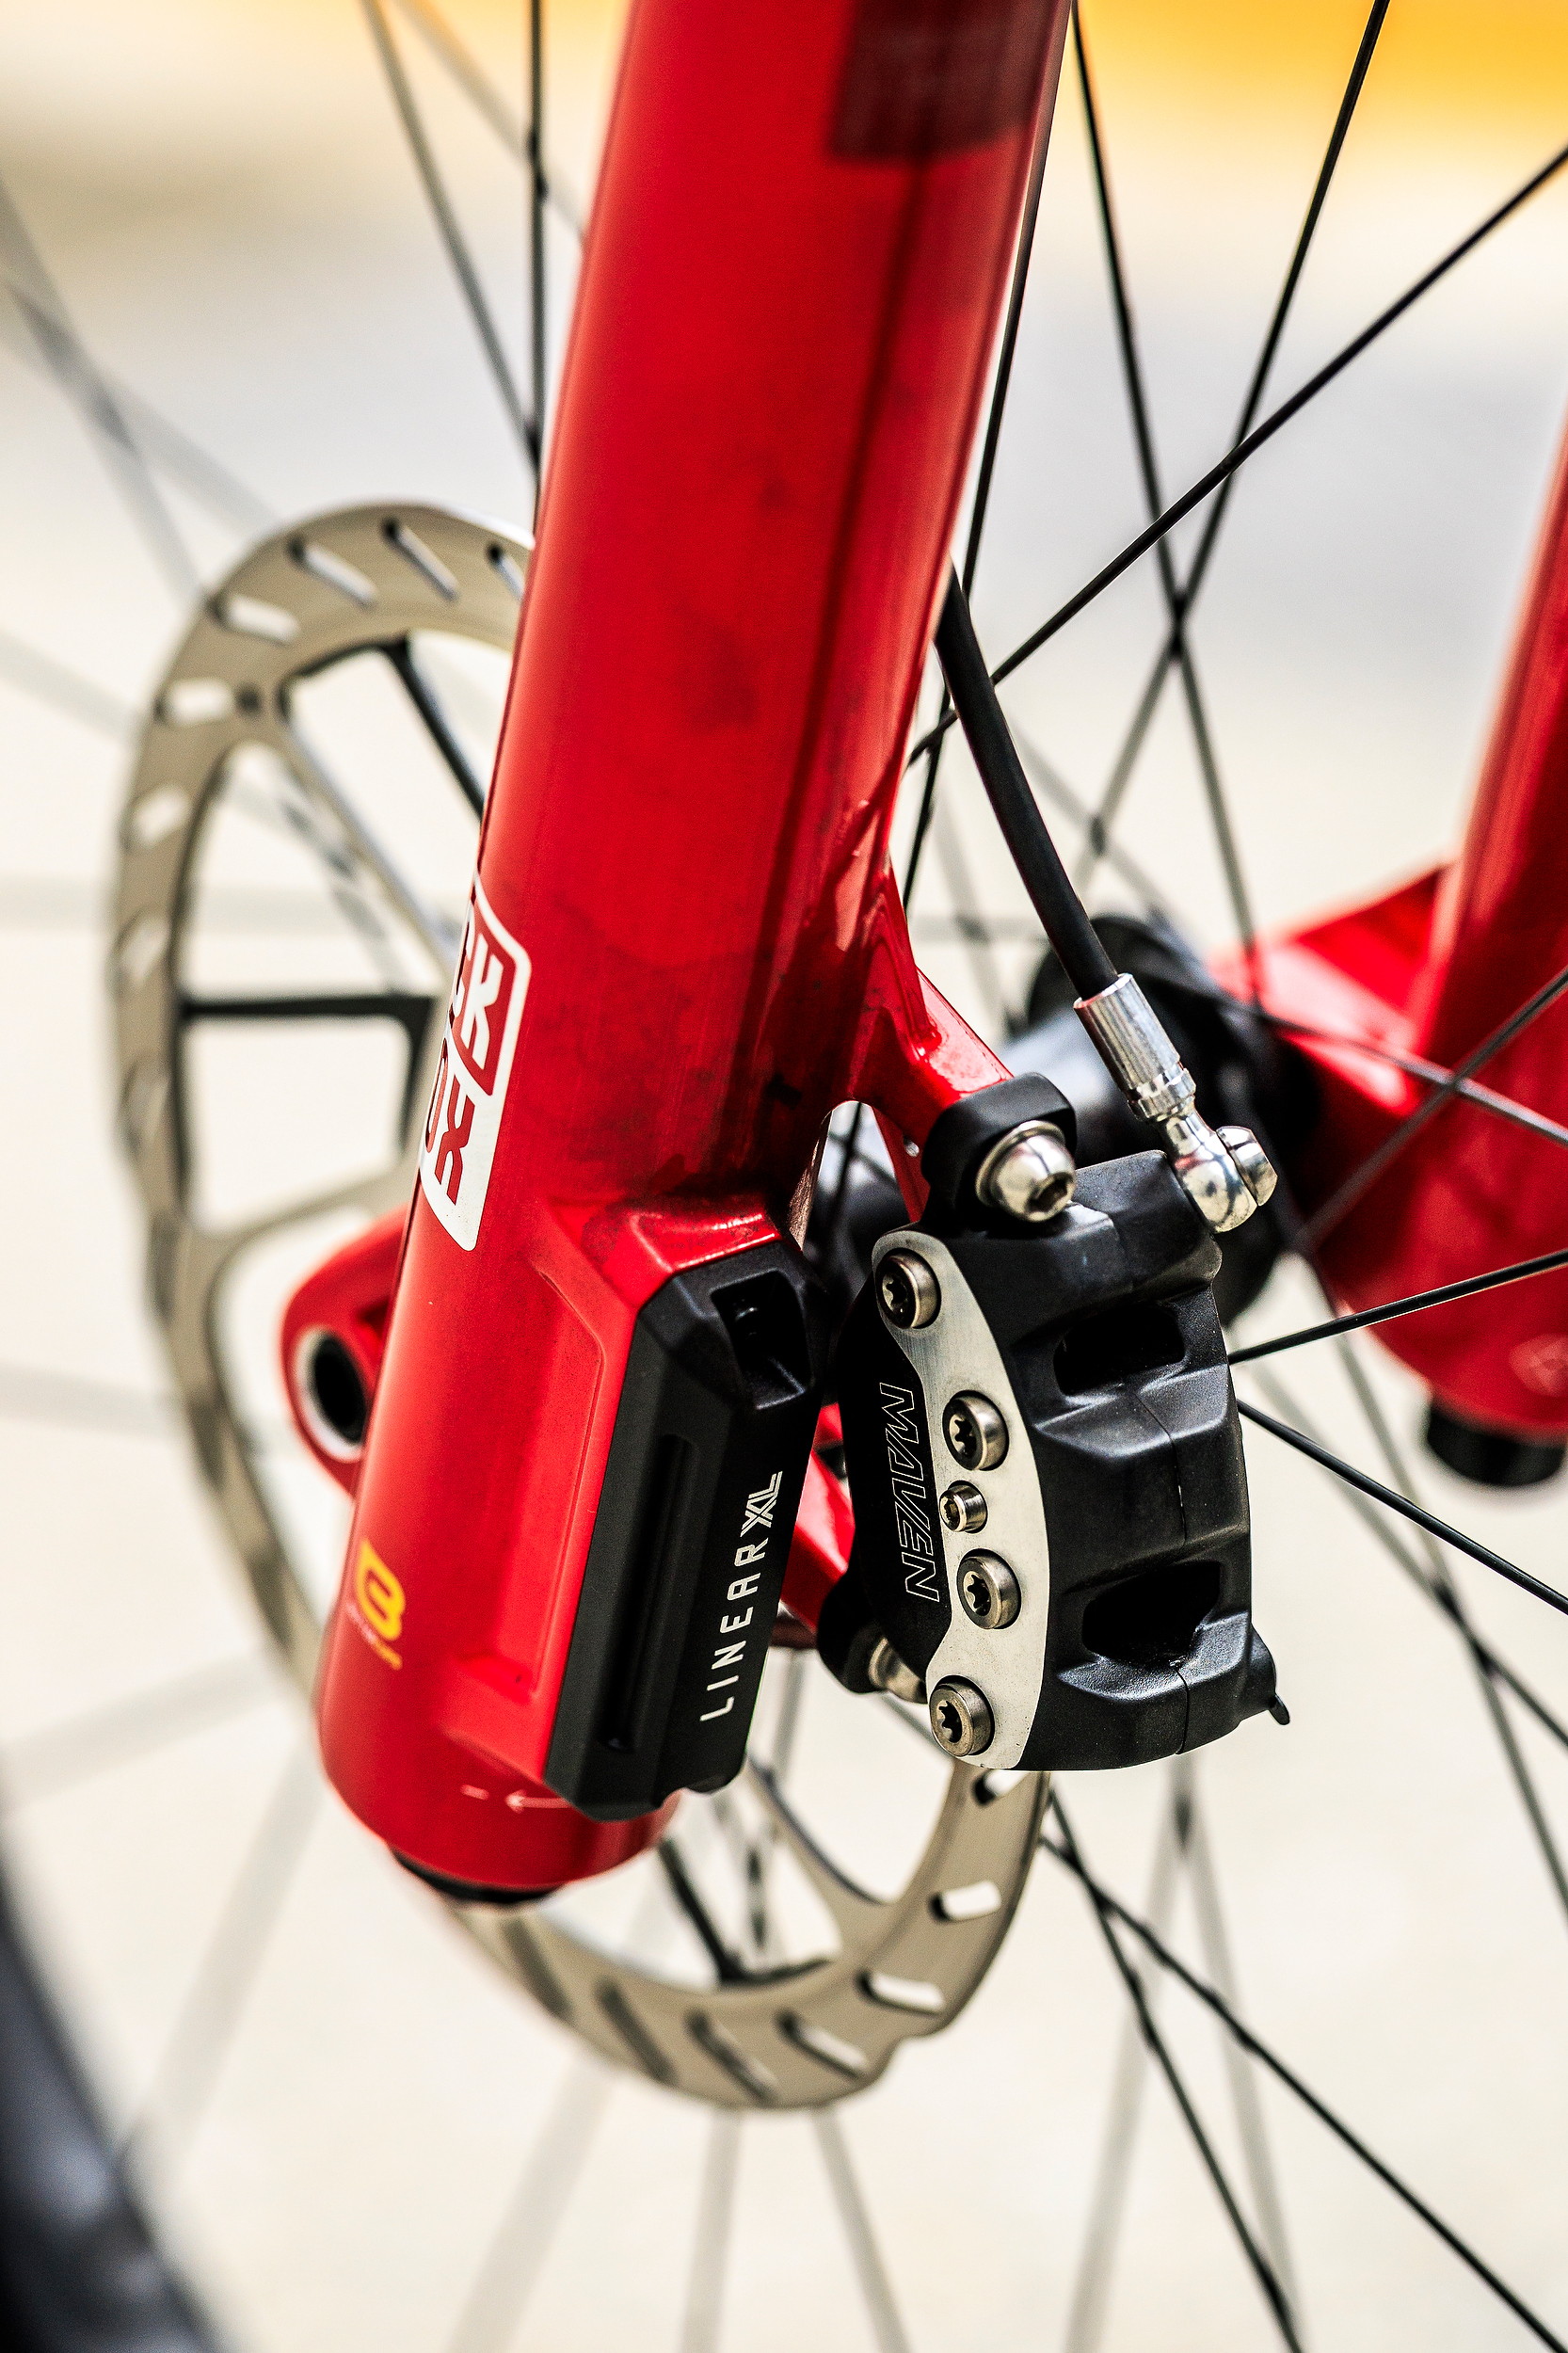
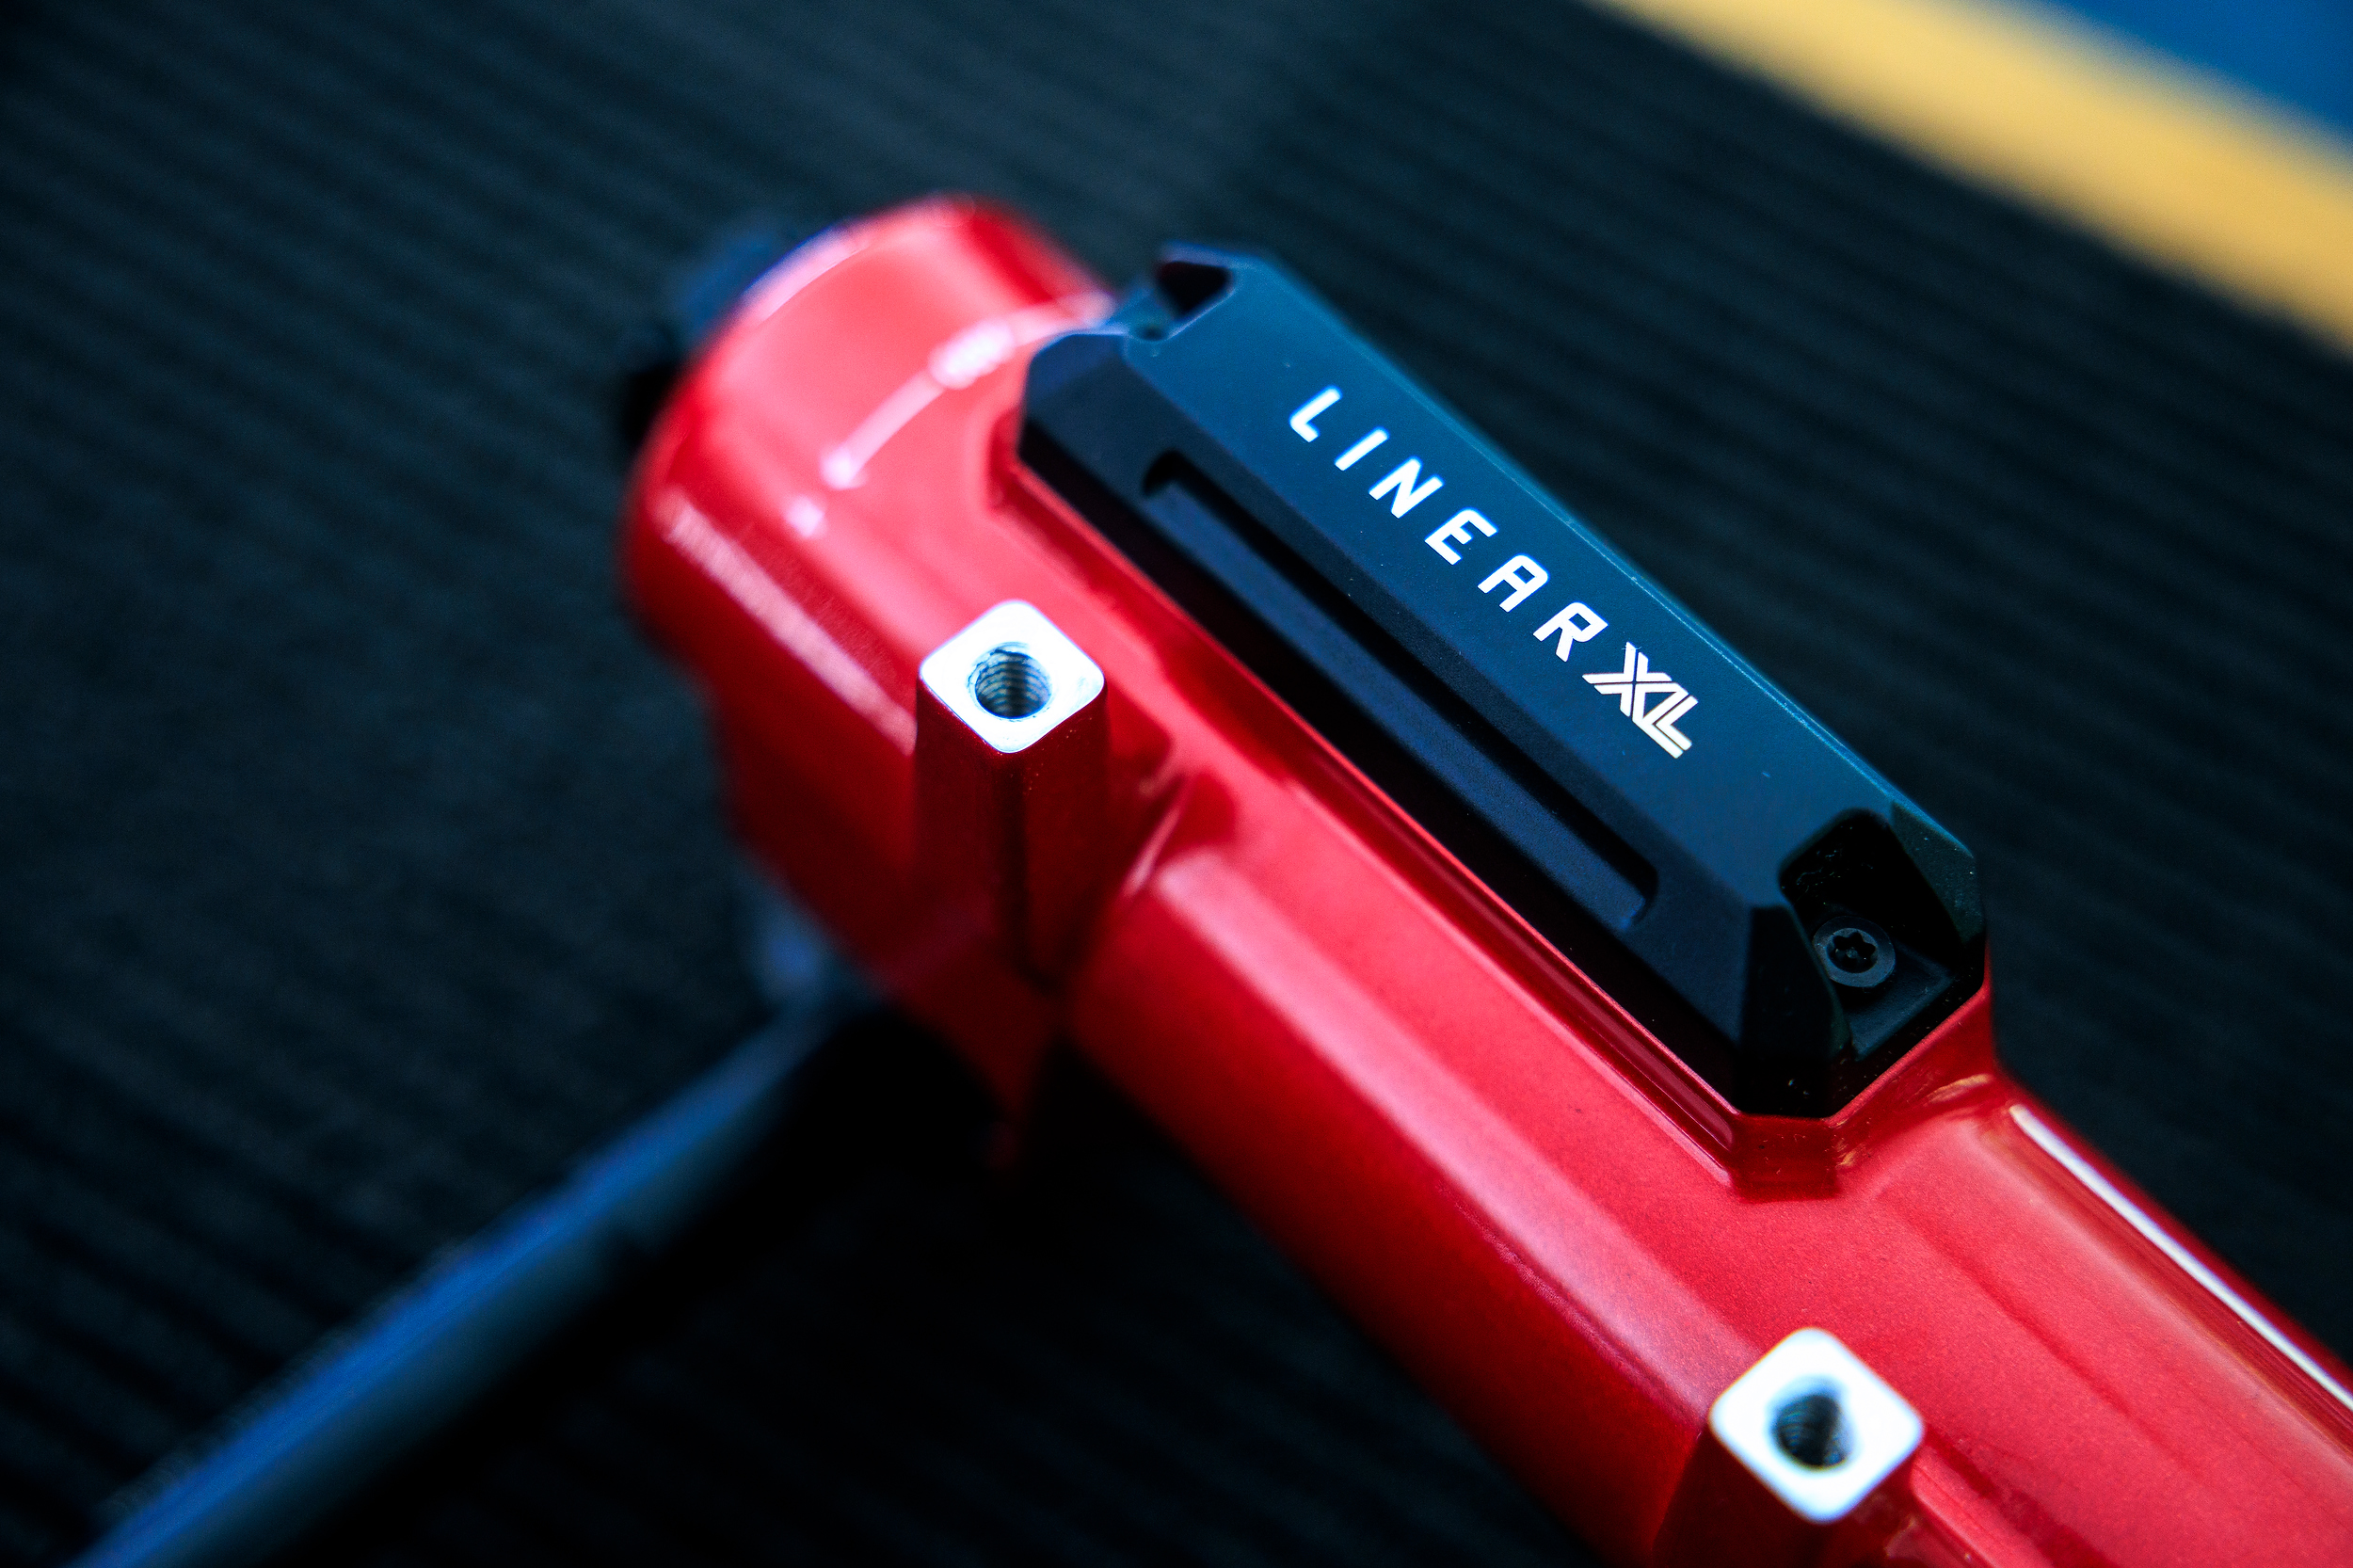
RockShox’s Linear XL system is an attempt to flatten that curve. The approach involves increasing the volume of both the positive and negative air chambers while simultaneously reducing the piston diameter and increasing the inner diameter of the shaft. Taken together these changes mean the fork runs at higher pressure but the rate the pressure increases as you compress through the travel is slower and more consistent. The Air Annex, an additional air chamber mounted on the side of the fork leg, adds further volume to the lower leg, reinforcing the flatter spring curve. The result is a spring that behaves more like a coil: predictable throughout the stroke rather than stiffening in stages.
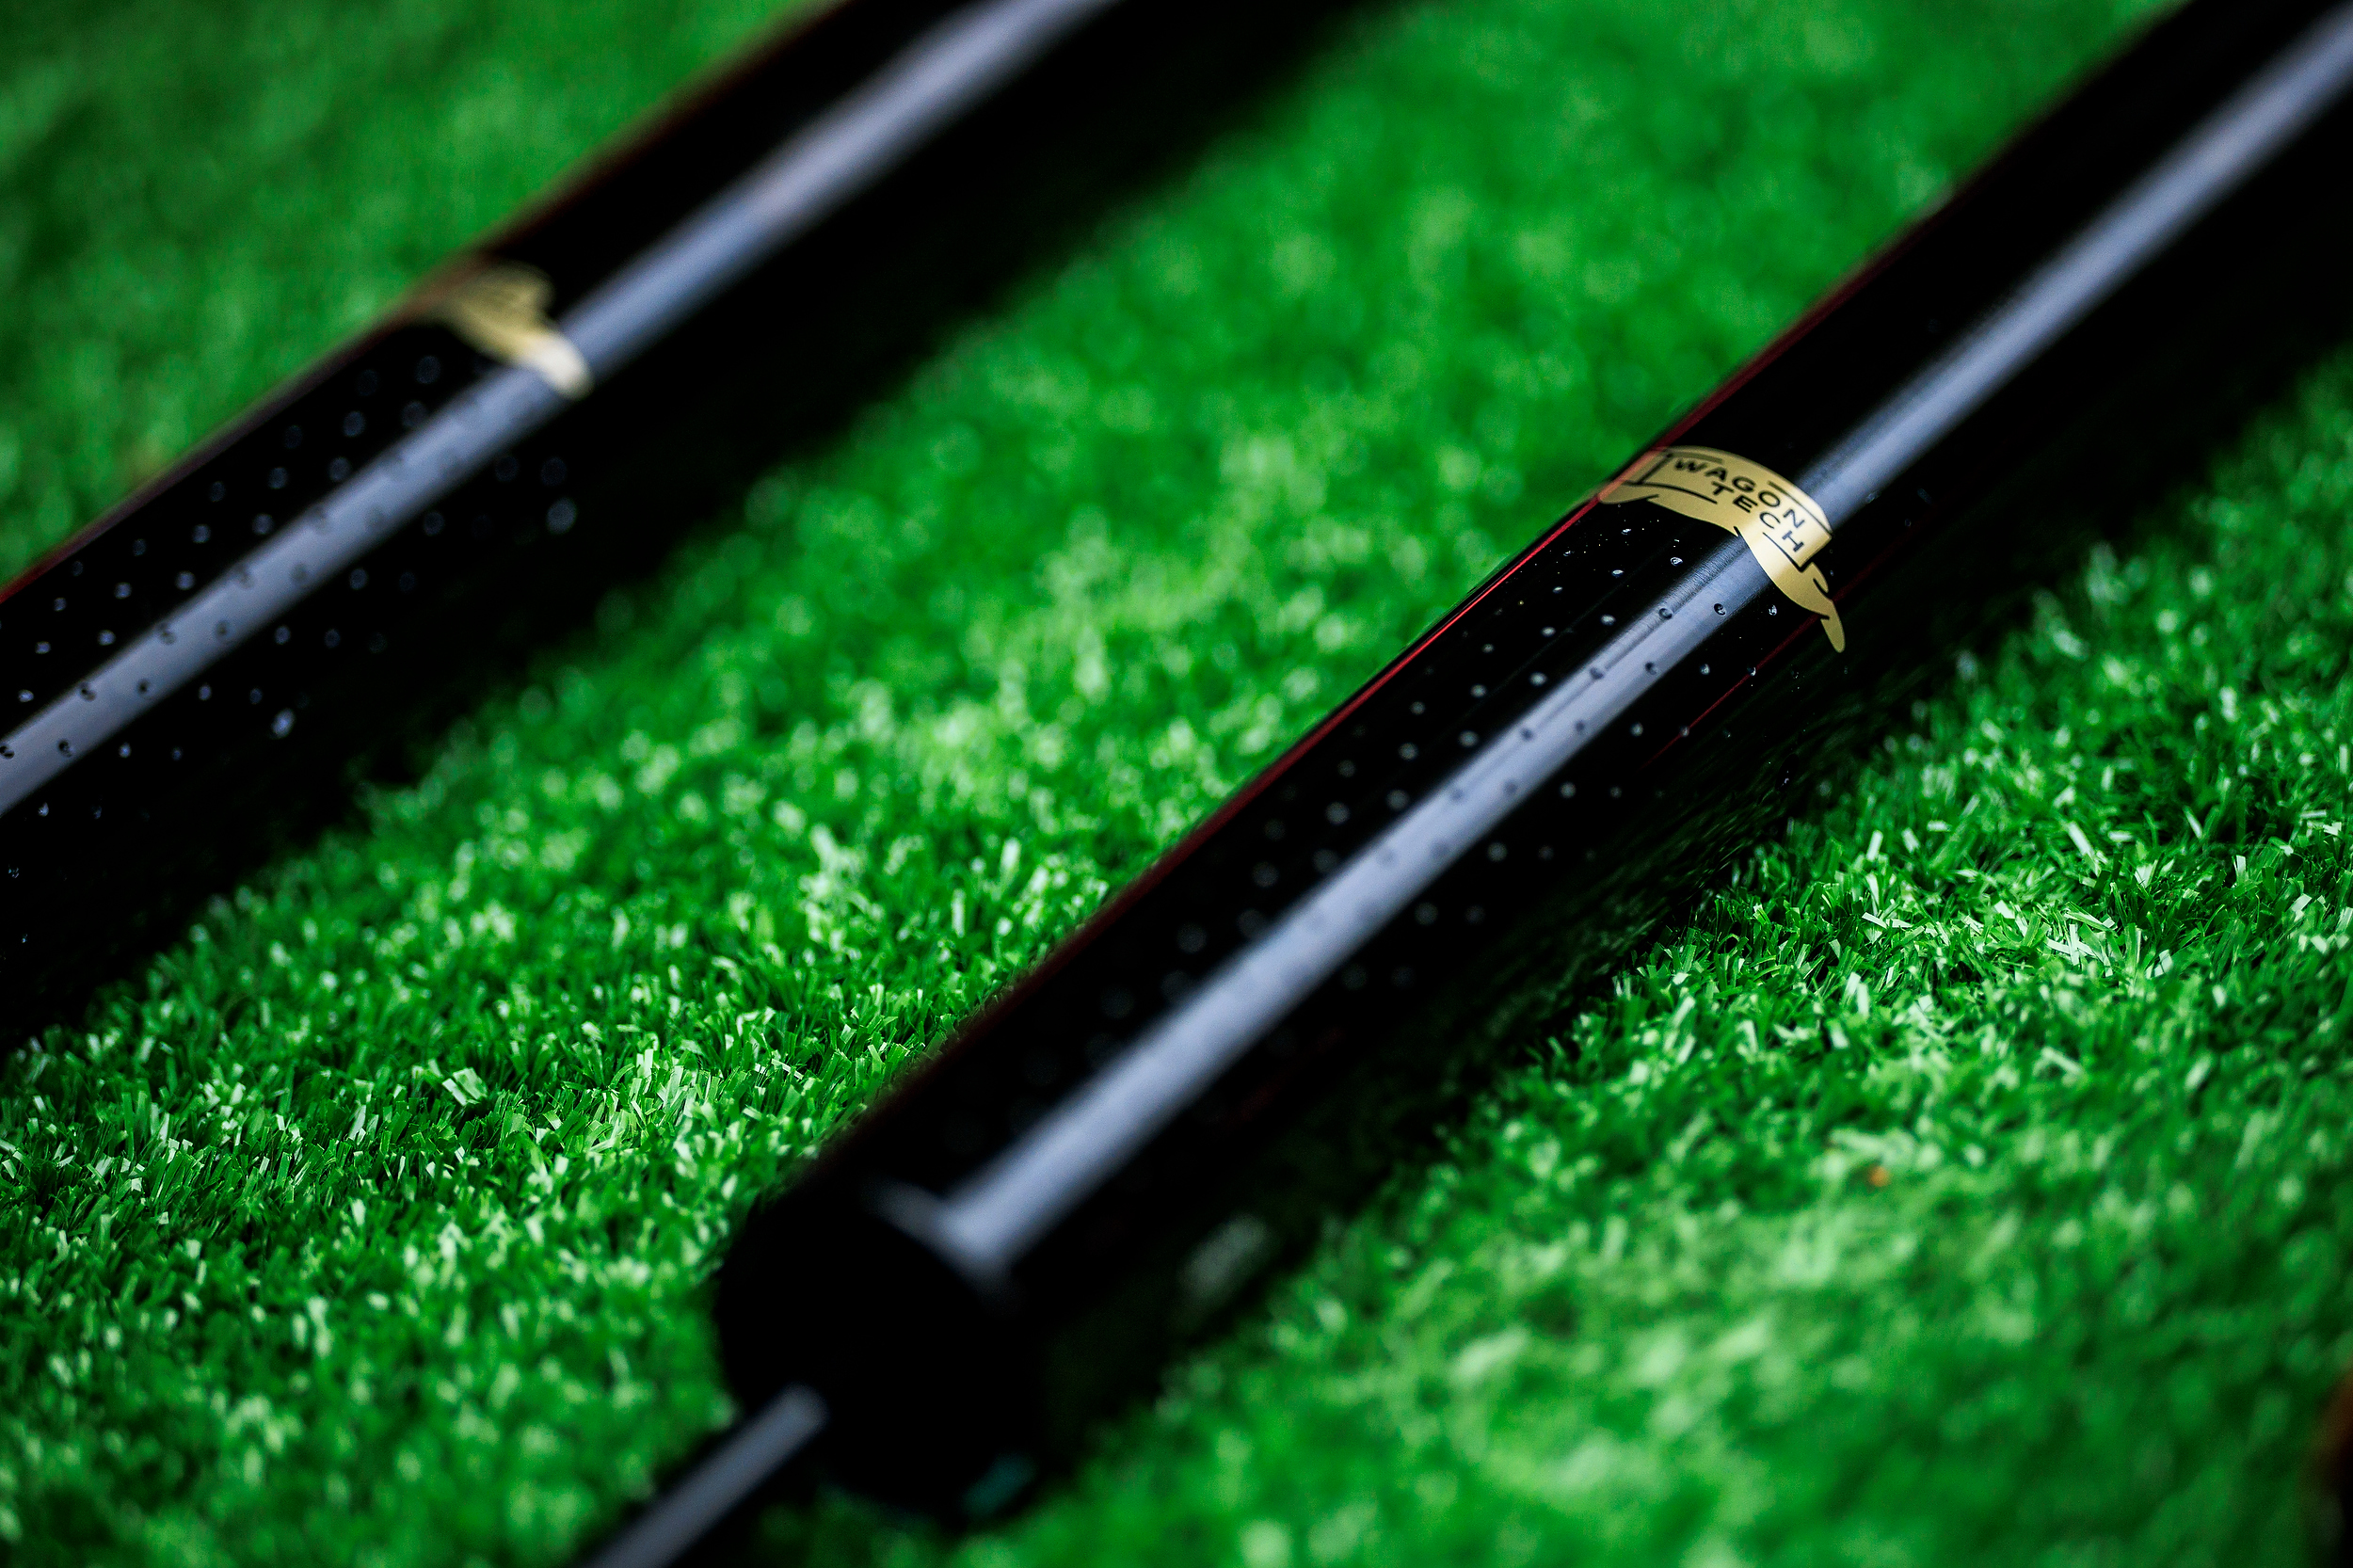
RockShox also refined the fork’s lubrication and small-bump behaviour through two supporting technologies. ButterWagonTech introduces small indentations machined across the lower section of the stanchions, below the dust wipers, which draw oil upward during rebound. On every stroke out, oil is actively redistributed across the bushing contact area rather than relying on gravity alone. Less friction throughout the stroke, more consistent movement, less arm pump on long rough runs. Complementing this are the ButterCups – elastomers mounted on both the spring and damping sides that filter small impacts and high-frequency vibrations, taking the edge off chatter before it reaches your hands. Then there are the breather holes, two small drill holes in each stanchion just below the oil seal. In a big hit the air trapped in the casting has somewhere to go, distributing quickly and evenly rather than creating a pressure spike. Oil circulation improves too, keeping damping consistent under repeated hard impacts. Together these three details are about keeping the fork moving cleanly and, honestly, not letting friction and trapped air compromise the spring curve the Linear XL system is working to deliver.
The Linear XL spring doesn’t work in isolation. Because the spring is more linear, less progressive, the Charger 3.2 damper that pairs with it in the new Zeb is tuned more progressively to compensate. The damper picks up where the spring backs off. This is important to understand because putting a Charger 3.2 into an older fork would feel unusually firm — the damper is calibrated specifically for the flatter spring curve, not for the progressive curve of the previous generation. The system is designed to work as a matched pair. RockShox describe the goal as coil-spring feel without giving up air’s key advantage — tune it with a pump rather than swap a spring.
On trail the difference is in the consistency. With a progressive spring curve, you develop a sense of where the fork is in its travel and you ride accordingly, backing off slightly before the middle of the stroke stiffens, or driving harder knowing the end of travel will support you. With a more linear spring that calibration becomes simpler. The fork is doing roughly the same thing throughout. Put simply, you can stop thinking about where you are in the travel and start thinking about the trail in front of you, which is exactly where your attention should be. During the camp in Queenstown this was most noticeable on repeated laps of the same trails, the fork felt consistent in a way that let you push harder without having to relearn its behaviour each time. Compared to the previous generation Lyrik, the Zeb felt firmer and stiffer but still nimble. It could hit harder when asked to, which is partly a function of the increased travel (150mm Lyrik to 170mm Zeb), but across the stroke it felt plusher , which is the Linear XL story in a single ride impression. The weight increase is noticeable if you’re looking for it, but the performance gain makes it an easy trade. What stood out most was the grip in technical terrain at lower speeds, the kind of riding where a fork that sits high and active in its travel makes the difference between traction and washing out. The steep, chunky terrain of Queenstown tested the support end of that equation. Rotorua tested the suppleness end, root-littered trails where the fork needed to stay planted and small-bump sensitive at the same time. It held up well in both.
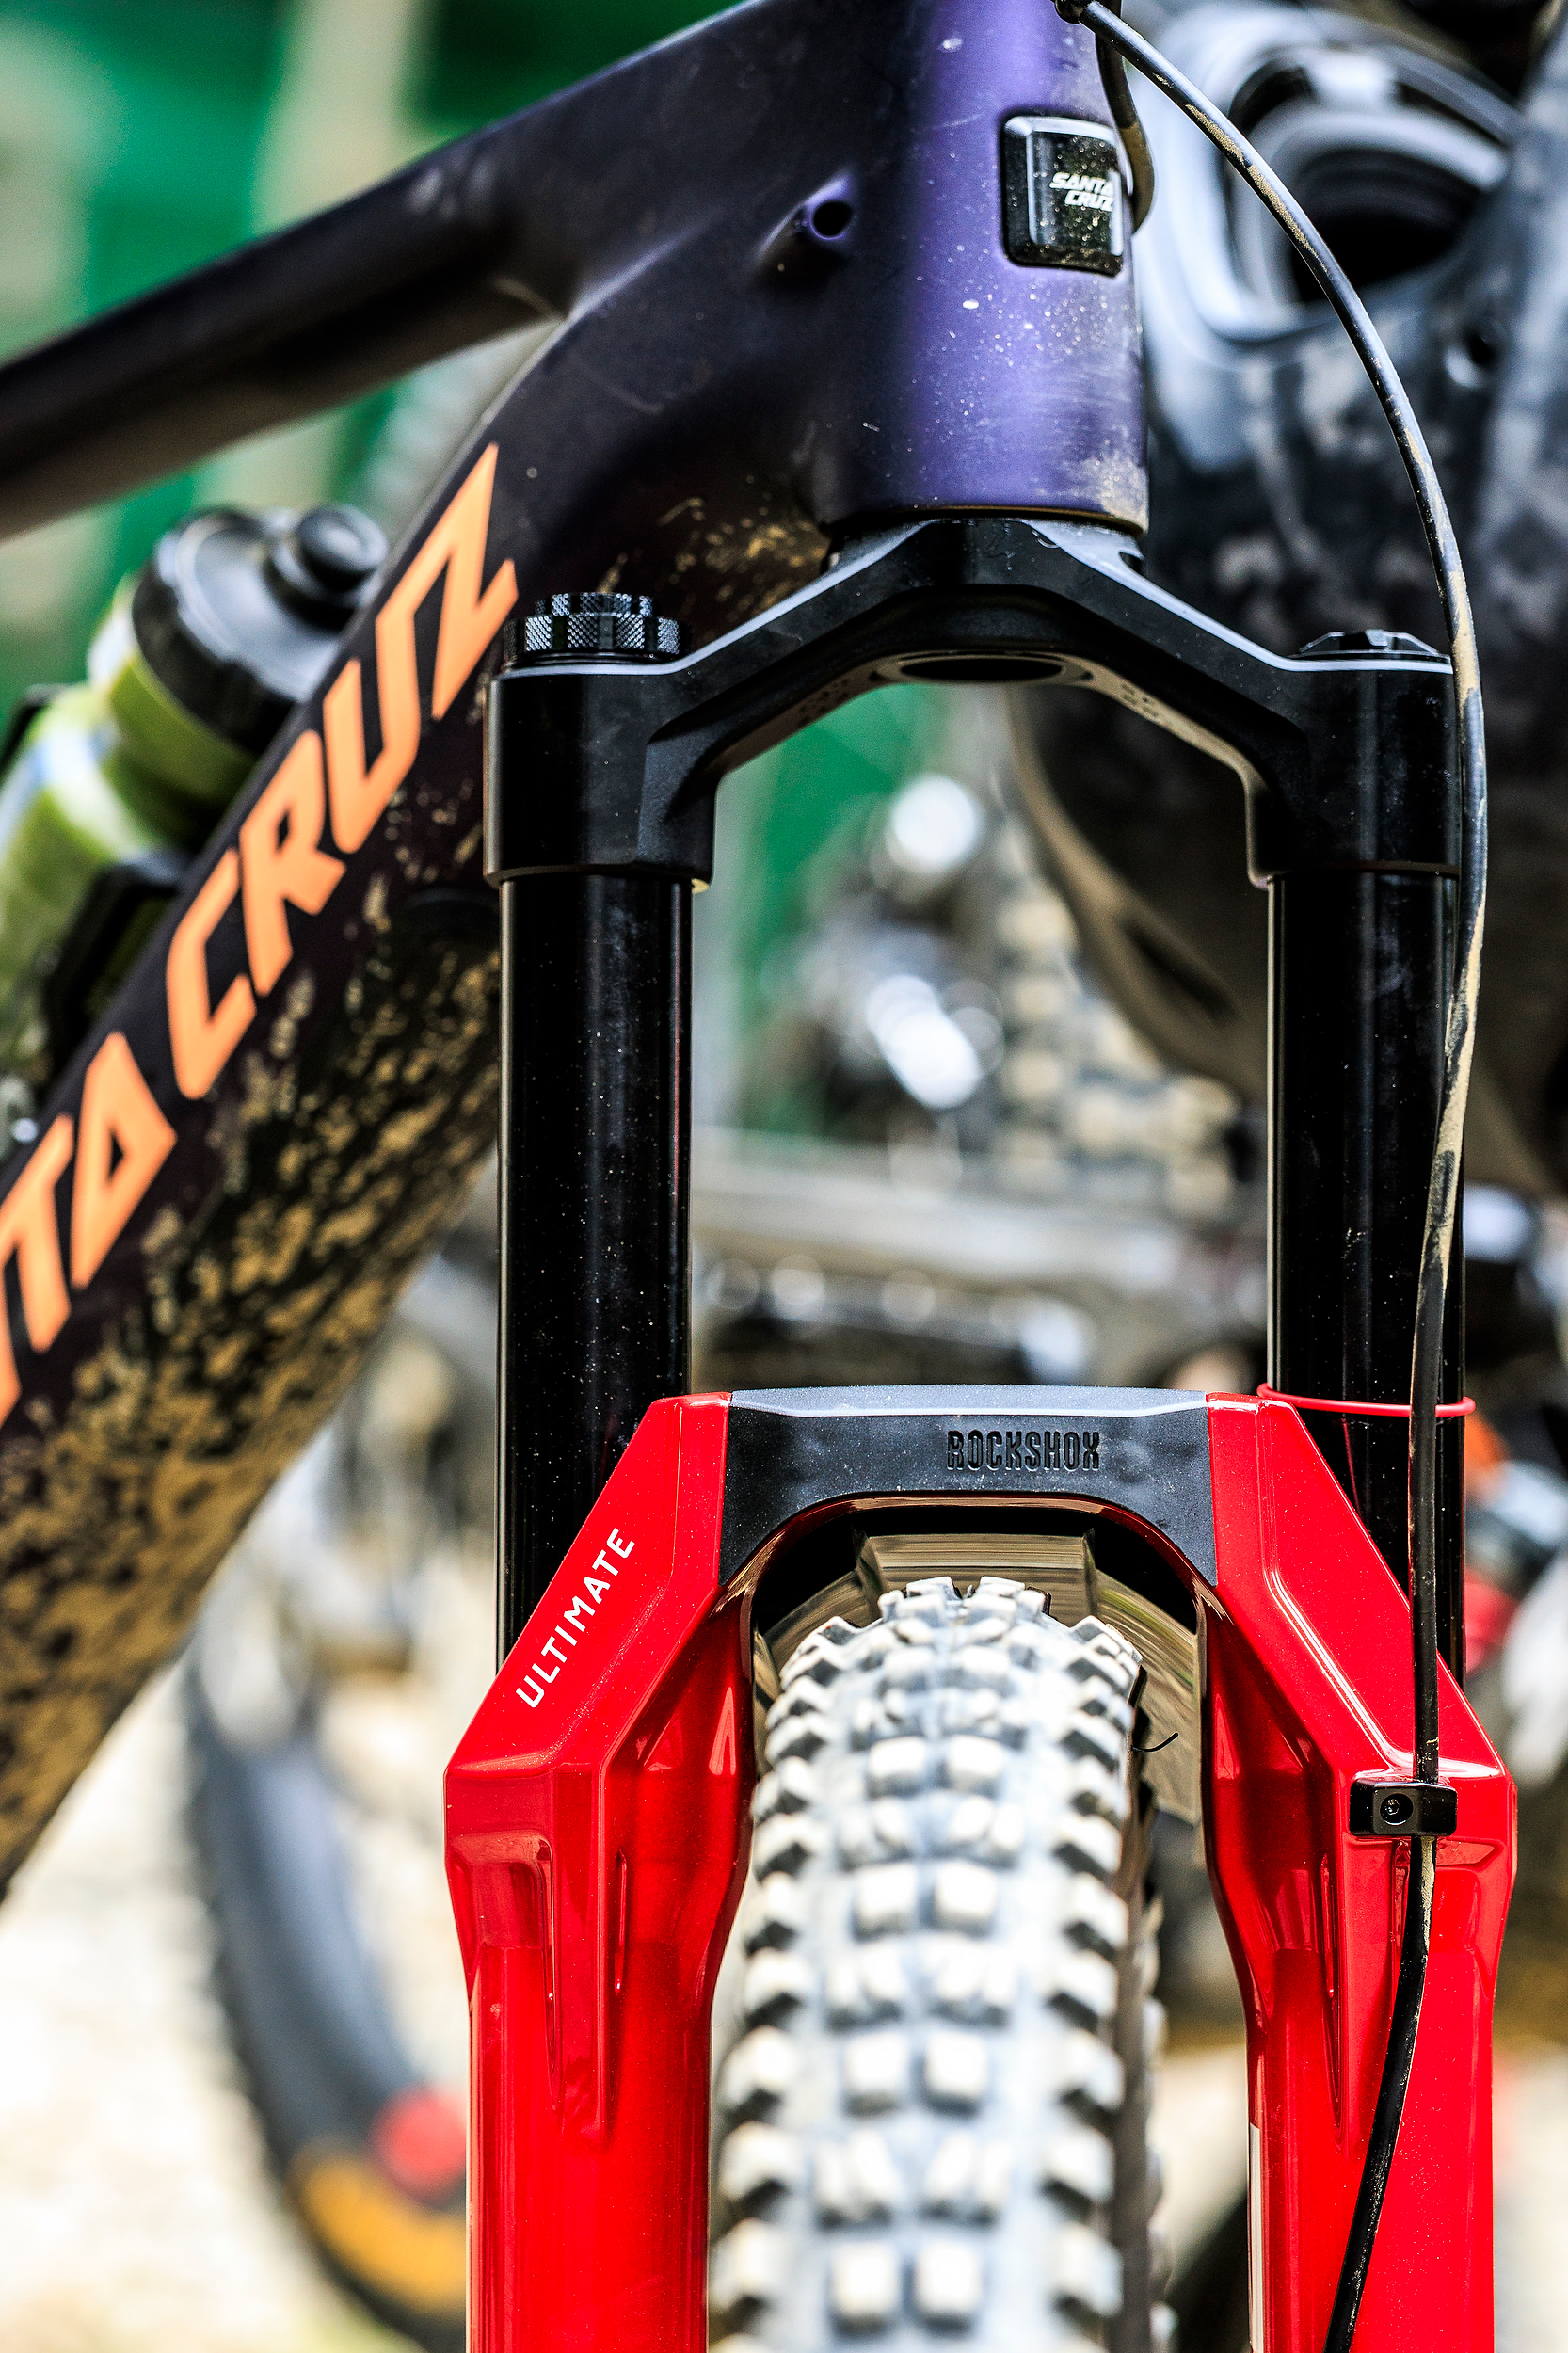
From the outset, the even and therefore more predictable spring curve immediately draws attention. The fork responds sensitively to small bumps and irregularities offering plenty of feedback. This is complemented by a progressive damping tune providing adequate support during hard compressions and fast berms. Even under heavy braking the front remains responsive without diving too deep, and the fork consistently rides pleasantly high in its travel.
The a-b-a testing format at the camp – old fork, new fork, old fork again on the same trails – is exactly the kind of structured comparison that makes this difference legible rather than just ‘felt’. The Zeb with the updated spring felt less variable through its travel. Less time spent managing the fork, more time spent riding the trail. And it performed well during the multiple runs in Queenstown. The solid chassis helped with confidence on steep tech terrain and behaved well in those relentless braking ruts. As for more pedalling on trails, the fork felt predictable and planted when transitioning to flatter or technical climbs. It was slacker than what I was used to but after a few rides it wasn’t a thing, and I liked having more travel on the descents so the payoff was well worth it. That said, I’d like to try the new RockShox Lyrik with similar internals of the Zeb for more all-mountain or pedalling days that I’m more used to.
RockShox has refined the setup with clearer, numbered adjuster dials and additional height indicators on the stanchions. One thing worth knowing: Linear XL runs higher setup pressures than the previous generation, so if the numbers on the pump look wrong, that’s why. The smaller piston needs more air to reach the same SAG — get it right and the spring rewards you. As usual, there are SAG markings and a sticker on the fork for quick base setup. It’s remarkable how much the adjuster dials affect the fork’s behaviour. The high-speed compression circuit, in particular, significantly influences the fork’s travel height. With just a few clicks, the setup can be easily adapted to various trails – from rough high-speed tracks to steep downhill sections, flowy bike park runs to loamy fern littered trails of Rotorua.
The new Zeb is a brawler’s dream, perfect for park laps, technical trails, steep shuts, swift descents and anything else thrown its way. It’s a solid companion for an enduro brawler or long-travel eMTB and I think it’d be a great fit. I’m eager to get an eMTB to fit the Zeb onto to see how it responds. It’s a classic evolution with a clear focus on a more linear and predictable spring curve. After my initial testing period, it responds sensitively, behaves predictably and maintains a pleasant travel height. The overhauled Zeb fork levels it up for today’s riders.
For more in-depth reviews on RockShox’s Vivid Air shock, sign up to our email newsletter, visit our website or follow us on Instagram.
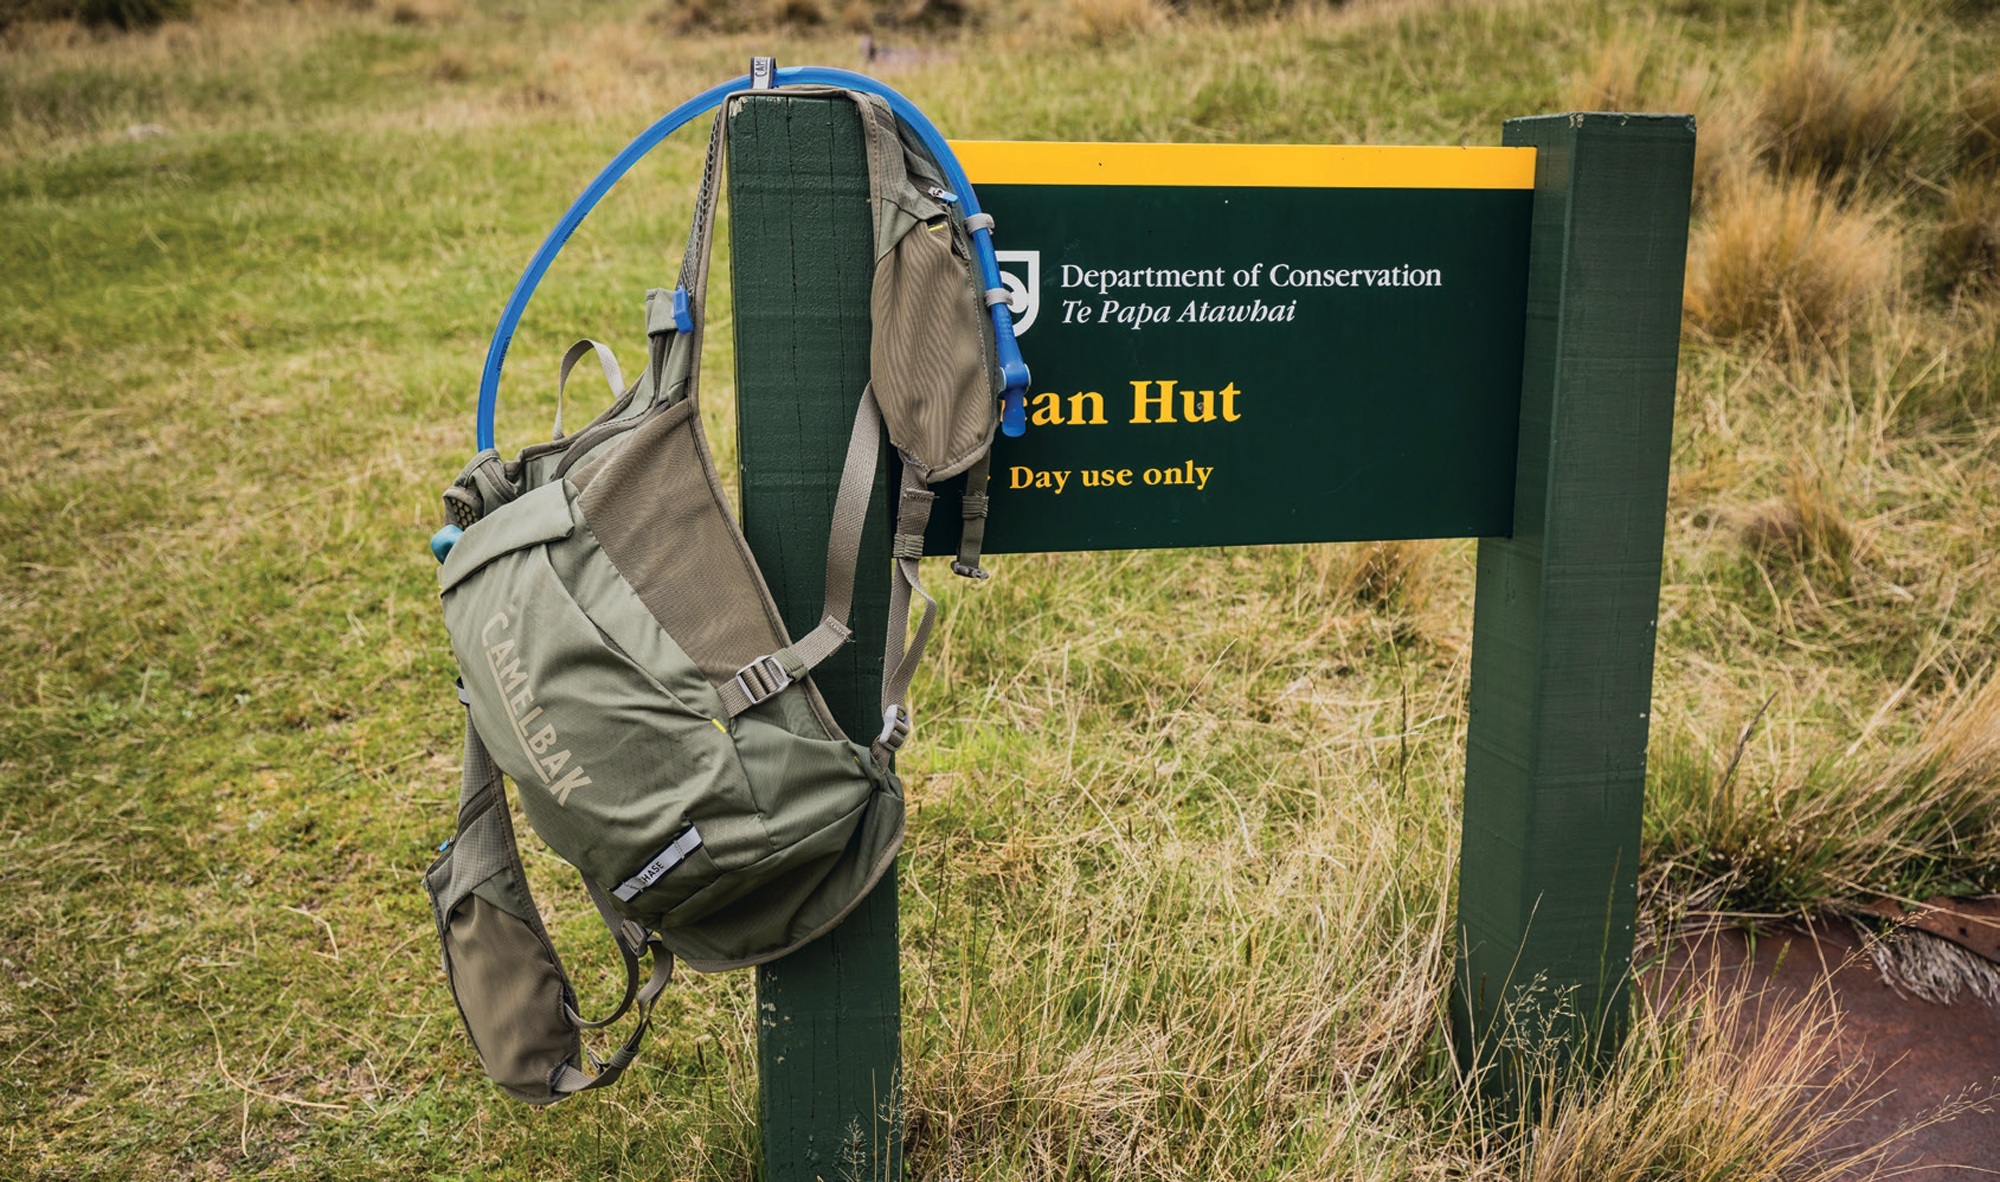
CamelBak Chase Adventure 8 Vest
Words Liam Friary
Images Caleb Smith
RRP $250
Distributor Southern Approach
There’s a particular style of riding where you need to carry more than your water bottle and whatever you have strapped to your bike or keep in frame storage (if you have one). But sometimes a full-blown backpack feels like overkill. On these days, you’re committed to being out for hours, tackling technical terrain, and need quick access to everything without fumbling around trying to get access to your gear.
When I first strapped on the Chase Adventure 8 Vest, I’ll admit I was sceptical – in the past, I’ve found vests either too snug or restrictive to wear. The Chase Adventure 8 Vest is designed for those big mountain all-day rides where preparation is everything. Eight litres total capacity, supplied with a two-litre Crux bladder, and enough clever organisation to make my tidy, slightly OCD self happy. The vest format means it sits above your jersey and/or bib pockets. This helps a lot as you’re not fighting for space but rather adding, and you can easily access any snacks or gear that’s not stashed in the vest.
The standout feature here is what CamelBak calls the “Command Center Harness”. It’s essentially a chest-mounted organisation system that puts your essentials right where you can see and grab them without contorting like a gymnast or stopping to dig through pockets. There’s integrated tool organisation built into the harness itself, which means your multi-tool, tyre plugs, and other critical bits are right there on your chest, easily within reach if something goes awry.
The main storage sits in the back panel with six litres of dedicated gear space. I managed to pack bike tools, some trail snacks, and a small first aid kit, and still had room for extras. The stretch overflow pocket on the outside is perfect for items you need quick access to – I stuffed my jacket in there. You can just grab the jacket on the descents or when the weather gets inclement without having to faff with zips and the like.
CamelBak has fitted this vest with their 3D Grid Mesh Harness, which does an admirable job of keeping airflow happening between you and the pack. But don’t get it confused – you’ll still be wearing something on your torso, so things will heat up. However, the airflow is pretty good when compared with other packs. The lightweight 420D recycled nylon construction helps here – it’s tough enough to handle branches and rocks but doesn’t add unnecessary bulk or weight.
The fit is secured with dual adjustable sternum straps. Being able to fine-tune the upper and lower chest fit means you can get it properly snug without feeling like you’re in a straitjacket. It did take some adjusting throughout the ride to get the sweet spot. The vest stays put remarkably well, even when you’re getting rowdy on technical descents or grinding up steep climbs. There’s minimal bounce or side-to-side movement, which is crucial when you’re trying to move around the bike.
I did find the fit good overall, though it could have been a bit better around the shoulders for me. However, this could be due to the winter months spent in the gym. Getting the right fit is crucial with a vest-style pack, more so than a traditional backpack, so definitely try before you buy if possible.
The two-litre Crux bladder is the same quality you’ll find across CamelBak’s range. The bite valve remains easy to drink from, positive shut-off when you’re done, and the magnetic tube trap keeps the hose secure against the shoulder strap when you’re not using it. It stays put on rough descents and didn’t bother me at all. The vest also features reflective elements for visibility, which is handy if your all-day ride stretches into dusk. There’s even provision for adding impact protection if you want back protection on gnarlier rides.
The capacity sits in an interesting, sweet spot. It’s not trying to be an overnighter like the H.A.W.G – this is for big single-day missions or rides where you need more than minimal kit but don’t want to feel like a pack mule.
I found myself reaching for this pack on more occasions with the warmer months, longer rides and changeable weather. I have been riding hip packs but lately, I’ve swayed back to the vest option due to its fit-and-forget nature and it sitting higher on the back. And, at 400 grams, it’s quite light for the capacity and build quality. When you cinch everything down for a shorter ride with minimal gear, it compresses nicely and doesn’t feel like you’re hauling around a half-empty sack. Equally, when you load it up properly, the harness system distributes the weight well enough that it doesn’t feel like it’s all pulling backwards off your shoulders.
The vest format really shines in situations where you’re frequently on and off the bike – technical trails with hike-a-bike sections, or rides where you’re stopping regularly to snack, session features or take photos. There’s no wrestling with shoulder straps or waist belts. And when riding, the vest just stays put and moves with you naturally.
The Chase Adventure 8 Vest is a well-executed piece of kit and it does what it says on the tin. It’s probably not for all riders, but it’s handy for those longer, more committing days in the mountains where preparation matters and quick access to your gear is invaluable.
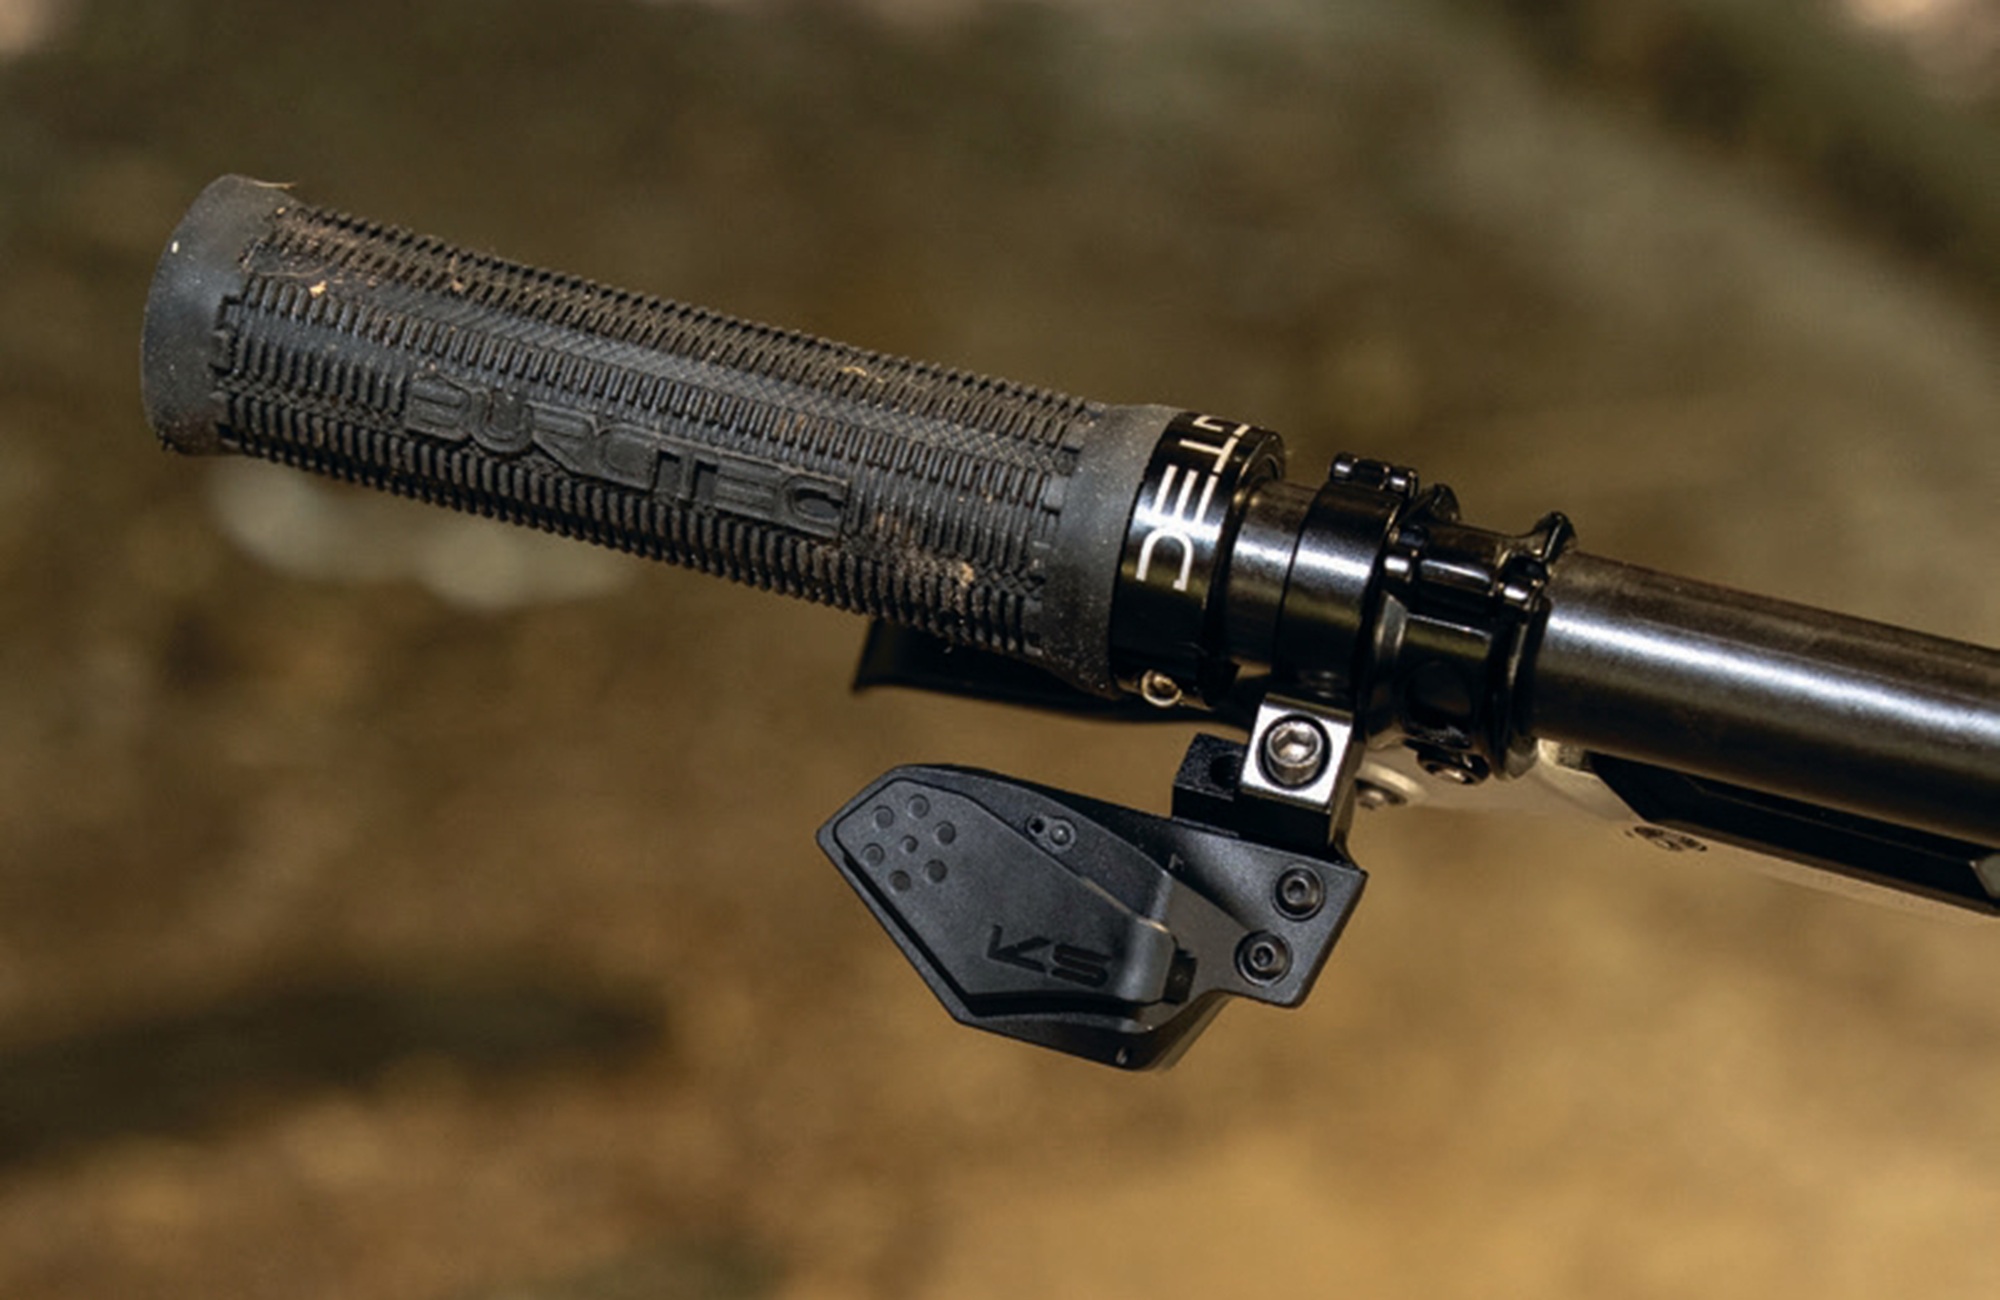
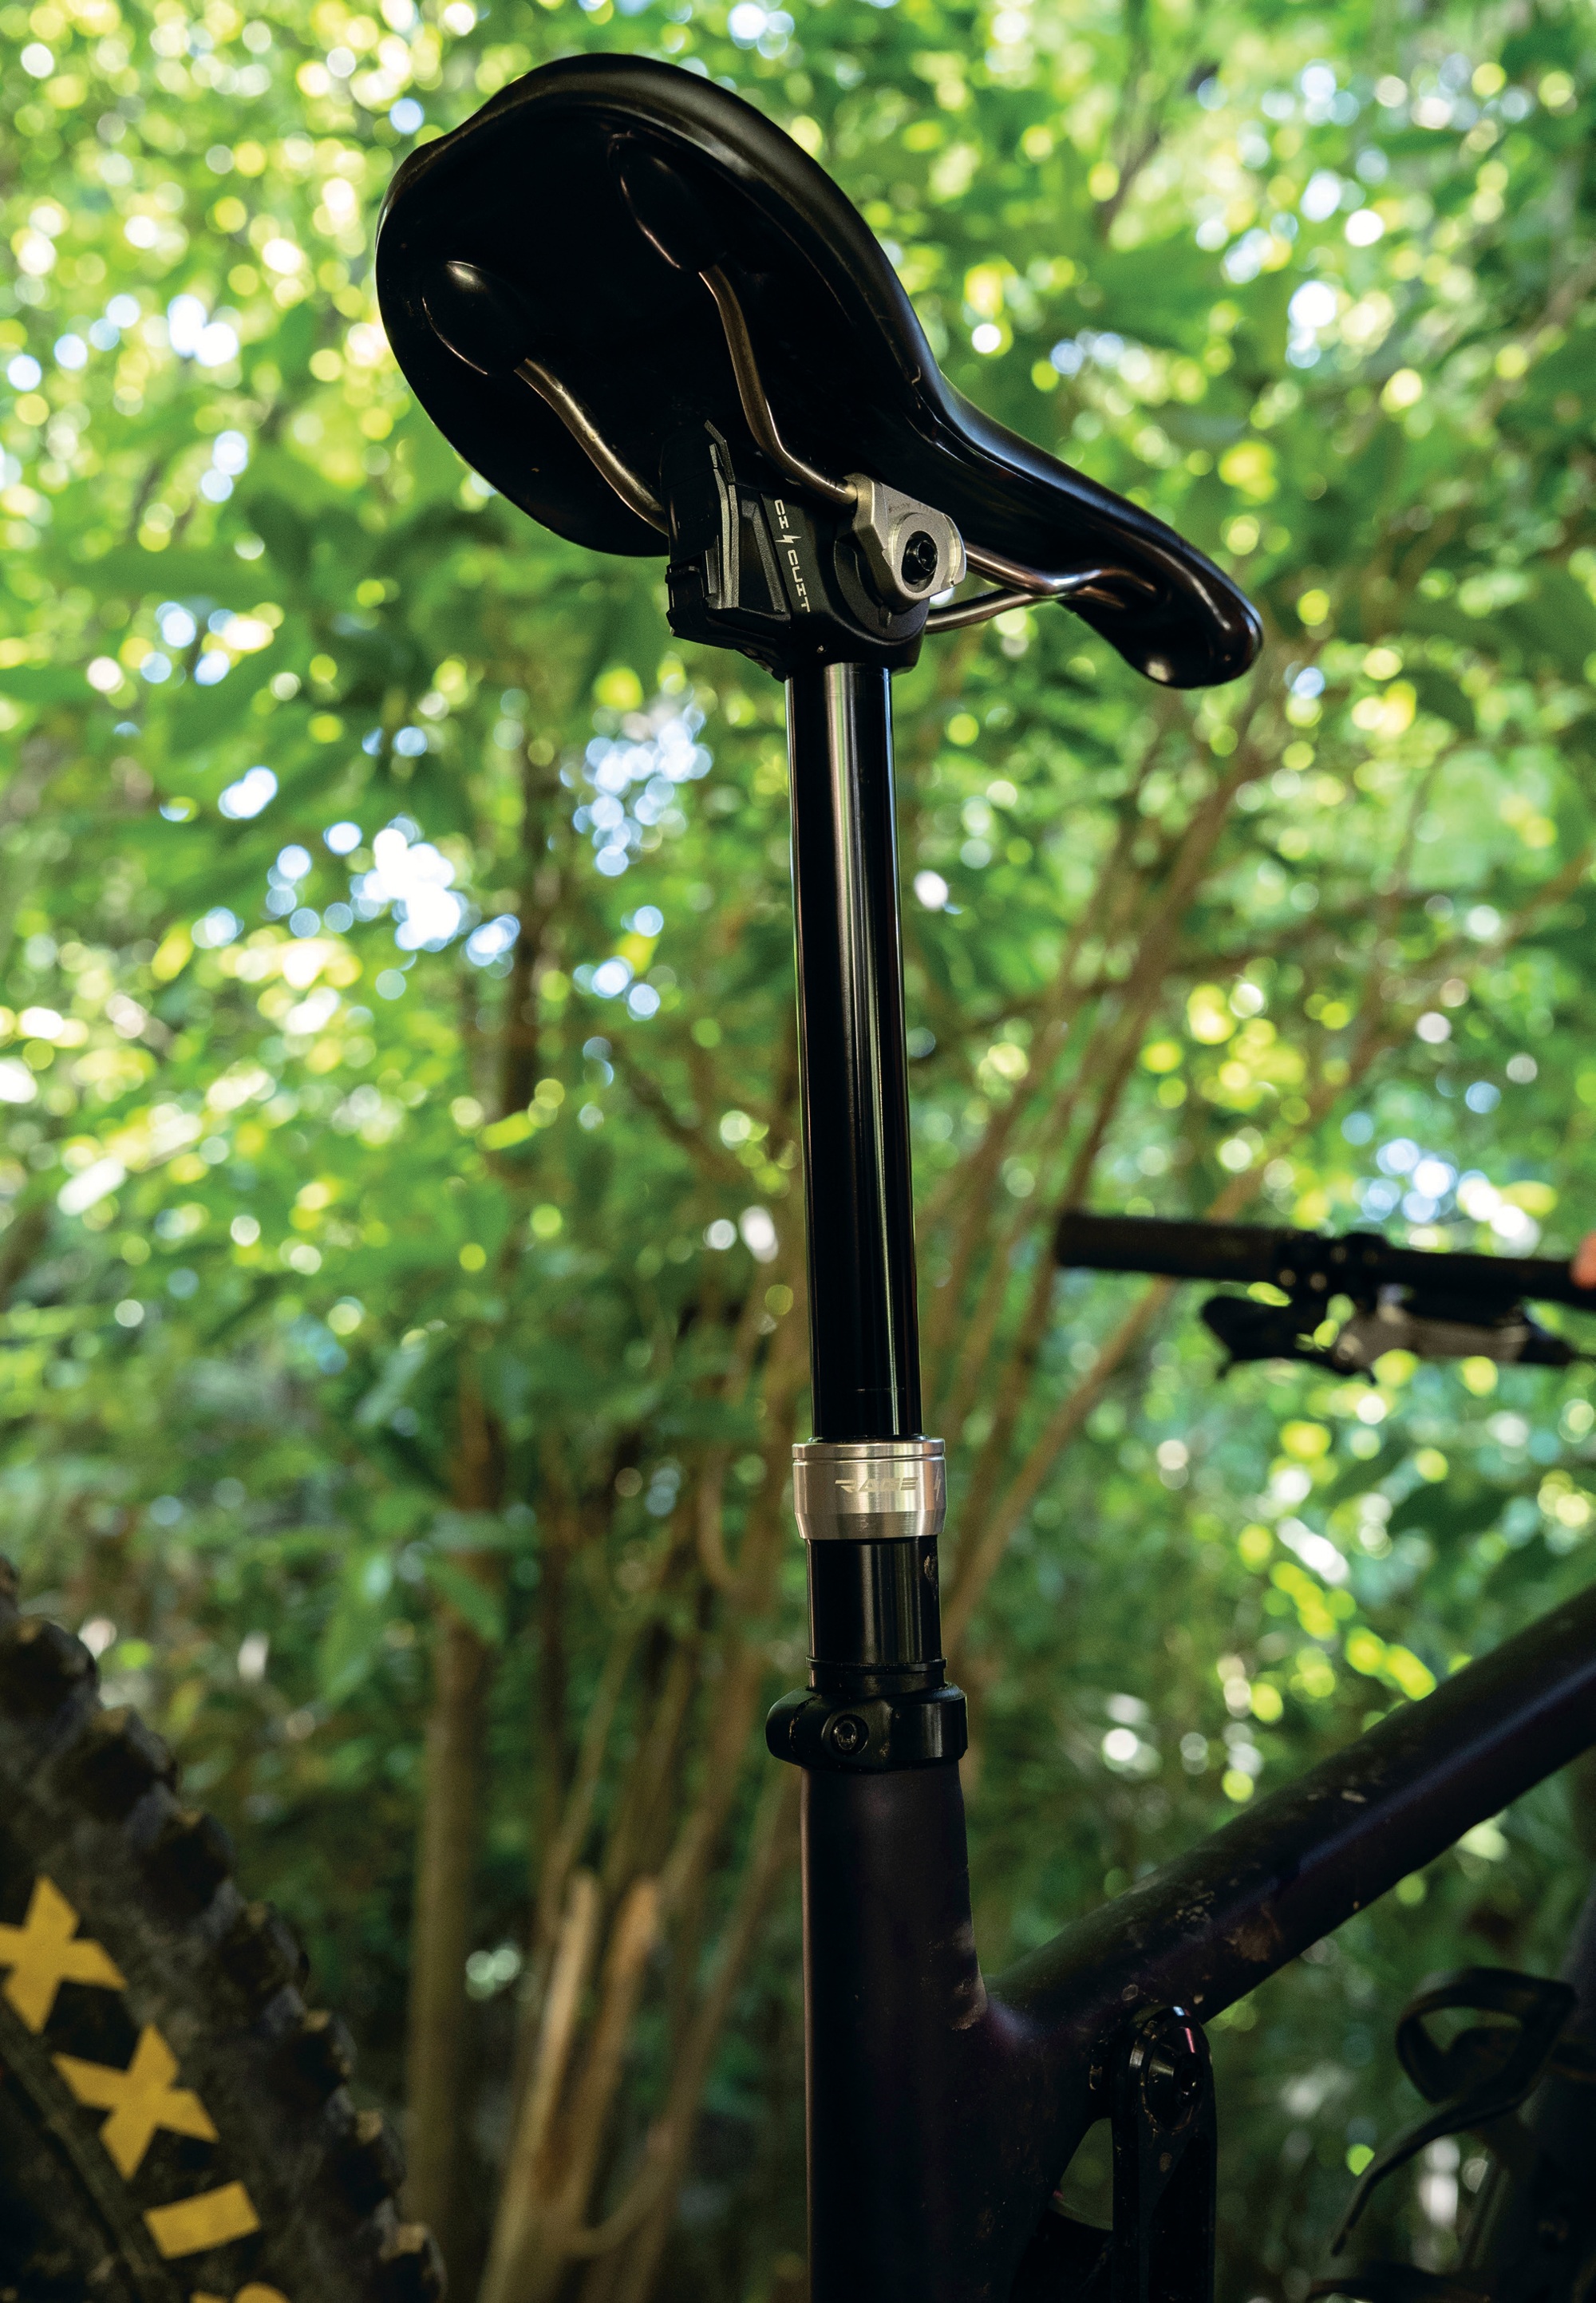
KS LEV Circuit Wireless Dropper Post
Words Liam Friary
Images Ralph Cabansag
RRP $799
Distributor Everoutdoor
Wireless droppers are in vogue lately. KS has thrown its hat firmly into the ring with the LEV Circuit. Let’s start with what makes this thing tick. The LEV Circuit is KS’s answer to the wireless dropper question, building on the proven internals from their well- regarded LEV series, but cutting the cord entirely.
No cables, no housing, no internal routing headaches. Just a Bluetooth connection between the remote and the post. Simple as.
Installation is a breath of fresh air. Drop the post in, clamp it down, pair the remote via Bluetooth, and you’re sorted. It literally took less than five minutes. It was a real pleasure when compared to wrestling internal cables through modern frames. The whole setup took me maybe twenty minutes, and most of that was just getting the saddle height dialled in. The remote runs on a standard CR2032 battery, while the post itself has a rechargeable battery that slots in neatly. Everything you need comes in the box: remote, battery, charger. Job done.
The post itself is available in 31.6 and 30.9mm versions of the Circuit, with travel set at 125, 150, 175, maxing out at a very respectable 200mm. KS has clearly thought about modern geometry here, with total post lengths that should fit most frames without too much drama. The adjustable air pressure at the base of the post lets you dial in the return speed to your preference, which is a nice touch. Mechanically, it’s nearly identical to the standard LEV, just flipped around. The air valve for adjusting return speed sits at the bottom of the post, while a small motor up top opens the hydraulic valve when you hit the remote.
The rechargeable 450 mAh battery slides in behind the seat clamp, keeping things tidy. KS reckons it’ll run for up to eight weeks on a charge under normal use, and it takes about 4.5 hours to top up with the included charger. The remote uses a CR2032 coin cell that should last around eight months, with an LED that flips from green to red when it’s time for a swap. You can grab one from any petrol station or supermarket if needed. I’ve had that happen on a few occasions, so it’s worth having a spare and double-checking battery life before rolling out.
Now, let’s talk about how this post performs on the trail. The actuation is noticeably smooth and light. There’s something almost effortless about how it drops when you press that remote button while weighted on the saddle. It doesn’t fight you at all. I have been running wireless dropper posts for more than a few years and rate them highly. I did revert back to a cable-actuated dropper with a recent test bike and actually forgot about how much more I use the electronic version when compared to the mechanical. Put simply – you press the button, the post drops. It’s that straightforward, and after a few rides, you stop thinking about it entirely. The remote lever itself is large and easy to reach, with a response time that’s very quick. The amount of force required is fairly light, and the post slides smoothly out of the way without much effort. It’s on par with the RockShox Reverb AXS for how little effort it takes to get the seat out of the way.
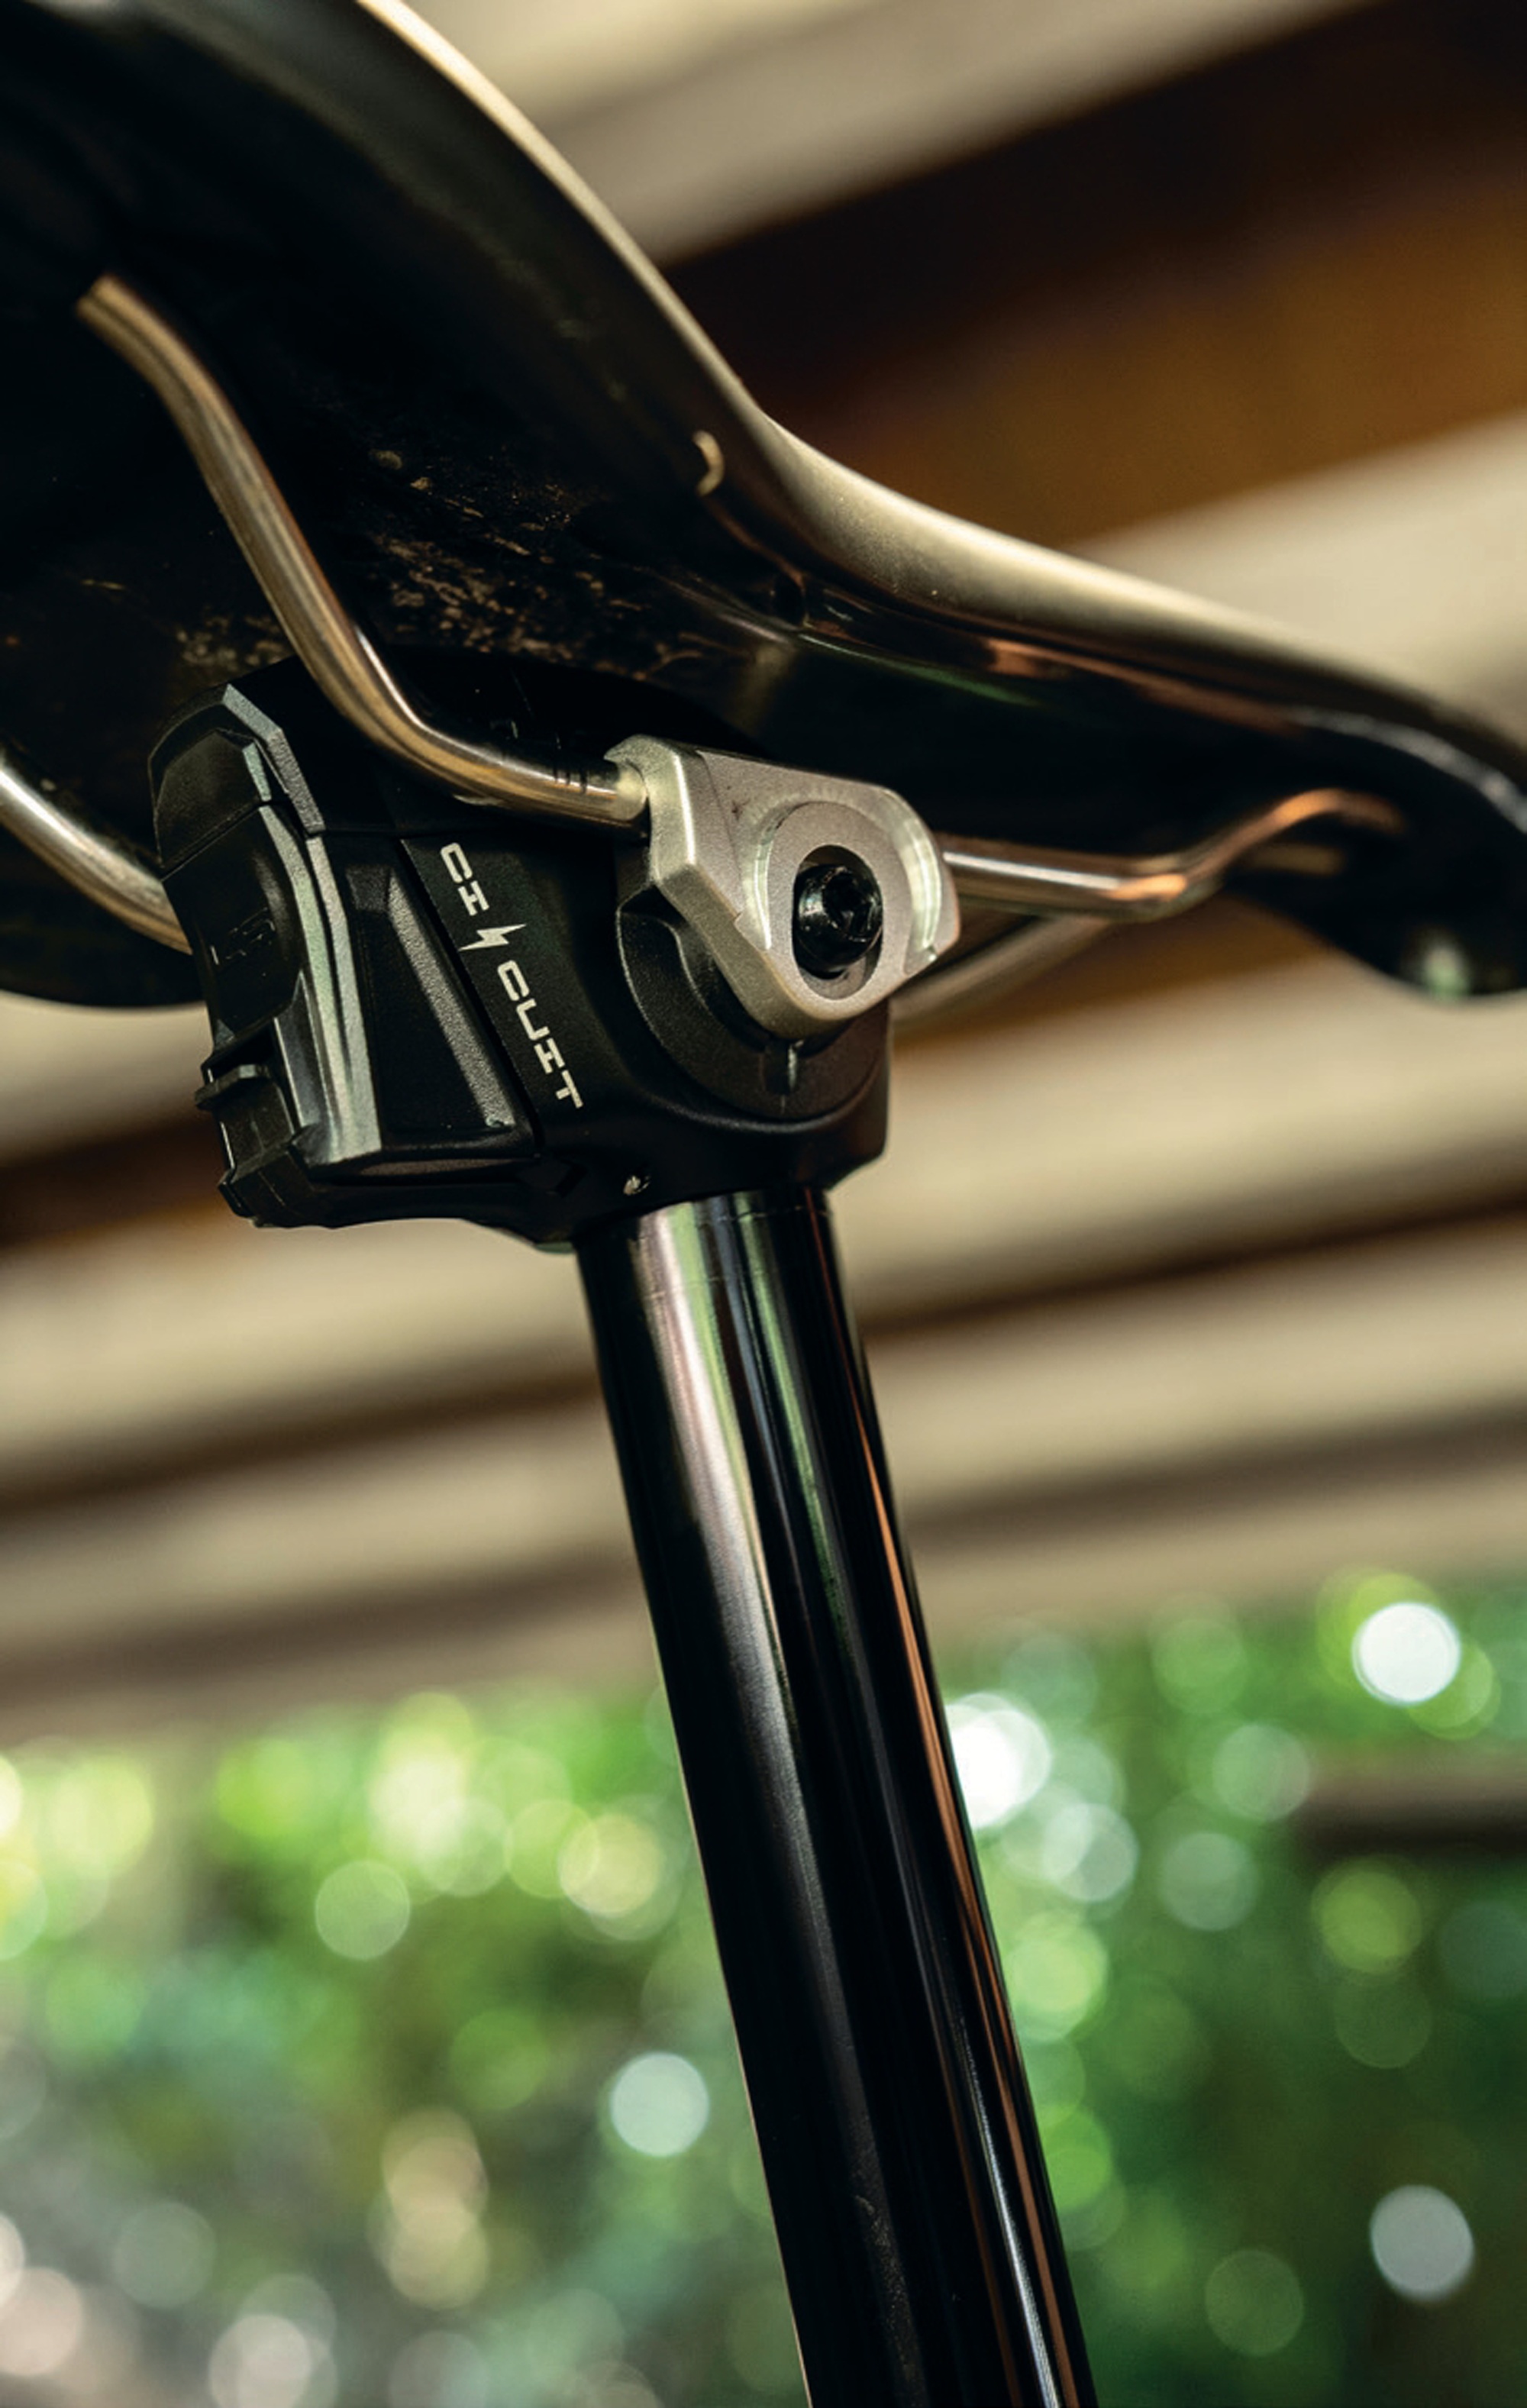
The post is built tough, too. An IP67 rating means it’s dust-tight and properly water- resistant. Precision keyways keep everything stable with virtually no play. This is something I’ve been checking for religiously, and so far, there’s been nothing to report. No slop, no wiggle, just solid performance.
But, there are some downsides. The return speed sits somewhere in the middle of the pack. It’s not sluggish by any means, but it’s not lightning-quick either. You can tune it a bit with air pressure, and I found adding a few extra psi helped. When it’s time to raise the seat for a climb, you hold down the remote and it returns to full extension, but this is where the Reverb AXS has the edge. That post extends much more quickly than the Circuit. I inflated the Circuit to 180 psi, the max recommended, and even then, I’d call the return speed adequate, but not amazing.
On rides with more rolling terrain, where the seat is constantly being adjusted, the difference between the Circuit and the Reverb AXS is noticeable. The Circuit is a little less eager to fully extend. Of course, not everyone wants a super speedy post, and I wouldn’t call the Circuit slow, at all – it’s just not the fastest out there.If you’re coming from a post that rockets back to full extension, you might notice the difference. It gets the job done, just not with any particular flair.
The remote lets the package down a bit. For a post at this price point, the remote feels cheaper than it should. Don’t get me wrong, it’s functional and does what it’s meant to do, but the construction feels a touch flimsy. It’s not that it’s going to fall apart on you, but for the price, you’d expect the remote to feel a bit more premium. The button action is fine, and the ergonomics are decent, but the overall build quality just doesn’t quite match the post itself.
The price of the post is up there but not nearly as expensive as the new RockShox Reverb AXS. Wireless convenience does come at a cost, however. If you’re building up a new bike or already running wireless shifting, the LEV Circuit makes more sense. But if you’re thinking about replacing a perfectly good mechanical dropper, you’ll need to really value that cable-free experience.
One thing worth mentioning is the serviceability. KS has a decent reputation for support, and the post uses their proven hydraulic valve design that sits at the top of the unit. Time will tell how this holds up long term, but the company has a solid track record with their LEV series, so I would back them.
After several months of riding, the LEV Circuit has been rock solid. The Bluetooth connection has been flawless, never dropping signal or acting up. The actuation remains smooth and consistent, and the post hasn’t developed any play or quirks. It just works, which is exactly what you want from a dropper.
KS has delivered an impressive wireless dropper here. The smooth action alone is worth noting, and the battery life means you’re not constantly worrying about charging. Believe me, this can suck and ruin your riding experience. Installation is straightforward, and the performance has been reliable. For riders who value smooth, light actuation and don’t want to deal with cables, this post could be a good option.
If you’re in the market for a wireless dropper and want something that feels effortless to use, the LEV Circuit deserves serious consideration. When you’re out on the trail, pressing that button and getting the saddle to drop away without any resistance, you’ll improve the riding experience.